Home
This page describes how you can set up HiPiler locally, explains the functionality of the interface, and provides a cheat sheet for nifty keyboard shortcuts that make you more productive. I recommend watching the video and then playing around with the examples on the public instance before you set up everything locally.
Demo: https://flekschas.github.io/hipiler/
Video: https://youtu.be/qoLqje5OYKg
In order to run HiPiler on with own data all you need is a running instance of the HiGlass server. The server needs to have imported a Hi-C contact map and a corresponding chromosome size definition file of the Hi-C map's coordinate system.
Having configured HiPiler with your local server, you can drag-and-drop a configuration file into the public instance of HiPiler as the front-end application is running locally on your browser and only communicates with the server specified in your config file. (For more infos on how to configure HiPiler please go to Data > Config File
If you want to compile the frontend application yourself please follow the instructions below:
git clone https://github.com/flekschas/hipiler && cd hipiler
npm run update
npm run build
The first step fetches the source code, the second step loads third-party libraries and the documentation, and the last step compiles HiPiler. The final build is located in /dist. Open index.html to run HiPiler. You need to have a local web server running or start the developmental server with $ npm start and open localhost:9000.
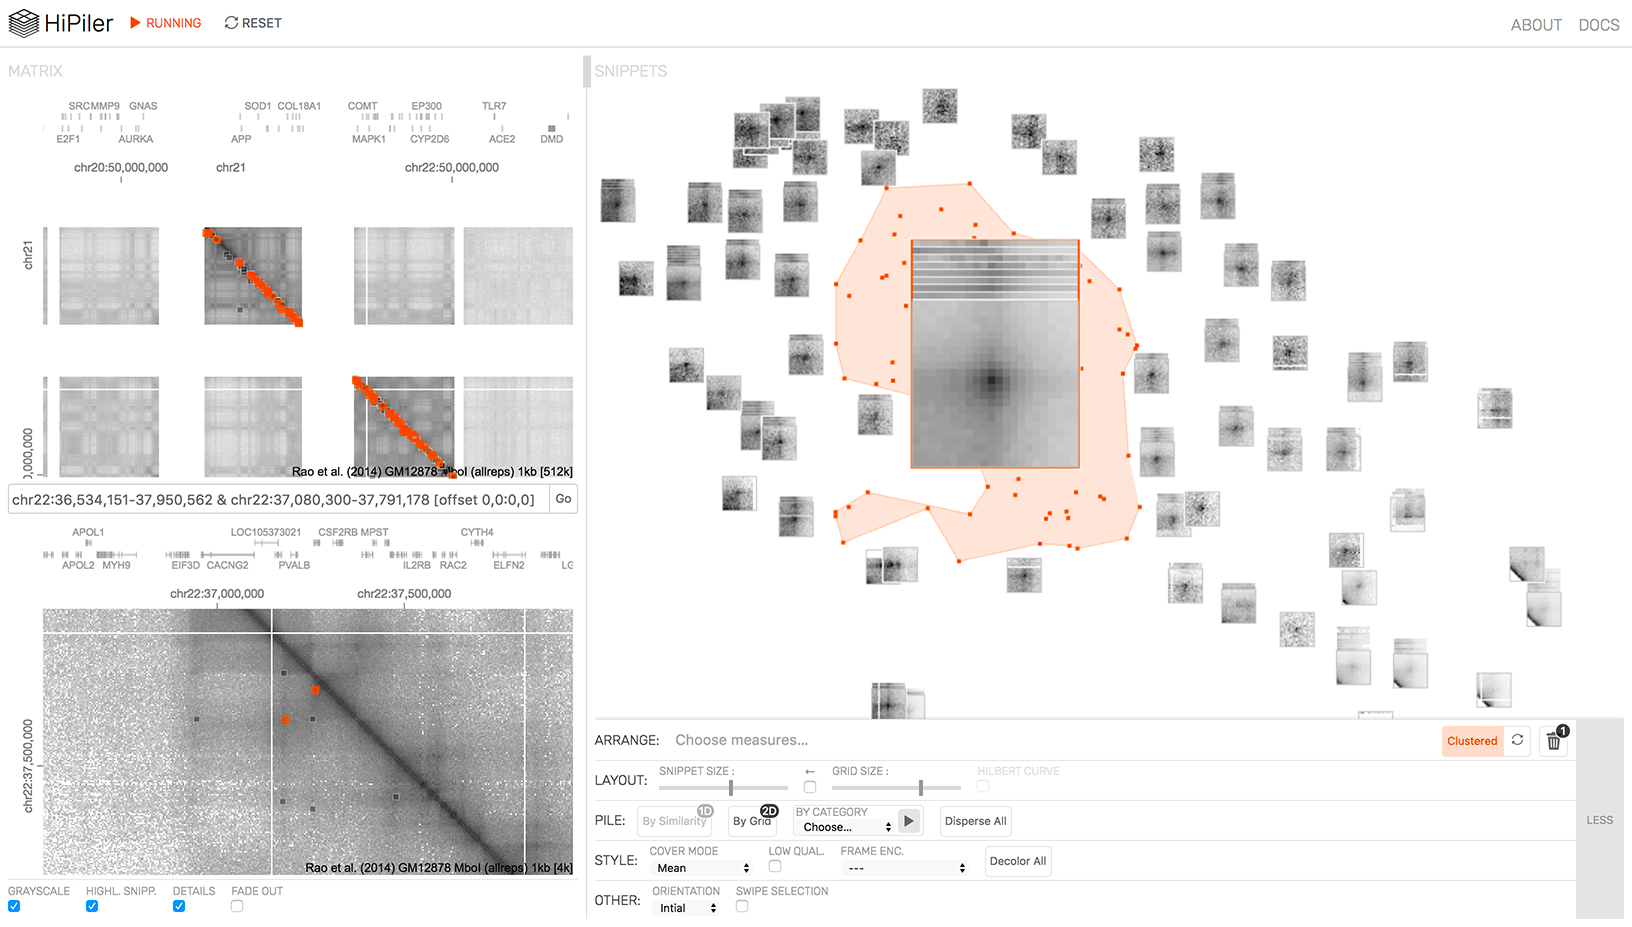
HiPiler's interface consists of two main linked view. On the left side is the matrix view and on the right side is the snippets view. The matrix view uses HiGlass to visualize the contact map. In theory, any view config that is possible in HiGlass is also possible in HiPiler but in practice HiPiler assumes one row (upper) of overview maps, which are fix in terms of their zooming and panning, and a detailed maps (bottom row) that allow interactive exploration of the contact map. (For more infos on how to configure HiGlass in HiPiler please go to Importing Data > Config File The bottom of the matrix view holds a menu for toggling the gray scale color map on and off, hiding the snippets locations, hiding the detail maps, and fading out snippets that are not visible in the detail map.
The snippets view let's you order, arrange, filter, group, and aggregate snippets. The upper panel displays the snippets and the bar at the bottom holds controls for some of the functionality. The following table describes all the implicit interactions that are possible in the snippets view:
| Layout | Action | Effect |
|---|---|---|
| All | Click on snippet. | Select snippet. |
| Click on white space. | Deselect a selected snippet. | |
| Right click on snippet. | Open snippet context menu. | |
| Click and hold on snippet and moving the cursor. | Drag a snippet. If the dragged snippet is released above another snippet the two will be piled up. | |
| Click and hold on white space and moving the cursor. | Selecting multiple snippets or piles. | |
| 1D | Scrolling | Scroll the snippets view up and down. |
| >1D | Hover pile | Display the hull that shows the location of all snippets on the pile. |
| Scroll and pan | When in zoom mode, you can zoom into and pan the snippets view. |
(Note that all interactions that work on a snippet are supported for piles of snippets as well.)
The table below describes the additional functionality that can be triggered with the controls contained in the bar at the bottom:
| Category | Action | Effect |
|---|---|---|
| Arrange | Arrange by measure | Order by one measure in reading direction or arrange snippets in a 2D scatter plot. |
| Cluster | Visually cluster snippets using t-SNE. t-SNE uses the underlying data to arrange the multidimensional vector in the 2D space such that similar vectors visually cluster together. | |
| Trash | Open or close the trash, which holds dismissed snippets. | |
| Layout | Snippet Size | Change the snippet size. |
| Link grid size to snippet size | When activated the grid size is linked to the snippet size. Deactivating this option allows to adjust the grid size individually, which can be useful for _piling by grid_. | |
| Grid Size | Change the grid size. The grid is displayed in orange frames while the mouse is hold down. | |
| Hilbert curve | Changes the directionality of the currently assigned ordering and displays snippets by [Hilbert curves](https://en.wikipedia.org/wiki/Hilbert_curve). | |
| Pile | By similarity | K-means-like clustering of piles by pair-wise similarity of the underlying matrix snippet. _K_ is the number of available grid size. This action essentially provides a quick way to get an overview of the averages of the _k_ most similar piles and avoids the need for scrolling. _(Note that this option is only available for 1D layouts as it's a means of avoiding the need to scroll.)_ |
| By grid | This action automatically piles all snippets that are located in the same grid cell. Hovering the button visualizes the current grid. _(Note that this option is only available for >1D layouts as it's a means of avoiding clutter.)_ | |
| By category | After selecting a categorical attribute all snippets with the same categorical value are piled up automatically. | |
| Disperse all | All piles will be dispersed. | |
| Style | Cover mode | Change the display mode to average (mean of all snippets on a pile) or variance (standard deviation of all snippets on a pile). The variance cover is visualized in an orange color map to differentiate from the average cover. |
| Low quality bins | Visualize bins (i.e., pixel of the matrix) that have been filtered out by [Cooler](https://github.com/mirnylab/cooler) with a light blue. Normally filtered out bins are displayed in white and not distinguishable from bins without a signal. | |
| Log transform | Log transforms the normalized bin values. | |
| Frame encoding | Choose a numerical attribute to be visualized via the frame of snippets. Thicker and darker frames indicate higher values. | |
| Decolor all | Remove the color tags from all snippets. | |
| Other | Orientation | Globally set the orientation of the snippets. For example, 5' -> 3', 3' -> 5', or the initial orientation given the snippet location. |
| Swipe selection | When activated the swipe selection is used instead of the traditional rectangular lasso selection. |
| Short cut | View | Action |
|---|---|---|
| ESC | Global | Exit / reject dialog, error notification, leave pile inspection and trash |
| ENTER | Global | Accept / resolve dialog |
| CMD + Z | Global | Undo |
| CMD + Y | Global | Redo |
| CMD + S | /explore |
Save snippets / piles configuration as JSON |
| C | /explore |
Toggle between the average and variance cover display. |
| L | /explore |
Toggle log transform of snippets. |
| S | /explore |
Toggle between the rectangular lasso and the swipe selection. |
| X | /explore |
Toggle between the collapsed and expanded snippet menu. |
| Z | /explore |
Enable snippet view navigation (i.e., pan and zoom). |