In this project, I demonstrate developing a custom Alexa skill to fly and control a DJI Tello drone.
This project explores the key IoT platform aspects like device registry, device shadows (aka device twins) provided by AWS IoT service to enable communication between Raspberry Pi Zero, DJI Tello drone and a custom Amazon Alexa skill giving the ability to control the drone via voice commands.
In case you missed my first project on controlling DJI Tello drone with Xbox Controller, here is the link to it.
Here is a short video where I am flying the drone using Alexa voice commands:
If you are new to AWS and Raspberry Pi, you may feel a lot is going around to make this work but I promise it's easy once you follow through the steps.
This project will also enable you to implement other ideas on similar lines or different since the blocks/services/concepts used here are very much needed for developing any IoT application.
Following is the tech stack used for developing this project:
- AWS IoT
- Device Registry
- Device Shadows
- AWS Lambda
- Amazon Alexa Custom Skill
- Python
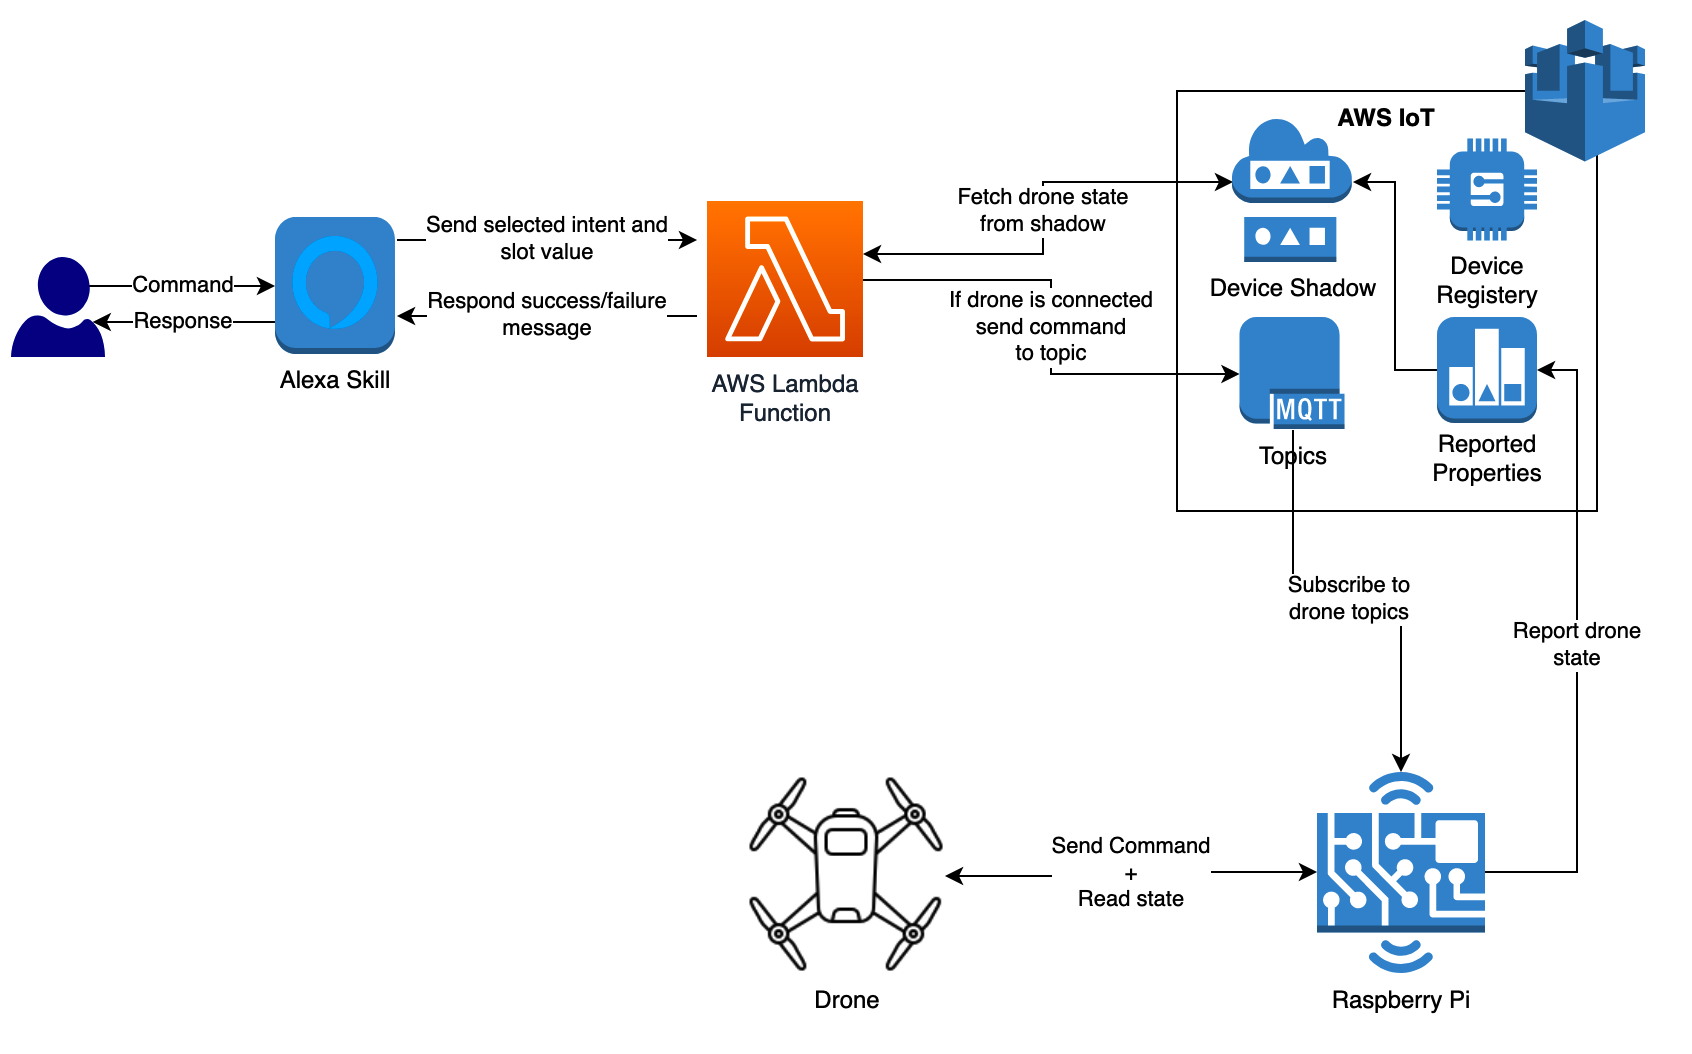
At high level, following are the sequence of events which take place during this interaction:
- User invokes the Alexa skill (in our case
drone pilot) and issues a voice command - Alexa skill validates this command with the available set of intents associated to the skill
- Alexa then sends the identified intent to the configured AWS Lambda function endpoint
- The lambda function receives incoming command,
- Queries the device shadow service to check if the drone is online
- Creates the command message and sends it to the AWS IoT device via MQTT channel
- Responds to the Alexa command with a success/failure message
- A Raspberry Pi zero (connected to the DJI Tello via WIFI)
- Subscribes to the AWS IoT MQTT channel for new messages.
- On regular intervals, keeps on reporting the drone telemetry like speed, battery status, wifi strength to the AWS IoT device shadow
- Upon receiving a message, the the Raspberry Pi interprets the MQTT message and issues a corresponding DJI Tello specific command
- Raspberry Pi Zero W or any Raspberry Pi with WIFI on-board
- DJI Tello. Ensure your Tello is setup and you are able to fly with your phone app.
- WiFi Dongle
- If you are using Raspberry Pi Zero W: Micro USB to USB Type A female adapter something like this
- AWS Account. You can create one for free here
- Amazon Alexa Developer account. You can create one for free here
- Amazon Alexa Device or Alexa App (get it from app store or google play) installed on your phone.
Note: Ensure you sign in into the Alexa app from the same email address you used for creating Amazon Alexa Developer account. If you are using Alexa device, then the device should be configured with the same email address.
You can follow the steps mentioned in the hardware section of my previous project to also prepare for the upcoming projects.
Alternatively, to keep it very simple here just connect the Micro USB to USB Type A female adapter + Wifi dongle to the Raspberry Pi (Zero).
- Let's start by download this Repository on your development machine
git clone https://github.com/erviveksoni/alexa-controlled-drone cdinto thealexa-controlled-dronedirectory- Create a new folder
certs
Let's start by setting up a device in AWS IoT to enable us communication with Raspberry Pi.
- Sign in into the AWS Console
- In the find service section, search for the service
IoT Core - On the left hand navigation, click to expand
Secureand then selectPolicies - Click
Createin the top right corner of the screen - In the create policy screen, click
Advanced mode - Provide a policy name e.g. AlexaPolicy
- In the below JSON. replace the
<REGION>with your AWS account region,<ACCOUNT_NUMBER>with your AWS Account Id and<THING_NAME>with the name of the AWS thing you will create e.g.Tello
{
  "Version": "2012-10-17",
  "Statement": [
    {
      "Effect": "Allow",
      "Action": [
        "iot:Publish"
      ],
      "Resource": [
        "arn:aws:iot:<REGION>:<ACCOUNT_NUMBER>:topic/$aws/things/<THING_NAME>/shadow/update",
        "arn:aws:iot:<REGION>:<ACCOUNT_NUMBER>:topic/$aws/things/<THING_NAME>/shadow/get",
        "arn:aws:iot:<REGION>:<ACCOUNT_NUMBER>:topic/drone/takeoff",
        "arn:aws:iot:<REGION>:<ACCOUNT_NUMBER>:topic/drone/land",
        "arn:aws:iot:<REGION>:<ACCOUNT_NUMBER>:topic/drone/direction",
        "arn:aws:iot:<REGION>:<ACCOUNT_NUMBER>:topic/drone/rotate",
        "arn:aws:iot:<REGION>:<ACCOUNT_NUMBER>:topic/drone/flip"
      ]
    },
    {
      "Effect": "Allow",
      "Action": [
        "iot:Receive"
      ],
      "Resource": [
        "arn:aws:iot:<REGION>:<ACCOUNT_NUMBER>:topic/$aws/things/<THING_NAME>/shadow/get/accepted",
        "arn:aws:iot:<REGION>:<ACCOUNT_NUMBER>:topic/$aws/things/<THING_NAME>/shadow/get/rejected",
        "arn:aws:iot:<REGION>:<ACCOUNT_NUMBER>:topic/$aws/things/<THING_NAME>/shadow/update/accepted",
        "arn:aws:iot:<REGION>:<ACCOUNT_NUMBER>:topic/$aws/things/<THING_NAME>/shadow/update/rejected",
        "arn:aws:iot:<REGION>:<ACCOUNT_NUMBER>:topic/drone/takeoff",
        "arn:aws:iot:<REGION>:<ACCOUNT_NUMBER>:topic/drone/land",
        "arn:aws:iot:<REGION>:<ACCOUNT_NUMBER>:topic/drone/direction",
        "arn:aws:iot:<REGION>:<ACCOUNT_NUMBER>:topic/drone/rotate",
        "arn:aws:iot:<REGION>:<ACCOUNT_NUMBER>:topic/drone/flip"
      ]
    },
    {
      "Effect": "Allow",
      "Action": [
        "iot:Subscribe"
      ],
      "Resource": [
        "arn:aws:iot:<REGION>:<ACCOUNT_NUMBER>:topicfilter/$aws/things/<THING_NAME>/shadow/get/accepted",
        "arn:aws:iot:<REGION>:<ACCOUNT_NUMBER>:topicfilter/$aws/things/<THING_NAME>/shadow/get/rejected",
        "arn:aws:iot:<REGION>:<ACCOUNT_NUMBER>:topicfilter/$aws/things/<THING_NAME>/shadow/update/accepted",
        "arn:aws:iot:<REGION>:<ACCOUNT_NUMBER>:topicfilter/$aws/things/<THING_NAME>/shadow/update/rejected",
        "arn:aws:iot:<REGION>:<ACCOUNT_NUMBER>:topicfilter/drone/takeoff",
        "arn:aws:iot:<REGION>:<ACCOUNT_NUMBER>:topicfilter/drone/land",
        "arn:aws:iot:<REGION>:<ACCOUNT_NUMBER>:topicfilter/drone/direction",
        "arn:aws:iot:<REGION>:<ACCOUNT_NUMBER>:topicfilter/drone/rotate",
        "arn:aws:iot:<REGION>:<ACCOUNT_NUMBER>:topicfilter/drone/flip"
      ]
    },
    {
      "Effect": "Allow",
      "Action": [
        "iot:Connect"
      ],
      "Resource": "*"
    }
  ]
}- Paste the policy text into the text box and click
Create
- On the left hand navigation, click to expand
Manageand then selectThing - Click
Createin the top right corner of the screen - Click
Create a single thingbutton in the next screen - Provide a name for the things e.g.
Tello. This should be the same name as used during policy creation - Click
Next - Click
Create certificatein front of One-click certificate creation (recommended) - Download all the 3 certificate files for your thing (public, private and certificate) and save them into
certsfolder - Click
Activebutton to activate the root CA for AWS IoT - Download the root CA certificate for AWS IoT from here and save it into
certsfolder - Click
Attach a policybutton and select the policyAlexaPolicyyou created in the above section - Click
Register thingto finish Thing creation - Once the Thing is created, open the thing details and click
Interactin the left hand navigation - Make a note of the value of
REST API Endpointunder the HTTPS section for later use. e.g.xxxxxxxxxxxxxx-ats.iot.us-east-2.amazonaws.comWe will use this endpoint to interact with the Thing later in the process.
At this point, we have all the stuff ready to communicate with the Thing.
Next step is to create an AWS Lambda function which will be invoked by the Alexa skill. The message passed by the Alexa invocation to the Lambda function will be validated against a list of allowed actions and further sent to the Thing we created in the above step.
Every message passed to the Lambda function represents a type of action the user wants to execute. Further every action has a designated MQTT topic defined in the policy attached to the Thing.
- In the AWS developer console, search for
lambda - Click
Lambdain the results to navigate to the Lambda console - Click
Create functionin the top right corner of the screen - Put the function name as
Alexafunction - Runs time as
Python 3.7 - Click
Create function - In the
Designersection, clickAdd trigger - In the Trigger configuration page, select
Alexa Skill Kit - Select
disableoption for the Skill ID verification - Click
Addto complete adding an alexa trigger - On the Designer section, click the lamda function icon
- Go to
Basic settingssection of the page - On a safer side, set memory as
256 MBand Timeout as10 seconds - Click
Savebutton on the top right corner to save changes - Make a note of the lambda function
ARNfrom the top right corner of the screen
- Copy the
certsfolder in the root of thealexa-controlled-dronedirectory to thelambda_functionsubdirectory cdinto thelambda_functionsub directory- Open
lambda_function.pyfile in your preferred text editor - Update the config section at the top of this file with the cert names and Rest API Endpoint details you noted earlier
Also, replace the
<THING_NAME>with the Thing you created in above section
config = {
         'host': '<REST API Endpoint>',
         'rootCAName': '<Root certificate file name>',
         'certificateName': '<Certificate file name>',
         'privateKeyName' : '<Private key file name>',
         'clientId': 'drone_alexa',
         'port' : 8883
}

thing_name = "<THING_NAME>"-
Save changes and close the file
-
Open command line and type
pip3 install AWSIoTPythonSDK -t .to download AWSIoTPythonSDK inside thelambda_functiondirectory -
Create a zip package with only the contents of the
lambda_functiondirectoryzip -9r lambda.zip AWSIoTPythonSDK* certs/* iot_client.py lambda_function.py alexa_response_builder.py -
At this point you should have a zip file
lambda.zipready to be uploaded to AWS Lambda function
- Back on the Lambda function console, from the Designer section, click the lamda function icon
- Expand the
Code entry typedropdown and selectUpload a .zip file - Click
Uploadbutton and browse and select thelambda.zipfile - Click
Savebutton on the top right corner to save changes
You should now be able to see your code in the online code editor interface of AWS Lambda.
Now we are all set to create an Alexa skill which will interact with user to receive commands and fly the drone.
- Sign into Alexa Skills Kit Developer Console with your credential created in prerequisite section
- Click
Create Skillbutton - Give your skill a name e.g.
Tello Voice Control - Select a default language. Your skill will only appear if the user has this language selected
- Select the model as
Customand hosting method asProvision your own - Click
Create skillbutton on top right of the screen - Select the skill template as
Start from scratchand then clickChoose - Click
Invocationfrom the left hand navigation - Specify a Skill Invocation Name e.g.
drone pilot - Click
Save Modelbutton at the top of the page - Click
JSON Editoron the left hand navigation - Copy and paste the contents of the
skill.jsonfile you downloaded as part of this repository into the editor surface - Click
Save Modelbutton at the top of the page - Feel free to go through the list of intents from the left hand navigation. Every intent represents a command the user can invoke
- Click
Endpointfrom the left hand navigation - Select
AWS Lambda ARN - In the Default Region textbox paste the
ARNof the Lambda function you noted in the previous section - Click
Save Endpointsbutton at the top of the page - Click
Invocationfrom the left hand navigation - Click
Build Modelbutton at the top of the page and wait for the skill build process to complete
Now is the time to put your skill to test!!!
There are multiple ways to test your skill. The easiest one is by using the Alexa simulator provided in the Alexa Skills Developer Console
- On the top navigation bar, click
Test - Select
Skill testing is enabled in:asDevelopment - Press the microphone button an speak
Alexa, open drone pilot - You should receive a voice feedback as
To start, you should say: Alexa, ask drone pilot to take off. - You can try other commands e.g.
Alexa, ask drone pilot to take offand alexa should respond back with the command acknowledgement
- Sign in to https://alexa.amazon.com/ with your Alexa developer account credentials
- Navigate to
Skillssection in the left hand navigation - Click
Your Skillson top left of the screen - Click
Dev Skillson top navigation - Click your skill name e.g.
Tello Voice Control - Click
ENABLEbutton
This will enable your skill on all devices, iOS and Android apps connected to your Alexa developer account.
Congratulations!! You have successfully created an alexa skill to fly your drone!!
Now the last step is to setup Raspberry Pi and make it to talk to AWS IoT thing to receive commands.
We will setup Raspberry Pi in headless mode to get the optimal usage of RAM and CPU. There are many good posts on how to setup Raspbian Buster Lite on the Raspberry Pi Zero in Headless Mode
At this point in time, we should be able to SSH into out Pi using the Wifi onboard. Also the Pi will be most likely have access to the internet (dependeing on your WIFI network settings).
When you turn on Tello, it configures itself as an AP allowing the clients to connect and control to it. Once a client is connected to Tello, it looses internet connectivity. To avoid this we'll configure the Raspberry Pi with dual WIFI interfaces.
The Raspberry Pi onboard WIFI connects to the internet (via my home network) and the WIFI Adapter connects to Tello's WIFI.
Here are the steps:
- Ensure the WIFI dongle is connected to the Raspberry Pi Zero micro usb port
- Power on Raspberry Pi
- SSH into Raspberry Pi Zero
- Type
lsusb. Ensure you see the WIFI USB adapter listed on the console output - Type
sudo nano /etc/network/interfacesto edit the network interfaces file - Add the text below towards the end of the file.
Replace the
TELLO_NETWORK_NAMEwith the WIFI AP name of Tello followed by its password.
auto lo

iface lo inet loopback
iface eth0 inet dhcp

allow-hotplug wlan0
iface wlan0 inet manual
wpa-roam /etc/wpa_supplicant/wpa_supplicant.conf

allow-hotplug wlan1
iface wlan1 inet dhcp
wpa-ssid "<TELLO_NETWORK_NAME>"
wpa-psk "<PASSWORD>"

iface default inet dhcp- Save your changes to the interfaces file
- Shutdown Raspberry Pi
sudo shutdown now - Turn on Tello
- Power on Raspberry Pi and SSH into it
- Type
ifconfigto list the Raspberry Pi network interfaces - You should see 2 interfaces
wlan0andwlan1connected to their network respectively - In case you don't see an IP address acquired for
wlan1, then reset thewlan1interface using the commandsudo dhclient -v wlan1
SSH into Raspberry Pi and follow the steps below.
sudo apt-get install python3-devsudo apt install python3-pip
pip3 install AWSIoTPythonSDKpip3 install cpython
git clone https://github.com/hanyazou/TelloPycd TelloPypython3 setup.py bdist_wheelpip3 install dist/tellopy-*.dev*.whl --upgrade
- Clone this Repository on Raspberry Pi
git clone https://github.com/erviveksoni/alexa-controlled-drone cdinto thealexa-controlled-drone/pi-alexa-codedirectory- Copy the certs folder which has all the certificates from your development machine into
pi-alexa-code - Open
start.pyfile in your preferred text editor - Update the config section at the top of this file with the cert names and Rest API Endpoint details you noted earlier
Also, replace the
<THING_NAME>with the Thing you created in above section
config = {
         'host': '<REST API Endpoint>',
         'rootCAName': '<Root certificate file name>',
         'certificateName': '<Certificate file name>',
         'privateKeyName' : '<Private key file name>',
         'clientId': 'drone_alexa_client',
         'port' : 8883
}

thing_name = "<THING_NAME>"- Save changes and close the file
Now its time to run the application!
- SSH into Raspberry Pi
- Ensure that the drone is powered on and your Raspberry Pi is connected to it's WIFI network using the secondary WLAN interface. Check the Connecting Raspberry Pi to Tello section to verify and troubleshoot.
cdinto thealexa-controlled-drone/pi-alexa-codedirectory- Type
python3 start.py - You should see the drone telemetry getting displayed on the console
- Now open your Alexa app or Alexa device with your skill enabled on it
- Say a command from the list below..
Alexa, open drone pilot.
Alexa, ask drone pilot connection status.
Alexa, ask drone pilot status of battery. Other possible values (wifi/battery/camera)
Alexa, ask drone pilot to take off.
Alexa, ask drone pilot to go left. Other possible values (up/down/back/forward/left/right)
Alexa, ask drone pilot to rotate left. Other possible values (left/right)
Alexa, ask drone pilot to flip.
Alexa, ask drone pilot to land.