Note, the upstream of pyeit goes here: eitcom/pyeit.
pyEIT is a python-based, open-source framework for Electrical Impedance Tomography (EIT). The design priciples of pyEIT are modularity, minimalism, extensibility and OOP.
pyEIT is purely python based, it can be installed and run without any difficulty.
pyEIT is now availbale on pypi and conda-forge. It is purely python, which can be installed via
$ pip install pyeitor
$ conda install -c conda-forge pyeitYou can track the git version of pyEIT, and use it locally by setting the PYTHONPATH variable.
export PYTHONPATH=/path/to/pyEITIf you are using spyder, or pyCharm, you can also set PYTHONPATH per project in the IDE, which is more convenient.
Alternatively, but not recommended, you can compile and install from source code,
$ python setup.py build
$ python setup.py installFrom the example folder, pick one demo and run!
Note: the following images may be outdated due to that the parameters of a EIT algorithm may be changed in different versions of pyEIT. And it is there in the code, so just run the demo.
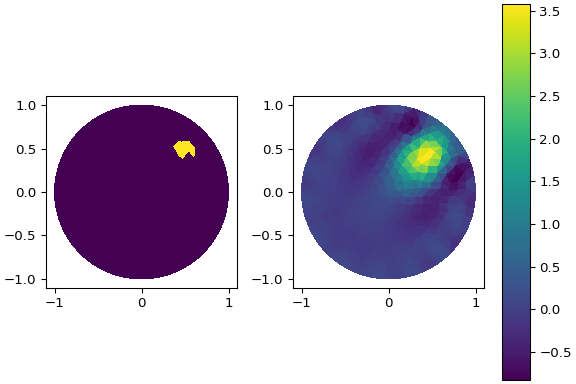
Using examples/eit_dynamic_bp.py
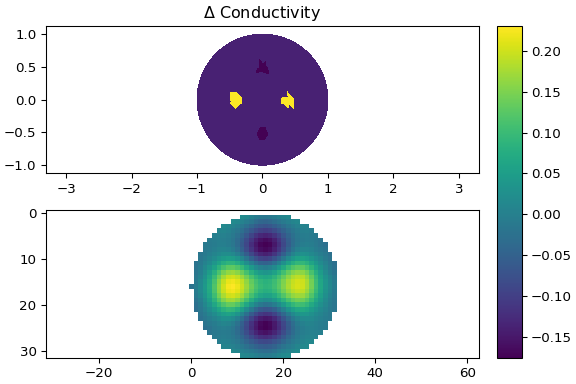
Using examples/eit_dynamic_greit.py
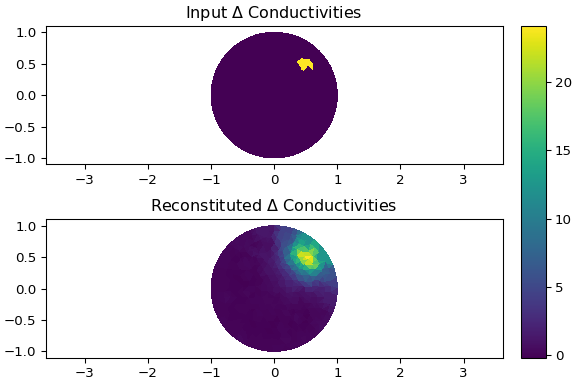
Using examples/eit_dynamic_jac.py
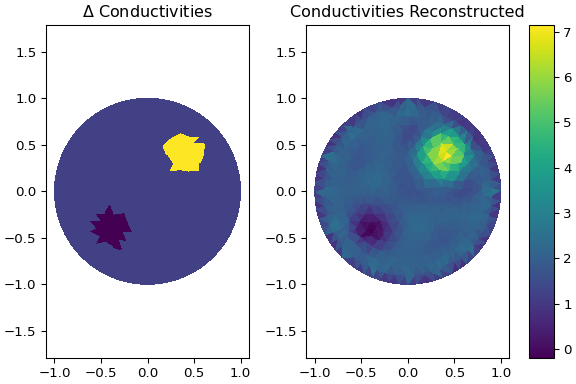
Using examples/eit_static_jac.py
Using examples/demo_forward3d.py
Using examples/demo_dynamic_jac3d.py
Limitations:
- 3D visualization plotted using
vispycan be adjusted using mouse wheels interactively. Seeking a perfect visualization mode, transparency or opaque, is in fact an individual taste. User can also trymayaviandvtkfor the visualization purpose using the unified 3D meshing structure. - Solving the inverse problem of 3D EIT, requires the electrodes to be placed at multiple altitude (z-axis) in order to have a (better) z-resolution. This should be done carefully, as adding extra z-belt introduces more stimulation patterns, which in turn adds to the computational loads.
Give pyEIT a star, fork this project and commit a pull request (PR) !
- 2D forward and inverse computing of EIT
- Reconstruction algorithms : Gauss-Newton solver (JAC), Back-projection (BP), 2D GREIT
- 2D/3D visualization!
- Add support for 3D forward and inverse computing
- 3D mesh generation and visualization
- Generate 2D/3D meshes from CT/MRI (based on iso2mesh https://github.com/fangq/iso2mesh)
- Complete electrode model (CEM) support
- Implementing the dbar algorithm for 2D difference EIT imaging
| Packages | Optional | Note |
|---|---|---|
| numpy | tested with numpy-1.19.1 |
|
| scipy | tested with scipy-1.5.0 |
|
| matplotlib | tested with matplotlib-3.3.2 |
|
| trimesh | for loading external meshes | |
| pandas | Optional | tested with pandas-1.1.3 |
| vispy | Optional | failed with vispy in python 3.8 |
| distmesh | Optional | a build-in module is provided in pyEIT |
| shapely | Optional | for thorax mesh implementation |
Q1, Why you choose vispy for 3D visualization?
pyEIT uses vispy for visualizing 3D meshes (tetrahedron), and this module is not required if you are using 2D EIT only. vispy has minimal system dependencies and it is purely python. All you need is a decent graphical card with OpenGL support. It supports fast rendering, which I think is more superior to vtk or mayavi and it also has decent support for python 3. Please go to the website vispy.org or github repository vispy.github for more details. Installation of vispy is simple by typing python setup.py install. We are also considering mayavi for a future version of pyEIT.
Q2, When to use Shapely?
pyEIT uses Shapely to build the thorax mesh and reconstruct EIT thoracic images. The thorax mesh shape is considered as a polygon and it is built based on real geometric measures given from a thorax figure simulated by EIDORS EIT MATLAB library. The figure in turns is based on a real thorax CT (Computed Tomography) scan.
To visualize thorax simulations, you should install Shapely. To do so, you should simply type pip install Shapely or conda install shapely. You can visit Shapely official documentation website shapely.readthedocs.io for more details or the dependency description at Shapely.pypi.
pyEIT was published at the 17th International Conference on Electrical Impedance Tomography, 2016. It is now officially published at softwareX, vol (7), 2018.
If you find pyEIT useful, please cite our work!
@article{liu2018pyeit,
  title={pyEIT: A python based framework for Electrical Impedance Tomography},
  author={Liu, Benyuan and Yang, Bin and Xu, Canhua and Xia, Junying and Dai, Meng and Ji, Zhenyu and You, Fusheng and Dong, Xiuzhen and Shi, Xuetao and Fu, Feng},
  journal={SoftwareX},
  volume={7},
  pages={304--308},
  year={2018},
  publisher={Elsevier}
}