
Botmaster is a lightweight highly extendable, highly configurable chatbot framework. It was meant to be used both in small scale and large scale projects. Its purpose is to integrate your chatbot into a variety of messaging channels like Facebook, Telegram and Slack.
- Create a Bluemix account
- Sign Up in Bluemix, or use an existing account. Your account must have available space for at least 1 application (256MB) and 1 service.
- Make sure that you have the following prerequisites installed:
- The Node.js runtime (including the npm package manager) when you plan to run your bot locally
- The Cloud Foundry and Bluemix command-line client is very useful.
- In order to connect your bot to Facebook messenger, you must first have a Facebook Developers account and page created. Click here to create your Facebook developers account.
If you wish to simply deploy a Botmaster instance without having to edit any of the pre-existing code, or when you do not wish to connect any additional API or additional functionality, use the steps below.
- In order to setup Botmaster and a webhook for messenger to link to your Watson Conversation instance we first need to deploy a Bluemix application. For this, click the "Deploy to Bluemix" button below.

- Log into Bluemix.
- Give your application a unique name. This will be the URL for the base of your webhook.
- Select the region, organization and space to deploy to.

- Once complete you will be presented with this screen. Now you can click "Edit Code" if you wish to add additional functionality.

- Once successfully deployed, go to your Bluemix application dashboard and view your app.

- Select 'Runtime' followed by "Environment Variables".

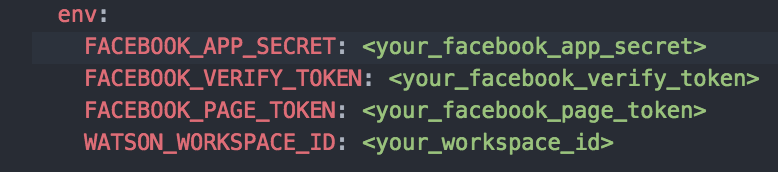
-
Populate these fields with the required information. The
FACEBOOK_VERIFY_TOKENis a token you define yourself, the other two Facebook variables are obtained by following the section Connecting to Facebook below. -
Follow the steps described in the Getting Watson Conversation Credentials section to obtain the
WATSON_WORKSPACE_ID. -
Hit "Save" to restart your application.
-
In order to connect to Facebook messenger, you must first have a Facebook Developers account and page created. If you don't already have these, follow the Steps 1-4 on the Facebook Messenger guide
-
In step 2 of the guide, where you setup your webhook, you don't need to code anything. In the callback URL field, paste in your application URL from Bluemix using your webhook. By default this is set to
/webhook(e.g myapp.bluemix.net/messenger/webhook) or in code line 36. Note the/messengerpart of the URL. This is part of the callback URL and is a way for the Botmaster framework to distinguish between the different messaging platforms. For Telegram and Slack the values/telegramand/slackare used respectively. -
Enter your verify token you created in the "Environment Variables" section and in line 21 of your
manifest.yml. -
Select the following fields
messages,messaging_postbacks. Those fields are "update"s using Botmaster semantics. -
To find your Facebook App Secret, navigate to your application's dashboard and under App Secret click "Show", enter your password if prompted and then there it is. This will be the value for
FACEBOOK_APP_SECRET. -
Finally, the third step in the guide will get you the
FACEBOOK_PAGE_TOKEN.
The best way to begin utilizing Botmaster is to run the app locally. This allows you to customize the code to match your needs. If however you are happy with what is already included, go ahead and skip to Getting Started with Botmaster on Bluemix.
Otherwise, begin by changing to the directory of this repository you have just cloned or downloaded.
- This can be done via command line e.g
cd ~/botmaster-watsonconversation-fb-nlu
To customize your Botmaster framework, such as adding additional actions or API services, find more detailed instructions in the Botmaster Documentation.
In order for Watson Conversation to integrate with Botmaster, the following credentials are required
- Service Credentials
- Conversation Workspace ID
- Find your service within Bluemix and click to view the service details screen. Create a new Watson Conversation service in case you want to run your bot locally. If you wish to run the bot on Bluemix, the service will be created for you as part of the deployment process.

- From this screen click the "Service Credentials" tab

- Copy the username and password information. We will use this later when connecting our conversation to Botmaster.
- Open the conversation instance you have created.
- In the service instance detail click "Launch Tool".

- Once in the Conversation tooling locate your conversation workspace. If you don't have a Conversation workspace yet, this the place where you have to create one.
- Click the menu located top right and select "View Details".

- Copy your workspace ID and make a note of this. We will use this with service credentials to connect our Watson Conversation to Botmaster.
You will notice within the repository files there is a manifest.yml file. This file is where we will enter our credentials to connect your application to IBM Watson Conversation and Facebook Messenger. For this, change the following lines with your information.
Bluemix is where we will host our application, therefore we will make use of the Cloud Foundry command line to help us manage and push the application.
- Open a terminal or command prompt.
- Set the API endpoint of your Bluemix space. The endpoints for the US region and the UK region are listed below.
cf api https://api.ng.bluemix.net- US Southcf api https://api.eu-gb.bluemix.net- UK
- Login to Bluemix using:
cf login- Enter your email address of your Bluemix account.
- Hit enter.
- Enter your password of your Bluemix Account (it will appear your password is not typing)
- Hit enter.
- Select your space following on screen prompt.
- To confirm and check which region, org and space is currently targeted type:
cf target
Once you have successfully logged in and targeted Bluemix you can now push your application to Bluemix.
Once you have finished working on your application you can now push this to Bluemix to be hosted.
-
Open a terminal or command prompt.
-
Login to Bluemix as described in Logging into Bluemix
-
Change directory to your repository using
cd <your_repository>. -
Use the following command to push to Bluemix
cf push.
Note: Before you use cf push ensure you have edited the manifest.yml file. You will need to update lines 13 and 14 using the unique name of your application.
If you wish to export your conversation in the raw .json format to share with others or backup, this can be achieved by following:
-
Log into Bluemix.
-
Locate your conversation service.
-
Within your conversation service locate your workspace.
-
Use the menu in the top right of your workspace and click "Download as JSON".

Botmaster supports Third party API integration to enable the conversation of your bot to be enriched. Within the weather.js middleware file you will see a pre-included Weather API that makes use of IBM Weather Company Data.
This sample code is able to be adapted to call any API function that returns a .json response. This is outputted as a message to the user within the specified channel.
To invoke an API call, your application may require a trigger. To do this, we've set an API trigger within the watson.output.context.action json tag. We have defined this within the Watson Conversation advanced dialog. Whenever the specified node is reached by the user, the action is triggered.
See e.g. the botmaster-watsonconversation-flightbot repository for an example implementation of this.
Botmaster Documentation : Botmaster Documentation
Facebook Messenger Webhook Reference : Facebook Webhooks
Watson Conversation Documentation : Watson Conversation