来源https://www.yuque.com/dubstep/gm3uwo/ghpddr
随着Aria2的大火,Aria2+AriaNg+Rclone+Google Drive模式的离线下载更成为各大博主的主流下载方式,博主把优化过的教程发出来。本教程主要通过AriaNg+Nginx提供Web界面,Aria2下载资源,下载后通过Rclone把资源自动上传到GoogleDrive,以达到离线下载资源的目的。
注:网上的大部分教程有严重的BUG,下载到VPS的文件并不能自动删除,当下载到硬盘满了之后就无法再继续运行,而且会上传.Aria2后缀文件碎片,本教程经过二次修改后脚本采用移动方式上传到网盘。
- 系统支持:CentOS6+ / Debian6+ / Ubuntu14+
- 一台KVM/OpenVZ架构的VPS
- 谷歌网盘(其他网盘也可以,但需要Rclone支持)
推荐使用CentOS 7,本教程也以CentOS 7+谷歌无限团队盘来演示,若使用其他系统,以下某些命令会出现不兼容,请自行修改为对应系统的命令。
以下命令行建议一条一条输入
首先更新系统并安装必要组件,此处为安装Nginx Web服务器
yum -y update
yum -y install epel-release
yum -y install wget git unzip gcc gcc-c++ openssl-devel nginxyum -y install nginx启动nginx并设置开机自启动
systemctl start nginx #启动Nginx
systemctl enable nginx.service #设置开机启动Nginx
关闭防火墙并关闭开机启动
systemctl stop firewalld #关闭防火墙
systemctl disable firewalld.service #静止开机启动下载Aria2脚本并运行脚本。
cd ~ #回到根目录
wget -N https://git.io/aria2.sh && chmod +x aria2.sh && bash aria2.sh #下载Aria2脚本并运行脚本
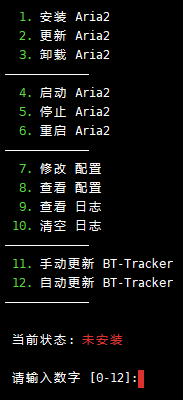
运行脚本后会出现脚本操作菜单,选择并输入1回车开始安装
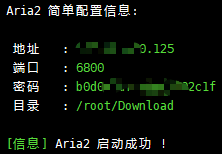
安装成功后得到以下Aria2配置信息,并用记事本记录
设置自动更新BT-Tracker,后台会定期更新trackerslist,一般情况下会加强BT下载效果(若不需要,请跳过次步骤)
再次执行菜单脚本
bash aria2.sh输入12回车
AriaNg是一个前端(HTML+JS静态)控制面板,不需要和Aria2(后端/服务端)放在一个服务器或者设备中,你甚至可以只在服务器上面搭建Aria2后端,然后访问别人建好的AriaNg前端面板,也可以远程操作Aria2后端!
AriaNg官方演示页面:http://ariang.mayswind.net/latest
创建Ariang目录
mkdir -p /data/www/ariang #创建一个Ariang目录
cd /data/www/ariang #进入这个目录下载并解压AriaNg文件,这段代码会自动检测并下载最新版本(代码较长,请复制完整)
Ver=$(wget --no-check-certificate -qO- https://api.github.com/repos/mayswind/AriaNg/releases/latest | grep -o '"tag_name": ".*"' | sed 's/"//g;s/tag_name: //g') && echo ${Ver}如果上面自动检测最新版本的代码返回空白或者错误,那么请访问下面网址来查看最新版本号
https://github.com/mayswind/AriaNg/releases/latest** **
例如手动获取的版本号是 1.1.4,那么手动执行命令: Ver=1.1.4,然后继续下面步骤即可
下载并解压AriaNg文件(代码较长,请复制完整)
wget -N --no-check-certificate "https://github.com/mayswind/AriaNg/releases/download/${Ver}/AriaNg-${Ver}.zip" && unzip AriaNg-${Ver}.zip && rm -rf AriaNg-${Ver}.zip创建虚拟主机配置文件
yum install vim #安装vim编辑器
cd /etc/nginx/conf.d
touch ariang.conf #创建配置文件
vim ariang.conf #编辑配置文件按键盘I键或Insert键进入修改模式,复制粘贴以下配置(复制粘贴时请仔细对照一下,有时候可能粘贴不全)
server {
    listen 80;
    server_name IP;
    location / {
        root   /data/www/ariang;
        index  index.html index.htm;
    }
}把以上配置中server_name右边的IP改成你自己服务器的IP地址或域名
保存并退出
:wq现在可以使用nginx -t测试一下配置文件是否修改正确
更新nginx配置后,需要重启nginx
systemctl reload nginx关闭SELINUX
vim /etc/selinux/config按键盘I键或Insert键进入修改模式
找到SELINUX=enforcing这行,并用#注释掉,并在下一行加上SELINUX=disabled
#SELINUX=enforcing
SELINUX=disabled
保存并退出
:wq重启系统
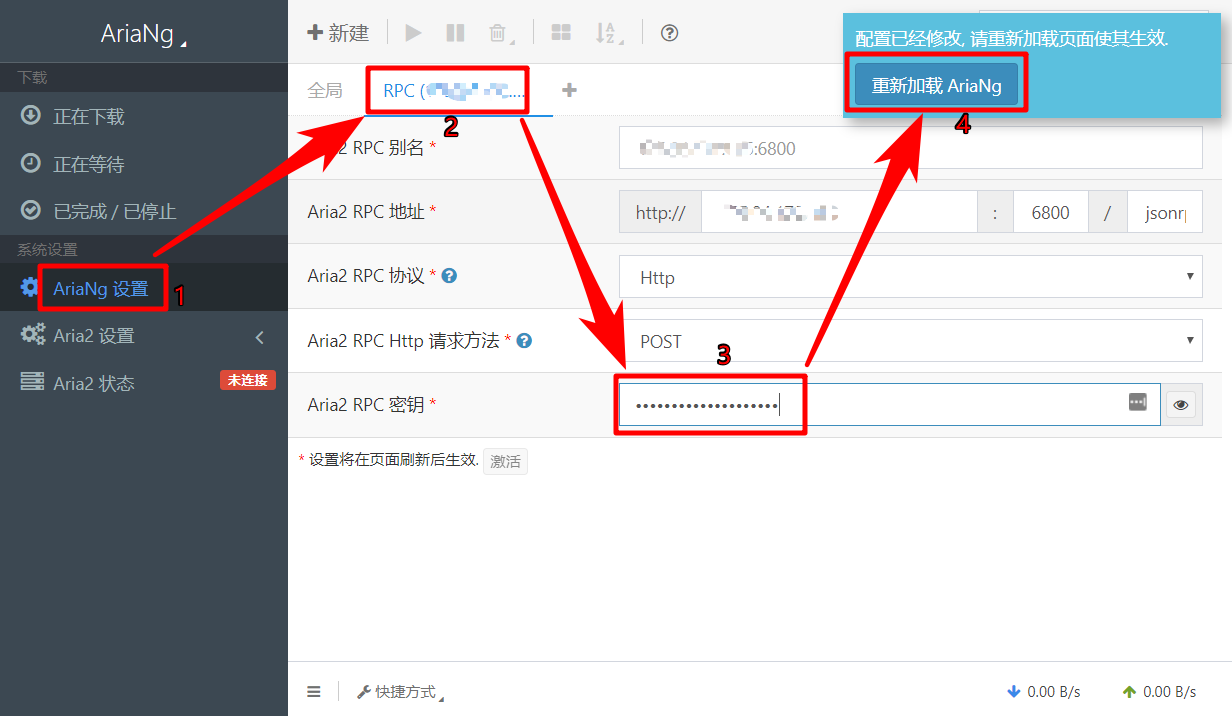
reboot重启好后访问IP地址或域名即可看到AriaNg Web界面,并按照下图1-4步骤填写Aria2 RPC密钥(该密钥为前面安装Aria2时生成配置信息中的密码)
cd ~ #回到根目录下载脚本并执行
curl https://rclone.org/install.sh | sudo bash如果系统为OpenVZ系统,则使用以下脚本安装
curl https://rclone.org/install.sh | bashrclone config[root@localhost ~]# rclone config
2020/01/03 02:41:17 NOTICE: Config file "/root/.config/rclone/rclone.conf" not found - using defaults
No remotes found - make a new one
n) New remote
s) Set configuration password
q) Quit config
n/s/q>n
name> GD(该名称为Rclone挂载的名称可以随便填,但要记住,后面会用到)
Type of storage to configure.
Enter a string value. Press Enter for the default ("").
Choose a number from below, or type in your own value
1 / 1Fichier
\ "fichier"
2 / Alias for an existing remote
\ "alias"
3 / Amazon Drive
\ "amazon cloud drive"
4 / Amazon S3 Compliant Storage Provider (AWS, Alibaba, Ceph, Digital Ocean, Dreamhost, IBM COS, Minio, etc)
\ "s3"
5 / Backblaze B2
\ "b2"
6 / Box
\ "box"
7 / Cache a remote
\ "cache"
8 / Citrix Sharefile
\ "sharefile"
9 / Dropbox
\ "dropbox"
10 / Encrypt/Decrypt a remote
\ "crypt"
11 / FTP Connection
\ "ftp"
12 / Google Cloud Storage (this is not Google Drive)
\ "google cloud storage"
13 / Google Drive
\ "drive"
14 / Google Photos
\ "google photos"
15 / Hubic
\ "hubic"
16 / JottaCloud
\ "jottacloud"
17 / Koofr
\ "koofr"
18 / Local Disk
\ "local"
19 / Mail.ru Cloud
\ "mailru"
20 / Mega
\ "mega"
21 / Microsoft Azure Blob Storage
\ "azureblob"
22 / Microsoft OneDrive
\ "onedrive"
23 / OpenDrive
\ "opendrive"
24 / Openstack Swift (Rackspace Cloud Files, Memset Memstore, OVH)
\ "swift"
25 / Pcloud
\ "pcloud"
26 / Put.io
\ "putio"
27 / QingCloud Object Storage
\ "qingstor"
28 / SSH/SFTP Connection
\ "sftp"
29 / Transparently chunk/split large files
\ "chunker"
30 / Union merges the contents of several remotes
\ "union"
31 / Webdav
\ "webdav"
32 / Yandex Disk
\ "yandex"
33 / http Connection
\ "http"
34 / premiumize.me
\ "premiumizeme"
Storage> 13(由于Rclone官方会更新,13并不一定是Google Drive,所以填入需要配置的网盘对应的序号即可)
See help for drive backend at: https://rclone.org/drive/
Google Application Client Id
Setting your own is recommended.
See https://rclone.org/drive/#making-your-own-client-id for how to create your own.
If you leave this blank, it will use an internal key which is low performance.
Enter a string value. Press Enter for the default ("").
client_id>直接回车
Google Application Client Secret
Setting your own is recommended.
Enter a string value. Press Enter for the default ("").
client_secret>直接回车
Scope that rclone should use when requesting access from drive.
Enter a string value. Press Enter for the default ("").
Choose a number from below, or type in your own value
1 / Full access all files, excluding Application Data Folder.
\ "drive"
2 / Read-only access to file metadata and file contents.
\ "drive.readonly"
/ Access to files created by rclone only.
3 | These are visible in the drive website.
| File authorization is revoked when the user deauthorizes the app.
\ "drive.file"
/ Allows read and write access to the Application Data folder.
4 | This is not visible in the drive website.
\ "drive.appfolder"
/ Allows read-only access to file metadata but
5 | does not allow any access to read or download file content.
\ "drive.metadata.readonly"
scope>1
ID of the root folder
Leave blank normally.
Fill in to access "Computers" folders (see docs), or for rclone to use
a non root folder as its starting point.
Note that if this is blank, the first time rclone runs it will fill it
in with the ID of the root folder.
Enter a string value. Press Enter for the default ("").
root_folder_id>直接回车
Service Account Credentials JSON file path
Leave blank normally.
Needed only if you want use SA instead of interactive login.
Enter a string value. Press Enter for the default ("").
service_account_file>直接回车
Edit advanced config? (y/n)
y) Yes
n) No
y/n> n
Remote config
Use auto config?
Say Y if not sure
Say N if you are working on a remote or headless machine
y) Yes
n) No
y/n> n
If your browser doesn't open automatically go to the following link: https://accounts.google.com/o/oauth2/auth?access_type=offline&client_id=2024815644.apps.googleusercontent.com&redirect_uri=urn%3Aietf%3Awg%3Aoauth%3A2.0%3Aoob&response_type=code&scope=https%3A%2F%2Fwww.googleapis.com%2Fauth%2Fdrive&state=eSMtROkBwv7nTw36Wg(****复制这段网址到浏览器中,最后会得到一段密钥并复制粘贴到下面****)
Log in and authorize rclone for access
Enter verification code> 4/vAGEnm1Vm2O7Ba************************
Configure this as a team drive?
y) Yes
n) No
y/n>y
Fetching team drive list...
Choose a number from below, or type in your own value
1 / dd
\ "0AAk7UDUUk9PVA"
Enter a Team Drive ID> 1
----------------------------
[GD]
type = drive
scope = drive
token = {"access_token":"ya29.Il4B97vj2p_*****************","token_type":"Bearer","refresh_token":"1//0eINZ8S2xdmkPdzFk7-*","expiry":"2020-0103T03:44:19.994344966-05:00"}
team_drive = 0AAk7UoZt
-----------------------------
y) Yes this is OK
e) Edit this remote
d) Delete this remote
y/e/d> y
Current remotes:
Name Type
==== ====
GD drive
e) Edit existing remote
n) New remote
d) Delete remote
r) Rename remote
c) Copy remote
s) Set configuration password
q) Quit config
e/n/d/r/c/s/q>q
修改我们的上传脚本中的Rclone名字和需要上传到网盘的文件夹
vim /root/.aria2/autoupload.sh #编辑上传脚本按键盘I键或Insert键进入修改模式
修改上传脚本的内容,博主修改为Google Drive的文件夹Download,这个文件夹必须存在,如果不存在请先在Google Drive中自行创建,不然会出错。
name='GD' #配置Rclone时的name
folder='/Download' #网盘里的文件夹,留空为网盘根目录
保存并退出
:wq打开配置文件
vim /root/.aria2/aria2.conf按键盘I键或Insert键进入修改模式
修改为以下内容
- 在on-download-complete=/root/.aria2/delete.aria2.sh前面加上#号
- 把#on-download-complete=/root/.aria2/autoupload.sh前面#号去掉
# 下载完成后执行的命令
# 删除.aria2文件
#on-download-complete=/root/.aria2/delete.aria2.sh
# 调用 rclone 上传(move)到网盘
on-download-complete=/root/.aria2/autoupload.sh
保存并退出
:wq然后重启Aria2
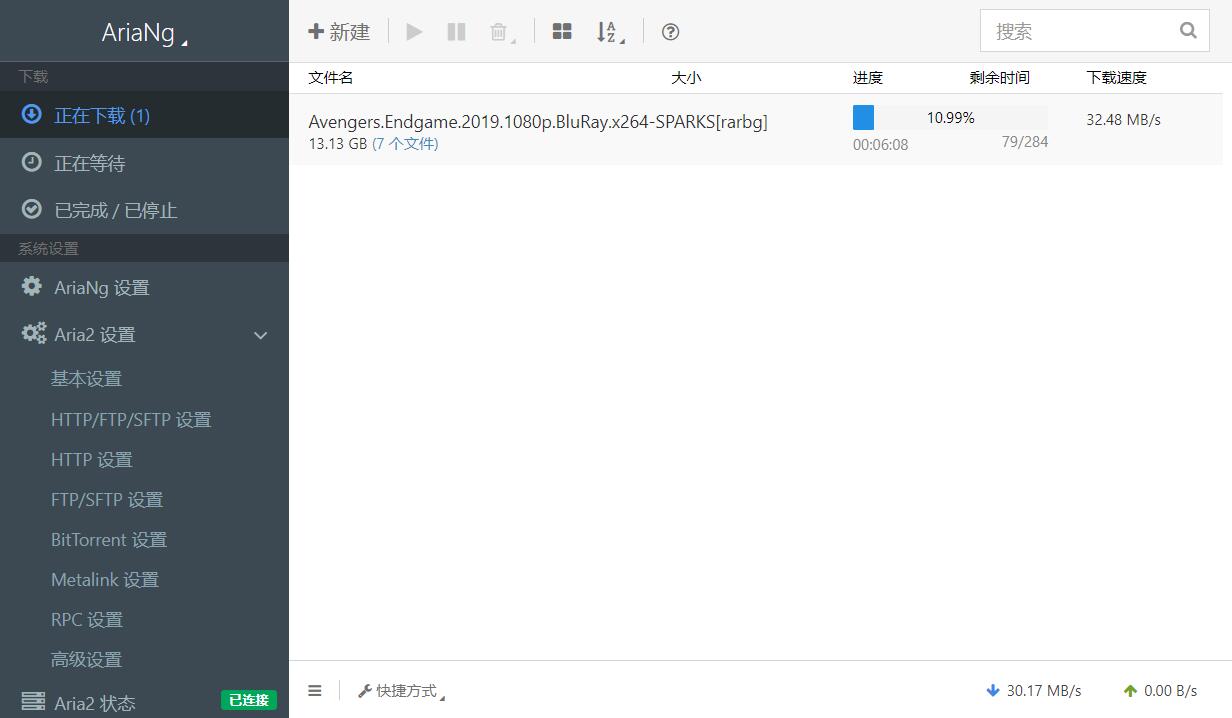
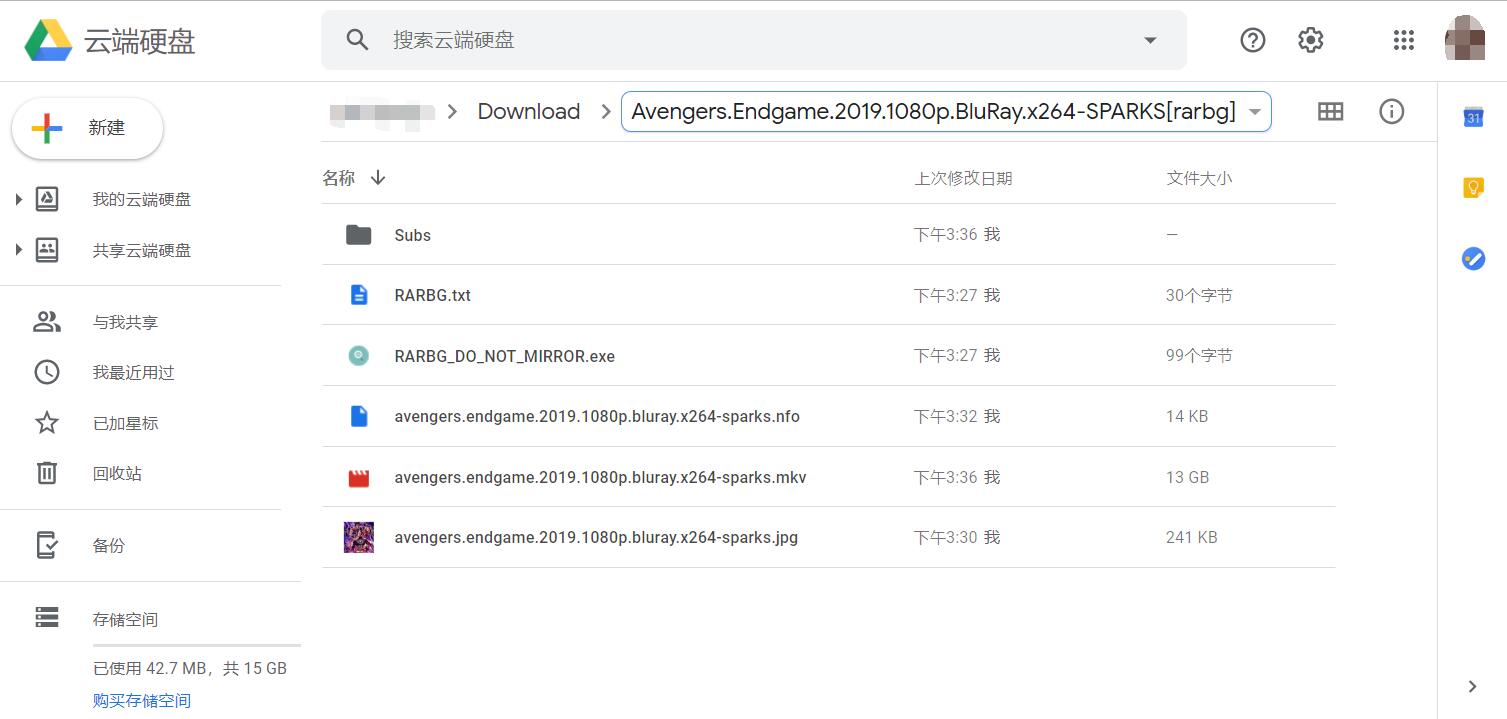
service aria2 restart到此为止离线下载已经完美搞定,输入服务器网址或域名到AriaNg Web页面进行下载资源,下载完成后直接到Google Drive中进行查看。
- 菜单:bash /root/aria2.sh
- 启动:/etc/init.d/aria2 start
- 停止:/etc/init.d/aria2 stop
- 重启:/etc/init.d/aria2 restart
- 查看状态:/etc/init.d/aria2 status
- 配置文件:/root/.aria2/aria2.conf
- 下载目录:/root/Download
- 查看服务状态:systemctl status nginx
- 启动服务:systemctl start nginx
- 停止服务:systemctl stop nginx
- 重新启动服务:systemctl restart nginx 或 systemctl reload nginx
- 设置开机自动启动:systemctl enable nginx
- 关闭开机自动启动:systemctl disable nginx
- 查看所有已启动的服务:systemctl list-units --type=service
- 默认配置文件:/etc/nginx/nginx.conf
- AriaNg主机配置文件:/etc/nginx/conf.d/ariang.conf
- 默认目录:/usr/share/nginx/html
- 访问日志:/var/log/nginx/access.log
- 错误日志:/var/log/nginx/error.log