Gimbal stabilizator for BeagleBone
This gimbal stabilizer uses two servos controlled from a BeagleBone for different purposes such camera stabilization. Intended to be used for rovers or drones. It uses a PID algorithm in order to stabilize, therefore its constants should be adapted depending the used hardware, in order to get best results. The system controls only two axis, usually X (pitch) and Y (roll) axis.
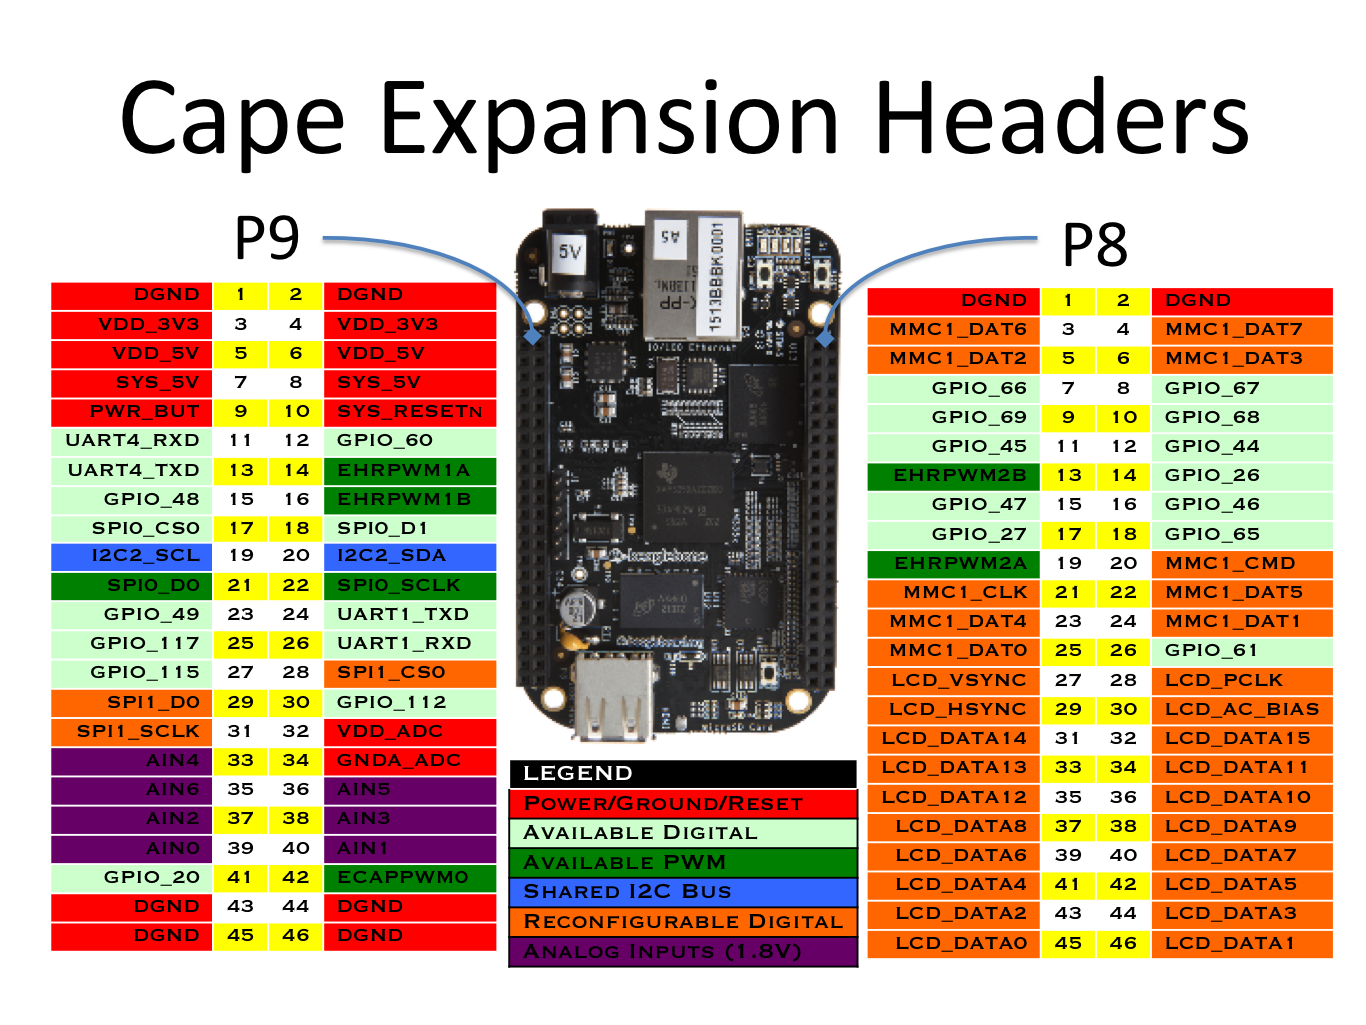
Build a gimbal using two servos, one for each axis. Plug each servo's signal wire (usually the white or yellow one) into the BeagleBone's PWM pinout as follows: the X-axis (pitch) servo at pin P8.13 and the Y-axis (roll) at pin P8.19. See the BeagleBone's pinout specification in order to find out the correct pins.
Plug the power wire (red one) into a appropriate power source. Check your servo manual in order to know how it should be powered. In some cases, 5 volt servos could be powered directly from the BeagleBone's 5V pin, but this is actually discouraged since the current intensity of two servos can damage the BeagleBone's circuits.
Finally, connect the servo's ground wire (the black one) into any of the BeagleBone's ground wire. If you are using an external power source for servos (what it's really recommended), don't forget to join the power source's ground and the BeagleBone's ground, using any of the ground pins.
Please, watch this video in order to get an idea of how to do the set up, and how it works.
Wire the Invesense's IMU 6050 pins as follows.
- Connect the sensor's power pin (named VCC) to any of the BeagleBone's 3.3 volt pins (P9.3 or P9.4).
- Connect the sensor's ground pin (name GRD) to any of the BeagleBone's ground pins.
- Connect the sensor's data pin to the BeagleBone's I2C data pin (P9.20).
- Connect the sensor's clock signal pin to the BeagleBone's I2C clock pin (P9.19)
See BeagleBone's pinout reference for further details.
Place the sensor horizontally below or above the camera in order to provide the camera's current angles. Additionally set the camera within the gimbal according the gimbal's instructions.
Log in the BeagleBone using your preferred terminal emulator. Once the code is fetched using git or unzipped, you'll need to configure the PID constants of the stabilizer. The stabilizer looks for this constants in a file named config.json at the project's root directory and it's not incluided in the source code. Anyway, there's an example file named config.json.example within the project's root directory. Just copy it as config.json in the same directory and edit. In case your servos are of 9 gr type, these example values should work, otherwise, you should test different values until you get a good behaviour. Finding a good combination of PID constants is important to have reliable results.
Next step is to add the stabilizer path into the python's path. If you current working directory is the gimbal stablizer project's root path, you can easily enter:
export PYTHONPATH=./gimbal
or replace the relative path with the full path if you want to execute it regardeless the current working directory.
The last step here, is to initialize the BeagleBone's PWM subsystem. Just type the following command as root from the project's root path:
./init-motor.sh
Once the previous steps are successfully done, just launch the stabilizer with root grant using the following command:
python ./gimbal/start.py
suppousing the current working directory is the project's root directory.
The two servos will be centered and the system starts to callibrate the IMU sensor. Therefore, place the camera, servos and IMU group leveled and still as much as possible during the callibration process. Once the callibration finishes the group can be moved as desired and the camera should be stabilized whereas the system is using a right PID constants set.