NodeJS
Express
Mongoose
MongoDB
EJS
The goal of this repo is to demonstrate how an web application with PassportJS, using the local-strategy, can be made and used. Authentication amongst web applications and websites is an important aspect of how users can attain access and use the many features an app or site have to offer. Typical methods of registering a user and asking them to login to the app or site is mandatory. The problem is that if an app is not setup properly the authentication process can be tedious and prone to security mishaps. PassportJS is a great framework to streamline the process of authenticating a user and ensuring that the user has a good user experience whilst using the app or site.
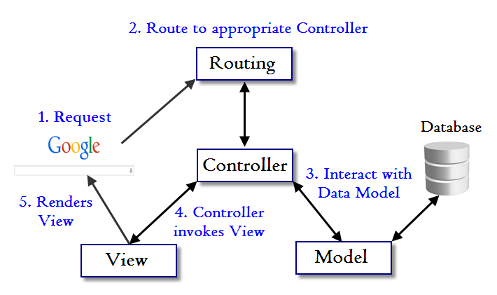
This repo provides and example in how to setup a NodeJS application wherein PassportJS can be added for authentication purposes. The repo also uses the MVC methodology and integrates PassportJS into the flow from user to server to database and back to the user.
Follow the instructions below:
$mkdir demo
$cd demo
$git clone https://github.com/dking1342/authApp.git
Next use npm to install all the dependencies
$npm install
In order for this application to work properly, then you need to have installed MongoDB and the MongoDB server running. This project will be creating the database on your local computer. For more information on how to install MongoDB and get a server up and running then please refer to the MongoDB website. The link is in the prerequisites section.
To confirm the application is working properly, first start the server (preferably with nodemon with the server.js file) and for start the MongoDB server. Once these servers are up and running then go to your browser and type http://localhost:3000 and press enter. If nodemon shows that a different port is being used then go back to your browser and type in that port number
The server.js file in the root directory is where we will begin. It has the imports for the npm packages listed in the package.json file. It will include some standard middleware for parsing, etc. The middleware specific for this project relates to connect-mongo and PassportJS. Here you will make a new mongostore that will go to your database to create a new session or find an existing session. The PassportJS middlware here is coming from passport.js in the config folder. The rest of the middleware before the routes is a custom checker to restrict or allow access to routes when a user is authenticated or not authenticated via PassportJS.
In the routes folder you will see routes.js which documents all the routes possible in this app. The function being invoked in each route is found in the controllers folder.
The userController.js file details each function and describes what it is meant to do and the route it is assigned to. Here is an example of one such function:
// @des     Gets the homepage view
// @route   GET /
const getHomepage = (req,res) => {
  let user = req.isAuthenticated();
  res.render('index',{user});
  res.end();
}
As you will notice, the function will render a template with some data. The views are made with EJS and the data is coming from the models folder. As seen, the user variable is used to authenticate a user and output a boolean. This is neccessary for the navbar used in each view. The incoming data will help determine whether or not the authenticated navbar is used or not.
The modesl folder only has one file which is userModel.js. In this file, it imports the configuration done with the MongoDB server. The usersdb.js file completes this configuration as seen below:
const mongoose = require('mongoose');
const { Schema } = require('mongoose');
require('dotenv').config();

// mongoose server init
const conn = process.env.DB_STRING;
const options = {
    useNewUrlParser: true,
    useUnifiedTopology: true,
    useFindAndModify: false,
    useCreateIndex: true
};

// connection
const connection = mongoose.createConnection(conn,options);

// schema
const UserSchema = new Schema({
    username: String,
    hash: String,
    salt:String,
});

// model
const User = connection.model('User',UserSchema);

// export connection
module.exports = {
    connection
};
As seen in this code block, the schema has a username (which will eventually be used in the PassportJS config file), hash and salt. The hash and salt fields are part of the encryption methodology used by the npm package crypto.
Once the model has access to the MongoDB database, it will insert new users that register with the app. The function that creates a new user into the database also has a bit of regex validation to ensure the username and password meet the desired criteria as seen below:
      let usernameRegex = /^[a-z][^\W_]{4,14}$/i;
      let passwordRegex = /^(?=[^a-z]*[a-z])(?=\D*\d)[^:&.~\s]{5,20}$/;

      // ****Explanation for username regex
      // [a-z]    the first letter
      // [^\W_]   equivalent to [a-zA-Z0-9]

      // ****Explanation for password regex
      // (?=..)    is a lookahead that don't consume characters but only check
      // (?=[^a-z]*[a-z]) check if there is at least 1 lower case letter
      // (?=\D*\d)   check if there is at least 1 digit
      // [^:&.~\s]  a character class that exclude all the characters you don't want
The view folder contains the views that are available in this app. These views were made using EJS. The most notable dynamic content is the navbar which is determined as mentioned above. The navbar will be different whether or not the user is authenticated or not.
    <% if(!user) { %>
      <nav>
        <a href="/">Home</a>
        <a href="/register">Register</a>
        <a href="/login">Login</a>
      </nav>
    <% } else { %>
      <nav>
        <a href="/landing">Landing</a>
        <a href="/about">About</a>
        <a href="/strategies">Strategies</a>
        <a href="/logout">Logout</a>
      </nav>
    <% } %>
Apart from traditional types of views, there is a 404 view for routes not mentioned in the routes.js file. It also has a /register-failure and /login-failure when a user is rejected on either of those forms with the register or login view.
The public folder contains the styles and scripts for the front end. The front end has no such javascript file, it only has css files for a simple stying of each view.
According to Passport's documentation, Passport is authentication middleware for Node. It is designed to serve a singular purpose: authenticate requests. When writing modules, encapsulation is a virtue, so Passport delegates all other functionality to the application. This separation of concerns keeps code clean and maintainable, and makes Passport extremely easy to integrate into an application.
It includes many different strategies to authenticate. In this app, we use the local-strategy strategy. This strategy is used for username and password.
In the config folder there is a file called passport.js which contains the configuration needed. The code block is seen in the Passport documentation and already has it being used for a MongoDB database.
Passport takes in a username and password. However, the username and password are passed through a file in the utils folder called usersUtil.js. In this file the username and password as passed through some functions that utilize the crypto package making it suitable for being encrypted.
const crypto = require('crypto');

const genPassword = (password) => {
  const salt = crypto.randomBytes(32).toString("hex");
  const genHash = crypto
    .pbkdf2Sync(password, salt, 10000, 64, "sha512")
    .toString("hex");
  return {
    salt: salt,
    hash: genHash,
  };
  }

  const validPassword = (password, hash, salt) => {
    const hashVerify = crypto
      .pbkdf2Sync(password, salt, 10000, 64, "sha512")
      .toString("hex");
    return hash === hashVerify;
  };
This repo has demonstrated how you can build an NodeJS app using the local-strategy offered by PassportJS to authenticate users of your app or website. There are some moving parts, but overall it accomplishes the goal. Please feel free to navigate around the app to see how the final product.