In this guide, we'll be going over how to create a form with dynamic fields using React, TypeScript or JavaScript, and Formik.
The form in this guide will represent a list of people. Each person will have first name, last name, and age fields. You will be able to add another person to the list by clicking the Add Person button and remove a specific person by clicking the Remove button underneath the list of fields for that specific person.
We will NOT be adding any styling to our form using CSS as well! This is to simplify the guide. With that said, this guide and its source code are all stored in a GitHub repository here.
Formik is the world's most popular open source form library for React and React Native. It comes with battle-tested solutions for input validation, formatting, masking, arrays, and error handling. This means you spend less time writing form code and more time building your next big thing.
These features make creating dynamic forms like the one we'll be creating in this guide easier and is why we chose to utilize Formik!
Before continuing, I just wanted to briefly go over my development setup.
I am writing this guide and developing the React application using Visual Studio Code as my IDE with the Remote SSH extension which allows me to write/execute code on my VM running Debian 12 (Linux) directly. The VM is located on one of my home servers I have running locally under its own VLAN.
The VM is running Node.js version 20.10.0 with NPM version 10.2.4. It also has 6 GBs of DDR4 RAM and two vCPU cores.
React, TypeScript, and Formik are required for this guide. We will also be using Node.js with its package manager, NPM.
On Debian/Ubuntu-based systems, you may install the nodejs and npm packages using the apt package manager. The following command should do the trick.
sudo apt install -y nodejs npmHowever, this will most likely install an outdated/stable version of Node.js. While the stable version of Node should work fine for this guide, if you want to install a more up-to-date version of Node.js, feel free to take a look at this guide! Additionally, you may read this guide if you want to install Node.js and NPM on a Linux OS other than Debian/Ubuntu.
For Windows builds, you may refer to the downloads page here.
You can create a React application using npx after installing Node.js and NPM above.
npx create-react-app <name> --template typescriptIf you plan on using TypeScript, make sure to pass --template typescript. Otherwise, you may omit this flag to use JavaScript.
To install Formik, you may use the following npm command.
npm install --save formikBefore continuing, you may also want to perform an audit using npm to ensure there aren't any vulnerabilities in our installed packages. You may use the following commands to do so.
# Perform an audit and receive a vulnerabilities report.
npm audit

# Attempt to update packages to resolve vulnerabilities without potentially breaking packages.
npm audit fixWe will be creating our form inside of the src/App.tsx source file (or src/App.jsx if you're using JavaScript).
We want to import elements we'll be using from Formik. With that said, I've cleaned up other imports we won't need such as the logo and CSS file.
We will import Formik, Form, Field, and FieldArray from the Formik package.
import { Formik, Form, Field, FieldArray } from 'formik'Next, we'll want to create an empty person object that represents the default values of a person. In this case, the first and last names will be an empty string while we'll use a default age of 21.
const emptyPerson = {
    first: "",
    last: "",
    age: 21
}
At this point, our code above the App() function should look something like the following.
import { Formik, Form, Field, FieldArray } from 'formik'

const emptyPerson = {
  first: "",
  last: "",
  age: 21
}Inside of our App() function, we can create a simple form using the <Formik> and <Form> elements. We'll need to pass two props to the <Formik> element. The first prop is our initial values and the second prop is an on submit callback function.
In this guide, our on submit callback function will simply print all values to the client's web developer console using console.log() when the Add People button is clicked. Our initial values will consist of a people array set to one single emptyPerson item.
function App() {
    return (
        <Formik
            initialValues={{
                people: [emptyPerson]
            }}
            onSubmit={(values) => {
                console.log(values)
            }}
        >
            {({ values }) => (
                <Form>
                    <h1>People</h1>
                    [People Array]
                    <div>
                        <button type="submit">Add People!</button>
                    </div>
                </Form>
            )}
        </Formik>
    )
}

export default App;Next, we'll want to create a field array using the <FieldArray> element with our people array. We'll be utilizing the push() and remove() functions from the <FieldArray> element to add and remove people from the people array.
We'll be replacing the [People Array] text above with the following code.
<FieldArray name="people">
    {({ push, remove }) => (
        <>
            {values.people.map((_person, index) => {
                return (
                    [Person]
                )
            })}
            [Add Button]
        </>
    )}
</FieldArray>To create our add person button, we'll be utilizing the push() function with emptyPerson as the argument to add another person to the people array with our default person values.
We'll be replacing the [Add Button] text above with the following code.
<div>
    <button
        type="button"
        onClick={() => push(emptyPerson)}
    >Add Person</button>
</div>Now we'll want to create fields using the <Field> element when mapping through our people array. Remember, we will be displaying first name, last name, and age fields for each person.
We'll be replacing the [Person] text above with the following code.
// To simplify code, let's build the starting string of our field names for this specific person which is `people[index]`.
const startName = `people[${index.toString()}]`

return (
    <div key={`person-${index.toString()}`}>
        <h2>Person #{(index + 1).toString()}</h2>
        <div>
            <label htmlFor={`${startName}.first`}>First Name</label>
            <Field name={`${startName}.first`} />
        </div>
        <div>
            <label htmlFor={`${startName}.last`}>Last Name</label>
            <Field name={`${startName}.last`} />
        </div>
        <div>
            <label htmlFor={`${startName}.age`}>Age</label>
            <Field
                type="number"
                name={`${startName}.age`}
            />
        </div>
        [Remove Button]
    </div>
)To create a button to remove the specific person, we will utilize the remove() function with the index of the person in the array as the argument. Since we pass index in our mapping function, this is pretty simple.
We'll be replacing the [Remove Button] text above with the following code.
<div>
    <button
        type="button"
        onClick={() => remove(index)}
    >Remove</button>
</div>Our final code should look something like below!
import { Formik, Form, Field, FieldArray } from 'formik'

const emptyPerson = {
  first: "",
  last: "",
  age: 21
}

function App() {
  return (
    <Formik
      initialValues={{
        people: [emptyPerson]
      }}
      onSubmit={(values) => {
        console.log(values)
      }}
    >
      {({ values }) => (
        <Form>
          <h1>People</h1>
          <FieldArray name="people">
            {({ push, remove }) => (
              <>
                {values.people.map((_person, index) => {
                  // To simplify code, let's build the starting string of our field names for this specific person which is `people[index]`.
                  const startName = `people[${index.toString()}]`

                  return (
                    <div key={`person-${index.toString()}`}>
                      <h2>Person #{(index + 1).toString()}</h2>
                      <div>
                        <label htmlFor={`${startName}.first`}>First Name</label>
                        <Field name={`${startName}.first`} />
                      </div>
                      <div>
                        <label htmlFor={`${startName}.last`}>Last Name</label>
                        <Field name={`${startName}.last`} />
                      </div>
                      <div>
                        <label htmlFor={`${startName}.age`}>Age</label>
                        <Field
                          type="number"
                          name={`${startName}.age`}
                        />
                      </div>
                      <div>
                        <button
                          type="button"
                          onClick={() => remove(index)}
                        >Remove</button>
                      </div>
                    </div>
                  )
                })}
                <div>
                  <button
                    type="button"
                    onClick={() => push(emptyPerson)}
                  >Add Person</button>
                </div>
              </>
            )}
          </FieldArray>
          <div>
            <button type="submit">Add People!</button>
          </div>
        </Form>
      )}
    </Formik>
  );
}

export default App;
You may also find this code inside our GitHub repository here.
We won't be writing automated tests in this guide, but we will be testing our code manually.
If you didn't follow the guide for your own project, you can still test the code by cloning our repository using git clone like below.
# Clone repository
git clone https://github.com/deaconn-net/react-form-with-dynamic-fields-and-formik

# Change directories
cd react-form-with-dynamic-fields-and-formik

# Install NPM packages
npm installYou may use the following command to start the NPM development server.
npm startThis should make http://localhost:3000 accessible. If you're starting the development server on another machine, you will most likely need to replace localhost with your server's IP address and ensure port 3000/TCP is allowed through its firewall. In my case, Visual Studio Code's Remote SSH extension automatically forwards localhost:3000 to the server's IP on port 3000.
You should see a page like below when visiting the React application through your web browser.
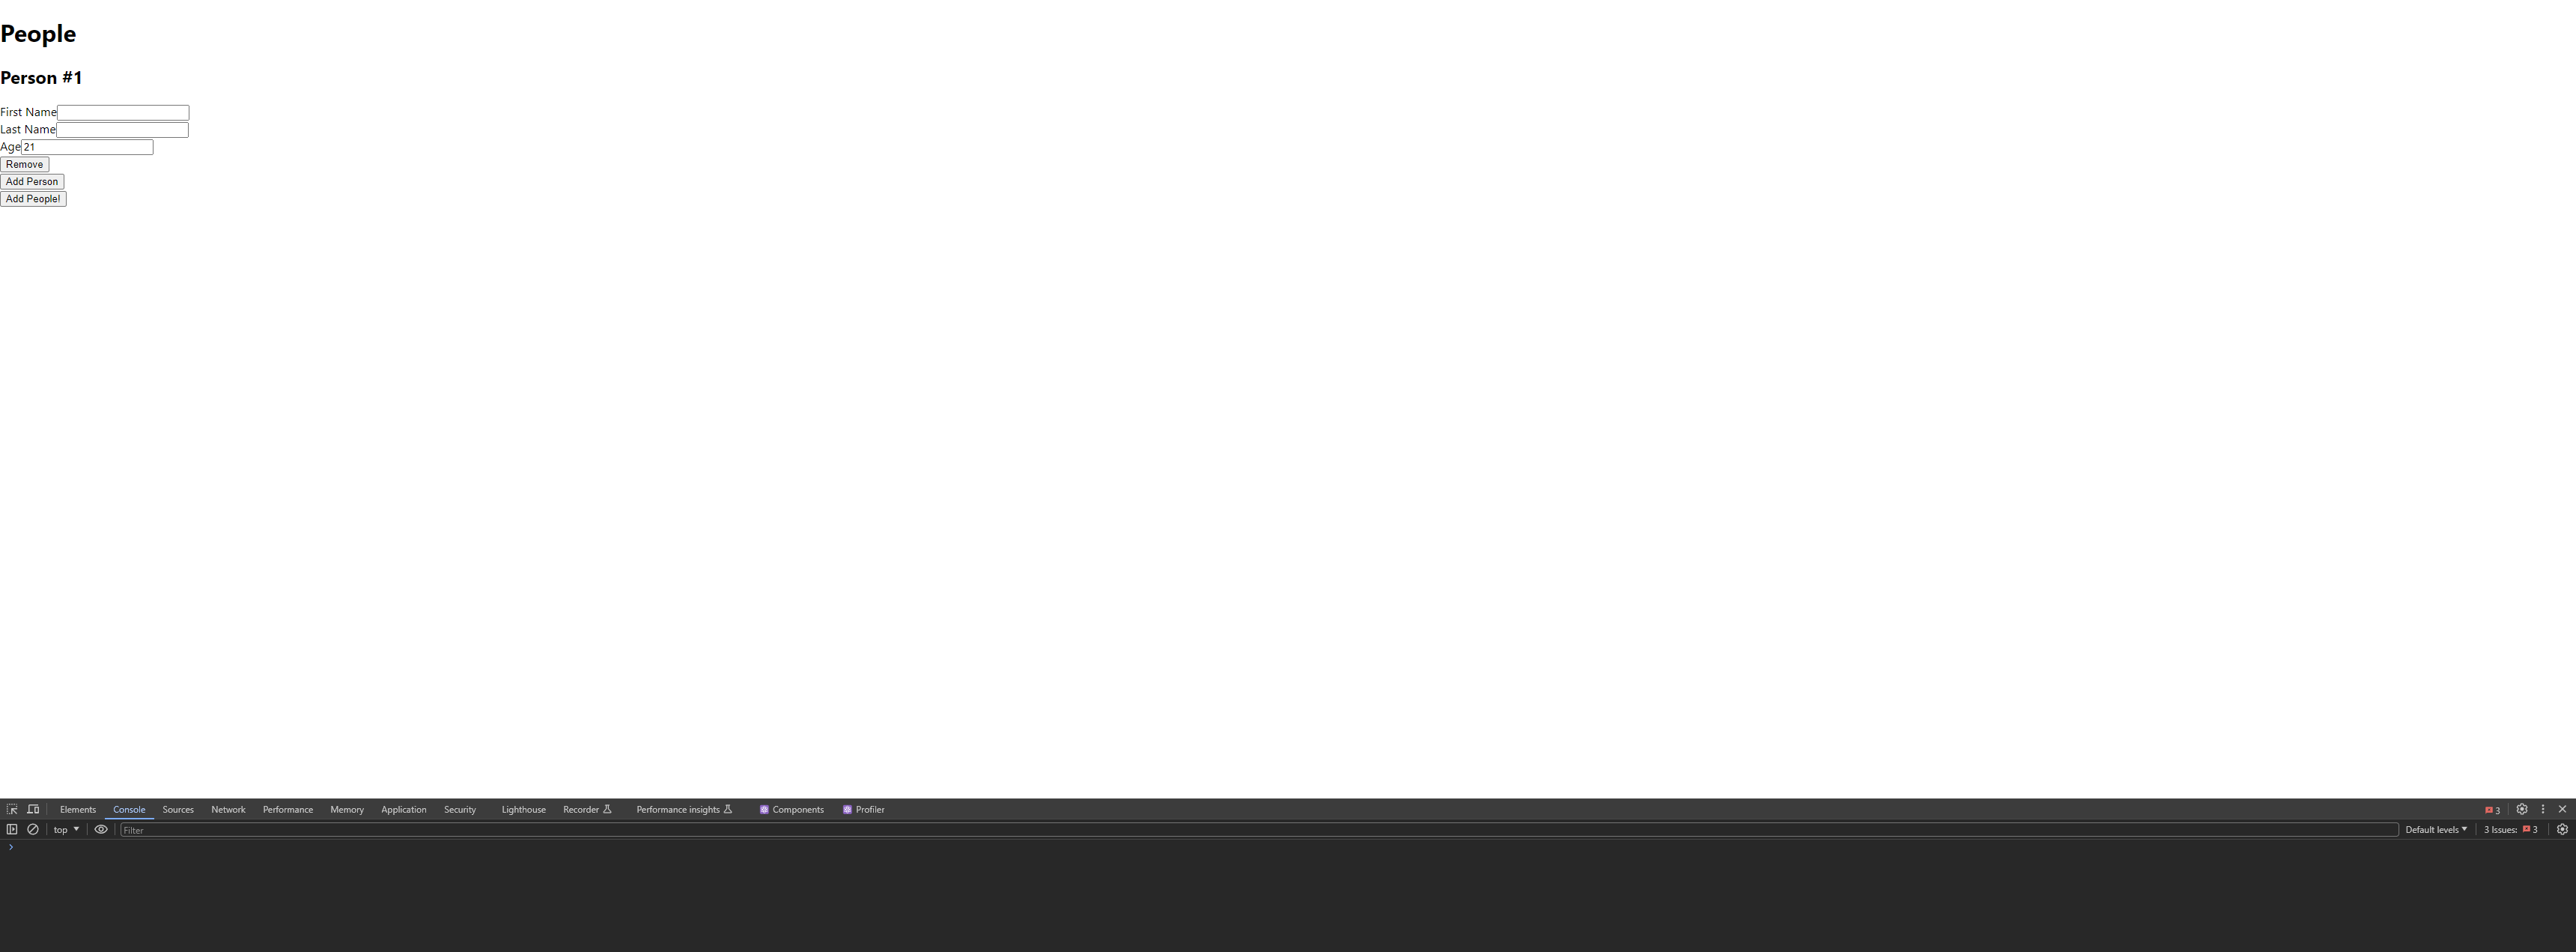
Now feel free to experiment with the fields along with add/remove buttons!
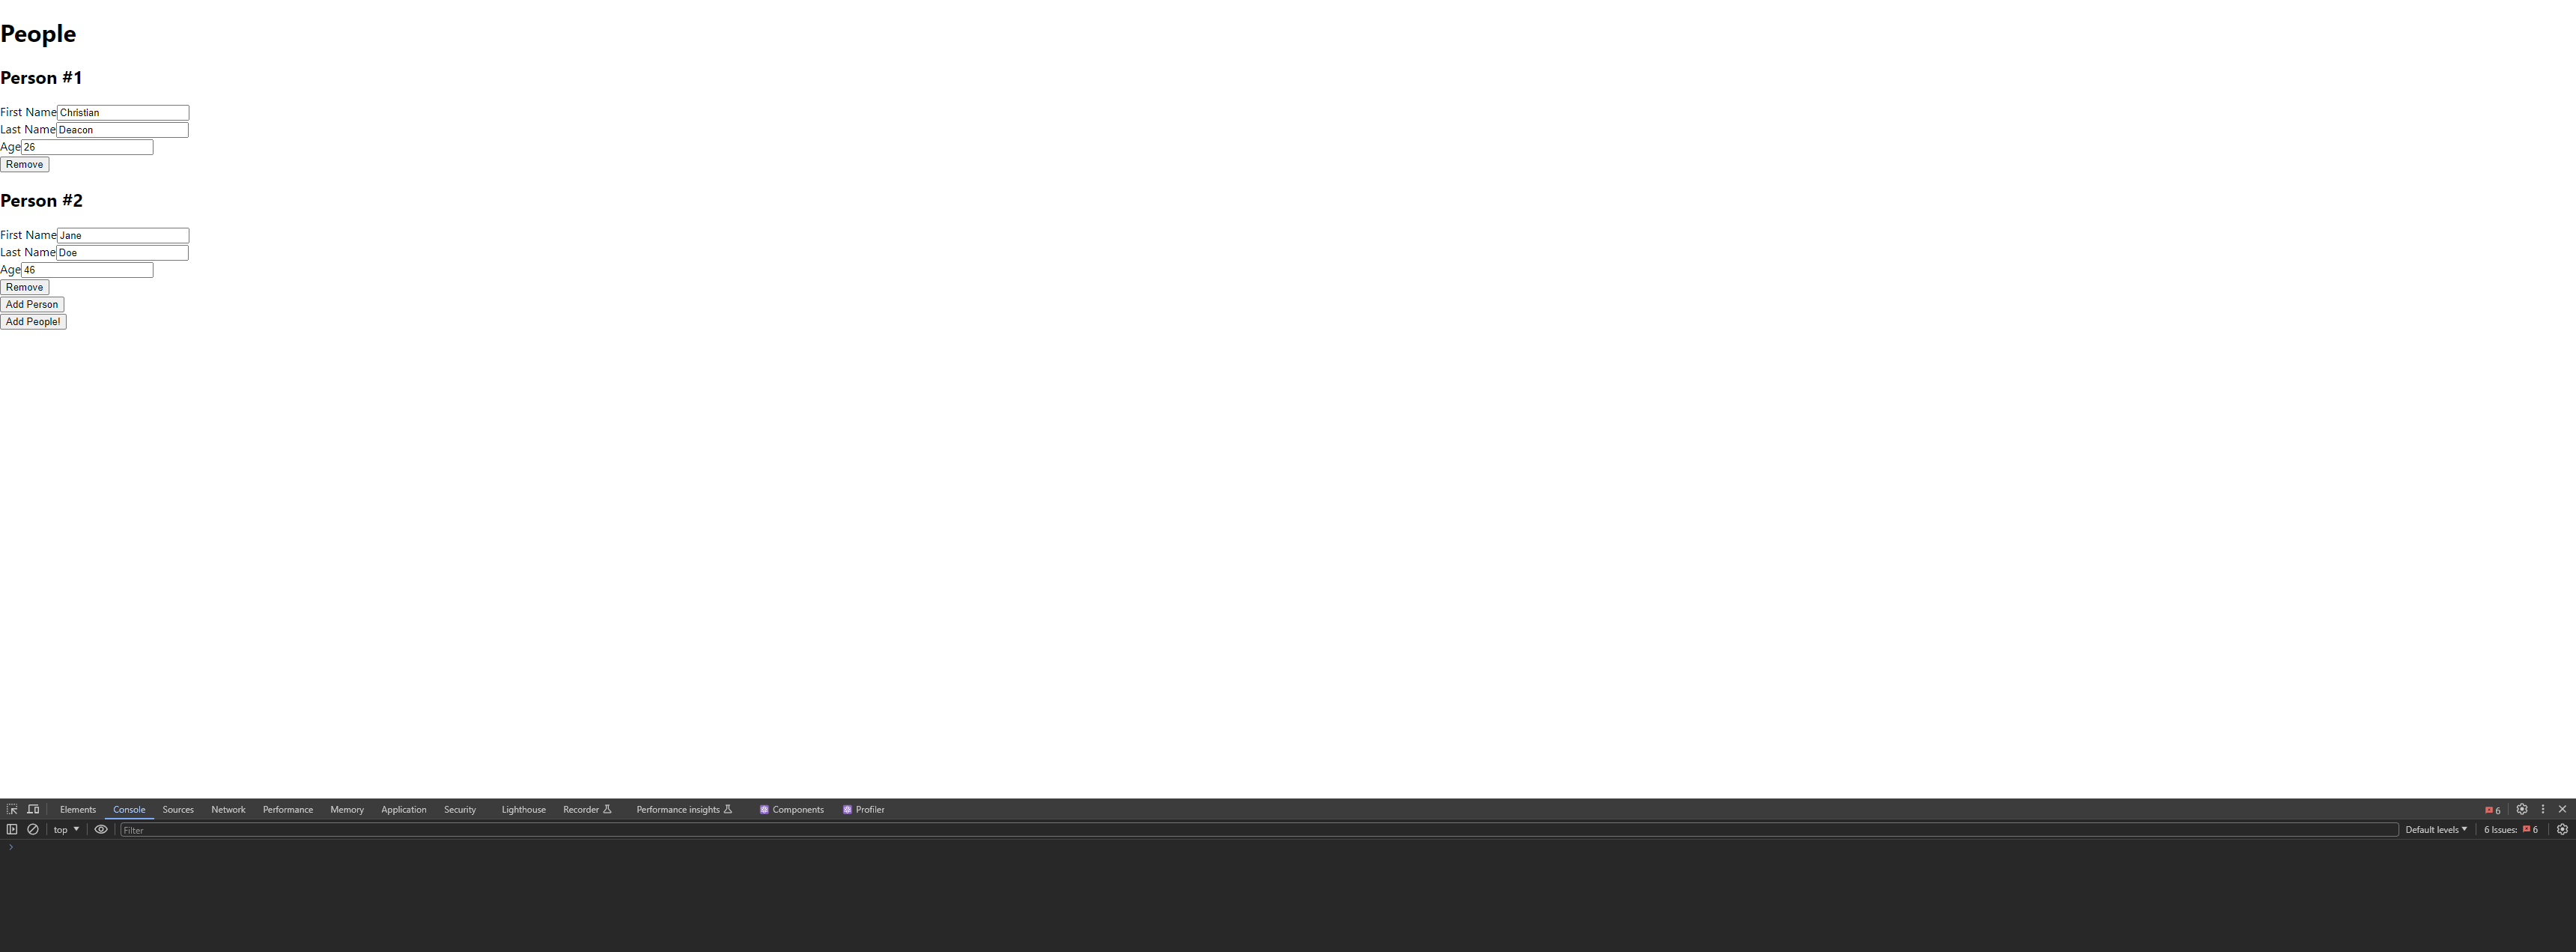
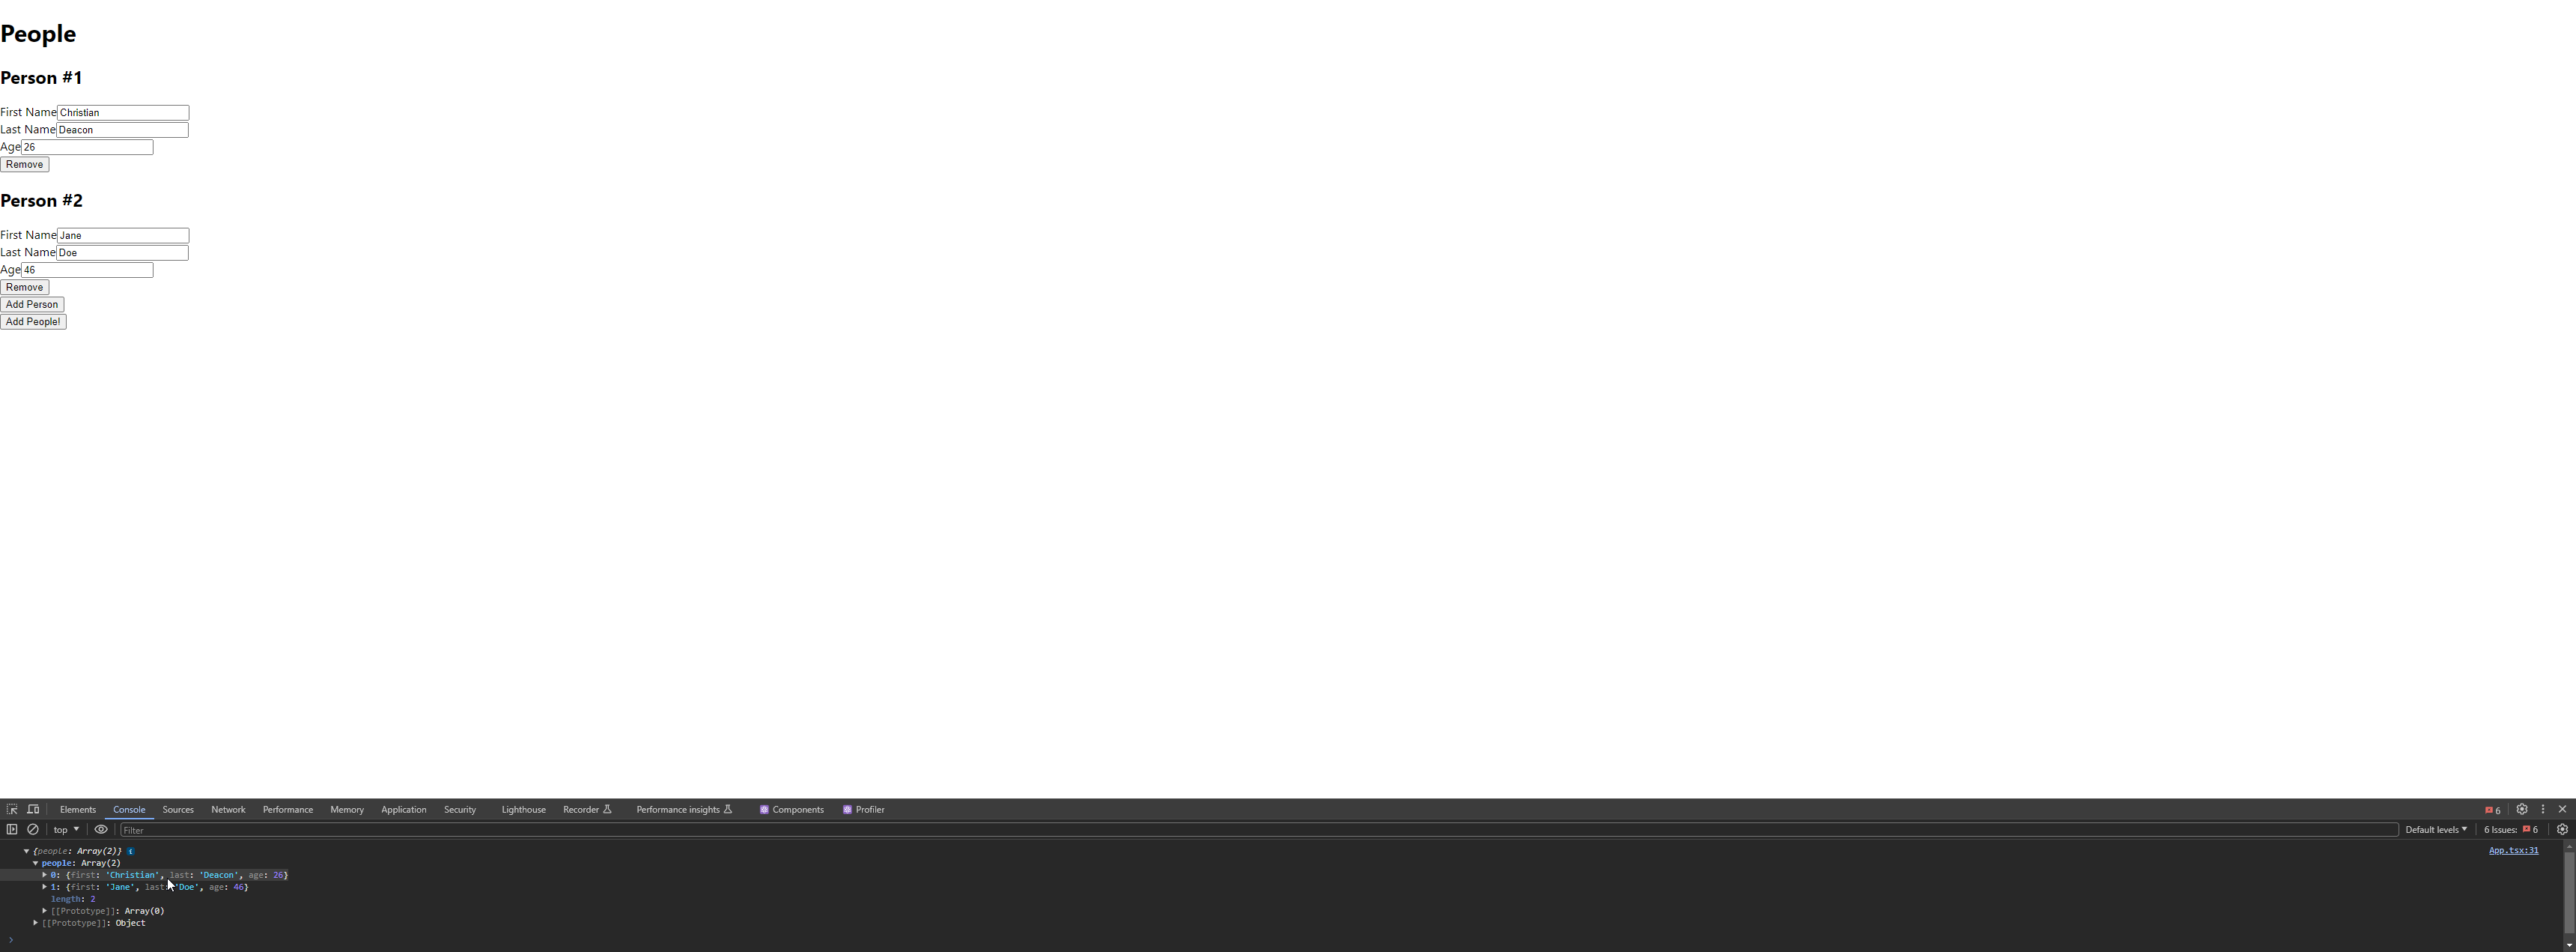
If you click the "Add People" submit button at the bottom and have some people added to your list, you should see an array outputted in the web developer console. You can normally access the web developer console using the F12 button, but this depends on what web browser you're using.
Yes, if you want to initialize your own array of people as the default values of the form, you can do so using something like the following.
const startingPeople = [{
  first: "First Name",
  last: "Last Name",
  age: 26
}, {
  first: "First Name #2",
  last: "Last Name #2",
  age: 21
}]

...
<Formik
    initialValues={{
        people: startingPeople
    }}
    ...
>
    ...
</Formik>That's all! I wanted to show you how to make a very simple form with dynamic fields and I hope this guide has helped you achieve that goal!
I also have a couple open source websites that utilize dynamic fields inside of forms using React, Formik, and TypeScript listed below if you want to check them out!