Creating a project in nUpdate Administration
nUpdate Administration will manage the update packages of your project. You're able to push, edit and remove updates from anywhere. The only thing that you need is the project file, that holds the necessary data for you. If you wish to integrate nUpdate into your application, this will be the first step.
nUpdate Administration is designed to facilitate the management of your update packages by doing everything automatically for you. There is no need to know about any file formats, constraints or security measures. In order to allow nUpdate Administration to establish the common interface that will be used by it and your application later on, you need to define a project that will be linked with it. Once created, just open the project and you'll be able to see and administer the updates of your program. This is therefore necessary as you can add an unlimited number of projects.
- A web server supporting HTTP(S) and FTP (and optionally PHP)
- A .NET-application (VB.NET, C#, ...) - both, Windows Forms and WPF are supported
- An active network connection
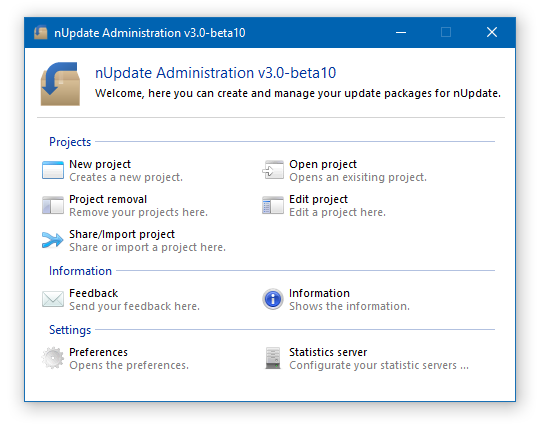
Open nUpdate Administration and you will see a screen as follows. Click on "New project".
After opening the dialog for creating a new project, you will see a screen as follows.
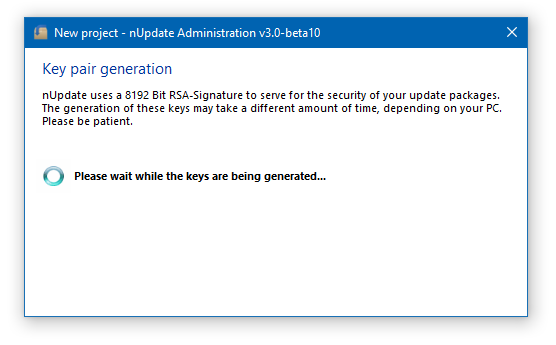
What nUpdate Administration does here, is, it generates a RSA-key pair (with a key size of 8192 Bits and SHA512 as hash algorithm) that will be used for signing and verifying the updates you'll publish. This means that each of your packages will be holding a signature, that, if successfully verified after downloading, indicates that the archive hasn't been corrupted or exchanged by an attacker for spreading malware. Consequently, this is part of nUpdate's security system and will identify you as the legitimate publisher. The generation of these keys may take some time (up to some minutes), depending on your computer's specs.
After your RSA-key pair has been generated, you will be navigated to the general data page.
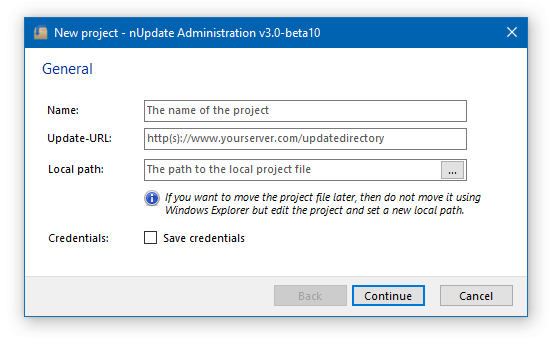
Name: Enter a name for your project. It would be best to use your application's name, but you can call it whatever you want. Primarily, it's just there to give the project an identifier that allows you to find it. Let's call it Music Player in this example.
Update-URL: Enter the URL to your server (including the directory) to specify where your update data (packages, configuration file etc.) for this project should be stored.
Say, your server can be reached at https://www.example.com/ and you made a directory updates, you would enter https://www.example.com/updates/. Of course, the way of specyfing it depends on you server's directory structure and thus, where your domain is pointing to.
Local path: This is the location where your project file will be saved and from where you will be able to open it up. By clicking on the button on the right, you are able to select a path and specify a name for your project file. It is recommended to use the same name as set above, but you're free to name whatever you want.
Let's say, we want to call it Music Player as well and we save it to the desktop. Then a possible path could be D:\Desktop\Music Player.nupdproj. The extension nupdproj wil be appended automatically.
Save credentials: By enabling this feature (which is convenient, but not recommended), all your secret data (such as passwords) will be encrypted using AES256 with an integrated key and initialization vector. This prevents that e.g. passwords are shown directly, but be aware that this does not bring any security! Everyone you hand the project file to (voluntarily or not), will be able to get your password.
By unchecking this feature, you will be asked for your username and password every time you open your project (uncomfortable, but this is secure).
In our case the result could look like this:

Now, click "Continue".
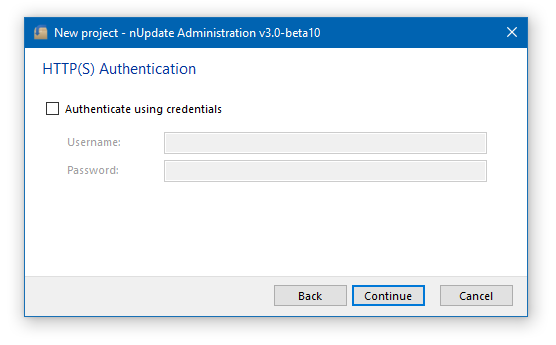
If the update directory is protected by a .htaccess-file and requires authentication (using .htpasswd), you can specify the username and password in this page. nUpdate Administration will then authenticate every time it needs to access your server.
Click "Continue".
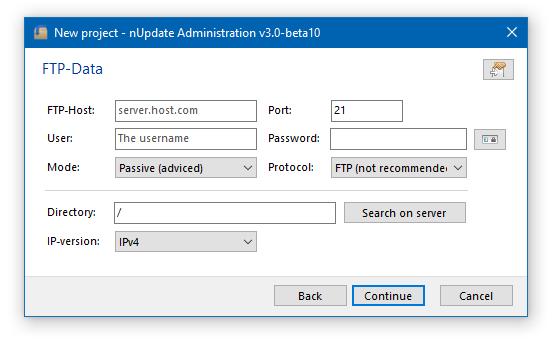
FTP-Host: Enter the host of the FTP server, e. g. "ftp.example.com".
Port: This is the port that will be used for the connection to the FTP server. By default, it is 21. This can vary in your case.
User: Enter the username that should be used for the login.
Password: Enter the password that should be used for the login.
Mode: Set the mode that should be used for the connection. You can choose between active and passive (recommended) mode.
Protocol: Set the protocol that you want to use for the connection. It is recommended to use FTPS, if possible.
Directory: This is the directory in which your update data will be stored. This must be the same directory that you specified through the "Update-URL" before. If there is a mismatch, nUpdate Administration won't be able to find the corresponding files later and issue a warning. The files will be uploaded using FTP(S) and downloaded using HTTP(S). Let's say our domain example.com points to the root directory (/) on the FTP server. As our URL points to the directory updates, we should find it under /updates on our FTP server.
Of course, this can vary again, depending on your directory structure.