Welcome to My Movies. Please read below to understand how everything works :)
Ah! First of all, take a quick look at the results ;) And please, check it out on desktop and on mobile. https://dabit1.github.io/mymovies
- Installation
- Packages I used
- Development server
- Git commits
- Branching model
- Folder structure
- Code style and rules
- Duplicate code
- React
- Redux
- Routing
- Development methodologies I used
- Unit testing
- Acceptance testing
- End to end testing
- Styling
- Building
- Environments
- Continuous integration
- Clone repository to your machine
- Open a console and go to repository root folder
- Run
npm install
I only list the most relevant
- Dependencies:
- material-ui: An amazing UI components collection.
- prop-types: React typechecking.
- react: ReactJS framework package.
- react-dom: ReactJS DOM entry point.
- react-infinite-scroller: To apply infinite scrolling at lists.
- redux: To apply the Flux design pattern.
- react-redux: React bindings for Redux.
- redux-thunk: To enable asynchronous Redux actions.
- react-router-dom: To manage navigation.
- Development dependencies:
- babel-*: Transpilation from ^ES6 to ES5.
- webpack: Powerfull build tool. Don't you know it? :P
- react-hot-loader: Webpack plugin to reload without refreshing browser.
- commitizen: To normalize git commits.
- eslint: Code style guide. The code follows Airbnb code style.
- nightwatch: Selenium wrapper to make end to end tests.
- cucumber: Acceptance tests based on Gherkin.
- enzyme: React testing tools.
- jest: Unit and integration tests.
- fetch-mock: Tool to mock fetch() requests.
- react-redux-test: Tool to test the entire flow of redux, including React connected components. This package was built by me: https://github.com/dabit1/react-redux-test.
It is mounted by webpack and this is the command to run it:
npm start
Some features:
- Hot reloading: Every change you do in the code will be updated instantly without reloading browser.
- Source mapping: Although code is minified, source maps allows you to watch errors in console with the original code.
Commits must be written in a particular way. The recommendation is to use commitizien at least at the beginning. Once you learned how commits must be written you can go back with command line or your preferred git tool.
Commitizien should be installed globally:
npm install commitizen -g
Once it is installed, run it to commit:
git-cz
More information: https://github.com/commitizen/cz-cli
The project follows GitHub flow (not Git flow):
- Anything in the
masterbranch is deployable - To work on something new, create a descriptively named branch off of master (ie: new-oauth2-scopes).
- Commit to that branch locally and regularly push your work to the same named branch on the server.
- When you need feedback or help, or you think the branch is ready for merging, open a pull request.
- After someone else has reviewed and signed off on the feature, you can merge it into master.
- Once it is merged and pushed to
master, it will be deployed immediately.
More information: http://scottchacon.com/2011/08/31/github-flow.html
There is another branch named
testingwhich is used just in case you need to show new changes to others or others needs to do testing manually.
- ci: Scripts for continuous integration.
- config: Configuration files.
- env-vars: Environment variables.
- testing: Files related to testing.
- fakes: Raw data to emulate remote/async calls.
- nightwatch: Configuration related to end to end testing framework.
- webpack: Webpack configuration for each environment.
- e2e-features: End to end testing.
- step_definitions: Implementations of end to end features.
- features: Acceptance testing.
- step_definitions: Implementations of acceptance features.
- src:
- lib: Some libraries like API classes.
- components: React components.
- features: Components related to the application features.
- layout: Components related to layout application (header, footer, menu, etc).
- pages: Main components for each application screen.
- containers: HOC which connects React components with Redux.
- helpers: Any file which contains classes or functions that help about some tasks.
- img: Image files.
- redux: Every file related to Flux pattern.
- actions: Redux actions.
- reducers: Redux reducers.
- routing: Files related to application routing.
- scss: SCSS files.
The project meet Airbnb rules, which is also specific for React apart of Javascript. It ensures that you will code in the right way and everybody will be able to understand quickly all code. Also it prevents syntax errors and make the code more efficient. You have to install eslint plugin in your IDE. The command to check it:
npm run eslint
More information: https://github.com/airbnb/javascript
In order to avoid duplicate code we will execute a command to check it:
npm run jsinspect
Components should follow Container pattern. This pattern tells that there are two type of components, the presentational one and the container one. The container one stores and manages the state and the presentational one just renders its properties.
More information: https://medium.com/@dan_abramov/smart-and-dumb-components-7ca2f9a7c7d0
The project is ready to use Redux to manage the state. Redux is a package which bases its functionality on Flux pattern. The data flow is unidirectional, so make everything very predictable.
There are mainly 4 elements:
- Action: It is which describes what is happening.
- Reducer: It is which knows how the data from the action should be stored.
- Store: It is the store. All the data is inside of it.
- View: It is which dispatches the actions.

The folder
./src/reduxcontains every file related to Redux. Also, the folder./src/containerscontains the only React components that are directly connected to the state.
To manage routing the project uses react router. If you want to add, edit or remove routes you have to open the file ./src/routing/routes.js. The attribute path indicate the path which has to be matched in order to render the component.
{
  path:  '/about-us',
  component:  AboutUs,
}
Information about attributes: https://reacttraining.com/react-router/web/api/Route
Add modal: true to render a route as a modal. Every modal should have a parent route. It means that, if for example you have the path /about-us/details as a modal, the path /about-us must exists as well in order to render some page behind of the modal.
More information: https://reacttraining.com/react-router/web/guides/philosophy
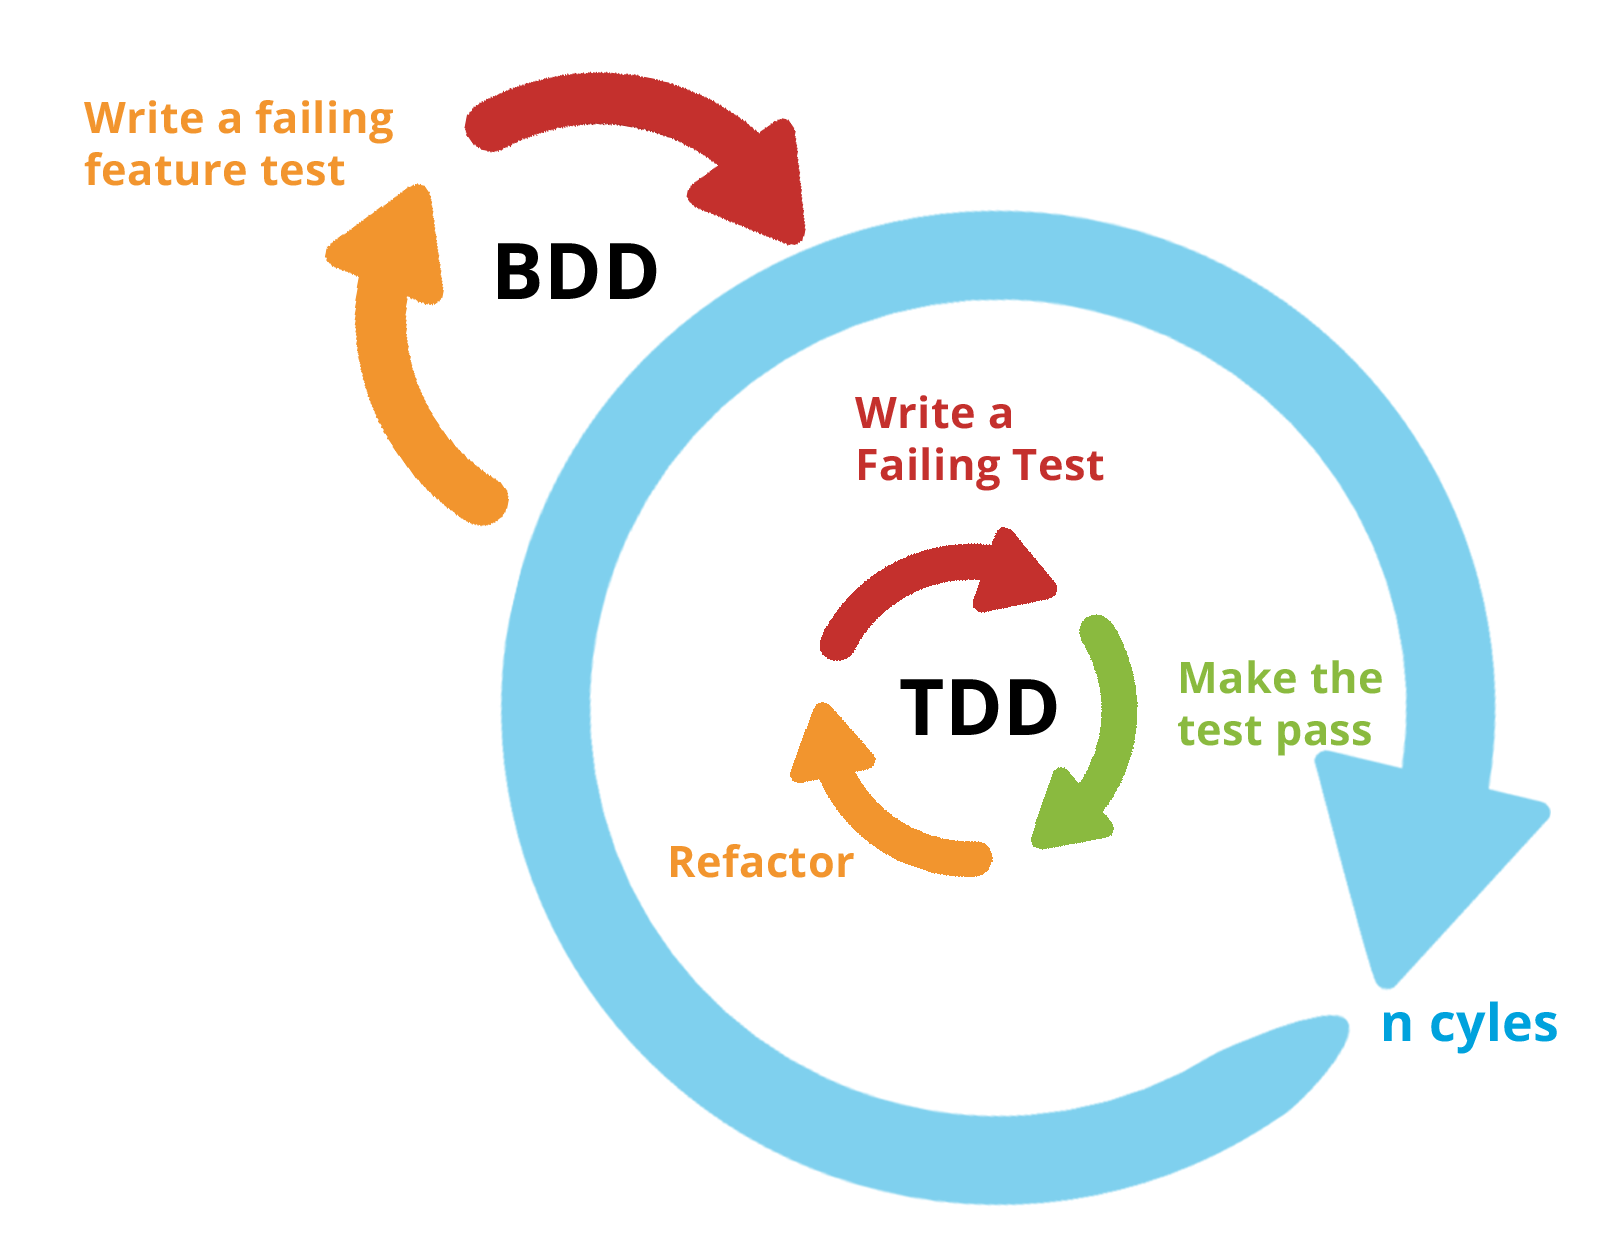
I developed the application following Behavior Driven Development (BDD) and Test Driven Development (TDD) methodologies. I separated the development in three fases, the first one to write the business logic, the second one to write the user interface and the third one to style the application. The first two fases follows similar steps.
These are the steps I followed:
- I wrote the app requirements/features in a declarative way using Gherkin language
- I wrote failing acceptance test of a scenario/use case
- I wrote failing unit and/or small-integration tests
- I made the unit and/or small-integration tests pass
- I refactored it
- I made the acceptance test of a secnario/use case pass
- I refactored it
- I repeated the steps from 2 to 4 until every feature was done
- I wrote the app requirements in a imperative way using Gherkin language
- I wrote failing end to end acceptance test of a scenario/use case
- I made the end to end acceptance test of a scenario/use case pass
- I refactored it
- I repeated the step 6 until every feature was done
- I styled the entire application
The unit tests coverage I got is 100%.
The acceptance tests are in the folder
featuresande2e-features. The unit tests and integration tests are next to the file they are testing with the extension.test.js.
BDD&TDD graphic representation:
It is managed with Jest, Enzyme and react-redux-test. Test files should be placed next to the file they are testing. For example, if you want to test the file ./src/helpers/functions.js you should create the file ./src/helpers/functions.test.js.
The command to run tests is:
npm test
The test coverage you must meet is defined in ./config/testing/setup-json.json.
They are managed with Cucumber. First of all you have to create the feature in Gherkin language and then to implement it. The command to run tests is:
npm run test:features
There is a command to create step definitions javascript file automatically after writing .feature file. For example, if you created a feature file called
my-feature.featurethen if you runnpm run test:features:create-steps features/my-feature.featurea file with javascript code is going to be created in step_definitions folder.
They are managed with Nightwatch and Cucumber. First you have to create the feature in Gherkin language and next implement it. By default tests are running in Chrome. The command to run tests is:
npm run test:e2e-features
npm run test:e2e-features:firefox
npm run test:e2e-features:mobile
There is a command to create step definitions javascript file automatically after writing .feature file. For example, if you created a feature file called
my-feature.featurethen if you runnpm run test:e2e-features:create-steps e2e-features/my-feature.featurea file with javascript code is going to be created in step_definitions folder.
It is created through SCSS and following ITCSS structure in order to organise files as better as possible.
More information: https://www.xfive.co/blog/itcss-scalable-maintainable-css-architecture/
To create a bundler run npm run build.
In development environment you can check what are you adding to your builds with bundle analyzer plugin. Just see in the console and after starting de development server you'll see a message indicating how to open Webpack bundle analyzer.
For NodeJS, the application has only 2 environments which are production and development. You can know in which environment you are through process.env.NODE_ENV. However, for the development process exists 3 environments which are production, testing and development. testing is an exactly clon of production except some configurations like the hostname of the API (go to ./config/env-vars). To know in which environment you are counting with testing you can check it through process.env.TARGET_ENV.
The project works with TravisCI to have a continuous integration and continuous delivery. Everytime you push your changes TravisCI will check that everything is ok, and in that case it will deploy it.