[GUIDE] Tips, Tricks & Tutorials for getting fully up and running openSUSE MicroOS Desktop (Baldur Edition)


In my project you will first receive a brief overview of the Linux distribution openSUSE MicroOS and will also receive some helpful tips in the areas of virtualization, Flatpak apps and display settings, to name just a few. Some executable scripts will also be published here that are intended to make the implementation of certain tasks quicker and easier. Of course, this always depends on the application and intended use. And now have fun exploring, experimenting and using openSUSE MicroOS!
*openSUSE Baldur is still in the development phase and is not yet officially available as a system role in the openSUSE MicroOS installation image, please keep this in mind!

- 1. Brief overview of openSUSE MicroOS
- 1.1 What is openSUSE MicroOS?
- 1.2 What features does openSUSE MicroOS offer?
- 1.3 Which download variants are available?
- 1.4 Which desktops can I choose with OpenSUSE MicroOS?
- 2. openSUSE Baldur
- 2.1 What is openSUSE Baldur?
- 2.2 Who is openSUSE Baldur for?
- 2.3 What are the design goals of this version of openSUSE MicroOS Desktop?
- 2.4 How can I download and Install this?
- 2.5 What special features are there?
- 2.6 How can I change the language for the system or user to another language?
- 3. Tips & tricks for openSUSE MicroOS
- 3.1 QEMU/KVM with GPU, PCI-USB, ... Passthrough
- 3.1.1 Which packages need to be installed?
- 3.1.2 How can I turn off the password prompt when starting the “Virt Manager” application?
- 3.1.3 Which parameters need to be set in the grub file?
- 3.1.4 Can I change the default directory/drive for the virtual machines (guests)?
- 3.1.5 What settings need to be made in Virt Manager, for example to be able to pass on the graphics card?
- 3.1.6 The latest update in MicroOS (version: 20231101) means that KVM cannot start the "default" network!
- 3.2 Flatpak-Runtime & -Apps
- 3.2.1 How do I install, update or remove Flatpak apps?
- 3.2.2 Can I change the appearance of Flatpak apps?
- 3.3 OBS-Studio & Elgato Stream Deck's
- 3.3.1 How can I activate the "Virtual Camera" function for OBS-Studio under openSUSE MicroOS?
- 3.3.2 Can I use the Elgato Stream Deck on openSUSE MicroOS?
- 3.4 Connect to your mobile phone with KDE-Connect or the GSConnect's Gnome extension
- 3.5 Linux Security with YubiKey
- 4. Additional information & links
Designed to host container workloads with automated management and patching. Installing openSUSE MicroOS gives you a fast, small environment for deploying containers or other workloads that benefit from transactional updates. As a rolling release distribution, the software is always up to date.
As a modern Linux operating system, openSUSE MicroOS is characterized as follows:
- Small: Lightweight images designed to be deployed for a specific use case
- Scalable: Optimized for large deployments while capable as a single machine OS
- Always up-to-date: Updates are automatically applied without impacting the running system
- Resilient: In case of trouble the system automatically rolls back to last working state
- Fast: Doesn't ship with baggage that slows it down
In other words, openSUSE MicroOS is an operating system you don't have to worry about. It is designed for, but not limited to, container hosts and edge devices. The focus on unattended operation makes it particularly suitable for large deployment environments. openSUSE MicroOS inherits the knowledge of openSUSE Tumbleweed and SUSE Linux Enterprise and redefines the operating system into a small, efficient and reliable distribution.
In order to be able to install openSUSE MicroOS on the respective system, a variety of different images are available, such as:
- Intel or AMD 64-bit desktops, laptops, and servers (x86_64) image
- UEFI Arm 64-bit servers, desktops, laptops and boards (aarch64) image
- KVM and XEN image
- VirtualBox image
- VMware image
- MS HyperV image
- ...
If you are interested in installing it on your system yourself, then go to the download area of openSUSE images!
| Desktop environment? | Packages installed? | Memory (RAM) usage? | Yubikeys are supported?[^5] | Official supported? | |
|---|---|---|---|---|---|
| openSUSE Base | Terminal | 320 (rpm), 0 (flatpak) | > 200 MB | ||
| openSUSE Aeon | GNOME | ~ 1200 (rpm), 10 (flatpak) | > 850 MB | ||
| openSUSE Baldur | Xfce | ~ 1200 (rpm), 10 (flatpak) | > 620 MB | ||
| openSUSE Kalpa | KDE Plasma | ~ 1300 (rpm), 10 (flatpak) | > 780 MB |
openSUSE Baldur provides only a minimal base system with a XFCE Desktop Environment and Basic Configuration Tools ONLY. All Applications, Browsers, Codecs, etc are provided by FlatPaks from FlatHub.
It is NOT for everyone. Your highly customisable Tumbleweed & Leap Desktops are safe and will remain the best choice for those who want to tinker with their Desktop.
It should be perfect for lazy developers, who no longer want to mess around with their desktop and just ”get stuff done”, especially if they develop around containers.
It should also appeal to the same audience now more used to an iOS, Chromebook or Android-like experience where the OS is static, automated & reliable and the Apps are the main thing the user cares about.
To deep dive on the origins and the case why some users should use openSUSE Baldur check out the following workshop:
Baldur should be reliable, predictable & immutable, just like openSUSE MicroOS.
Baldur should be less customisable than regular openSUSE Tumbleweed/Leap.
Baldur should be small, but not at the expense of functionality. Printing, Gaming, Media Production and much more should all work.
Baldur should just work “out of the box” without the need for additional configuration to get key functionality like software installation and web browsing working. All features offered by default should work - features that don't work shouldn't be offered/visible/available to users.
Since openSUSE Baldur is still in development and is not in the official installation medium of openSUSE MicroOS, the installation is still a bit complicated!
Because some Linux knowledge is required in terms of using the command line in order to be able to run the installation script after the basic installation of openSUSE MicroOS.
For this reason, please watch the above two videos!
And this would be the command after the basic installation of openSUSE MicroOS to get only the XFCE desktop without configured Flatpak and a new non root user:
curl https://raw.githubusercontent.com/cryinkfly/openSUSE-Baldur/main/minimal-install.sh && chmod +x minimal-install.sh && ./minimal-install.sh | tee minimal-install.log
This would be the command after the basic installation of openSUSE MicroOS to get the XFCE desktop with configured Flatpak (Apps preinstalled: Firefox, Calculator, Texteditor & Flatseal) and a new non root user:
curl https://raw.githubusercontent.com/cryinkfly/openSUSE-Baldur/main/install.sh > install.sh && chmod +x install.sh && ./install.sh | tee install.log
The basic installation of openSUSE MicroOS to get the XFCE desktop with the XFCE Initial Setup for configuring all things is still in progress at the moment!
With both installation variants, a log file is created about the installation so that you can find any errors when installing the packages more quickly!
Since openSUSE Baldur is basically structured in the same way as openSUSE Aeon and Kalpa, it also offers the same functions!
However, openSUSE Baldur has a few special features:
- Graphics card driver: The installation script install the graphics card drivers (e.g.: NVIDIA CUDA, ...) automaticly!
- Keyboard shortcuts: The keyboard shortcuts have been adapted directly for the XFCE and Flatpak environment!
- 2FA authentication: The 2FA authentication using external devices such as a Yubikey works out-of-the-box after installing openSUSE Baldur!
- ...
In other words, openSUSE Baldur is a new flavor of openSUSE MicroOS Desktop that gives users a light, fast and stable working environment.
Now the language can be adjusted under openSUSE Baldur via the XFCE settings!

Or you can change the language manually via the terminal.
Here is an example of the conversion to German:
echo "export LANGUAGE=de_DE.utf8
export LANG=de_DE.utf8
export LC_ALL=de_DE.utf8" > $HOME/.i18n
The language settings take effect automatically when the user logs out and logs in again.
And if you are looking for the right name for your language, you can run the following command:
locale -a
This will give you a list of enabled locales!
Related software packages from openSUSE Leap and Tumbleweed software repositories are organized into installation patterns. openSUSE MicroOS uses openSUSE Tumbleweed repositories as a basis and therefore you can use these patterns to install specific virtualization components on an already running openSUSE MicroOS.
Use transactional-update to install them:
sudo transactional-update pkg install -t pattern PATTERN_NAME
To install the KVM environment, consider the following patterns:
sudo transactional-update pkg install -t pattern kvm_server kvm_tools
sudo transactional-update -c pkg install -y libvirt libvirt-client libvirt-daemon virt-manager virt-install virt-viewer qemu qemu-kvm qemu-ovmf-x86_64 qemu-tools
- kvm_server = Installs basic VM Host Server with the KVM and QEMU environments.
- kvm_tools = Installs libvirt tools for managing and monitoring VM Guests in KVM environment.
And if you prefer to install the Xen environment, consider the following patterns:
sudo transactional-update pkg install -t pattern xen_server xen_tools
- xen_server = Installs a basic Xen VM Host Server.
- xen_tools = Installs libvirt tools for managing and monitoring VM Guests in Xen environment.
The following packages are also required to find out the device IDs and for changing some config files:
sudo transactional-update -c pkg install pciutils usbutils nano
And after successful installation of all packages and reboot, the libvirt service should be activated:
sudo systemctl enable --now libvirtd
With the addition of the "libvirt" user group, for example, the "normal" user is no longer asked for the "root" password when starting the "Virt Manager" application!
And for that you have to execute the following command:
sudo usermod -aG libvirt $USER
Enable the IOMMU feature and the [vfio-pci] kernel module on the KVM host (line 6).
- for AMD CPU, set [amd_iommu=on iommu=pt video=efifb:off]
- for INTEL CPU, set [intel_iommu=on iommu=pt video=efifb:off]
Note 1: The "video=efifb:off" option should only be added if your system is configured to automatically load the graphical environment! If you want to switch to the graphical environment via the terminal after booting, you may no longer see the terminal.
Note 2: In addition, the option causes problems with some NVIDIA graphics cards!
Note 3: Basically, the "amd_iommu=on" or "intel_iommu=on" option would also suffice, but you get better performance in the guest VM with the "iommu=pt" option and with the "video=efifb:off" option will prevent the driver from stealing the GPU.

-
The following commands must be executed1:
su -c 'nano /etc/default/grub' -
Save changes with "Ctrl+X -> "Y".
-
Show PCI identification number and [Vendor-ID:Device-ID] of the graphics card2 and USB controller:
lspci -nn | grep -i amd #All AMD graphics cards are displayed!

lspci -nn | grep -i nvidia #All NVIDIA graphics cards are displayed!

lspci -nn | grep -i usb #All USB devices (controllers) are displayed!
- 12:00.0 VGA compatible controller [0300]: Advanced Micro Devices, Inc. [AMD/ATI] Navi 24 [Radeon PRO W6400] [1002:7422]
- 12:00.1 Audio device [0403]: Advanced Micro Devices, Inc. [AMD/ATI] Navi 21/23 HDMI/DP Audio Controller [1002:ab28]
- 06:00.0 USB controller [0c03]: ASMedia Technology Inc. ASM2142/ASM3142 USB 3.1 Host Controller [1b21:2142]
-
Two files (/etc/modprobe.d/vfio.conf &/etc/modules-load.d/vfio-pci.conf) must be created and your device-specific numbers must be entered there:
su -c 'echo "options vfio-pci ids=1002:7422,1002:ab28,1b21:2142" > /etc/modprobe.d/vfio.conf && echo "vfio-pci" > /etc/modules-load.d/vfio-pci.conf' -
You need to rebuild the initial ram disk to include all the needed modules. Create a file named /etc/dracut.conf.d/gpu-passthrough.conf:
su -c 'nano /etc/dracut.conf.d/gpu-passthrough.conf' # Insert the respective line that matches your CPU! # INTEL CPU: add_drivers+="pci_stub vfio vfio_iommu_type1 vfio_pci vfio_virqfd kvm kvm_intel" #OR FOR AMD CPU: add_drivers+="pci_stub vfio vfio_iommu_type1 vfio_pci vfio_virqfd kvm kvm_amd" -
Save changes with "Ctrl+X -> "Y" and now we regenerate grub and rebuild the initrd by executing:
sudo transactional-update grub.cfg

# With the -c option, the latest or given snapshot as base continues to be used after the regenerate grub.
sudo transactional-update -c initrd

sudo reboot
In order to be able to change the default storage location of KVM Libvirt, you should also change this file (/etc/libvirt/qemu.conf):
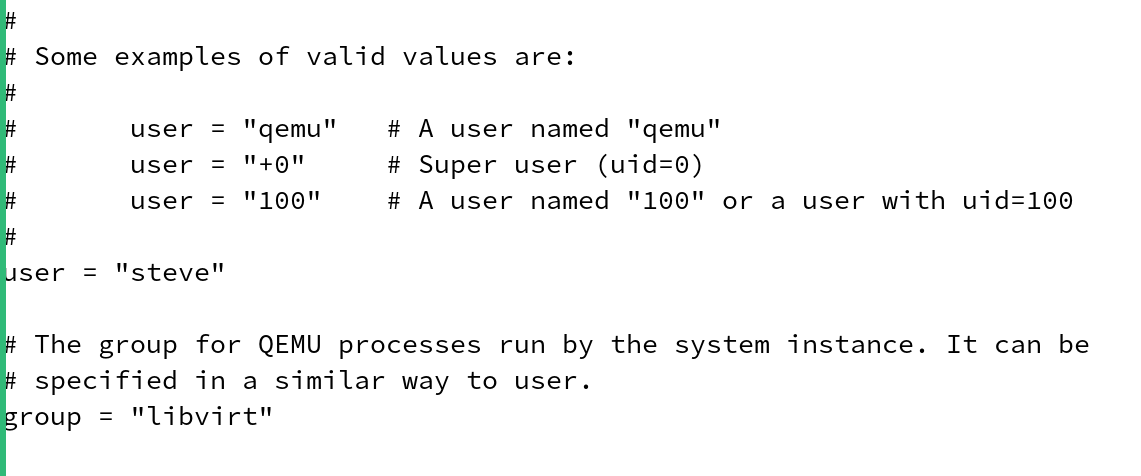
su -c 'nano /etc/libvirt/qemu.conf'
Note: The username "steve" should be replaced with your username!
Save changes with "Ctrl+X -> "Y" and reboot the system with:
sudo reboot
Further information can be found here:
- https://ostechnix.com/how-to-change-kvm-libvirt-default-storage-pool-location/
- https://ostechnix.com/solved-cannot-access-storage-file-permission-denied-error-in-kvm-libvirt/
3.1.5 What settings need to be made in Virt Manager, for example to be able to pass on the graphics card?
I have already published a video on my YouTube channel where I showed how, for example, you can pass a graphics card and a PCI USB card to the guest.
3.1.6 The latest update in MicroOS (version: 20231101) means that KVM cannot start the "default" network!
I have already written a workaround for this problem and you can read it here: #2
Flatpak applications are installed either via the Gnome Software Center/Discover or via the terminal. The user can search for and install any application in the Software Center himself or install[^3] them all at once via the terminal.
Please look this videos here:
And install the Flatpak-App "Flatseal" on your system with this command:
flatpak install --user com.github.tchx84.Flatseal
- https://www.gnome-look.org/p/1359276 <- Tela circle icon theme
- https://www.gnome-look.org/p/1831077 <- Colloid cursors theme
- https://www.gnome-look.org/p/1357889 <- Orchis gtk theme (Orchis-Teal version)
- https://itsfoss.com/flatpak-app-apply-theme/ <- How to Apply GTK Themes on Flatpak Applications?
Please look this video here: https://youtu.be/V-0yngWXbU4?feature=shared&t=1625


First, the package ... must be installed with the following command:
sudo transactional-update -c pkg install v4l2loopback-kmp-default
So that the “Virtual Camera” function can actually be used in OBS Studio under openSUSE MicroOS, a file (/etc/modules-load.d/v4l2loopback.conf) must be created using the following command via the terminal:
su -c 'echo "v4l2loopback" > /etc/modules-load.d/v4l2loopback.conf'

sudo reboot
After a restart, the “Virtual Camera” function can now be used in OBS Studio!
Yes, the Elgato Stream Deck can be used on Linux by implementing or installing a few things.
The best way to do this is with the Flatpak app Boatswain, for example!

Boatswain3 can then be installed via the app store (Gnome Software Center/Discover) or via the terminal with the following command:
flatpak install --user com.feaneron.Boatswain com.obsproject.Studio.Plugin.WebSocket
After that you have to do the following things:
-
List all USB Devices Details using lsusb command:
lsusb
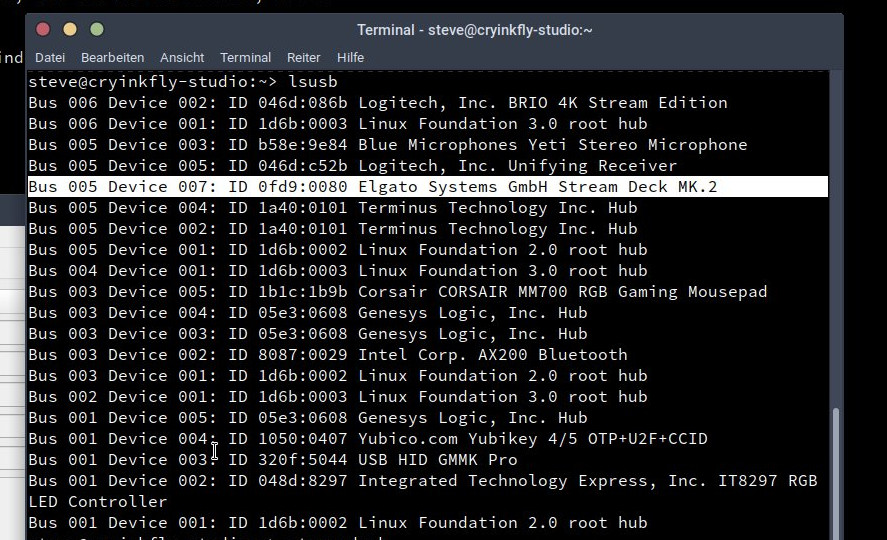
-
Then you need to replace the ATTRS{idVendor} and ATTRS{idProduct} in the following command:
su
-
Elgato Stream Deck Mini:
echo 'SUBSYSTEM=="usb", ATTRS{idVendor}=="0fd9", ATTRS{idProduct}=="0063", TAG+="uaccess"' >> /etc/udev/rules.d/70-streamdeck.rules -
Elgato Stream Deck Original:
echo 'SUBSYSTEM=="usb", ATTRS{idVendor}=="0fd9", ATTRS{idProduct}=="0060", TAG+="uaccess"' >> /etc/udev/rules.d/70-streamdeck.rules -
Elgato Stream Deck Original (v2):
echo 'SUBSYSTEM=="usb", ATTRS{idVendor}=="0fd9", ATTRS{idProduct}=="006d", TAG+="uaccess"' >> /etc/udev/rules.d/70-streamdeck.rules -
Elgato Stream Deck XL:
echo 'SUBSYSTEM=="usb", ATTRS{idVendor}=="0fd9", ATTRS{idProduct}=="006c", TAG+="uaccess"' >> /etc/udev/rules.d/70-streamdeck.rules -
Elgato Stream Deck XL (v2):
echo 'SUBSYSTEM=="usb", ATTRS{idVendor}=="0fd9", ATTRS{idProduct}=="008f", TAG+="uaccess"' >> /etc/udev/rules.d/70-streamdeck.rules -
Elgato Stream Deck MK.2:
echo 'SUBSYSTEM=="usb", ATTRS{idVendor}=="0fd9", ATTRS{idProduct}=="0080", TAG+="uaccess"' >> /etc/udev/rules.d/70-streamdeck.rules -
Elgato Stream Deck Pedal:
echo 'SUBSYSTEM=="usb", ATTRS{idVendor}=="0fd9", ATTRS{idProduct}=="0086", TAG+="uaccess"' >> /etc/udev/rules.d/70-streamdeck.rules
-
After that, it is best to restart the system:
exit sudo reboot -
Then all you have to do is pair Boatswain with OBS Studio: https://www.youtube.com/watch?v=zrgQyrtQrCo
Further information can be found here:
So if you don't use a Gnome desktop environment, then you need to install the KDE-Connect app.
And you can do this with the following command:
sudo transactional-update -c pkg install kdeconnect-kde
Otherwise, simply install the GSConnect's Gnome extension via your web browser of your choice and activate it.
You need to make the following changes to your firewall settings:
sudo firewall-cmd --zone=public --add-port=1714-1764/tcp --permanent
sudo firewall-cmd --zone=public --add-port=1714-1764/udp --permanent
#OR
su -c 'firewall-cmd --zone=public --add-port=1714-1764/tcp --permanent && firewall-cmd --zone=public --add-port=1714-1764/udp --permanent'

sudo reboot
Further information can be found here:
- https://extensions.gnome.org/extension/1319/gsconnect/
- https://en.opensuse.org/SDB:KDE_Connect
- https://www.cyberciti.biz/faq/set-up-a-firewall-using-firewalld-on-opensuse-linux
For example, so that the USB sticks from Yubico can be used under openSUSE MicroOS, a few packages must be installed on your system.
And that can be done with the following command:
sudo transactional-update -c pkg install pcsc-ccid pcsc-tools
The Yubico Authenticator and KeePassXC can then be installed via the app store (Gnome Software Center/Discover) or via the terminal with the following command:
flatpak install --user com.yubico.yubioath org.keepassxc.KeePassXC
You can find further important information here:
- https://microos.opensuse.org/
- https://en.opensuse.org/Portal:Aeon
- https://en.opensuse.org/Portal:Baldur
- https://en.opensuse.org/Portal:Kalpa
- https://www.cryinkfly.com
- https://www.facebook.com/cryinkfly/
- https://www.instagram.com/cryinkfly/
- https://www.youtube.com/@cryinkfly