Cloudinary offers a command line interface (CLI) that enables you to make API calls directly in your terminal. The Cloudinary CLI runs on top of the Python SDK.
The information in this repository's README follows along the structure of the Cloudinary Academy course, Introduction to Cloudinary's CLI and even includes some examples for topics we do not cover in the Introduction to Cloudinary's CLI Course, such as Presets, Named Transformations, Backups, and Auto-Upload mapping.
If you would like to take this 50 minute course, you can enroll for free at training.cloudinary.com.
The information below corresponds with the slides used in Introduction to Cloudinary's CLI.
Course Topics:
- Introduction: 2:42 minutes
- Environment Setup: 3:38 minutes
- Helper Tools: 1:36 minutes
- Uploading: 12:07 minutes
- Cloudinary URLs: 2:31 minutes
- Managing Assets: 11:50 minutes
- Sync: 3:11 minutes
- Transformations: 10:02 minutes
- Further Support: 1:53 minutes
- Python 3.6 or greater
- Download: https://www.python.org/downloads/
- Mac : brew install recommended https://brew.sh/
# install brew
mkdir homebrew && curl -L https://github.com/Homebrew/brew/tarball/master | tar xz --strip 1 -C homebrew

# install python
brew install python3Initial install:
pip3 install cloudinary-cliUpdate Cloudinary Package:
pip3 install cloudinary-cli --upgradeSign up for free account or login.
Navigate to: https://cloudinary.com/console
Once you have a Cloudinary account, you can access your CLOUDINARY_URL/API Environment Variable in your Dashboard, as shown below. This credential is comprised of all three of your credentals combined into one line of code. You’ll use the CLOUDINARY_URL to authenticate and get authorization to upload. You can easily copy the CLOUDINARY_URL into your clipboard by clicking on the clipboard icon.

For Mac (bash or zsh):
export CLOUDINARY_URL=cloudinary://API_KEY:API_SECRET@cloud_nameFor Windows (powershell):
set CLOUDINARY_URL=cloudinary://API_KEY:API_SECRET@cloud_nameAfter setting the environment variable, call config to make cloud_name, api_secret, and api_key available to the CLI.
Running the config command will out put these values separately in the terminal. If you ever accidentally reveal the API_SECRET, you can reset in the console.
export CLOUDINARY_URL=cloudinary://API_KEY:API_SECRET@cloud_name
cld config
    cloud_name:	cloud_name
    api_key:	API_KEY
api_secret: ***************************You setup and reference multiple configs by name. If you set up using this command, you'll need to reference the Cloudinary config by name when you issue a command.
Setup by name (usage)
cld config --from_url <CLOUDINARY_URL from console>
cld -C <cloud_name> <command>
Setup by name (example)
cld config --from_url cloudinary://API_KEY:API_SECRET@cloud_name
cld -C cloud_name configYou can get usage help on any command
cld --help # lists available commands
cld <command> --help #general help

example:
cld search --help 	# Search API usage

cld <API> #Lists functions of that API

example:
cld admin     # Admin API functions
cld uploader    # Upload API functions
You can easily access the HTML for Cloudinary widgets via the CLI, which you can then copy/paste and embed on your site.
Upload Widget:
cld make upload widgetMedia Library widget:
cld make media library widgetProduct Gallery widget:
cld make product_gallery widgetVideo Player widget:
cld make video_player widgetUpload (usage)
cld upload file [options] Upload (examples)
cld upload sample.jpg resource_type=image
cld upload sample.jpg resource_type=auto
cld upload sample.jpg
cld upload dog.mp4 resource_type=video
cld upload dog.mp4 resource_type=auto
cld upload dog.mp4
cld upload data.json resource_type=raw
cld upload data.json resource_type=auto
cld upload data.json
Resource type can be found in the URL after the cloud name.
res.cloudinary.com/demo/image/upload/sample.jpg
res.cloudinary.com/demo/video/upload/dog.mp4
Explicitly Set the public id. The uploaded asset public id will be sample.
cld upload sample.jpg public_id=sample_idAssign the Asset Filename. The uploaded public id will be sample.
cld upload sample.jpg use_filename=true unique_filename=falseIf you remove the options to make the unique filename false or set it to true, the filename will be appended with _xxxxxx representing 6 random characters. The uploaded public id will be sample_xxxxxx.
cld upload sample.jpg use_filename=true If you don't specify a public id or filename the asset public id will be a string of 32 random characters.
cld upload sample.jpgYou can create folders (directories) on the fly by adding them to your public id. The following examples create assets with the same public id.
$ cld upload sample.jpg public_id=my_folder/my_sub_folder/my_nameYou can also specify folders as an option.
cld upload sample.jpg folder=my_folder/my_sub_folder/ public_id=my_namecld upload http://www.example.com/sample.jpgcld upload s3://my-bucket/my-path/example.mp4cld upload 'data:image/png;base64,iVBORw0KGgoAAAANSUhEUgAAAAUAAAAFCAYAAACNbyblAAAAHElEQVQI12P4//8/w38GIAXDIBKE0DHxgljNBAAO9TXL0Y4OHwAAAABJRU5ErkJggg=='cld upload ftp://user1:mypass@ftp.example.com/sample.jpgFetch is a "delivery" type. Other deliver types include upload, private and authenticated. You find these after the resource type in the URL.
[res.cloudinary.com/demo/image/upload/sample.jpg](https://res.cloudinary.com/demo/image/upload/sample.jpg]
![https://res.cloudinary.com/demo/image/upload/sample.jpg]](https://res.cloudinary.com/demo/image/upload/sample.jpg%5D)
With Fetch you specify the full URL of the remote image and that URL can be found in the Cloudinary URL. Fetch is only for images.
cld url -t fetch 'http://upload.wikimedia.org/wikipedia/commons/b/b1/Carnegiea_gigantea_(3).jpg'The cld url command creates a URL string. The string created by the command above is show below.
res.cloudinary.com//image/fetch/http://upload.wikimedia.org/wikipedia/commons/b/b1/Carnegiea_gigantea_%283%29.jpg
You may need to change your settings because Fetched URL is disabled by default.
Create a mapping between a Cloudinary folder and a remote URI (path). Auto-Upload will work for all asset types.
cld create_upload_mapping \
remote_media \
template=https://upload.wikimedia.org/wikipedia/
Create a URL to request an asset using the mapping to upload the asset to Cloudinary in the mapped folder.
cld url --open remote_media/commons/b/b4/Apollo_7_Florida.jpg
We'll be using the URL helper to create URLs. URL requests are handled by Cloudinary and cached on the CDN and then a response is returned.
We can create a URL string
Usage
cld url [OPTIONS] PUBLIC_ID [TRANSFORMATION]If you want to make a request using the URL, add the --open option
cld url --open [OTIONS] PUBLIC_ID [TRANSFORMATION]Admin functions
(10 by default).
cld admin resourcesFor up to 500 in the list.
cld admin resources max_results=500List all images with prefix.
cld resources type=upload prefix=sampleUsage
cld upload rename old_name new_nameExample
cld upload rename sample old-sampleRemove one asset at a time using pubic id.
cld uploader destroy sampleRemove multiple assets using public id.
cld admin delete_resources image1,image2Remove multiple assets using prefix.
cld admin delete_resources_by_prefix sundaycld upload sample.jpg tags=animalcld add_tag animal public_ids=samplecld remove_tag animal samplecld remove_all_tags sample Use the invalidate option.
cld destroy sample invalidate=trueSynchronize a local directory to the cloud using push and pull command. push copies the local directory up to the cloud and pull downloads a cloud directory to the local file system.
Usage
# upload
cld sync --push <local directory> <cloud directory>
# download
cld sync --pull <local directory> <cloud directory>
Examples
cld sync --push ~/Pictures/images test-imagescld sync --pull ~/Pictures/myimages test-imagesTransformations can be provided as comma separated lists of options as they appear in the URL or as key/value assignments.
Create URLs with Transformations including cropping (height, width, crop), formatting (fetch_format) and compressing (quality).
The code below will set the width to 300, height to 200 and crop using scale by default. The resource type is set to video.
This example provides the transformation as it would appear in the URL and the resource type as an option.
cld url dog.mp4 w_300,h_200,c_crop -rt videoYou'll see this URL: res.cloudinary.com/demo/video/upload/w_300,h_200,c_crop/dog.mp4
This example provides the transformation as a key/value assignment. The f_ is a shorthand for format.
cld url toshi.jpg f_autoYou'll see this URL: res.cloudinary.com/demo/image/upload/f_auto/toshi.jpg
This example provides the transformation as a key/value assignment
cld url robot.jpg q_autoYou'll see this URL: res.cloudinary.com/demo/image/upload/q_auto/robot.jpg
Use r_<value> to create rounding similar to the CSS border-radius. A value of max will create a circle.
cld url face_left.png w_200,h_200,g_face,r_max,c_thumbYou'll see this URL:
res.cloudinary.com/demo/image/upload/w_200,h_200,c_thumb,g_face,r_max/face_left.png
Use bo_<size in pixels>_<style>_<color> to create borders similar to the CSS border command.
cld url sample.jpg bo_5px_solid_redYou'll see this URL: res.cloudinary.com/demo/image/upload/bo_5px_solid_red/sample.jpg
Use b_<option> to add a background color. Options include auto which chooses the image predominant color, or auto:border_contrast, or auto:predominant_contrast.
cld url sample.jpg h_300,w_300,c_pad,b_autoYou'll see this URL:
res.cloudinary.com/demo/image/upload/h_300,w_300,c_pad,b_auto/sample.jpg
The e_ is for effect. You can see the documentation on effects and filters to see all the options.
In the transformation below the balloon has an orange outline.
cld url -o -t upload -o balloon.png h_200/e_outline,co_orange/You'll see this URL. Notice that the outline has a width and blur. The values are defaulted in but you can add your own. The width is 15px and the blur is 200.
res.cloudinary.com/demo/image/upload/h_200,c_scale/e_outline:15:200,co_orange/balloon.png
The improve effect is one of many that apply visual enhancements: improve, gamma,auto_brightness, auto_contrast, auto_color, fill_light, vibrance, contrast, viesus_correct.
cld url -o sample.jpg e_improve:outdoorYou'll see this URL
res.cloudinary.com/demo/image/upload/e_improve:outdoor/sample.jpg
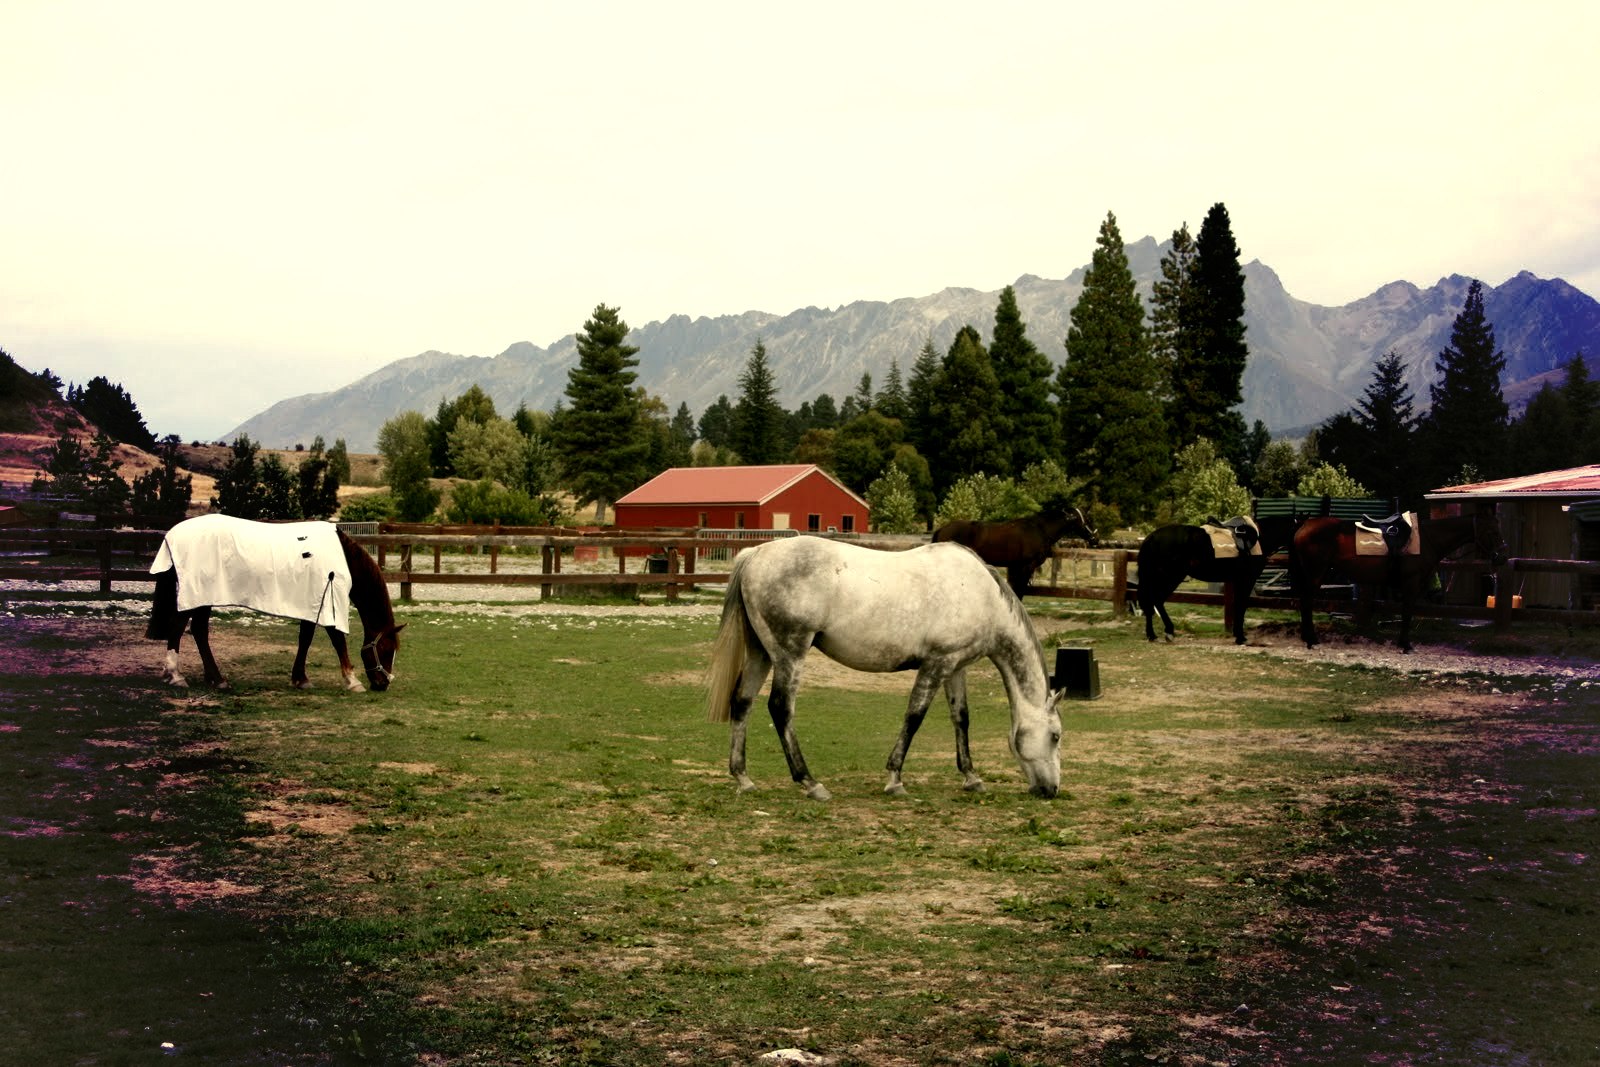
Try out some of the art filters: al_dente, athena, artistic, audrey, artistic filteraudrey, daguerre and more.
cld url -o horses.jpg e_art:quartzYou'll see a URL like this
res.cloudinary.com/demo/image/upload/e_art:quartz/horses.jpg
You render an image, video, or text on top of another asset. These have many uses including watermarking.
This positions the icon on top of the other image using a compass position of north_east which is the upper right.
cld url \
sample.jpg \
l_cloudinary_icon,g_north_east
You'll see a URL like this
res.cloudinary.com/demo/image/upload/l_cloudinary_icon,g_north_east/sample.jpg
When specifying text you need to use it like this font_family_<size in pixels>_<style>:<text>. This example using x, y positioning relative to the center of gravity, which in this case is the north_east. The text is therefore offset down and left 15 pixels from the upper right. If gravity is not included the default is the center of the asset. The color can be specified as a hex value like this example or with a color name.
cld url \
-t upload \
-o \
sample.jpg \
c_scale,w_500/co_rgb:ffff00,g_north_east,l_text:Times_90_bold:Bees!,x_15,y_15
You'll see a URL like this
Preset are a named set of instructions to be carried out when an asset is uploaded. It's often used to apply similar crop instructions to any asset that uses it.
The preset below is named mobile_profile_photo and instructs that the asset be cropped using a 640x640 limit crop. It also assigns a tag with the value mobile_upload to the asset.
cld admin create_upload_preset name=mobile_profile_photo width=640 height=640 crop=limit tags=mobile_uploadcld upload santa.jpg upload_preset=mobile_profile_photoAny transformation string can be stored by name. This can make cleaner URLs and be used for templates. The transformation is named small_fill2 in the example below. The gravite=face option will attempt center the image on face.
cld admin create_transformation small_fill2 width=150 height=100 crop=fill gravity=facecld url sample t_small_fill2https://res.cloudinary.com/picturecloud7/image/upload/t_small_fill2/sample
Enable and Configure backups in the DAM.
You can use the CLI ensure a specific asset is backed up.
cld upload sample.jpg backup=trueIntroduction to Cloudinary's CLI Course (Free!)
Cloudinary Academy GitHub Respositories
Support Email support@cloudinary.com
- tent.jpg - image from Pexels by Sagui Andrea
- hiker.jpg - image from Pexels by Ali Kazal
- hiking.jpg - image from Pexels by Sagui Andrea
- dolomites.jpg - photo from Pexels by Thomas Vitali
- pnw.jpg - image from Pexels by PNW Production
- coffee-with-a-view.jpg - image from Pexels by Andy Vu
- backpack.mp4 - video from Pexels by Mikita Yo
- water-bottle.mp4 - video from Pexels by Taryn Elliott
- kids-hiking.mp4 - video from Pexels by RDNE Stock Project
- waterfall.mp4 - video from Pexels by Beckett Johnson
- crossing.mp4 - video from Pexels by Yaroslav Shuraev