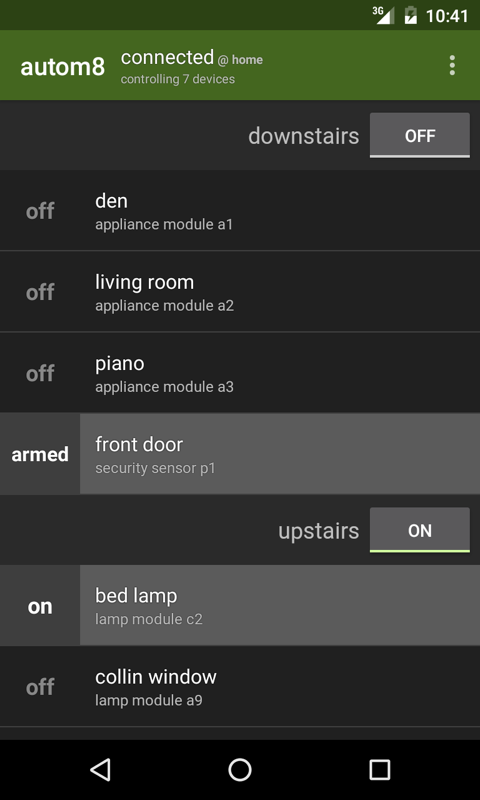
Turn on lights and monitor security sensors in your house, from your phone.
autom8 is a home automation client and server I've been hacking on since my friend gave me some spare parts in 2007.
It's really useful if you happen to own the supported hardware.
The autom8 server runs in both Windows and Linux. It runs best on a Raspberry Pi with Raspbian Jessie.
Standard 3-clause BSD
- X10 CM15A device controller
- WGL V572RF32 transceiver
- LM456 lamp module
- AM466 appliance module
- DS10A door/window sensor
- MS10A motion detector
- And probably more generic x10 sensors... but untested

To compile you need to check out the sources. Make sure git is installed, then:
cd ~/src/git clone git@github.com:clangen/autom8.git
The autom8 Android app makes use of the Retrolambda Gradle plugin. Make make sure you have JDK 8 installed, and have set the JAVA8_HOME environment variable appropriately.
- Install Android Studio 2.0 or newer.
- Import the project
- Build and Run
System diagram:
+--------------------------------------------------------+
|                   android client                       |
+--------------------------^-----------------------------+
                           |
+--------------------------v-----------------------------+
|           main server (autom8_server_ui.exe)           |
+--------------------------^-----------------------------+
                           |
+--------------------------v-----------------------------+
|                    libautom8.dll                       |
+----------^---------------------------------------------+
           |
+----------v-----------+  +------------------------------+
|  ActiveHome Pro SDK  <-->     x10 cm15a controller     |
+----------------------+  +------------------------------+
The server listens on TCP port 7901 by default.
- Visual Studio 2015 with the 32-bit C++ compiler (https://www.visualstudio.com/en-us/products/visual-studio-community-vs.aspx)
- Boost 1.60 (https://sourceforge.net/projects/boost/files/boost-binaries/1.60.0/)
- QT 5.7 with 32-bit MSVC2015 libraries (http://download.qt.io/official_releases/online_installers/qt-unified-windows-x86-online.exe)
- Qt5Package VS Addin (https://visualstudiogallery.msdn.microsoft.com/c89ff880-8509-47a4-a262-e4fa07168408)
- ActiveHome Pro SDK (http://www.starbasestudios.net/ahk/ahsdk_install.exe)
All other dependencies are included in the source.
The Visual Studio Solution (autom8.sln) assumes the following directory structure:
./
../
    autom8/
        autom8.sln
        ...
    boost_1_60_0/
        ...
That is: autom8 and boost should share the same parent directory.
- Open /autom8.sln
- Configure the Qt5Package Addin:
- Main Menu -> QT -> Qt Options
- Qt Version -> Add
- Name: 5.7
- Path: d:\path\to\Qt\5.7\msvc2015
- Configure the QTDIR environment variable:
- Main Menu -> View -> Other Windows -> Property Manager
- autom8_server_qt -> Debug | Win32
- Double click QtConfig
- User Macros
- Name: QTDIR
- Value: d:\path\to\Qt\5.7\msvc2015
- Compile and Run
System diagram:
+--------------+  +--------------+  +--------------------+
|  web client  |  | admin client |  |   android client   |
+-------^------+  +-------^------+  +----------^---------+
        |                 |                    |
+-------v-----------------v--------------------v---------+
|                main server (autom8.js)                 |
+---------------------------^----------------------------+
                            |
+---------------------------v----------------------------+
|                   node.js / C bridge                   |
+---------------------------^----------------------------+
                            |
+---------------------------v----------------------------+
|                      libautom8.so                      |
+--------^-----------------------------------------------+
         |
+--------v-------+  +------------------------------------+
|     mochad     <-->        x10 cm15a controller        |
+----------------+  +------------------------------------+
Ports the main server listens on by default:
- native/android client: TCP/7901
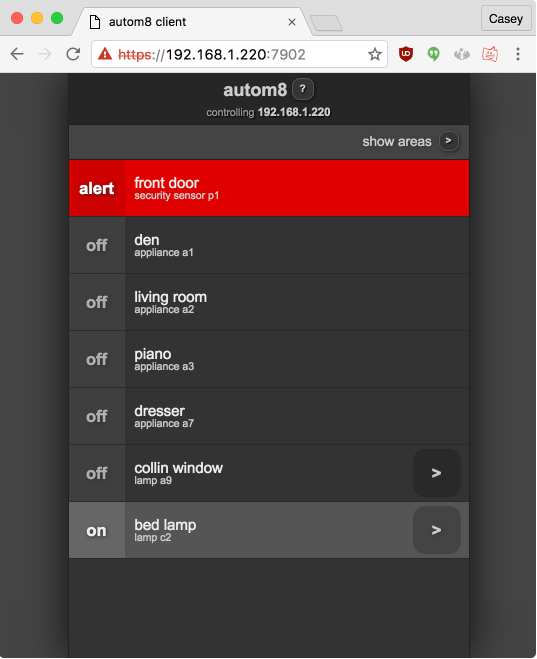
- web client: HTTPS/7902
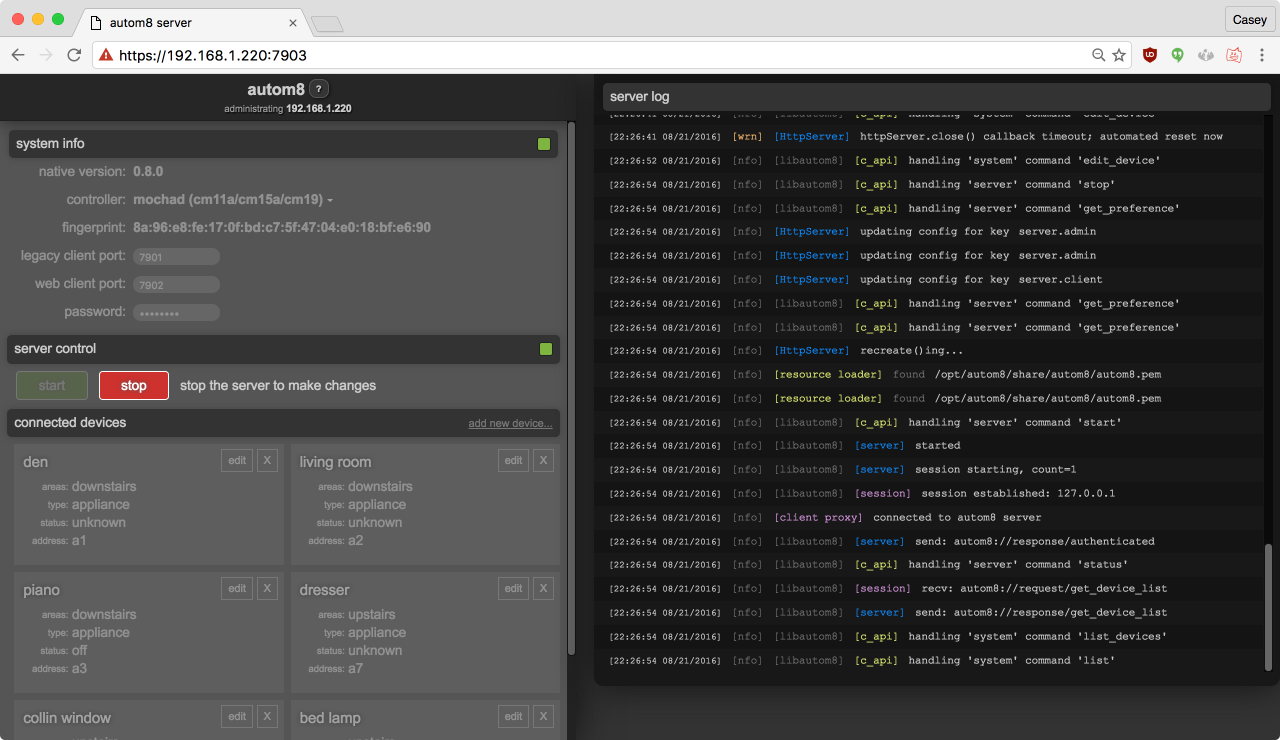
- admin client: HTTPS/7903
autom8 works well on Debian Jessie.
It works especially well on a Raspberry Pi running Raspbian Jessie.
- sudo apt-get install build-essential clang llvm libboost-chrono-dev libboost-system-dev libboost-regex-dev libboost-date-time-dev libboost-filesystem-dev libboost-thread-dev libssl-dev libsqlite3-dev libusb-1.0-0-dev
The default apt-supplied version of nodejs is too old; install version v4.4.
- curl -sL https://deb.nodesource.com/setup_4.x | sudo -E bash -
- sudo apt-get install -y nodejs
- sudo npm install -g grunt grunt-cli
https://sourceforge.net/projects/mochad/files/mochad-0.1.16.tar.gz/download
- tar xvfz mochad-0.1.16.tar.gz
- cd mochad-0.1.16
- ./configure
- make
- sudo make install
- cd ~/src/autom8
- ./bin/build
- cd build/
- sudo ./install -p /opt/autom8/
Note 1: bin/build is a shell script that will do the following:
- Run
maketo compilelibautom8.so - Run
gruntto compile the admin and web clients - Stage all files required for distribution to
build/stage - Copy an
installscript tobuild/
Note 2: build/install is a shell script that will:
- Create a new user as specified by the
-uparameter (defaults toautom8). the autom8 server will be run as this user, and device configuration will be stored in the~/user/.autom8. - Use npm to compile and install all required node dependencies for the app to run
- Install an init script called
autom8-serverto/etc/init.d/so you can run autom8 automatically at boot - Copy (install) all required files to the path specified by the required
-pparameter.-p /opt/autom8is recommended.
- sudo /etc/init.d/autom8-server start
If you want to start the server on boot:
- sudo update-rc.d autom8-server defaults 99
If you're using the autom8 Linux server then you can easily configure port numbers and SSL certificates.
Edit /opt/autom8/share/autom8/config.json (note, you can also copy it to /etc/autom8/config.json, which will take precedence). Update the cert and key values to point towards your preferred credentials.
- Q1: I'm having problems installing nodejs on my older Raspberry Pi
- A1: It's probably because you need an ARM V6 build. Try to use this deb: http://node-arm.herokuapp.com/node_latest_armhf.deb
- Q2: The server doesn't seem to be starting
- A2: Tail the logs and try to start it again, hopefully you will get some useful diagnostic output.
tail -f /tmp/autom8.log