DeepLabCut can be run on Windows, Linux, or MacOS (see more details at technical considerations).
There are several modes of installation, and the user should decide to either use a system-wide (see note below), Anaconda environment based installation (recommended), or the supplied Docker container (recommended for Ubuntu advanced users). One can of course also use other Python distributions than Anaconda, but Anaconda is the easiest route.
Simply download the appropriate files here: https://www.anaconda.com/distribution/
Anaconda is perhaps the easiest way to install Python and additional packages across various operating systems. With Anaconda you create all the dependencies in an environment on your machine.
Please click here to get these files (and more info).
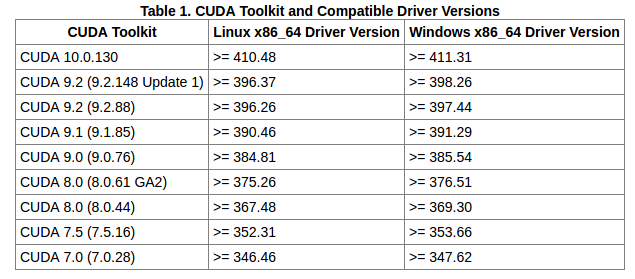
CRITICAL: If you have a GPU, you should FIRST then install the NVIDIA CUDA (10 or LOWER) package and an appropriate driver for your specific GPU, then you can use the supplied conda file. Please follow the instructions found here https://www.tensorflow.org/install/gpu, and more tips below, to install the correct version of CUDA and your graphic card driver. The order of operations matters.
- Here we provide notes on how to install and check your GPU use with TensorFlow (which is used by DeepLabCut and already installed with the Anaconda files above). Thus, you do not need to independently install tensorflow.
In the Nature Neuroscience paper, we used TensorFlow 1.0 with CUDA (Cuda 8.0); in the Nature Protocols paper, we tested up through TensorFlow 1.14 with CUDA 10. Some other versions of TensorFlow have been tested (i.e. these versions have been tested 1.2, 1.4, 1.8 and 1.10-1.14, but might require different CUDA versions - CUDA 10.1+ is NOT supported)! Currently, TensorFlow 2.0 is not supported. Please check your driver/cuDNN/CUDA/TensorFlow versions on this StackOverflow post.
Currently, TensorFlow 2.X is NOT supported!
Here is an example on how to install the GPU driver + CUDA 9 + optional TensorFlow 1.12 will follow here:
FIRST, install a driver for your GPU (we recommend the 384.xx) Find DRIVER HERE: https://www.nvidia.com/download/index.aspx
- check which driver is installed by typing this into the terminal:
nvidia-smi
SECOND, install CUDA (9.0 here): https://developer.nvidia.com/cuda-90-download-archive (Note that cuDNN, https://developer.nvidia.com/cudnn, is supplied inside the anaconda environment files, so you don't need to install it again).
THIRD: Launch the provided Anaconda Environment File "DLC-GPU" (see here!)
FOURTH, Please check your CUDA and TensorFlow installation with the lines below:
Start a python session:
ipython
import tensorflow as tf
sess = tf.Session(config=tf.ConfigProto(log_device_placement=True))
You can test that your GPU is being properly engaged with these additional tips.
TensorFlow: Here are some additional resources users have found helpful (posted without endorsement):

FFMEG:
- A few Windows users report needing to install ffmeg as described here: https://video.stackexchange.com/questions/20495/how-do-i-set-up-and-use-ffmpeg-in-windows (A potential error could occur when making new videos).
DEEPLABCUT:
- if you git clone or download this folder, and are inside of it then
import deeplabcutwill import the package from there rather than from the latest on PyPi!
Now you can use Jupyter Notebooks, Spyder, and to train just use the terminal, to run all the code!
If you perform the system-wide installation, and the computer has other Python packages or TensorFlow versions installed that conflict, this will overwrite them. If you have a dedicated machine for DeepLabCut, this is fine. If there are other applications that require different versions of libraries, then one would potentially break those applications. The solution to this problem is to create a virtual environment, a self-contained directory that contains a Python installation for a particular version of Python, plus additional packages. One way to manage virtual environments is to use conda environments (for which you need Anaconda installed).
-
Computer:
- For reference, we use e.g. Dell workstations (79xx series) with Ubuntu 16.04 LTS or 18.04 LTS and run a Docker container that has TensorFlow, etc. installed (https://github.com/MMathisLab/Docker4DeepLabCut2.0).
-
Computer Hardware:
- Ideally, you will use a strong GPU with at least 8GB memory such as the NVIDIA GeForce 1080 Ti or 2080 Ti. A GPU is not necessary, but on a CPU the (training and evaluation) code is considerably slower (10x) for ResNets, but MobileNets are faster (see WIKI). You might also consider using cloud computing services like Google cloud/amazon web services or Google Colaboratory.
-
Camera Hardware:
- The software is very robust to track data from any camera (cell phone cameras, grayscale, color; captured under infrared light, different manufacturers, etc.). See demos on our website.
-
Software:
- Operating System: Linux (Ubuntu), MacOS* (Mojave), or Windows 10. However, the authors strongly recommend Ubuntu! *MacOS does not support NVIDIA GPUs (easily), so we only suggest this option for CPU use or a case where the user wants to label data, refine data, etc and then push the project to a cloud resource for GPU computing steps, or use MobileNets.
- Anaconda/Python3: Anaconda: a free and open source distribution of the Python programming language (download from https://www.anaconda.com/). DeepLabCut is written in Python 3 (https://www.python.org/) and not compatible with Python 2.
pip install deeplabcut- TensorFlow
- You will need TensorFlow (we used version 1.0 in the paper, later versions also work with the provided code (we tested TensorFlow versions 1.0 to 1.14) for Python 3 with GPU support.
- To note, is it possible to run DeepLabCut on your CPU, but it will be VERY slow (see: Mathis & Warren). However, this is the preferred path if you want to test DeepLabCut on your own computer/data before purchasing a GPU, with the added benefit of a straightforward installation! Otherwise, use our COLAB notebooks for GPU access for testing.
- Docker: We highly recommend advaced users use the supplied Docker container. NOTE: this container does not work on windows hosts!
Return to readme.