This project takes an image as an input and processes it to create a custom drawing.

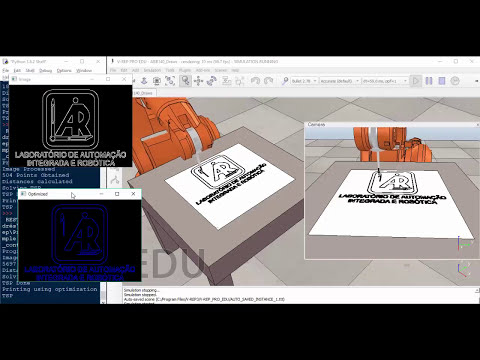
Look at a video of the simulation in VREP now CoppeliaSim.
And a video of the implementation in the real robot.
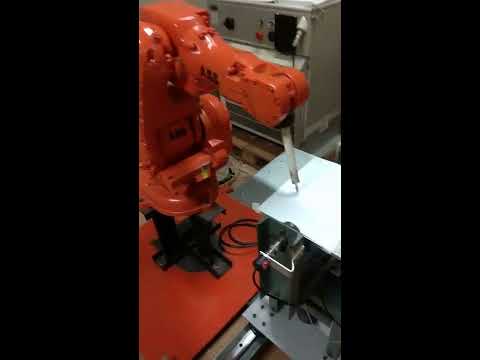
Sample of the obtained drawing in the real robot


It is not the best, but the algorithm can be improved.
This idea can be applied to customize/individualize products in mass.

This project uses:
- Image processing (Input image)
- Trajectory optimization (Draw)
- Inverse Kinematics (Robot Arm)
This project proposes implementing the real robot's obtained results using its proprietary language RAPID, bringing a self-generated code to get this result. (USE THIS FEATURE WITH CAUTION, IN THIS CASE, THE CODE IS OPTIMIZE TO THE FEATURES/CONFIGURATION/CALIBRATION OF THE ROBOT I AM USING)
The image processing tries to obtain the edges of the image.

Then the problem is taken as an optimization problem, as follows:

The trajectory looks like this:

- It is possible to control the robot with the global coordinate system.
- The use of Inverse Kinematics on the robot is not required.
- A “Dummy” point may be a reference point that would be the starting point of the work area.
Dummy point:

The implementation of kinematics in VREP needs:
- Create an associated SERVER in the API using TCP / IP on the host.
- Create a class constructor for each of the objects to be used
- Modify the position of the associated object in the robot's final tool or effector

- Understand the structure and syntax of RAPID code
- Abstractly generate a code template that can be executed in any case.
- Create the template in text form in the desired language (considering the possible changes in the code in the different requirements).
- Adjust and implement the code.
Used template:

VREP/CoppeliaSim, these files are included in the software (provided API by Coppelia):
Make sure you have the following files in your directory:
-
vrep.py
-
vrepConst.py
-
the appropriate remote API library: "remoteApi.dll" (Windows), "remoteApi.dylib" (Mac) or "remoteApi.so" (Linux)
In Windows, you can find them on: C:\Program Files\CoppeliaRobotics\CoppeliaSimEdu\programming\remoteApiBindings\lib\lib
(This information was obtained from the simulator examples)
I worked with the next libraries:
opencv-python == 4.1.1.26
numpy == 1.17.1
tsp-solver == 0.1
- Open the ABB140_Draws.ttt and press Play
- Go to the Source_Code folder
- Run the code ABB140_control.py
- If you want to change the input image file, put it on the Image folder in the Source_Code folder and be sure of use its name on the ABB140_control.py program.
It should work without any additional configuration.