Home

The qDomyos-Zwift app developed by Roberto Viola for iOS and Android allows users to create a Bluetooth connection between a treadmill or exercise bike and the popular online, virtual training world of Zwift. The qDomyos-Zwift app also allows users to create a customizable dashboard displaying various real-time metrics including elapsed time, speed, cadence, resistance, instantaneous output, average output, and power training zone among others. Furthermore, the qDomyos-Zwift app allows users to record and save workout sessions in .FIT or .GPX file format to upload your activity to fitness sites such as Strava, Garmin, MapMyFitness, etc.
Here are a few basic user instructions to help new users get started:
Purchasing & Downloading the app:
It’s always a good idea before downloading any new apps, to ensure that your devices operating system is up to date. Most apps are maintained to work best on the most recent operating system.
Purchases of this app are connected to your App Store Account
- iOS: qDomyos-Zwift on Apple App Store
- Minimum Requirements: iPhone or iPad running iOS 12.0 or later
- Android: qDomyosZwift on Google Play Store
- Minimum Requirements: Android 5.0 or later
Also, there is a Facebook Group dedicated to this app - search for qdomyos-zwift to find it.
Before using the app the first time it is recommended to configure the settings according to your needs. They can be adjusted later as well.
NOTE: Each time you make a change in the settings menu, if there is an OK button on the right you must click OK to set the change. When you are done making changes, you must close the app completely (quit the app) and reopen it in order for the changes to take effect. Each time the app restarts, it will retain the settings from the previous session.
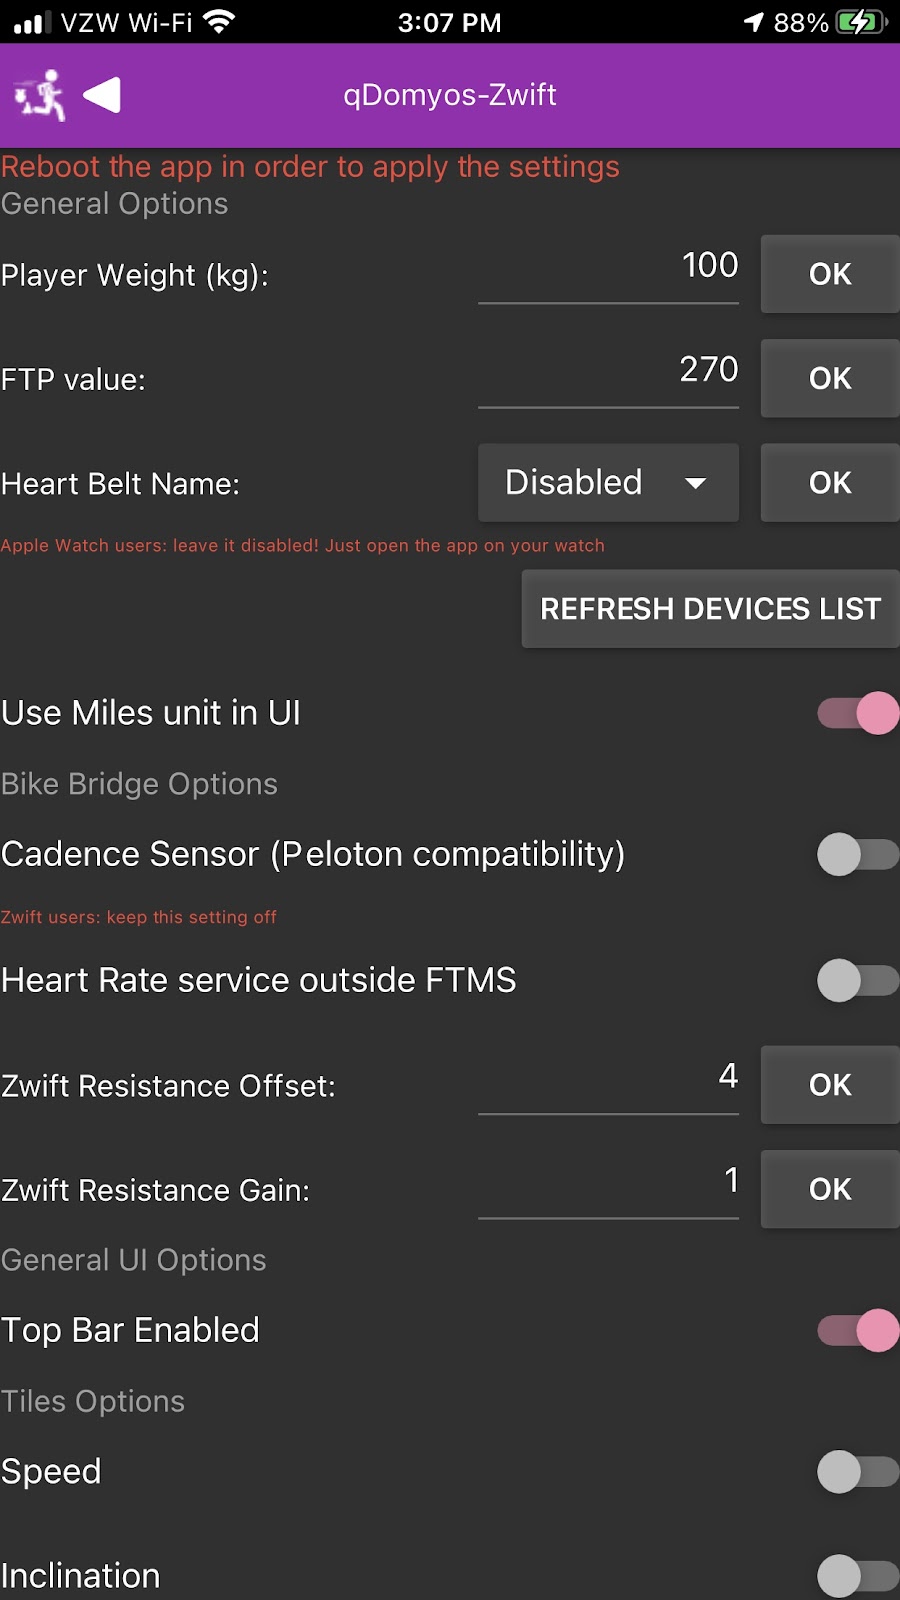
GENERAL OPTIONS - These options are used in general calculations, communication and display within the app and behind the scenes.
- Enter user weight in kilograms
- Enter user FTP Value - this is your total average watts output during an FTP test. For more information visit: Peloton Power Zone Basics
- Heart Belt Name: select your heart rate belt or band if you have one or leave it to disabled if you don’t have one. If your heart rate does not appear, click the “REFRESH DEVICES LIST” button and wait 10-20 seconds and check again in the list. Apple Watch users: leave this setting disabled.
- Refresh Devices List: press this to refresh the Heart Belt list
- Use Miles Unit in UI: Toggle on for Miles/Off for Kilometers
- Cadence Sensor (Peloton Compatibility): Toggle On to allow Peloton Digital App (iOS Only) to see qDomyos App as a Cadence Sensor and display cadence on screen within Peloton Digital App (iOS Only)
- Heart Rate Service Outside FTMS: For iOS Users and Android Users using Android v9.0 or older, this setting enables the qDomyos App to create a new bluetooth service for the heart rate instead of adding it to FTMS. In short: If you are not using Android v10.0+ and you use qDomyos with zwift, leave it enabled, in all the other cases, disable it.
- Zwift Resistance Offset: Forget about gears. You need to get yourself into the mindset of being on a Fixie (single geared bike). You’re best thinking of this setting as your fixed, single gear. It’s like the gear you feel comfortable spinning on a flat with. This will differ depending on your strength and fitness, so you’ll want to play about with it.
Note: this setting is only applicable for bikes supporting electronically controlled resistance. - Zwift Resistance Gain: This scales the resistance taken from your bike before reporting it to Zwift. Logically, the default is set to 1. But if you’re feeling a disconnect in speed between what you’re doing and what you’re seeing reflected on screen in Zwift then you may want to consider tweaking this. For example, a value of 1.25 will result in a 25% faster visual speed in Zwift, since this is determined by your resistance and cadence. It's worth mentioning this is technically “gaming” or cheating Zwift so you need to weigh up the importance you place on virtual simulation vs a real world simulation.
Note: this setting is only applicable for bikes supporting electronically controlled resistance - Top Bar Enabled: Toggle On to show “Start”, ”Pause”, “Stop” and Connection Status Details at the top of the dashboard screen, toggle off if not needed.

- Speed - Toggle on to display speed in “Miles per Hour” or “Kilometers per Hour”
- Inclination (Treadmill Only) - Toggle on to display treadmill incline
- Cadence (Bike Only) - Toggle on to display bike pedal cadence in rpm.
- Elevation (Treadmill Only) - Toggle on to display total elevation gain
- Calories - Toggle on to see estimated calories burned during session
- Odometer - Toggle on to see estimated distance traveled during session
- Pace (Treadmill Only) - Toggle on to see current pace per km or mile
- Resistance (Bike Only) - Toggle on to see resistance as broadcast by bike - for example value 1 - 32 for Echelon Brand Bikes
- Watt - Toggle on to see an instantaneous display of the amount of power you are producing in Watts; in other words a measure of how hard you are working
- AVG Watt - Toggle on to see the average power produced for the duration of the session
- FTP% - Toggle on to see an instantaneous display of the percentage of FTP and Power Zone (Z1 - Z7), refer to Power Zones
- Heart - Toggle on to see real time heart rate display from separate heart rate strap, compatible fitness device, or Apple Watch
- Fan (Treadmill Only) - See and control built-in treadmill fan speed
- Joules - Toggle on to see the cumulate power produced during the session. 1 Watt = 1 Joule/Second
- Elapsed - Toggle on to see total time elapsed from beginning of session
- Peloton Resistance (Bike Only) - Toggle on to see resistance converted from bike brand resistance scale (i.e. Echelon 1-32) to Peloton resistance (1-100) so that riders can more easily follow instructors guidance.


- Relaxed Bluetooth for mad devices: use only in case you lose connection to your bike or treadmill every 30 seconds.
- Simulate Battery Service: useful if you want to connect qDomyos-Zwift to Garmin/Polar watch
- Service Changed Service: you should never use this.
- Virtual Device: it should be always on. This setting, if off, will disable the ability to use peloton or zwift. The user can disabled it just to assist in diagnosing phone/tablet Bluetooth issues.
Using a spin bike on Zwift has a number of benefits including structured training, social community, and connection to 3rd party apps like Strava, Garmin, TrainingPeaks, MapMyRide, etc.
To connect an Echelon Exercise Bike to Zwift, you will need the following:
- Echelon Connect Bike (EX-1LE, EX-3, EX-5, EX-5S, Connect Sport, Connect Prime)
- iOS or Android Device Running qDomyos-Zwift App
- Separate Device (iOS, Android, Mac, Windows, or AppleTV) Running Zwift - Note, this must be a separate device from the device running the qDomyos-Zwift app. Check Zwift.com for minimum system requirements.
- Ensure your bike is plugged in. Pedal a bit to “wake up” your bike.
- On iOS/Android device open the qDomyos-Zwift App. It should automatically detect and connect to your bike and begin displaying metrics.
- Connect Heart Rate Monitor to qDomyos-Zwift App:
- Apple Watch - Ensure qDomyos-Zwift Watch App is running - it may take up to 1 min for the watch app to begin displaying heart rate.
- Other Heart Rate Monitor - it may take up to 30 second to connect to the HRM
- On a separate device open Zwift. Log in.
- When you reach the device pairing screen:
- First Pair Power Source - Selecting the iOS/Android Device running qDomyos-Zwift App
- Second Pair Cadence Source - Selecting the iOS/Android Device running qDomyos-Zwift App
- Third Pair Heart Rate Source - Selecting the iOS/Android Device.

From this point, you should be ready to get Zwifting. If you experience issues connecting devices, please check/try the following:
- Confirm that qDomyos-Zwift App and Zwift are running on separate devices.
- Try closing all apps on both devices and starting again fresh.
- Ensure that Bluetooth is enabled on the device that is running Zwift app. To resolve BLE Pairing Issues on a MacBook visit this helpful page: Zwift Support: MAC BLE Pairing Issues
- Ensure that Cadence Sensor (Peloton Compatibility) Setting is toggled off in qDomyos-Zwift App. Remember when you change a setting you need to close the app and reopen the app.
- Try unplugging your bike for 10 seconds and plugging it back in.
Two Device Solution for iOS:
For this solution, you will need the following:
- Echelon Connect Bike (EX-1LE, EX-3, EX-5, EX-5S, Connect Sport, Connect Prime)
- iOS Device Running qDomyos-Zwift App
- Optional: Heart Rate Monitor or Apple Watch - If you want to use your Apple Watch as a Heart Rate monitor then you will need to run the qDomyos-Zwift App on the iPhone that is paired with your Apple Watch
- iOS/iPadOS Device Running Peloton Digital App
Peloton Digital App on iOS/iPadOS is capable of displaying cadence and heart rate from an external sensor, which is how it will see qDomyos-Zwift App. This is not possible on other OS (Android, AppleTV, FireStick, etc.) or in the browser-based version of Peloton workouts. This may be desirable because using this information, the Peloton Digital App will record your Cadence and Heart Rate performance within the “Workouts” section of your profile. However, it will not record things like distance or output.
To display Cadence and Heart Rate in Peloton Digital App on iOS follow these steps:
- Ensure your bike is plugged in. Pedal a bit to “wake up” your bike.
- On iOS device open the qDomyos-Zwift App. It should automatically detect and connect to your bike and begin displaying metrics.
- Connect Heart Rate Monitor to qDomyos-Zwift App:
- Apple Watch:
- Launch qDomyos-Zwift App on Apple Watch. If it is not installed you may need to go into the Apple Watch App on your paired iPhone and install the qDomyos-Zwift App onto your Apple Watch
- Press (Long) Start on qDomyos-Zwift App on Apple Watch. Confirm Heart Rate is displayed on qDomyos-Zwift App on Apple Watch and on iPhone
- Other Heart Rate Monitor - no actions are required from the user
- Apple Watch:
- On second iOS/iPadOS device open Peloton Digital App
- Select your workout and begin workout
- Tapping on the screen will bring up a series of icons on the right hand side of the screen as seen below:
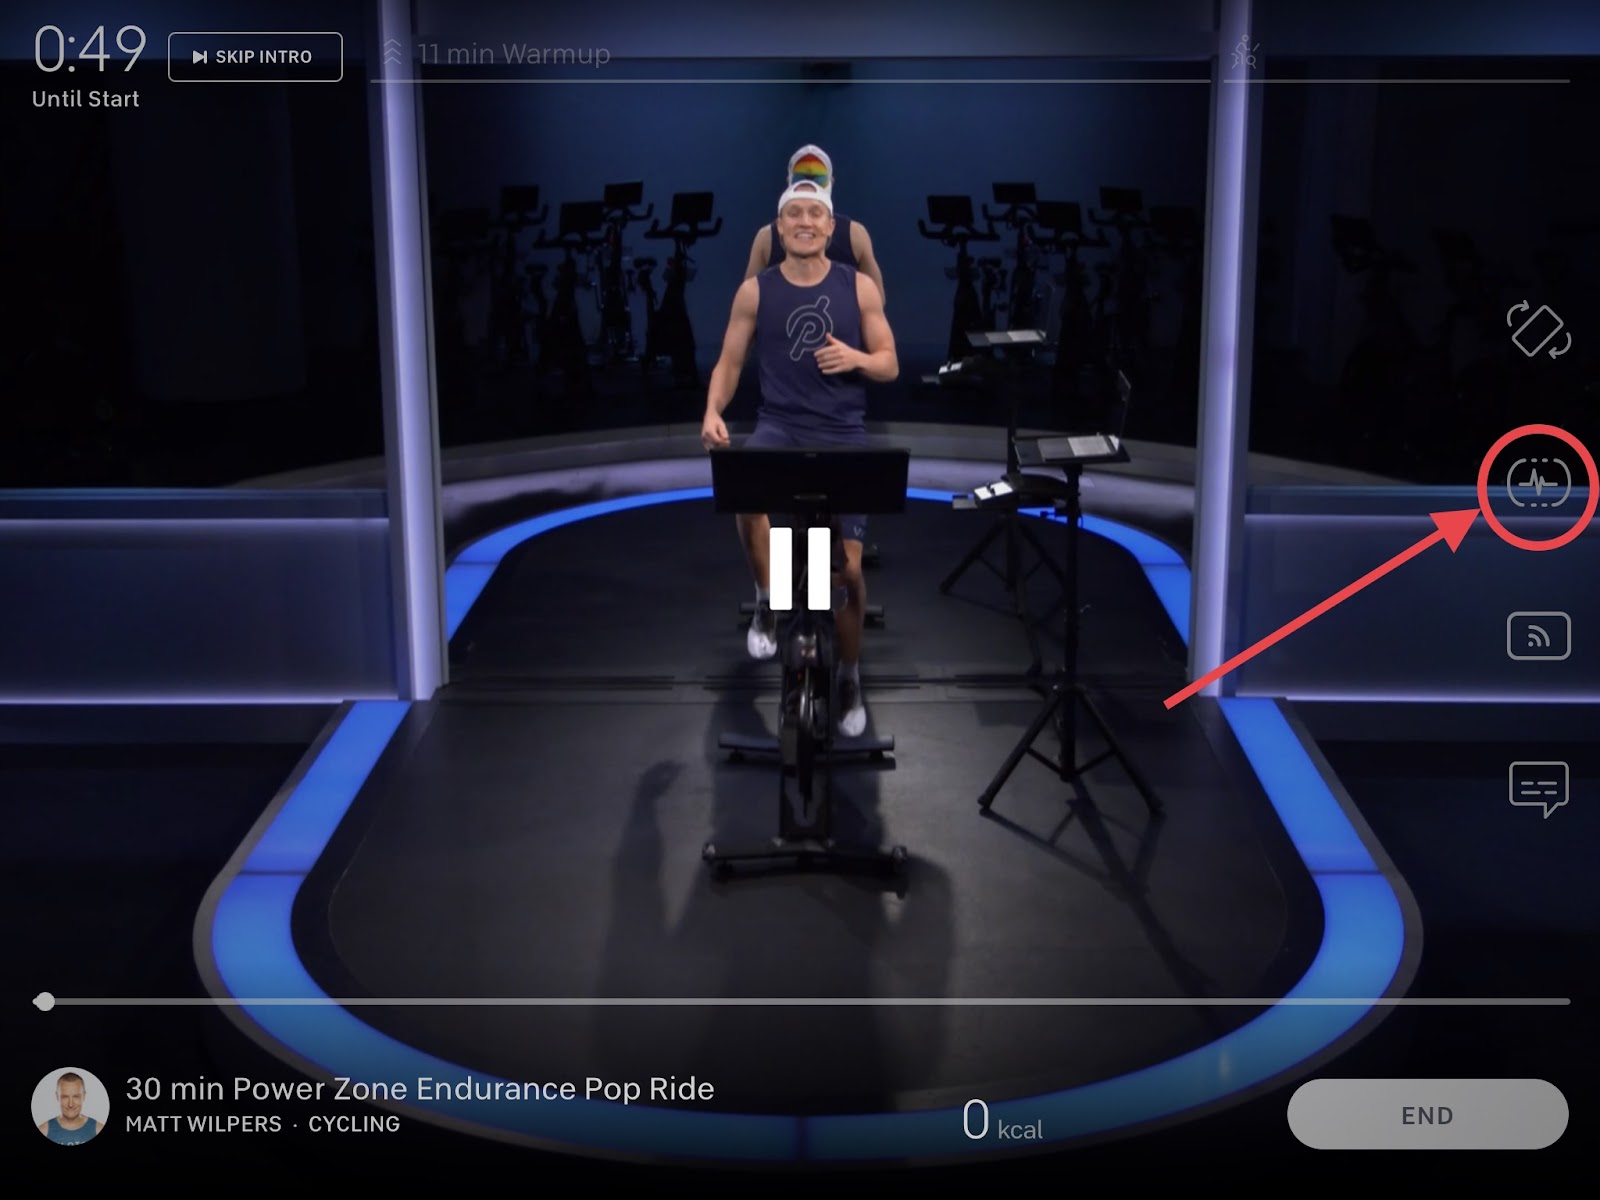
- Tap on the sensor icon indicated in the image above. Which will display the following “Connected Devices” selection box:

- Tap on either Heart Rate or Cadence.
- The next screen should show you the name of the device that is running the qDomyos-Zwift App. For example “John’s iPhone”. Select your device.
- To add the other sensor display to your screen, repeat the process - tap screen, select sensors icon, tap Cadence, select your device. You should be able to see Heart Rate and Cadence within the Peloton Digital App on iOS/iPadOS:

If you run the Peloton Digital App on an OS other than iOS/iPadOS you can simply use the qDomyos-Zwift App as your “bike computer” to track all the necessary metrics during your Peloton workout. This allows you to use the qDomyos-Zwift App Settings to customize the tiles which are displayed including Cadence, Echelon Resistance, Peloton Resistance (automatically calculated to align with Peloton coaches instructions), Output (Watts), FTP % (Power Zone), Heart Rate, and more.
For example:

Another great feature of the qDomyos-Zwift App is the ability to save a workout in .GPX or .FIT format that can then be uploaded to your favorite fitness tracking service such as Strave, Garmin, MapMyFitness, etc. If your preferred service will accept .FIT files that is the preferable format.
<iframe allowtransparency="" frameborder="0" height="454" scrolling="no" src="https://www.strava.com/clubs/783173/latest-rides/4ad9768050c0d1514b0e0490bd0ccd081a81df75?show_rides=true" width="300"></iframe>Important: when you open the qDomyos-Zwift app, it immediately begins recording a workout session. Therefore following these steps will download a complete file from the moment you opened the app. So, if you want a “clean” file for a workout, close the app and reopen it to begin a new workout record.
The following is the process for uploading a .FIT file to Strava:
- Immediately when you complete your workout, tap the menu button on the qDomyos-Zwift App.
- Select Save .FIT (or .GPX if necessary). This will save a .FIT file into the qDomyos-Zwift Folder on your device. For instance, on an iPhone, look inside the Files App → Click Browse and find the qDomyos-Zwift App:
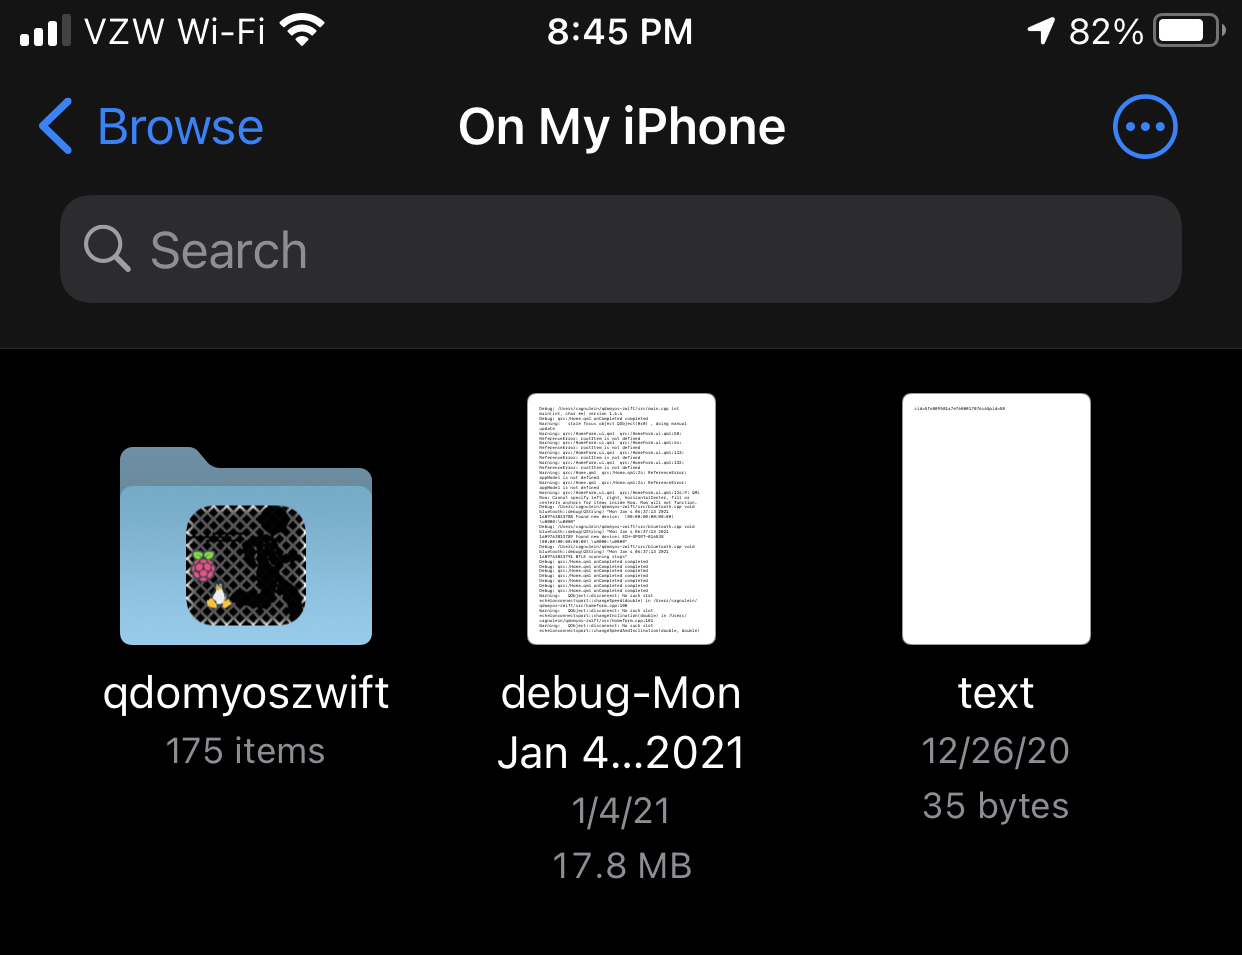
Within that folder you can use the menu button to change the way the files are displayed and the order in which they are displayed so that the most recent file is displayed at the top.
- Strava only allows manual file uploads through it’s website (not it’s mobile app). But, you can do this from your mobile device.
- Go to Strava.com
- Click on menu (top left) and click Log In. Logging in will likely force the mobile app to open on your phone.
- Switch back to your browser.
- Open the browser menu (3 dots at the bottom right on Chrome; Two letter A’s at the top left of Safari) and “Request the Desktop Site.
- Open Strava Site Menu (3 lines at top right) Scroll all the way down below your profile name and select Upload Activity.
- Select File from the left hand navigation menu.
- Select Choose File. Select Browse. This will open the File Browser App on your iPhone.
- Navigate to the qDomyoszwift folder on your iPhone. Select your .FIT or .GPX file. This will take you back to Strava page.
- Strava will process for a few seconds. Then click “Save and View” in the the lower right corner of the web page. The workout will now be on the Strava Web Site and the Strava Mobile App. From there you can edit, add comments, add photos, etc.
Note: Some metrics and graphs will only be available with Strava Subscription ~ USD $5/month.
Remember to enable all the permissions in order to have Heart Rate value in qdomyos-zwift from your Apple Watch