Schematics, code, and guide for building your own Arduino-powered MIDI accordion (based off Dmitry Yegorenkov's AccordionMega project)
MIDI Accordion Project Photo Gallery
Demo Video #1 - Professor Layton Main Theme (Intro)
Demo Video #2 - Stolen Moments (by Oliver Nelson)
Demo Video #3 - Everfrost Peak (from Diddy Kong Racing)
Demo Video #4 - Stickerbrush Symphony (from Donkey Kong Country 2)
| Table of Contents |
|---|
| Overview |
| Changelog |
| Materials |
| Software |
| Quick Guide |
| Links |
The goal of this project is to take a traditional piano accordion and turn it into a MIDI controller capable of playing music through your computer. To do this requires solving a few different problems; the finished MIDI Accordion needs to be able to:
- Send a digital signal from the accordion keys and buttons to the computer
- Convert that signal to MIDI
- Play that signal back with music software
- Communicate that signal for each button on the accordion
The above goals are enough to have a functional MIDI instrument, but there are a few additional "nice to have" requirements that can also be implemented, such as the ability to:
- Communicate MIDI signals wirelessly (via Bluetooth)
- Decouple the accordion's power supply from the computer/wall
- Add dynamic expression using the accordion bellows (via barometric pressure sensor)
- Add other expressions such as pitch bend, panning, and other sound control effects with potentiometers (sliders, knobs, joysticks, etc.)
Note: In the project, the computer is required for playback; this project does not involve installing speakers to play back MIDI-realized sound directly from the accordion. I may delve into such a feat someday, but today is not that day.
- Added joystick to control pitch bend
- Can be configured (at compile time) to bend pitch up or down
- Can be configured (at compile time) to bend pitch for melody, bass, and/or chords
- Breaking Change! - Opto-interruptor pin connections have been moved in order to free up analog and PWM pins for future components. If you are upgrading to v1.3 from an earlier version you will need to adjust your Arduino pin connections and/or code. Schematics and Breadboard docs have been updated accordingly.
- Added BMP180 support, allowing changes in pressure from moving bellows to change MIDI expression (i.e. volume)
- Made the following changes from the original AccordionMega BMP085 code:
- Updated the temperature and pressure reading code to use SparkFun's BMP180 library.
- Updated pressure<->velocity mapping algorithm according to various play tests.
- Pressure is now read asynchronously from the Arduino - adds approximately 2ms delay when enabled (original added delay was about 3-5ms).
- Made the following changes from the original AccordionMega BMP085 code:
- Added Bluetooth support (e.g. HC-05), allowing MIDI data to communicate wirelessly instead of over USB
- Uses #DEFINE variable to toggle between using USB and additional serial port at compile time to reduce bandwidth usage
- First working version of final project with all accordion keys mapped according to bvavra's PCB design.
- Made the following changes from the original AccordionMega code:
- Updated files (and syntax) from .pde to .ino (new Arduino IDE)
- Removed register shift code
- Although it's a cool idea that could be realized on the accordion by adding some digital register buttons, I've decided to keep things simple and only transmit one register per button and control which registers sound via MIDI playback software (e.g. Logic, Reason, etc.)
- Shaved off 2-3 ms of latency by reorganizing how the opto-interruptors are read.
- Updated MIDI code to use Arduino MIDI Library
- Added some extra comments to explain what some of the more obtuse lines are doing (port manipulation, bit operations, etc.)
The final project requires the following materials and components:
| Item Name (Part Number) | Quantity |
|---|---|
| Accordion | 1 |
| Arduino Mega 2560 R3 | 1 |
| Barometric Pressure Sensor (BMP 180) | 1 |
| Bluetooth Transceiver Module (HC-05 RS232) | 1 |
| USB Bluetooth Dongle | 1 |
| Photo/Opto Interruptor (ITR-9608) | 65 |
| 270 Ohm Resistor 1/4W 5% | 65 |
| 1k Ohm Resistor 1/4W 5% | 9 |
| 2k Ohm Resistor 1/4W 5% | 1 |
| BJT NPN Transistor (2N 2222A) | 8 |
| Black 8" Zip Ties | 65 |
| USB 2.0 Type A Type B M/M Cable | 1 |
| USB 2.0 Type A to Type B F/F Adapter Header | 1 |
| SB404 PCB (BB400) | 2 |
| BR1 PCB (830) | 5 |
| .5"x.5" 90 Degree Angle Corner Plate (H# 884487) | 10 |
| 2.54mm Breakaway PCB Board 40 Pin Header Kit | 1 |
| 2.54mm Dupont M/F 40 Pin Connector Kit | 1 |
| Multicolored Jumper Wire Ribbon Cable Kit | 1 |
| M3 M/F Brass Spacer Standoff Assortment Kit | 1 |
| Threaded Insert M3 9.52mm | 8 |
| White 4" Zip Ties (100pc) | 1 |
The total cost of these materials can vary. The original accordion project cost under $100. If you exclude the accordion, I spent about $220 on the above materials. If you don't have an accordion you can get a decent enough one on eBay for as low as $100 (normally I'd advise against buying an accordion off eBay, but it doesn't have to sound good; it just needs to function mechanically). I bought mine for $150 (plus $30 shipping), bringing my project's grand total cost to about $400.
You will also need the following tools:
| Item | Usage |
|---|---|
| Multimeter | Used to debug circuit connectivity. |
| Soldering Iron | Used to join components to the circuit boards. |
| 60-40 Rosin Core Solder | Used to create circuit joints. |
| Brass Wire and Holder | Used to clean the soldering iron tip. |
| Desoldering Wick/Pump/Bulb | Used to fix soldering mistakes. |
| Adjustable Circuit Board Holder | Used to hold the circuit board in place while soldering. |
| Wire Strippers | Used to cut and strip wires to size. |
| Wire Cutters | Used to trim wires and components after they've been soldered. |
| Utility Knife | Used to cut the circuit boards and sever bad solder connections. |
| Sandpaper | Used to smooth cuts made to circuit boards. |
| Power Drill | Used to drill holes in the circuit boards and the accordion. |
| Small Flathead Screwdriver (c.1/8") | Used to open up and take apart the accordion. |
| Crimping pliers | (Optional) Used to make jumper wire ends. |
I had to buy most of these tools for this project, which rang up to about $100 total.
The only files required for the final project are the Arduino files located in the root level MIDI_Accordion directory. Everything else in this repo is supplemental information to help research and build the project (e.g. Prototypes, Datasheets, Design docs, etc.). Of course, you will need the Arduino IDE to write and upload the project source code to your Arduino.
The following libraries are required to compile the MIDI_Accordion Arduino sketch:
- Arduino MIDI Library
- Used to simplify sending data via the MIDI protocol.
- Sparkfun's Arduino BMP180 Library
- Used to interface with the BMP180 barometric pressure sensor.
To play your finished MIDI Accordion you'll need the following additional software:
- Serial-to-MIDI converter
- Used to convert data coming from the Arduino from Serial to MIDI. I recommend Hairless MIDI <-> Serial Bridge.
- Virtual MIDI port
- Used to connect the MIDI data to playback software.
- OSX configuration instructions
- Linux (Debian/Ubuntu) config instructions
- Windows requires 3rd party software - I recommend LoopMIDI.
- MIDI controller/sequencer/player
- Used to play back MIDI data triggered by the accordion. It can be whatever your preferred MIDI playback software is (e.g. Logic, Reason, etc.), but if you don't have one I recommend using Virtual MIDI Piano Keyboard (VMPK), which is free and Windows/OSX/Linux compatible.
- (Optional) ASIO4All
- Used to reduce latency when playing back MIDI on Windows machines without ASIO audio drivers.
This is meant to be a bare-bones guide to building your own MIDI accordion, providing only a general roadmap for those who already know what they're doing or for those who are curious about the process, but only want a tl;dr. You can view the complete guide here. I also provided a set of links that were helpful to me in getting my project up and running - if any of them are broken please let me know and I'll update the list accordingly.
Note: Although this guide is labelled as "quick", the project itself is not. Between researching, building prototypes, making a lot mistakes (and learning from them), and designing/building/testing the final product, I spent over 200 hours on this project. However, I made this guide in hopes that others can do this project with all the necessary information and resources available in one place, which I believe will enable future makers to complete this project in far less time.
In-depth instructions can be found on the MIDI Accordion Project Page
- Upload the MIDI_Tutorial prototype to your Arduino.
- Install the Serial-to-MIDI conversion software of your choice (e.g. Hairless MIDI)
- Install (or configure) a virtual MIDI port (e.g. LoopMIDI) and configure the Serial-to-MIDI converter to send data from the connected Arduino to the virtual MIDI port.
- Open the MIDI playback software of your choice (e.g. VMPK) and configure the MIDI input to read from the virtual MIDI port. At this point you should hear MIDI being played by the Arduino.
- Build and upload the Opto_Interruptor_1 prototype to your Arduino and assert the following:
- When the interruptor is blocked, the digital output is HIGH.
- When the interruptor is unblocked and the input pin is HIGH, the digital output is LOW.
- When the interruptor is unblocked and the input pin is LOW, the digital output is HIGH.
- Cut and mount opto-interruptor blockers to each of the 24 key pads on the left hand and each of the 41 keys on the right hand. I did this by cutting and gluing zip ties to the bottom of the keypads and mounting circuits inside the bellows, whereas Dmitry attached metal rods on the other side of the keypads. You can choose whichever method works best for you and your accordion.
- Test that the blockers work by uploading the MIDI_Accordion sketch to your Arduino, wiring a prototype of 1 or more opto-interruptors away from the breadboard (using M/F jumper wires), and temporarily adhering them over the blockers where they will be for the finished product. Pressing the corresponding accordion keys when all the MIDI software is running should trigger sound playback (though the pitches may be incorrect).
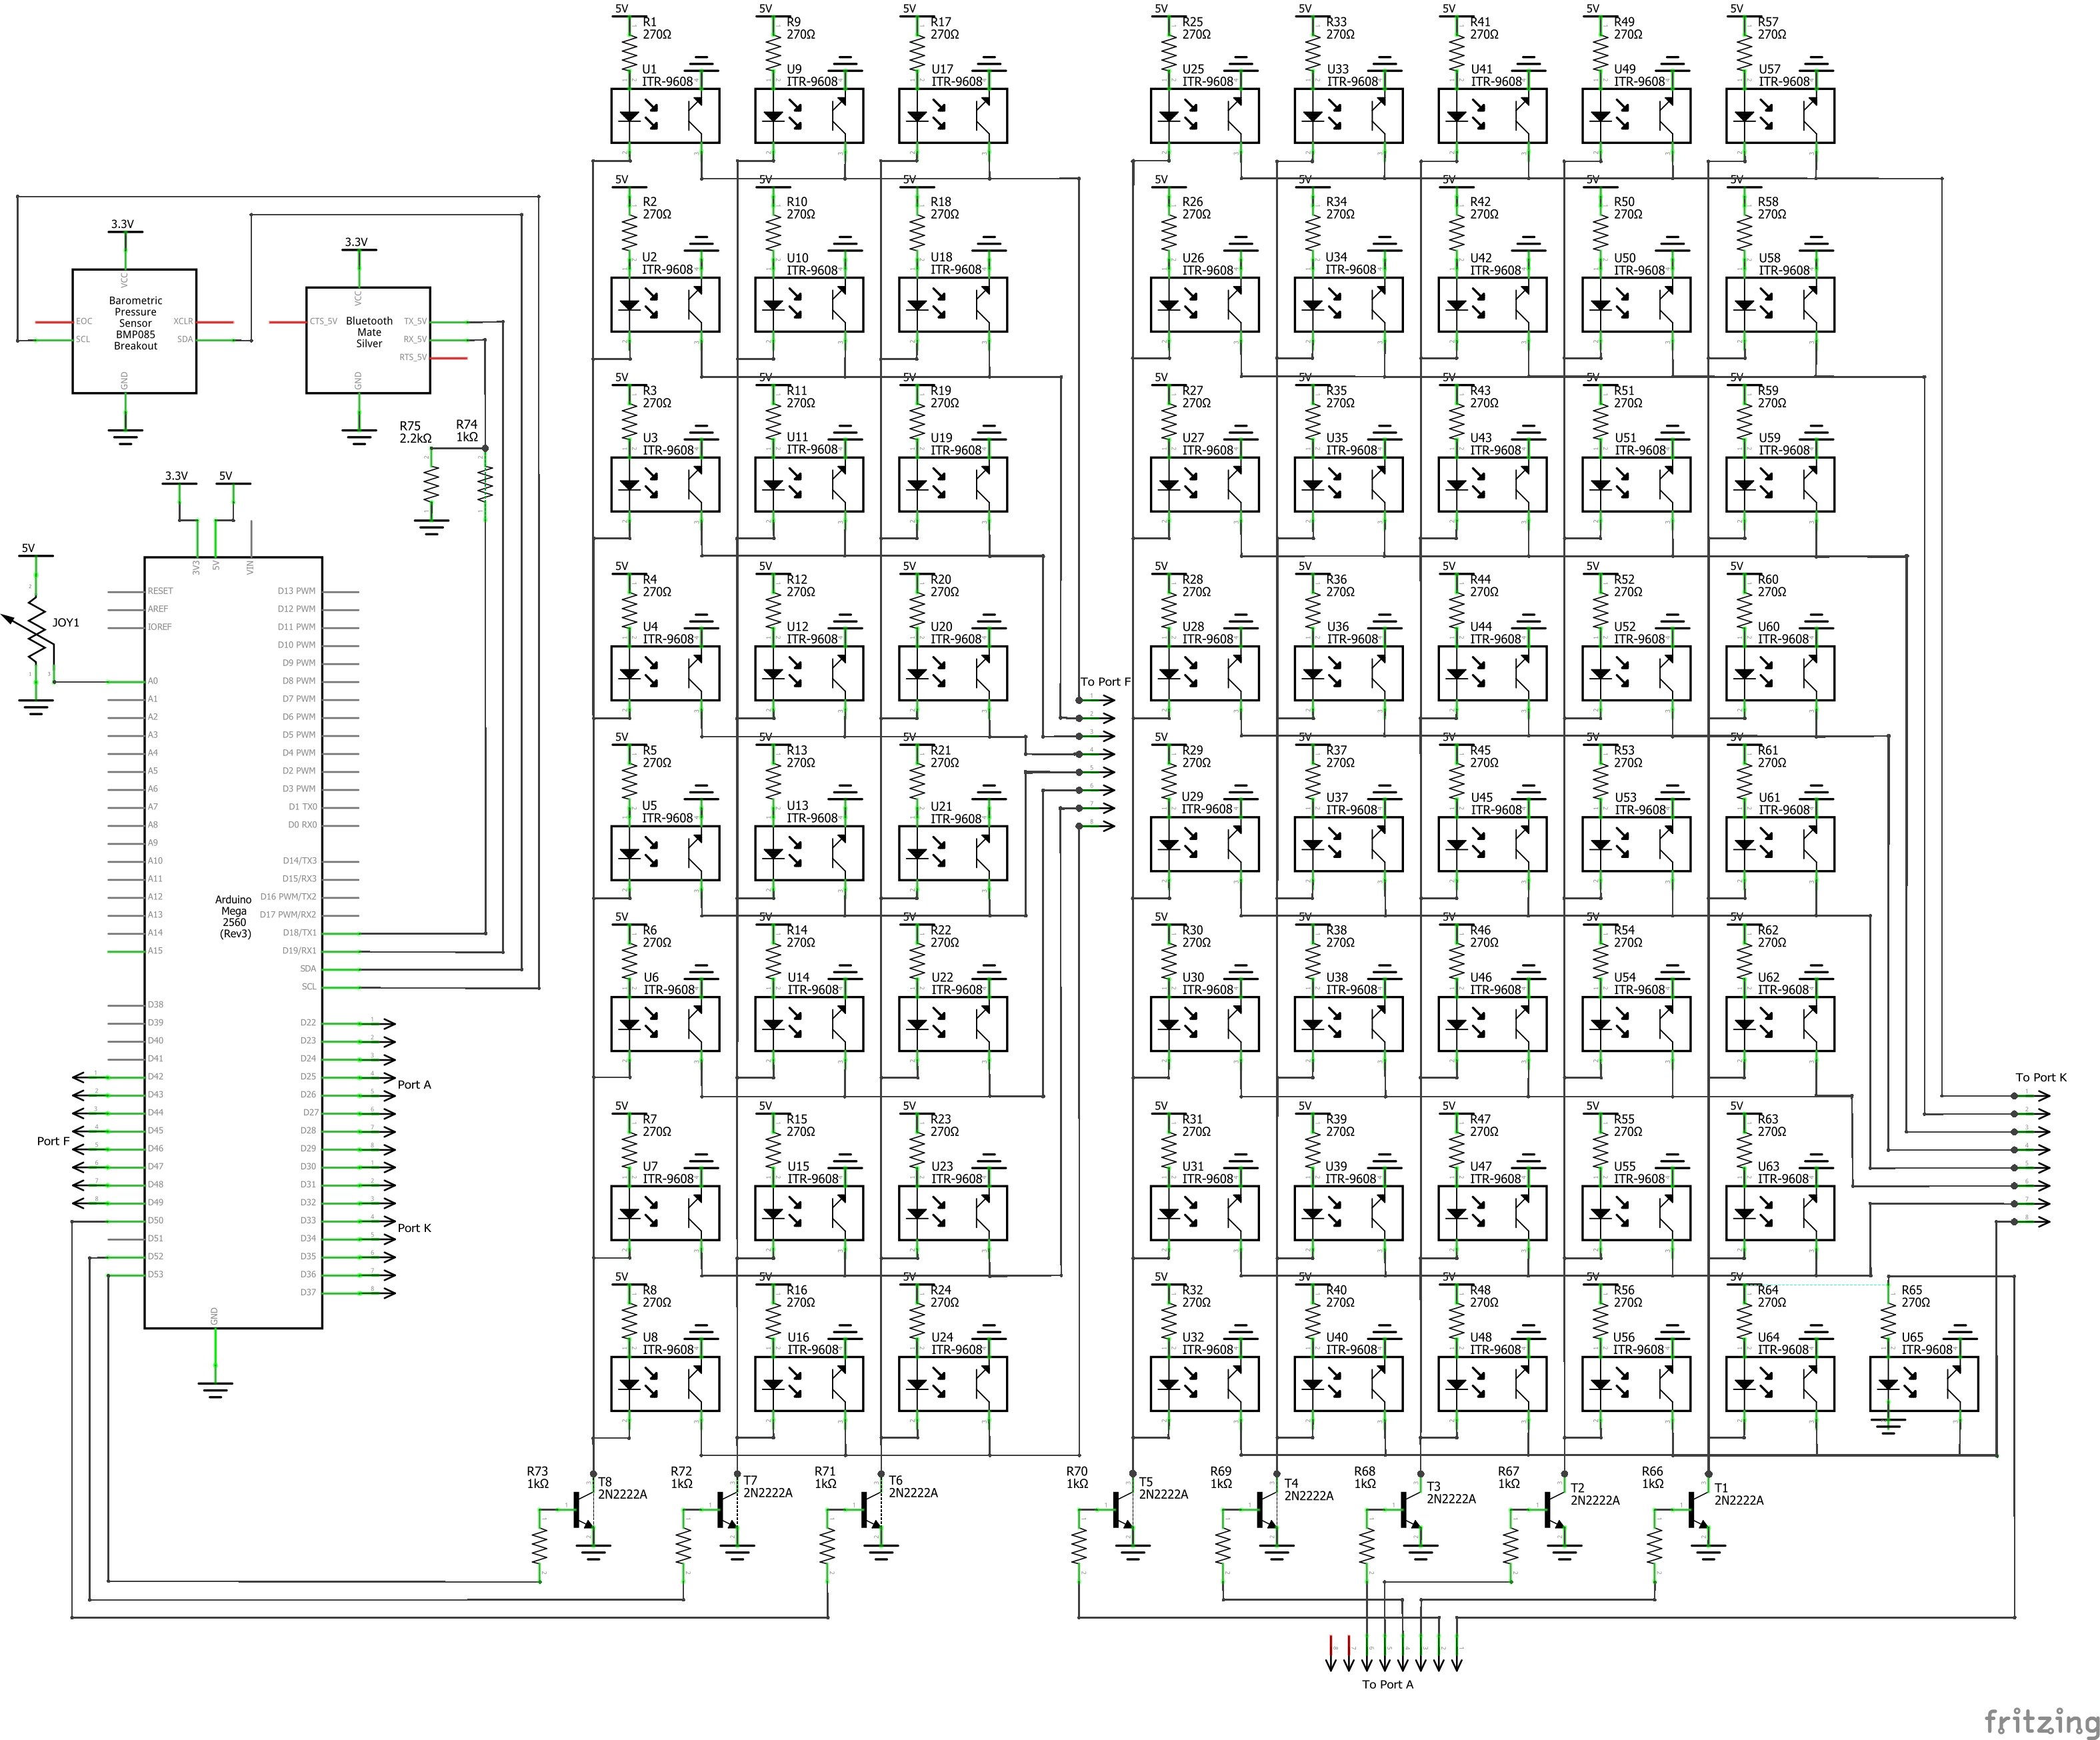
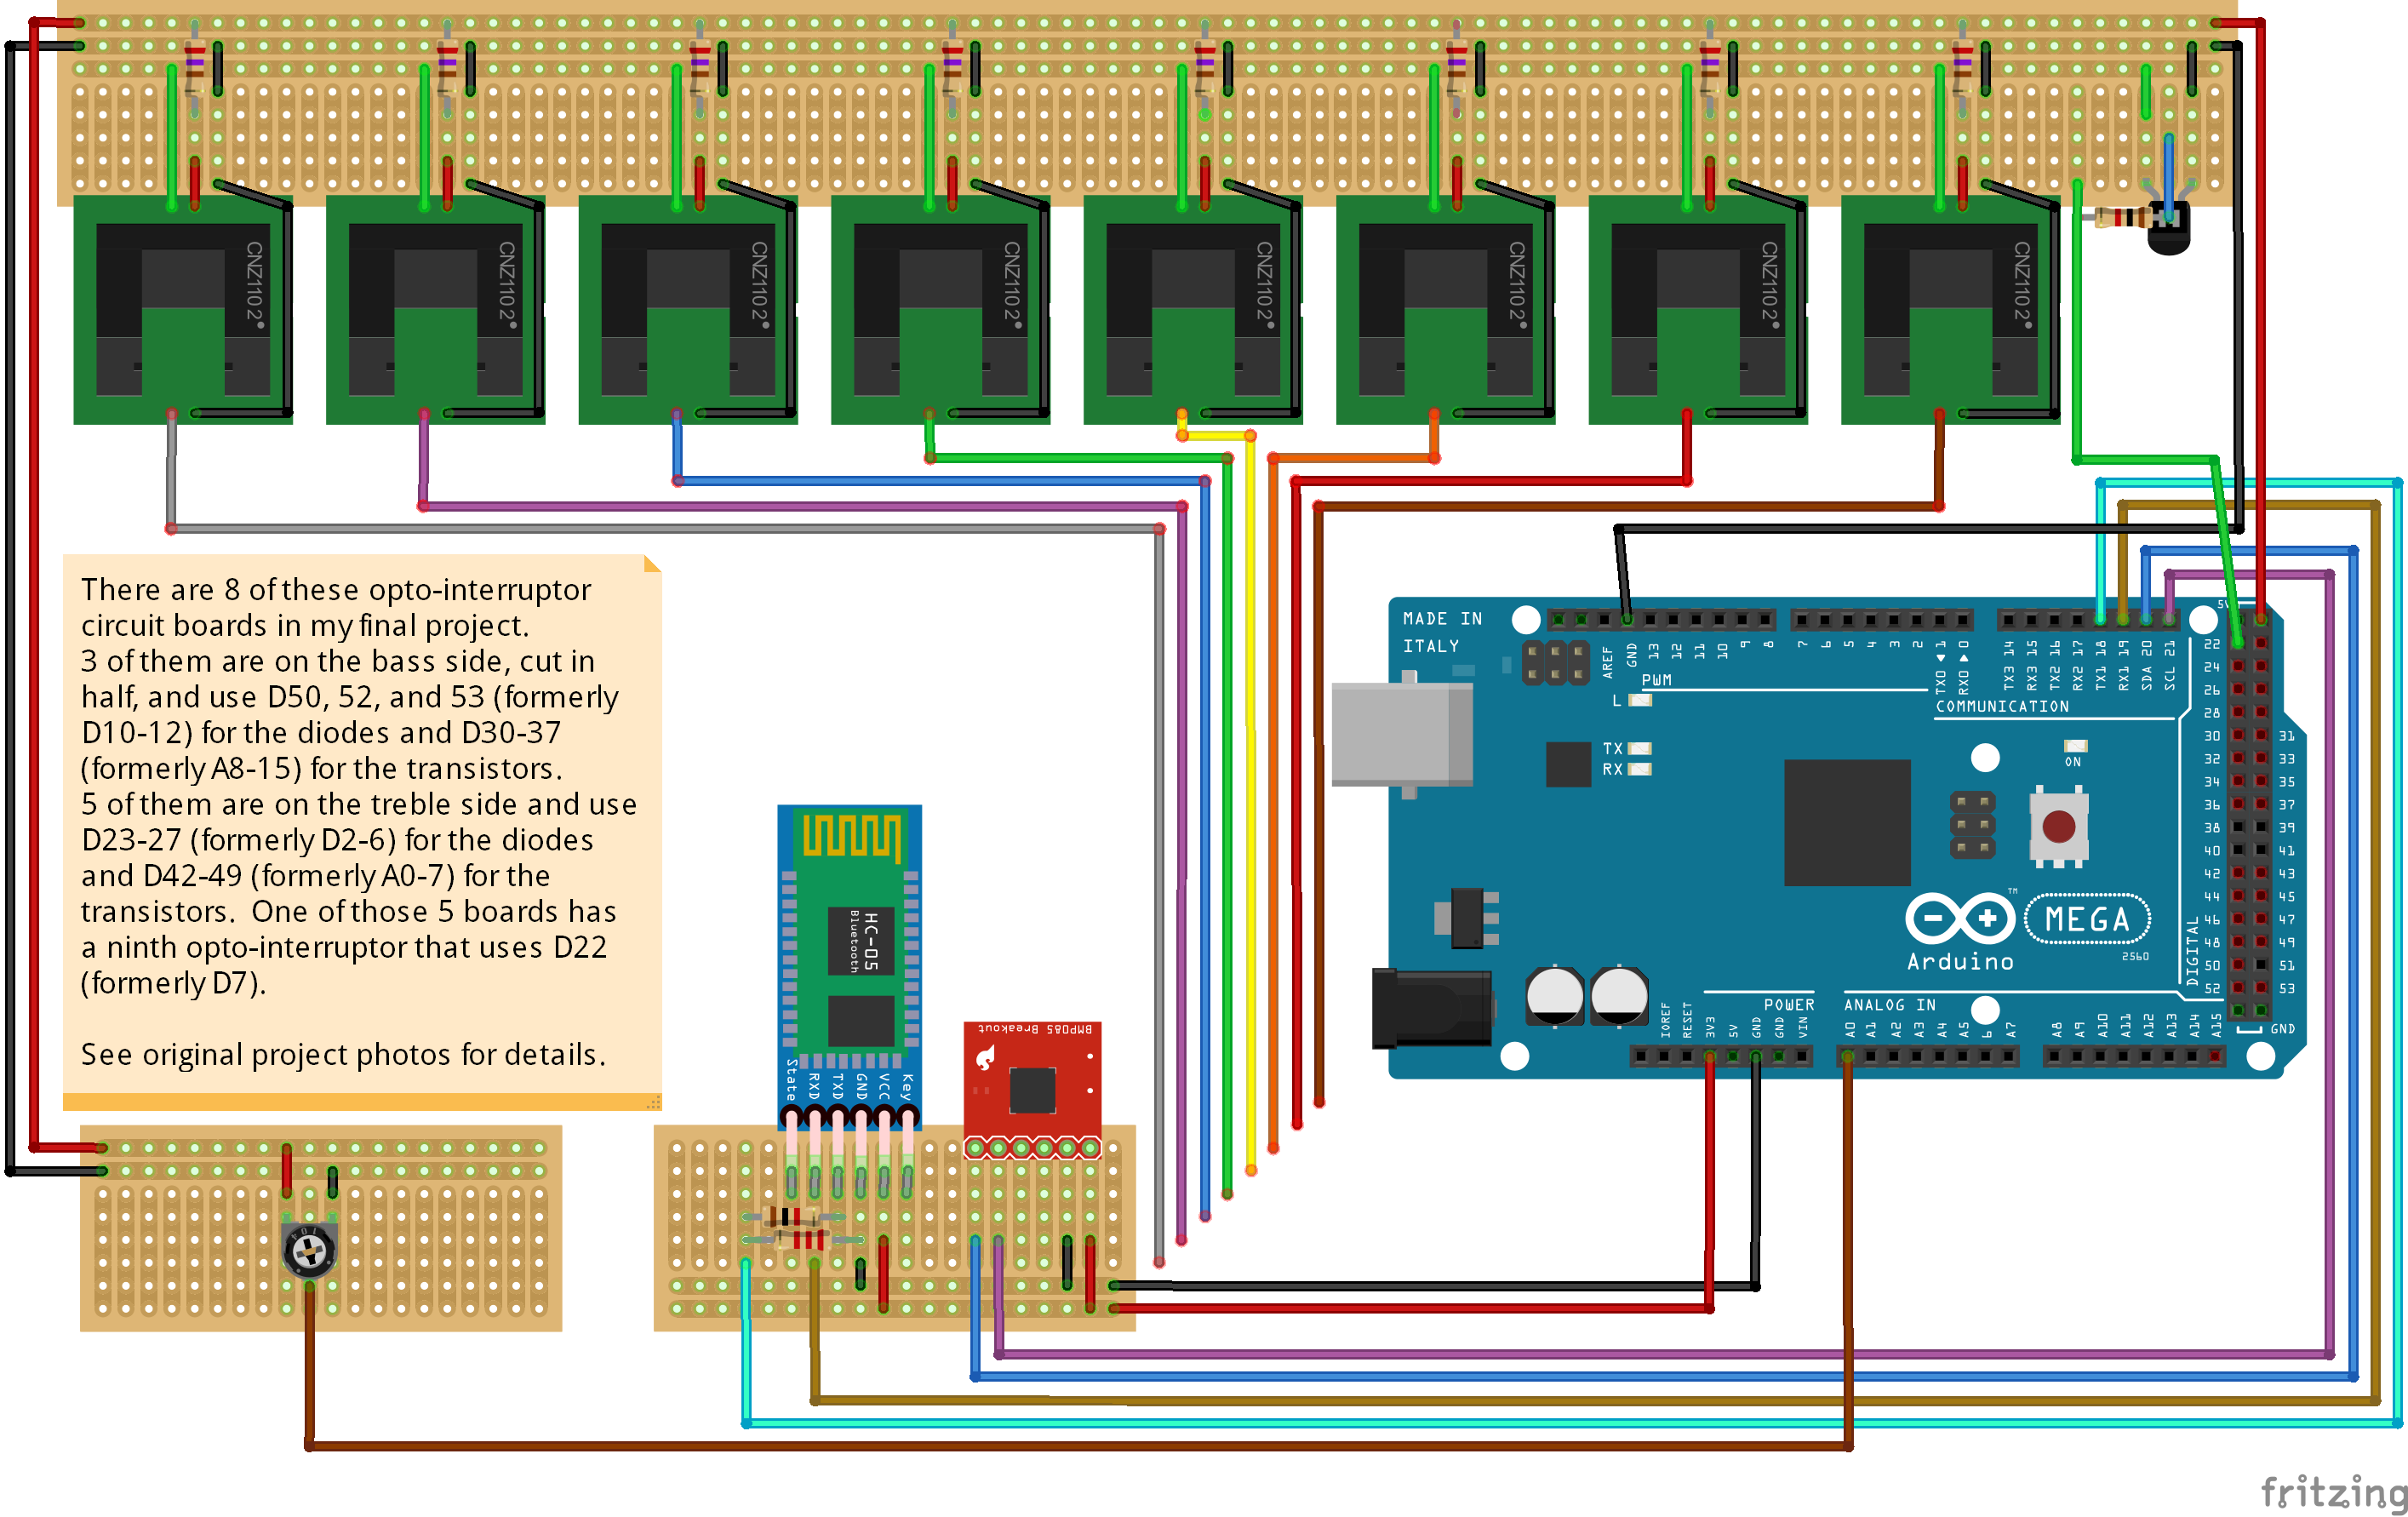
- Design and build circuits for each of the keys that need to be mapped according to the final project schematics. You can refer to these design docs, this Fritzing reference, and my project photos for reference.
- Note: Each accordion is different, so the designs that worked for my accordion may not work for yours. Stick to the schamtics and plan your boards accordingly. Be sure to leave enough room for wires to connect everything and for the accordion to be closed up.
- Mount the circuit boards to the accordion and wire everything together. If you plan on adding the BMP180 for bellow expression, be sure to provide enough slack for the wires connecting the treble and bass side to allow for pulling the bellows out.
- Drill a hole to allow for connecting the USB cable from the Arduino to the computer and mount the USB port in the hole.
- Once everything is connected, upload the MIDI_Accordion sketch to your Arduino, open all of your connection software, and test that every key works properly by asserting that the key doesn't stick and that the key or button plays the correct pitch(es). You will likely have to adjust the pitch mappings in the code based on how you organized and wired your sensor circuits.
- Upload the Bluetooth_Tutorial prototype to your Arduino and follow the instructions on this instructables page to hook up the transceiver to the Arduino, configure it with your Bluetooth receiver, and test that it works properly.
- Upload the Bluetooth_Tutorial_2 prototype to your Arduino and follow the instructions on this instructables page to access the Bluetooth transceiver's AT mode. While in AT mode, update the baud rate to 115,200 kb/sec by entering the command "AT+UART=115200,1,0". You can optionally also change the name and password of the Bluetooth device.
- If you haven't already, solder, mount, and wire a circuit board for the HC-05 according to the given design and schematics.
- Open the MIDI_Accordion sketch and uncomment the "//#define BLUETOOTH" line of code to enable the bluetooth serial port. Upload the changes to your Arduino.
- Update your Serial<->MIDI conversion software to point to the Bluetooth COM port instead of the Arduino port.
- (Optional) Instead of plugging the Arduino into the computer via USB cable, you can now use a battery pack to power the accordion. A 4xAA pack is recommended, but certain 5V USB phone charger packs may also work (but I haven't tested this yet, so your mileage may vary).
- If you haven't already, solder, mount, and wire a circuit board for the BMP180 according to the given design and schematics.
- Open the MIDI_Accordion sketch and uncomment the "//#define BMP" line of code to enable using the BMP180 to map bellow pressure to MIDI expression. Upload the changes to your Arduino.
- Cover as many unused air holes in the accordion bellows as possible to maximize the amount of air resistance you will feel when squeezing the bellows.
- (Optional) The bellows may not feel right based on your playing style or the amount of air resistance. To improve this, you may need to tweak the numbers in the function used to map the difference in air pressure to MIDI expression values.
- Solder, mount, and wire a circuit board for a mini joystick so it gets triggered when you press the register switch.
- Open the MIDI_Accordion sketch and uncomment the "//#define JOYSTICK" line of code to enable mapping the joystick tilt to MIDI pitch bend data.
- Adjust the configuration variables in Pitch_Bend.ino as desired.
The following links were helpful in making this project happen. If any of these links are broken, or if you have any additional links that you found helpful, please contact me and let me know so I can update this list accordingly.
- Lots of accordion repair resources
- Taking apart the Stradella bass system
- Taking apart the piano keyboard
- Accordion repair videos
- Accoridon repair tools
- Internal pullup resistor tutorial
- Info about switches
- Arduino baud rates
- Arduino port manipulation
- Port manipulation tutorial
- Another port manipulation tutorial
- Organizing Arduino code with tabs
- MIDI Protocol essentials
- Arduino MIDI Library docs
- MIDI CC List
- Send and receive MIDI with Arduino
- When does audio latency matter and not matter?
- Latency problem using MS GS Wavetable Synth
- Reducing latency on MIDI-over-USB keyboard
- Arduino MIDI Expression Pedal
- Difference between MIDI velocity and Expression
- "Unexpected data byte" error when sending CC data over Hairless MIDI
- How To Set Up A Photo Interrupter (or Slotted Optical) Switch On The Arduino
- Connecting a photo interrupter/optoisolator to an Arduino
- ITR-9608 Datasheet
- Cheap 2-Way Bluetooth Connection Between Arduino and PC
- Modify The HC-05 Bluetooth Module Defaults Using AT Commands
- Arduino with HC-05 Bluetooth module - AT MODE
- Feeding power to Arduino: the ultimate guide
- Arduino power sharing
- 9V is not a good power source
- Arduino power switch
- Is it bad practice to provide power through the VIN Pin?
- Powering an Arduino Mega with external USB Power Bank?
- Soldering 101 (adafruit)
- How to solder electronics (wikiHow)
- How to solder (instructables)
- Basic de-soldering guide
- Custom Cables & Guide to Crimping Dupont PCB Interconnect Cables
- How to read a schematic
- Understanding the functions of a multimeter
- Light-Emitting Diodes (LEDs)
- How to test diodes using a digital multimeter
- Why exactly can't a single resistor be used for many parallel LEDs?
- 8 Tips On How To Pick A Resistor For An Arduino (Circuit)
- Voltage Dividers tutorial
- Transistors tutorial
- How transistors work