- Demo 🚀 here
- Fast streaming of the screen of your reMarkable to a window in your computer
- Support for reMarkable 1 and 2
- Works with software version pre 2.8
- Compatible with ScreenShare (post 2.9)
- Supports colors (tablet is grayscale but original colors are preserved in rmview)
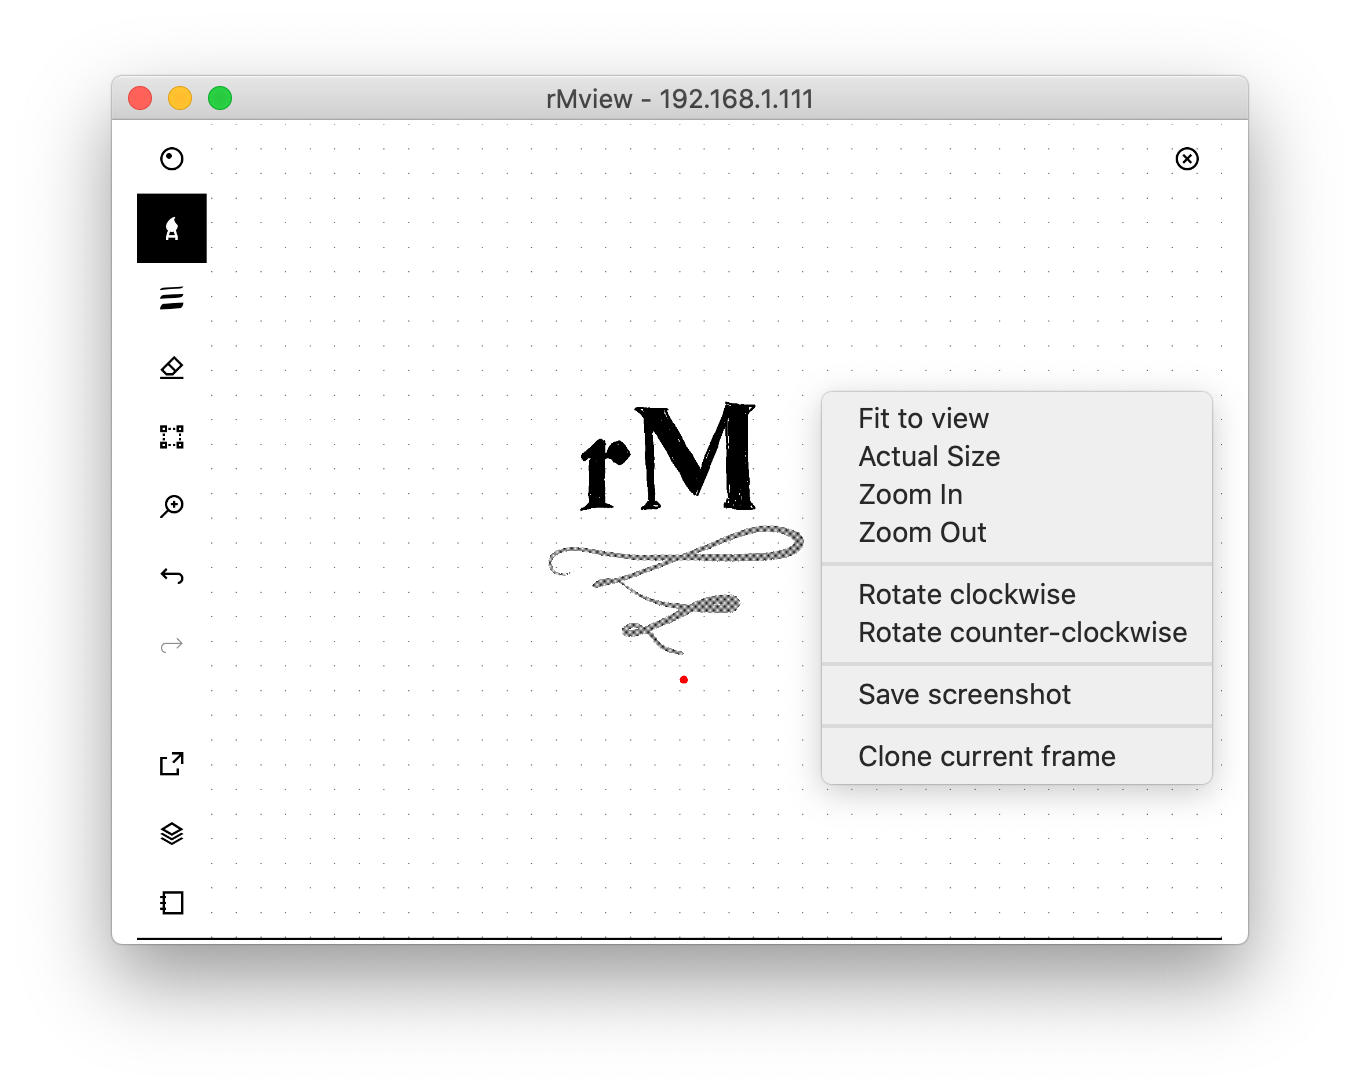
- UI for zooming, panning, rotating, inverting colors
- Pen tracking: a pointer follows the position of the pen when hovering on the reMarkable
- Clone a frame into separate window for reference
- Save screenshots as PNG
| ScreenShare | VNC Server | rm2fb | |
|---|---|---|---|
| RM1/2 < v2.9 | ❌ | ✅ | ✅ |
| RM1/2 >= v2.9 | ✅ | ❌ | ❌ |
⚠️ Update 2.9+ users⚠️ : To use rmview with the ScreenShare feature you have to first start the ScreenShare from the tablet, and then start rmview.
The most efficient installation method is the semi-automatic one below, which requires a Python3 installation. If you are looking for a standalone executable, check the releases page for executable bundles. If there is no bundle for your operating system then follow the installation instructions below.
As a basic prerequisite you will need Python3 on your computer.
⚠️ Please make surepipis pointing to the Python3 version if your system has Python2 as well. If not, usepip3instead ofpipin what follows.
⚠️ WARNING⚠️ : If you use Anaconda, please install the dependencies viaconda(and notpip) then runpip install ..
The easiest installation method is by using pip, from the root folder of this repository:
pip install .
(please note the command ends with a dot)
which will install all required dependencies and install a new rmview command.
If you want to use the SSH tunnel feature, install with
pip install ".[tunnel]"
Then, from anywhere, you can execute rmview from the command line.
The tool will ask for the connection parameters and then ask permission to install the VNC server on the tablet.
Press Auto install to proceed.
If you plan to modify the source code, use pip install -e . so that when executing rmview you will be running your custom version.
Install the dependencies (PyQt5, Paramiko, Twisted, PyJWT) with pip or conda manually:
# install dependencies
pip install pyqt5 paramiko twisted pyjwt
pip install sshtunnel  # optional
# build resources file
pyrcc5 -o src/rmview/resources.py resources.qrc
Then you can run the program with python -m rmview from the src folder.
This project contains a Dockerfile so that rmview and all its dependencies can be installed and run inside a Docker container.
Since rmview not only reads your local configuration but also needs an X11 display, you should run docker-run.sh which takes care of the host mappings.
Please note that docker-run.sh is written for Unix-like OSes and expects your rmview configuration inside your local $HOME/.config/rmview/ folder.
Suggested first use:
after installing run rmview, insert when prompted the IP of your tablet and the password,
as found in the Menu / Settings / Help / Copyright and Licences menu of the tablet.
Then, optionally, select "Settings..." from the context menu (or the error dialog) to open
the default configuration file which you can edit according to the documentation below.
More generally, you can invoke the program with
rmview [-v|-q] [config]
The optional -v flag makes the console output verbose, -q makes it quiet (only errors).
The optional config parameter is the filename of a json configuration file.
If the parameter is not found, the program will look for a rmview.json file in the current directory, or, if not found, for the path stored in the environment variable RMVIEW_CONF.
If none are found, or if the configuration is underspecified, the tool is going to prompt for address/password.
The supported configuration settings are below.
Look in file example.json for an example configuration.
All the settings are optional.
| Setting key | Values | Default |
|---|---|---|
ssh |
Connection parameters (see below) | {} |
backend |
"auto", "screenshare", "vncserver" |
"auto" |
orientation |
"landscape", "portrait", "auto" |
"landscape" |
pen_size |
diameter of pointer in px | 15 |
pen_color |
color of pointer and trail | "red" |
pen_trail |
persistence of trail in ms | 200 |
background_color |
color of window | "white" |
invert_colors |
if true, start the tablet with inverted colors | false |
hide_pen_on_press |
if true, the pointer is hidden while writing | true |
show_pen_on_lift |
if true, the pointer is shown when lifting the pen | true |
forward_mouse_events |
Send mouse events to tablet (see below) | false |
PLEASE NOTE:
When backend is auto, if the tablet is using version 2.9 and above then screenshare is used;
otherwise vncserver is selected.
Note that currently screenshare is only compatible with version 2.9 and above,
and vncserver with version 2.8 and below.
If forward_mouse_events is enabled, clicks and mouse drags on the main window
will be sent to the tablet as touch events,
mouse drags while pressing CTRL will be sent as pen events, allowing drawing.
This option is only available if using "backend": "vncserver", which in turn is only supported for rM software version below 2.8.
Connection parameters are provided as a dictionary with the following keys (all optional):
| Parameter | Values | Comments |
|---|---|---|
address |
IP of remarkable | tool prompts for it if missing |
auth_method |
Either "password" or "key" |
defaults to password if key not given |
username |
Username for ssh access on reMarkable | default: "root" |
password |
Password provided by reMarkable | not needed if key provided |
key |
Local path to key for ssh | not needed if password provided |
timeout |
Connection timeout in seconds | default: 1 |
host_key_policy |
"ask", "ignore_new", "ignore_all", "auto_add" |
default: "ask" (description below) |
tunnel |
True to connect to VNC server over a local SSH tunnel | default: false (description below) |
tunnel_compression |
True to enable compression for SSH tunnel | default: false (description below) |
The address parameter can be either:
- a single string, in which case the address is used for connection
- a list of strings, which will be presented at launch for selection
To establish a connection with the tablet, you can use any of the following:
- Leave
auth_method,passwordandkeyunspecified: this will ask for a password - Specify
"auth_method": "key"to use a SSH key. In case an SSH key hasn't already been associated with the tablet, you can provide its path with thekeysetting. If key is password protected, you can specify key passphrase usingpasswordparameter. - Provide a
passwordin settings
If auth_method is password but no password is specified, then the tool will ask for the password on connection.
As a security measure, the keys used by known hosts are checked at each connection to prevent man-in-the-middle attacks.
The first time you connect to the tablet, it will not be among the known hosts.
In this situation rMview will present the option to add it to the known hosts, which should be done in a trusted network.
Updates to the tablet's firmware modify the key used by it, so the next connection would see the mismatch between the old key and the new.
Again rMview would prompt the user in this case with the option to update the key. This should be done in a trusted network.
The host_key_policy parameter controls this behaviour:
"ask"is the default behaviour and prompts the user with a choice when the host key is unknown or not matching."ignore_new"ignores unknown keys but reports mismatches."ignore_all"ignores both unknown and not matching keys. Use at your own risk."auto_add"adds unknown keys without prompting but reports mismatches.
The old "insecure_auto_add_host": true parameter is deprecated and equivalent to "ignore_all".
In case your ~/.ssh/known_hosts file contains the relevant key associations, rMview should pick them up.
If you use the "Add/Update" feature when prompted by rMview (for example after a tablet update) then ~/.ssh/known_hosts will be ignored from then on.
-m PEM option of ssh-keygen). See here for details.
NOTE: If you have a lot of known hosts in system known hosts file (~/.ssh/known_hosts), you are advised to add
known host entry for remarkable to ~/.config/rmview_known_hosts because paramiko can be very slow when loading
large known hosts file which slows down the whole connection routine.
If your user system known hosts file already contains entry for remarkable, you can add it to rmview specific hosts file using this command:
cat ~/.ssh/known_hosts | grep 10.11.99.1 >> ~/.config/rmview_known_hostsYou should of course replace IP with your remarkable IP.
By default, this program will start VNC server on remarkable which listens on all the interfaces and doesn't expose any authentication mechanism or uses encryption.
This program will then connect to the VNC server over the IP specified in the config.
Not using any authentication and exposing VNC server on all the network interfaces may be OK when connecting to the remarkable over USB interface, but when you are connecting to remarkable over WLAN, you are strongly encouraged to use built-in SSH tunnel functionality.
When SSH tunnel functionality is used, VNC server which is started on remarkable will only listen on localhost, this program will create SSH tunnel to the remarkable and connect to the VNC server over the local SSH tunnel.
This means that the connection will be encrypted and existing SSH authentication will be used.
- Settings dialog
- About dialog
- Pause stream of screen/pen
- Binary bundles for Window, Linux and MacOs (PyInstaller?)
- Add interaction for Lamy button? (1 331 1 down, 1 331 0 up)
There are two versions of rMview, presenting the same interface but using different back-ends (thus requiring different setups on the reMarkable):
- The "VNC-based" version, in the
vncbranch (default) - The "reStreamer-like" version, in the
sshbranch
In my tests, the VNC version is a clear winner.
The ssh branch of this repo hosts the reStreamer-like version for those who prefer it, but it should be considered unmaintained.
The VNC server running on the tablet is developed by @pl-semiotics:
Support for the ScreenSharing feature is based on @ddvk's reverse-engineering of the authentication protocol.
I took inspiration from the following projects:
- QtImageViewer
- remarkable_mouse
- reStream
- VNC client originally written by Chris Liechti
Icons adapted from designs by Freepik, xnimrodx from www.flaticon.com
Thanks to @adem, @ChrisPattison, and @jlbas for their PRs.
This project is not affiliated to, nor endorsed by, reMarkable AS. I assume no responsibility for any damage done to your device due to the use of this software.
GPLv3