How install Semtech Basic Station LoRA packet forwarder on a Raspberry Pi with a Imst iC880A-SPI radio module and connect it to TTN v3
I wrote this doc for upgrading a working installation on a Raspberry Pi of a Semtech udp packet forwarder to the new Basics Station protocol. If you need to install the hardware go to the best howto and complete hardware install, stop before software install, and back here.
I tested it on a Raspberry Model B Rev 2 with debian jessie 8.0 but it should work on all types, remember that with very old Raspberry Pi you must change the spi address.
- Get the source code:
git clone https://github.com/lorabasics/basicstation.git
- Compile it:
cd basicstation
make platform=rpi variant=std
- Manually install it:
sudo su -
mkdir /opt
mkdir /opt/basicstation
mkdir /opt/basicstation/bin
cp build-rpi-std/bin/station /opt/basicstation/bin
- Create config directory:
mkdir /etc/basicstation
- Create the service file:
/lib/systemd/system/basicstation.service
with this content
[Unit]
Description=Basic Sation TTN V3 service

[Service]
WorkingDirectory=/opt/basicstation/bin
ExecStart=/opt/basicstation/bin/station -h /etc/basicstation
SyslogIdentifier=ttn-gateway
Restart=on-failure
RestartSec=5

[Install]
WantedBy=multi-user.target
- Go to TTN v3 console.
- Create a new gateway checking the Require authenticated connection box.

- Create station.conf file:
cd /etc/basicstation
create the file station.conf with this content
{
    /* If slave-X.conf present this acts as default settings */
    "SX1301_conf": {                 /* Actual channel plan is controlled by server */
        "lorawan_public": true,      /* is default */
        "clksrc": 1,                 /* radio_1 provides clock to concentrator */
        /* path to the SPI device, un-comment if not specified on the command line e.g., RADIODEV=/dev/spidev0.0 */
        "device": "/dev/spidev0.0",
        /* if you don't have pps from gps */
        "pps": false,
        /* freq/enable provided by LNS - only HW specific settings listed here */
        "radio_0": {
            "type": "SX1257",
            "rssi_offset": -166.0,
            "tx_enable": true,
            "antenna_gain": 0
        },
        "radio_1": {
            "type": "SX1257",
            "rssi_offset": -166.0,
            "tx_enable": false
        }
        /* chan_multiSF_X, chan_Lora_std, chan_FSK provided by LNS */
    },
    "station_conf": {
        "routerid": "ffffffffffffffff",
        "log_file":  "/var/log/basicstation.log",
        /*"log_level": "DEBUG",  /* XDEBUG,DEBUG,VERBOSE,INFO,NOTICE,WARNING,ERROR,CRITICAL */
        "log_level": "INFO",
        "log_size":  10000000,
        "log_rotate":  3,
        "CUPS_RESYNC_INTV": "1s",
        "RADIO_INIT_WAIT": "2s",
        "radio_init": "/opt/basicstation/bin/reset_gw.sh"
    }
}
get the Gateway EUI parameter from the TTN v3 console's gateway info and put it on the routerid parameter.

The device parameter is correct for new Raspberry Pi cards, if you have a really really old Raspberry Pi you need to change it.
Create the file /opt/basicstation/bin/reset_gw.sh with this content
# Reset iC880a PIN
SX1301_RESET_BCM_PIN=25
echo "$SX1301_RESET_BCM_PIN"  > /sys/class/gpio/export
echo "out" > /sys/class/gpio/gpio$SX1301_RESET_BCM_PIN/direction
echo "0"   > /sys/class/gpio/gpio$SX1301_RESET_BCM_PIN/value
sleep 0.1
echo "1"   > /sys/class/gpio/gpio$SX1301_RESET_BCM_PIN/value
sleep 0.1
echo "0"   > /sys/class/gpio/gpio$SX1301_RESET_BCM_PIN/value
sleep 0.1
echo "$SX1301_RESET_BCM_PIN"  > /sys/class/gpio/unexport
execute this command to allow /opt/basicstation/bin/reset_gw.sh execution
chmod +x /opt/basicstation/bin/reset_gw.sh
Choose which type of config you want LNS or CUPS, with CUPS you can control the gateway from remote and in future you could do more thing, LNS configure only the frequencies, this is what I understand after fast documentation reading, for best understand read this link.
- Create the tc.trust file:
cd /etc/basicstation
create the file tc.trust with this content:
-----BEGIN CERTIFICATE-----
MIIFazCCA1OgAwIBAgIRAIIQz7DSQONZRGPgu2OCiwAwDQYJKoZIhvcNAQELBQAw
TzELMAkGA1UEBhMCVVMxKTAnBgNVBAoTIEludGVybmV0IFNlY3VyaXR5IFJlc2Vh
cmNoIEdyb3VwMRUwEwYDVQQDEwxJU1JHIFJvb3QgWDEwHhcNMTUwNjA0MTEwNDM4
WhcNMzUwNjA0MTEwNDM4WjBPMQswCQYDVQQGEwJVUzEpMCcGA1UEChMgSW50ZXJu
ZXQgU2VjdXJpdHkgUmVzZWFyY2ggR3JvdXAxFTATBgNVBAMTDElTUkcgUm9vdCBY
MTCCAiIwDQYJKoZIhvcNAQEBBQADggIPADCCAgoCggIBAK3oJHP0FDfzm54rVygc
h77ct984kIxuPOZXoHj3dcKi/vVqbvYATyjb3miGbESTtrFj/RQSa78f0uoxmyF+
0TM8ukj13Xnfs7j/EvEhmkvBioZxaUpmZmyPfjxwv60pIgbz5MDmgK7iS4+3mX6U
A5/TR5d8mUgjU+g4rk8Kb4Mu0UlXjIB0ttov0DiNewNwIRt18jA8+o+u3dpjq+sW
T8KOEUt+zwvo/7V3LvSye0rgTBIlDHCNAymg4VMk7BPZ7hm/ELNKjD+Jo2FR3qyH
B5T0Y3HsLuJvW5iB4YlcNHlsdu87kGJ55tukmi8mxdAQ4Q7e2RCOFvu396j3x+UC
B5iPNgiV5+I3lg02dZ77DnKxHZu8A/lJBdiB3QW0KtZB6awBdpUKD9jf1b0SHzUv
KBds0pjBqAlkd25HN7rOrFleaJ1/ctaJxQZBKT5ZPt0m9STJEadao0xAH0ahmbWn
OlFuhjuefXKnEgV4We0+UXgVCwOPjdAvBbI+e0ocS3MFEvzG6uBQE3xDk3SzynTn
jh8BCNAw1FtxNrQHusEwMFxIt4I7mKZ9YIqioymCzLq9gwQbooMDQaHWBfEbwrbw
qHyGO0aoSCqI3Haadr8faqU9GY/rOPNk3sgrDQoo//fb4hVC1CLQJ13hef4Y53CI
rU7m2Ys6xt0nUW7/vGT1M0NPAgMBAAGjQjBAMA4GA1UdDwEB/wQEAwIBBjAPBgNV
HRMBAf8EBTADAQH/MB0GA1UdDgQWBBR5tFnme7bl5AFzgAiIyBpY9umbbjANBgkq
hkiG9w0BAQsFAAOCAgEAVR9YqbyyqFDQDLHYGmkgJykIrGF1XIpu+ILlaS/V9lZL
ubhzEFnTIZd+50xx+7LSYK05qAvqFyFWhfFQDlnrzuBZ6brJFe+GnY+EgPbk6ZGQ
3BebYhtF8GaV0nxvwuo77x/Py9auJ/GpsMiu/X1+mvoiBOv/2X/qkSsisRcOj/KK
NFtY2PwByVS5uCbMiogziUwthDyC3+6WVwW6LLv3xLfHTjuCvjHIInNzktHCgKQ5
ORAzI4JMPJ+GslWYHb4phowim57iaztXOoJwTdwJx4nLCgdNbOhdjsnvzqvHu7Ur
TkXWStAmzOVyyghqpZXjFaH3pO3JLF+l+/+sKAIuvtd7u+Nxe5AW0wdeRlN8NwdC
jNPElpzVmbUq4JUagEiuTDkHzsxHpFKVK7q4+63SM1N95R1NbdWhscdCb+ZAJzVc
oyi3B43njTOQ5yOf+1CceWxG1bQVs5ZufpsMljq4Ui0/1lvh+wjChP4kqKOJ2qxq
4RgqsahDYVvTH9w7jXbyLeiNdd8XM2w9U/t7y0Ff/9yi0GE44Za4rF2LN9d11TPA
mRGunUHBcnWEvgJBQl9nJEiU0Zsnvgc/ubhPgXRR4Xq37Z0j4r7g1SgEEzwxA57d
emyPxgcYxn/eR44/KJ4EBs+lVDR3veyJm+kXQ99b21/+jh5Xos1AnX5iItreGCc=
-----END CERTIFICATE-----
this is the public certificate of the SSL TTN servers
- Create the tc.uri file:
cd /etc/basicstation
create the file tc.uri with this content:
wss://eu1.cloud.thethings.network:8887
this is the TTN v3 secure websocket server.
THIS SERVER IS FOR THE EUROPEAN USERS. IF YOU ARE NOT AN EUROPEAN USER USE THE SERVER IN Gateway Server address ON YOUR TTN v3 INFO PAGE.

- Go on the TTN v3 console on your new gateway API keys section and add a new key, call it LNS and check the
Grant individual rights box
link as Gateway to a Gateway Server for traffic exchange, i.e. write uplink and read downlink box
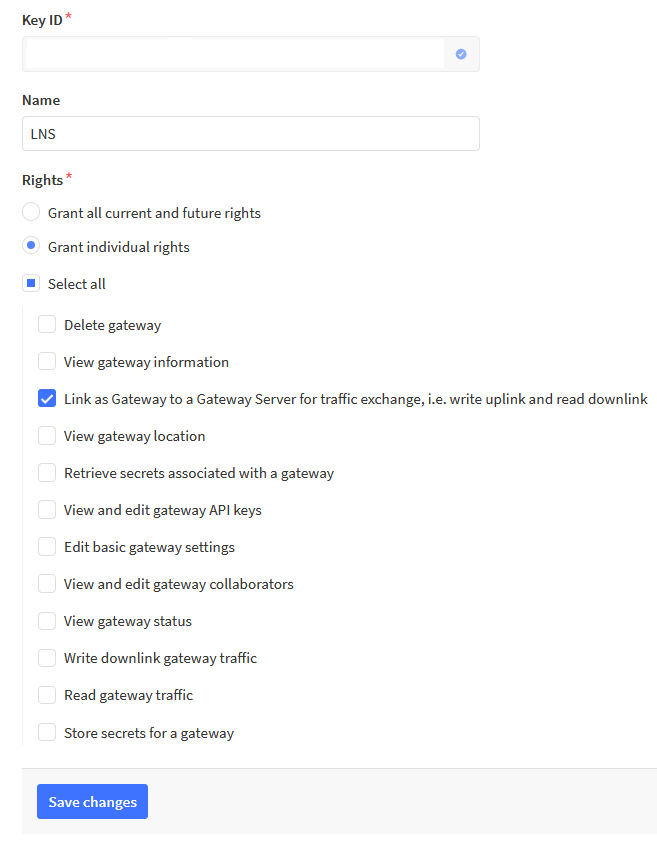
Save changes
write down the key in a text file and save it for next usage, YOU CANNOT SEE THE KEY AFTER!!! If you loose it you must delete ad recreate it!!!
- Create the tc.key file:
cd /etc/basicstation
create the tc.key with this content:
Authorization: NNSXS.Your key from previus point
THE FILE MUST HAVE A DOS FORMATTED END OF LINE, IF THE FILE DON'T HAS IT THE BASIC STATION SERVER GIVE THE INFAMOUS INCORRECT END OF LINE ERROR!!!!!!!
Go to enable the server section.
- Create the cups-boot.trust file:
cd /etc/basicstation
create the file cups-boot.trust with this content:
-----BEGIN CERTIFICATE-----
MIIFazCCA1OgAwIBAgIRAIIQz7DSQONZRGPgu2OCiwAwDQYJKoZIhvcNAQELBQAw
TzELMAkGA1UEBhMCVVMxKTAnBgNVBAoTIEludGVybmV0IFNlY3VyaXR5IFJlc2Vh
cmNoIEdyb3VwMRUwEwYDVQQDEwxJU1JHIFJvb3QgWDEwHhcNMTUwNjA0MTEwNDM4
WhcNMzUwNjA0MTEwNDM4WjBPMQswCQYDVQQGEwJVUzEpMCcGA1UEChMgSW50ZXJu
ZXQgU2VjdXJpdHkgUmVzZWFyY2ggR3JvdXAxFTATBgNVBAMTDElTUkcgUm9vdCBY
MTCCAiIwDQYJKoZIhvcNAQEBBQADggIPADCCAgoCggIBAK3oJHP0FDfzm54rVygc
h77ct984kIxuPOZXoHj3dcKi/vVqbvYATyjb3miGbESTtrFj/RQSa78f0uoxmyF+
0TM8ukj13Xnfs7j/EvEhmkvBioZxaUpmZmyPfjxwv60pIgbz5MDmgK7iS4+3mX6U
A5/TR5d8mUgjU+g4rk8Kb4Mu0UlXjIB0ttov0DiNewNwIRt18jA8+o+u3dpjq+sW
T8KOEUt+zwvo/7V3LvSye0rgTBIlDHCNAymg4VMk7BPZ7hm/ELNKjD+Jo2FR3qyH
B5T0Y3HsLuJvW5iB4YlcNHlsdu87kGJ55tukmi8mxdAQ4Q7e2RCOFvu396j3x+UC
B5iPNgiV5+I3lg02dZ77DnKxHZu8A/lJBdiB3QW0KtZB6awBdpUKD9jf1b0SHzUv
KBds0pjBqAlkd25HN7rOrFleaJ1/ctaJxQZBKT5ZPt0m9STJEadao0xAH0ahmbWn
OlFuhjuefXKnEgV4We0+UXgVCwOPjdAvBbI+e0ocS3MFEvzG6uBQE3xDk3SzynTn
jh8BCNAw1FtxNrQHusEwMFxIt4I7mKZ9YIqioymCzLq9gwQbooMDQaHWBfEbwrbw
qHyGO0aoSCqI3Haadr8faqU9GY/rOPNk3sgrDQoo//fb4hVC1CLQJ13hef4Y53CI
rU7m2Ys6xt0nUW7/vGT1M0NPAgMBAAGjQjBAMA4GA1UdDwEB/wQEAwIBBjAPBgNV
HRMBAf8EBTADAQH/MB0GA1UdDgQWBBR5tFnme7bl5AFzgAiIyBpY9umbbjANBgkq
hkiG9w0BAQsFAAOCAgEAVR9YqbyyqFDQDLHYGmkgJykIrGF1XIpu+ILlaS/V9lZL
ubhzEFnTIZd+50xx+7LSYK05qAvqFyFWhfFQDlnrzuBZ6brJFe+GnY+EgPbk6ZGQ
3BebYhtF8GaV0nxvwuo77x/Py9auJ/GpsMiu/X1+mvoiBOv/2X/qkSsisRcOj/KK
NFtY2PwByVS5uCbMiogziUwthDyC3+6WVwW6LLv3xLfHTjuCvjHIInNzktHCgKQ5
ORAzI4JMPJ+GslWYHb4phowim57iaztXOoJwTdwJx4nLCgdNbOhdjsnvzqvHu7Ur
TkXWStAmzOVyyghqpZXjFaH3pO3JLF+l+/+sKAIuvtd7u+Nxe5AW0wdeRlN8NwdC
jNPElpzVmbUq4JUagEiuTDkHzsxHpFKVK7q4+63SM1N95R1NbdWhscdCb+ZAJzVc
oyi3B43njTOQ5yOf+1CceWxG1bQVs5ZufpsMljq4Ui0/1lvh+wjChP4kqKOJ2qxq
4RgqsahDYVvTH9w7jXbyLeiNdd8XM2w9U/t7y0Ff/9yi0GE44Za4rF2LN9d11TPA
mRGunUHBcnWEvgJBQl9nJEiU0Zsnvgc/ubhPgXRR4Xq37Z0j4r7g1SgEEzwxA57d
emyPxgcYxn/eR44/KJ4EBs+lVDR3veyJm+kXQ99b21/+jh5Xos1AnX5iItreGCc=
-----END CERTIFICATE-----
this is the public certificate of the SSL TTN servers
- Create the cups-boot.uri file:
cd /etc/basicstation
create the file cups-boot.uri with this content:
https://eu1.cloud.thethings.network:443
this is the TTN v3 secure web server.
THIS SERVER IS FOR THE EUROPEAN USERS. IF YOU ARE NOT AN EUROPEAN USER USE THE SERVER IN Gateway Server address ON YOUR TTN v3 INFO PAGE.
- Go on the TTN v3 console on your new gateway API keys section and add a new key, call it CUPS and check the
Grant individual rights box
view gateway information box
retrieve secrets associated with a gateway box
edit basic gateway settings box
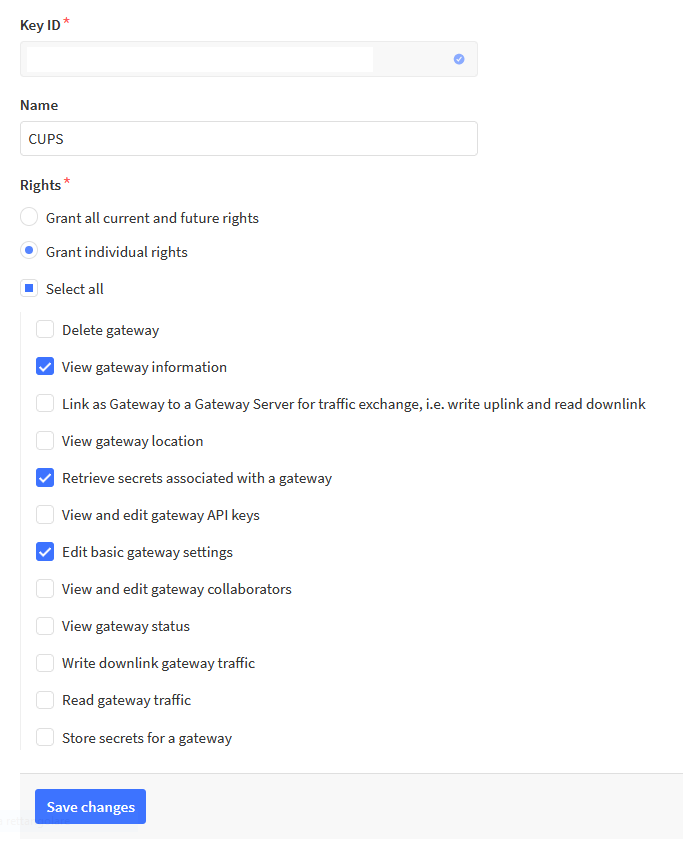
Save changes
write down the key in a text file and save it for next usage, YOU CANNOT SEE THE KEY AFTER!!! If you loose it you must delete ad recreate it!!!
- Create the cups-boot.key file:
cd /etc/basicstation
create the cups-boot.key with this content:
Authorization: Bearer NNSXS.Your key from previus point
THE FILE MUST HAVE A DOS FORMATTED END OF LINE, IF THE FILE DON'T HAS IT THE BASIC STATION SERVER GIVE THE INFAMOUS INCORRECT END OF LINE ERROR!!!!!!!
- Go on the TTN v3 console on your new gateway API keys section and add a new key, call it LNS and check the
Grant individual rights box
link as Gateway to a Gateway Server for traffic exchange, i.e. write uplink and read downlink box
Save changes
write down the key in a text file and save it for next usage, YOU CANNOT SEE THE KEY AFTER!!! If you loose it you must delete ad recreate it!!!
- Go on the TTN v3 console on your new gateway general settings and paste the key created at previus ponit on the
LoRa Basic Station LNS Authentication Key box
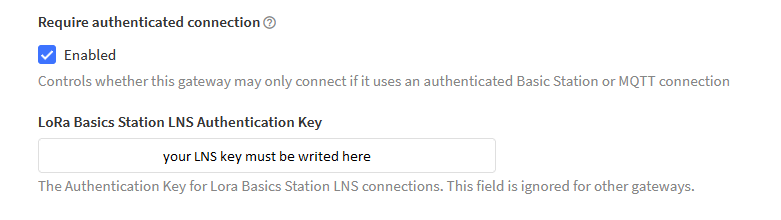
Save changes
If you have both LNS and CUPS files in the config directory the LNS files has the precedence, I think...
- Stop the ttn-gateway.service
systemctl stop ttn-gateway.service
- Disable the ttn-gateway.service
systemctl disable ttn-gateway.service
- Check the ttn-gateway.service status
systemctl status ttn-gateway.service
the comand should show this:
● ttn-gateway.service - The Things Network Gateway
   Loaded: loaded (/lib/systemd/system/ttn-gateway.service; disabled)
   Active: inactive (dead)
in this way we disable the old packet forwarder but don't uninstall it, if you have some problem with the Basic Tation you could quickly reenable the old.
- Enable the basicstation.service
systemctl enable basicstation.service
- Start the basicstation.service
systemctl start basicstation.service
- Check the basicstation.service status
systemctl status basicstation.service
the comand should show something like this:
● basicstation.service - Basic Sation TTN V3 service
   Loaded: loaded (/lib/systemd/system/basicstation.service; enabled)
   Active: active (running) since gio 2021-07-22 05:17:08 CEST; 2 weeks 4 days ago
 Main PID: 332 (station)
   CGroup: /system.slice/basicstation.service
           └─332 /opt/basicstation/bin/station -h /etc/basicstation
In the TTN v3 console gateway live data you should view two lines like these:
