Ideas for first Y7 Lessons
Bit of a brain dump about where I was thinking of going with my Y7 lesson planning for Python/Microbit. My year 7s have done some Python already (Caesar cyphers, simple loops, Turtle graphics spirals) but wouldn't assume prior knowledge.
- Try to be non-platform specific.
- Avoid REPL, at least at first - 2 reasons for this:
- I started my Y7s on Python shell/command line, then moved to IDLE editor, some are STILL confused by the difference months later.
- REPL on Windows requires drivers which may or may not be installable due to local IT support issues etc. I want to keep it simple.
-
Lesson 1: (see below) LO to learn basics of Mu editor. Introduce device with v simple project a bit like http://www.suppertime.co.uk/blogmywiki/2016/02/simple-microbit-python-demo/ but without sound - scrolling text 'Hello I am MicroBit, I belong to Sam' - customise their own name. Trigger text and built-in images by buttons A & B, touch buttons and shake. Get chn to experiment with different pre-defined images and events. Also teaches while True loop, draw parallel with 'forever' block in Scratch. Possible activity sheet here: http://www.suppertime.co.uk/blogmywiki/wp-content/uploads/2016/02/Y7-Microbit-Lesson-1.pdf
-
Lesson 2: something with graphics - animations, using pre-defined images at first - e.g. faces whose expressions change depending on button pushes or shakes. Extn: define own images, own animations.
-
Lesson 3: something game-like, possibly dice or Magic 8-Ball type game > or give them choice? Either could teach variables, random numbers, trigger by shake, lists, defining own graphics, more complex loops.
-
Lesson 4: build a graphical game, possibly something based on http://www.suppertime.co.uk/blogmywiki/2016/02/tilty/ - may be a simple draw program to start with, then add game elements. Extn: add more levels, make game more challenging, improve game play.
-
Lesson 5: Build a more advanced game like Kettle Run? http://www.suppertime.co.uk/blogmywiki/2016/02/kettle-run/ and https://github.com/blogmywiki/kettle_run Encourage chn to come up with their own game name and narrative within the same basic format of a slalom - remember device can be rotated 90 degrees to fly up/down rather than left/right. Chn customise game with own messages, icons, pictures, sounds etc.
You can download the Mu editor for Windows, Mac OS X and Linux here: https://github.com/ntoll/mu It is all you need to start programming a MicroBit in Python.
The documentation for MicroPython on the BBC MicroBit is here: http://microbit-micropython.readthedocs.org/en/latest/index.html
written by Giles Booth / @blogmywiki - contributions, suggestions welcome
Today we’re going to
- start using our BBC MicroBits
- learn how to use an app on our computers called Mu to program the MicroBit
- learn a bit about the Python programming language
- find out how to use some of the MicroBit's input and output features.
Tick off each step as you go.
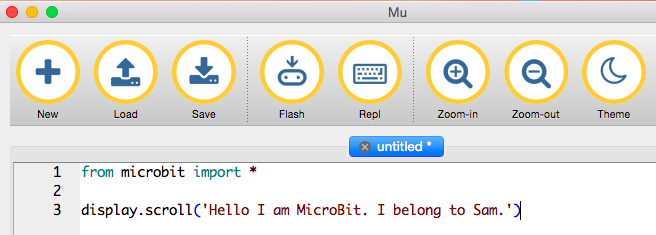
Open Mu on your computer and start typing this code in. Use your own name instead of Sam (unless your name is Sam!)
from microbit import*

display.scroll('Hello I am Microbit. I belong to Sam.')
All our programs for the MicroBit will start with the line from microbit import* - this tells Python that we're going to use some special instructions for using input and output parts of your MicroBit like the buttons and LED display.
Plug your MicroBit in to one of the spare USB sockets on your computer. Your MicroBit will probably have some code on it already and spring to life. We're going to write over the code that's already on it with our own code.
You may see a message on your computer asking if you want to allow your computer to access it. You should choose ‘allow read and write access’.
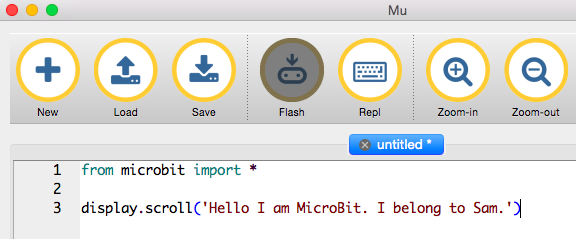
Click on the Flash button on the Mu toolbar:
A few things should happen:
- The yellow light on the back of your MicroBit should flash. This means your computer is talking to your MicroBit.
- You should see a message pop up on your computer screen to say the program is being 'flashed'.
- Most importantly, after a few seconds you should see your message scrolling across the red LED lights on your MicroBit!
Unlike the IDLE Python editor you may have used before, Mu doesn’t force you to save your code every time you run it, so let’s save it now. Click on the Save button and give the file a useful name like Sam-Microbit1
Remember to keep saving your code when you make changes.
Congratulations - you have now programmed your BBC MicroBit using Python!
So far your program stops running as soon as the message is displayed. Let’s keep it going forever (or until you unplug the MicroBit).
The while True: loop in Python is really useful - it’s very much like the ‘Forever’ block in Scratch. Edit your code so it looks like this, then press Flash to send it to the MicroBit:
from microbit import *

while True:
    display.scroll('Hello I am MicroBit. I belong to Sam.')
Make sure you have four spaces at the start of the display.scroll line, spell True with a capital letter T and don't forget the colon at the end of True:
Python uses these spaces - called indents - to tell it which lines of code belong together, such as in a loop. Any instructions you put after
while.True:with 4 spaces at the start will run forever.
If you get the number of spaces wrong or type the wrong thing you may see a debugging message scroll across the screen of your MicroBit. Make a note of any line numbers it gives you - these can be useful for finding the bugs and squishing them.
You should see your message now keeps scrolling across the MicroBit.
Scrolling text was ok, but let’s get drawing! You can make your own shapes (which we’ll look at in another lesson), but MicroBit Python also has lots of pictures built in. Edit your code so it looks like this, then send it to the Microbit with the Flash button:
from microbit import *

while True:
    display.show(Image.HAPPY)
Then try changing the picture name. Try SAD, HEART, MEH, RABBIT, COW, DUCK, SWORD, GIRAFFE, TARGET, HOUSE, TORTOISE, UMBRELLA, SNAKE, SKULL, BUTTERFLY, TSHIRT, XMAS, STICKFIGURE, MUSIC_CROTCHET, CHESSBOARD, YES, NO, CONFUSED, ANGRY, ARROW_N, ARROW_S, ARROW_E, ARROW_W, ARROW_SE
You can have more than one picture. Use the sleep(1000) instruction to pause your MicroBit for 1 second. (The number is milliseconds, or thousandths of a second - try changing it to 500 and see what happens).
from microbit import *

while True:
    display.show(Image.HAPPY)
    sleep(1000)
    display.show(Image.SAD)
    sleep(1000)
Your MicroBit has two buttons on the front called A and B - and we can use them in our Python programs to make things happen:
from microbit import *

while True:
    if button_a.is_pressed():
        display.show(Image.PACMAN)
    if button_b.is_pressed():
        display.show(Image.GHOST)
Be careful with your indents! Some lines have 4 spaces at the start, some have 8 - and some have no spaces at all.
See if you can make different pictures appear when you press the left and right buttons.
Your MicroBit also contains an accelerometer. This is the same chip your phone or tablet has so it knows which way up you are holding it - or if you shake it. Add a line of code to show another picture when you shake your MicroBit:
from microbit import *

while True:
    if button_a.is_pressed():
        display.show(Image.PACMAN)
    if button_b.is_pressed():
        display.show(Image.GHOST)
    if accelerometer.was_gesture('shake'):
        display.show(Image.SURPRISED)
Your MicroBit also has touch sensors that work like a MakeyMakey - we can use them in our code too. Add the new line, flash it to the MicroBit then see what happens of you touch the gold number 1 on the bottom of the MicroBit with one finger and the GND label with another:
from microbit import *

while True:
    if button_a.is_pressed():
        display.show(Image.PACMAN)
    if button_b.is_pressed():
        display.show(Image.GHOST)
    if accelerometer.was_gesture('shake'):
        display.show(Image.SURPRISED)
    if pin1.is_touched():
        display.show(Image.HEART)
See what you can create - mix up button pushes, touch sensors, pictures and scrolling messages to make your own machine that does whatever you want.
Q1. What Python command puts a picture on the MicroBit screen?
Q2. How do we make sure our code keeps running forever rather than just once?
Q3. What command puts scrolling text on the display?
Q4. How do we tell if a button has been pushed?