Guide for Developers
System Overview
Roles
Privileges and Acess Control
Paths of Important Files
Becoming a new Front End Developer
Developing for the Autolab Front End
Scripting for the Front End
The Back End
Web Services
Network Services
Database Service
Tango Service
Tashi Service
Autograding Service
Managing the System
Debugging the Backend
- Hardware: Frontend host, Autograding hosts, public network, private network
- Storage: MySqL DB, NFS file system, AFS file system, FE local filesystem
- Software: Web server, Tango, Tashi, VM images
- Principal: Manage the project in terms of overall vision and mission. The Principal is responsible for selling Autolab to clients and communicating the needs of potential clients to the Lead Developer.
- Lead developer: Manage the development team and maintain a clear understanding of the current and future states of the project. The Lead Developer should also check over all code submitted by other developers and should be the only developer to push changes into production.
- Developer: Develop new features, find/fix bugs, optimize existing features.
- System Administrator: Manage the physical systems and daemon processes. Including Web Server, Database Server, NFS file share, Tango, Tashi, and networking.
$ aklog CS.CMU.EDU
Autolab itself runs on a service principal academic.autolab and is authenticated via a keytab.
The following PTS groups are used to controll access for human users:
- academic:admin.autolab The administration group. This group has access to the production directory of Autolab.
- academic:developer.autolab The developer group. This group has permission to check out and check in code to the development repositories.
Checking the membership of a group can be done (from an andrew server) with:
$ pts membership academic:developer.autolab -cell CS.CMU.EDU
Members of academic:developer.autolab (id: -4799) are:
  d
  h
  h@andrew.cmu.edu
  k@andrew.cmu.edu
  r@andrew.cmu.edu
  a@andrew.cmu.edu
You can add an account to a group with:
$ pts adduser newdev@andrew.cmu.edu academic:developer.autolab -cell CS.CMU.EDU
You can remove an acount from a group with:
$ pts removeuser baddev@andrew.cmu.edu academic:developer.autolab -cell CS.CMU.EDU
Greatwhite Login Access and Local File Permissions.
The Autolab frontend machine is greatwhite.ics.cs.cmu.edu. Access is limited to Autolab developers and course staff.
Root control of greatwhite is with sudo. Use the visudo command to edit the sudoers file. Root access should (of course) be extremely limited.
Access to other local files on greatwhite is controlled with the autolabDev group. The usermod command can be used to add and remove a user from groups:
$ sudo usermod -a -G autolabDev userid
To add a new user on greatwhite, use the visudo command to modify the AllowUsers field in /etc/ssh/sshd_config.
-
Production code:
- Autolab2 Website: /afs/cs.cmu.edu/academic/autolab/autolab2
- Tango: /usr/share/tango
- Tashi: /usr/share/tashi
- Git Master repository /afs/cs.cmu.edu/academic/autolab/repositories/autolab2
-
Logs
- Web Server: /afs/cs.cmu.edu/academic/autolab/autolab2/log/{access,error}
- Autolab: /afs/cs.cmu.edu/academic/autolab/autolab2/log/production.log
- Tango: No Log!
- Tashi Clustermanager: /var/log/clustermanager.log
- Tashi Nodemanagers: /var/log/nodemanager.log
- Virtual machine images: Virtual machine images for tashi are stored in /raid/tashi/images.
-
Management tools/utilities: All scripts and paths are from
greatwhite. Files in /raid/ are available on all
machines in the cluster under /mnt/nfs/.
- /usr/share/tango/tango/startTangoAFS.sh : This script is used to start tango using the autolab service principle so it can access the handin files.
- /etc/init.d/httpd : Apache control script. use just like any other daemon control script.
- /etc/init.d/mysqld : MySQL control script, use just like any other daemon control script.
- /root/FISH.dynamic.dns.net.cs.cmu.edu : The DNS key to control the *.fish.ics.cs.cmu.edu domain. This is how we do things like unofficial.fish.ics.cs.cmu.edu, and once day can give students customized domain names for their virtual machines.
- /root/aa.keytab : This is the autolab keytab file used to get tokens in the autolab service principal.
- /raid/scripts/wipeLo.sh : Used to remove all the open loopback devices. This isn't something you should use, as it will majorily break tango. Only run this script if you have to manually restart Tango and things are not working.
- /raid/scripts/destroyAll.sh : Used to destroy all active virtual machines in Tashi. Don't use this if you are not really sure what you're doing.
- /raid/scripts/launch.sh : Outline script for launching a virtual machine for testing purposes. Run this from one of the backend grading machines (not greatwhite).
- /raid/scripts/mountDiskImage.sh : Will mount and chroot into a virtual machine hard drive. You might have to modify this script depending on the exact image that you're using. Read the DOCUMENTATION ON BUILDING A VIRTUAL MACHINE for more information on this.
- /raid/scripts/iptables-base-set : The baseset of rules for a nodemanager's iptables firewall. Read the networking section below for more information.
- tashi-client.py : Frontend script to interact directly with the Tashi clustermanager. This is a great first step for any and all inquries into Tashi.
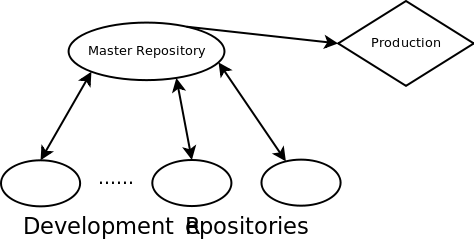
Development for the front end is done through individual development servers for each developer. Each developer pulls code down from the master repository into their development repository, commits changes, then will push back up to master when they are done. The Lead Developer will then review changes and push changes from the master respository down to the production repository.
You need to be in the academic:developer.autolab pts group to access the master repository. Email autolab-dev@andrew.cmu.edu and the right person will get the email. You can find out if you are in the pts group with
$ pts membership hpitelka -cell CS.CMU.EDU
Once you are in the pts group, create your repository by executing:
$ git clone /afs/cs.cmu.edu/academic/autolab/repositories/autolab2 autolab2
This will create a directory 'autolab2' which will contain the current checkout of the autolab source code. This is not an open source project, please make sure the directory is locked down and do not share the code publically.
Initalize your development environment with
$ git pull
$ rake db:create
$ rake db:migrate
Now, you could load up your development server and hop into autolab right now, but it wouldn't let you do much, since there are no courses, and no users (since users belong to courses!). Let's create a course and a user first. Load up the development console and issue the following commands. Things in bold are what you should type, but you should make them more interesting.
$ script/console
Loading development environment (Rails 2.3.8)
>> c = Course.new(:name=>"devCourse",:semester=>"s11",:late_slack=>0,:grace_days=>0,
:late_penalty=>0,:display_name=>"Development Course",:start_date=>Time.now(),
:end_date=>Time.now())
=> #<Course id: nil, name: "devCourse", semester: "s11", late_slack: 0,
grace_days: 0, late_penalty: 0.0, display_name: "Development Course",
start_date: "2011-05-02 00:47:39", end_date: "2011-05-02 00:47:39", disabled:
false>
>> c.save()
=> true
>>
If c.save() comes back false, you can type c.errors() to see what was wrong, the errors are fairly english. That will create a course. Now, we'll create a user account for you (obviously use your own user information)
>> u = c.users.new(:first_name=>"Hunter",:last_name=>"Pitelka",
:andrewID=>"hpitelka",:school=>"SCS",:major=>"CS",:year=>4,:lecture=>1,
:section=>"Instructor",:email=>"hpitelka@andrew.cmu.edu",:instructor=>true,
:nickname=>"nicoleH")
=> #<User id: nil, first_name: "Hunter", last_name: "Pitelka", andrewID:
"hpitelka", school: "", major: "", year: nil, lecture: nil, section: "",
grade_policy: "", course_id: 8, email: "hpitelka@andrew.cmu.edu", created_at:
nil, updated_at: nil, instructor: false, administrator: false, dropped: false,
nickname: "nicoleH", course_assistant: false, tweak: 0.0>
>> u.save()
=> true
You now have a user account and belong to a course. The course needs a directory for assessments to be stored in, go ahead and create that. The name of the directory needs to be the same thing as your course's name.
$ mkdir courses
$ mkdir courses/devCourse
You will also need to create other directories which are course-dependent.
- gradebooks will store the course gradebooks
- assessmentConfig will store the configuration files for courses.
- log will store the log files
After creating the directories, you will not need to modify them again.
You can now load up your development web server and log into Autolab. Each developer needs to use a different port to use their development server. The Lead Developer always has port 3000. Feel free to coordinate with the other developers, or pick something random and just cross your fingers
linux> script/server -p [port]
Notice that the server must must be started from the main autolab directory because the autolab pages uses pathnames that are relative to the main directory. In particular,
linux> cd script
linux> ./server -p [port]
will not work.
You can now point a web browser to autolab.cs.cmu.edu:[port] and log into your development account with the user account you just created. During development the server will automatically reload on each request, this slows things down a bit, but allows for a much cleaner development cycle. Most developers prefer to leave their development server running in a screen session while they work.
Once you have setup your development environment, you'll follow the following lifecycle to make all of your changes.
- Log into greatwhite.ics.cs.cmu.edu
- cd into your development directory.
- Pull down changes that other developers have pushed up to master, and update
your database if necessary (You'll only need to update your database if you
see any files come in that are db/migrate/*).
$ git pull
$ rake db:migrate
If the git pull complains of any uncommitted changes in your repository, you'll either need to wipe the changes (use git checkout [filename] to checkout the most recent version of the file from master) or commit your changes (use git commit [filename] to commit a particular file, or git commit -a to commit all changes in your repository). - Now you'll want to restart your development server just because it's good practice. I like to run mine in a screen session so it stays running when you log out. But you can run yours in a seperate terminal if you prefer. The command to start your development server is script/server -p 3001 (3001 is the port number)
- Now, you can access your current development site by going to http://autolab.cs.cmu.edu:3001 and it should ask you for a username.
- Make a change to the source code
- Debug and test your change to the source code.
- A handy printf equivalent for degugging is the log() method:
COURSE_LOGGER.log("Hello from method foo. user=#{@user.andrewID}")This will append a line to log/course_name.log (e.g., log/15213-f11.log), which you can view in real-time by runningunix> tail -f log/course_name.log
- Once everything looks good and you like what you've done, it's
time to commit the change. Run `git status` to see what the current
status of your repository is. It should say something like
# On branch master
# Changed but not updated:
#   (use "git add <file>..." to update what will be committed)
#
#       modified:   app/views/home/index.html.erb
#
This means that that file needs to be commited. You can either commit a single file at a time with
git commit [filename]or you can commit all changed files withgit commit -a. Your favorite text editor will come up and you should add an informative message about what you did. - Finally you want to push your change upstream so that I can get it and push it into production. But just in case another developer pushed something while you were working, you'll first want to `git pull` to pull down any changes. If there were changes, you'll want to retest your change to make sure it still works. Then you can `git push` to push your change up to the master repository.
- Email autolab-dev@andrew.cmu.edu with a description of your change. The lead developer will push your code to production, or will inform you of any changes you need to make before your change can be pushed to production.
Occasionally it will be very useful to be able to run a custom script against the production database and interact with the live data, either to gain information or fix a problem. Luckly there are two very simple ways to do this with Autolab.
Disclaimer: Following these steps will put you into the production environment of Autolab with full read-write access. Don't do anything you're not sure of, and you might want to backup the database before hand if you're unsure. You do need to have autolab-admin@CS.CMU.EDU privelages to do this.
-
The Rails Console: The easiest way to interact with Autolab in
real-time in code is through the Rails Console. This is a script located in
scripts/console that will provide you with a
interactive terminal into the Autolab Database. From here you can issue any
instruction you would normally put into a controller and it will execute. To
access the production environment you must specify "production" as the first
argument to the script
$ script/console production Loading production environment (Rails 2.3.8) >> @user = User.find_by_andrewID("hpitelka") => #> @user.submissions.count => 25 -
Loading the Rails Environment: For tasks that you cannot do "live"
or might want to reuse, you can also write a script and load the Rails
Environment inside that script. Just start your Ruby script with the following
lines:
RAILS_ENV = "production"
require File.expand_path('/afs/cs.cmu.edu/academic/autolab/autolab2/config/environment')
And then you can freely access the Autolab Environment. For example, you could have the following script:RAILS_ENV = "production" require File.expand_path('/afs/cs.cmu.edu/academic/autolab/autolab2/config/environment')
courses = Course.find(:all).count() users = User.find(:all).count()
puts "Autolab has #{courses} courses and #{users} users"
The Autolab Back end is quite possibly one of the more complex systems you'll deal with today, it consists of two primary systems with a lot of configuration holding things up.
- Tango: is the service that runs and manages autograding jobs for Autolab. Requests for autograding jobs, student Virtual Machines, or queries about the state of the cluster come into Tango and are processed there. Tango maintains a list of the current jobs on the cluster and understands how to talk to Tashi, which manages the virtual machines running on the backend cluster.
-
Tashi: is an Apache virtualization cluster management system, written in Python,
developed by some folks at CMU and other places. See http://incubator.apache.org/tashi/
for more information.
We use a slightly different version of tashi than what is kept in the public repository. Mostly the following features were added:
- Individual VM Firewall Management: In order to provide a higher level of security in our VM cluster, we can individually manage the firewall for each virtual machine. Additionally, because we cannot hand out public IP addresses to our virtual machines, we must provide per-VM NAT'ing to allow for external access.
- Resume from suspended image: The way we get Virtual Machines to boot so quickly is to suspend a single image to a RAM image then "resume" multiple images off that single RAM image. KVM natively supports migrating virtual machines using these RAM images, so support was added to allow for the second half of a migration to take place while creating a new virtual machine. See the resume_source hint to the createvm command for tashi-client.py, and the -incoming flag for qemu-kvm.
- Hotplug Disk support: The primary method to provide files to a resumed Virtual Machine via adding a pci device. See the hotDisks hint for the createvm command for tashi-client.py, and the pci_add command for qemu.
Tashi controls the networking aspects of the cluster via DNS and DHCP control.
Web Services for Autolab are managed by an Apache webserver hosted on greatwhite.ics.cs.cmu.edu. The configuration directory is located at /etc/httpd/ and the server is controlled by the init script /etc/init.d/httpd. The webserver runs with AFS tickets to the autolab service principal in the CS.CMU.EDU realm. This is necessary in order for the web server to be able to access files in AFS. This page was some inspiration for how our server is setup. Authentication to Autolab is done using mod_pubcookie, See here for more information on mod_pubcookie, and here for more information how to hook into CMU's Webiso. The following files are of importance:-
/etc/init.d/httpd: This script start's and stop's the apache daemon
process. Because Autolab runs inside a PAG group and must renew its Kerberos
tickets every <24 hours, this script is customized to include the following
commands:
krbWrapper="export KINIT_PROG='/usr/bin/aklog CS.CMU.EDU'; /usr/local/bin/k5start -t -U -f /root/aa.keytab -l 24h -K 30 --" #NO_DETACH makes it so that apache stays in the PAG. OPTIONS="${OPTIONS} -D NO_DETACH " - /etc/httpd/conf/httpd.conf The primary httpd configuration file. You should not be changing this. This file configures the connection to webiso.andrew.cmu.edu
- /etc/httpd/sites-available/autolab.conf The primary httpd configuration file for the autolab.cs.cmu.edu domain. This also configures the SSL certificates.
- /etc/httpd/conf/ssl.{key,crt} The SSL certificate for https://autolab.cs.cmu.edu
-
DNS: Controls the hostname to IP address translation for virtual
machines. This service is much more of a convience than actually necessary. It
is configured out of /var/named/* (because that
totally makes sense, right?). The private key to control DNS is located in
/var/named/Kgreatwhite.+157+65165.private. You
should only be dealing with the .vmNet subdomain, since that is the only
subdomain that the greatwhite DNS server is authoritative for. You never should
be talking to the DNS server directly, Tashi will handle all of that. But here is
an example connection to add a virtual machine to the .vmNet subdomain anyways,
because this should be documented.
$ nsupdate -k /var/named/Kgreatwhite.+157+65165.key
> server 192.168.1.1
> update add huntersVM.vmNet 3600 A 192.168.1.200
> [ctrl+d]
$ nslookup
> server 192.168.1.1
Default server: 192.168.1.1
Address: 192.168.1.1#53
> huntersVM.vmNet
Server:		192.168.1.1
Address:	192.168.1.1#53

Name:	huntersVM.vmNet
Address: 192.168.1.200
-
DHCP: Controls the IP address assignment to virtual machines. This
is necessary only if you are using networking with the virtual machines. DHCP
is configured out of /etc/dhcpd.conf. The DHCP
server should only ever be set to run on eth1 or SCS
operations will get really pissed at you really quickly. The interface is
determined by /etc/sysconfig/dhcpd.
In order to NAT each virtual machine independently, it must have a gateway address which is capable of knowing which virtual machine sent the request, so therefore the gateway must be the physical host. In order to give each virtual machine the correct gateway address, there are different routing groups for each of the physical host. These are definted in the DHCP configuration file.
Tashi automatically handles adding hosts to DHCP, using an interface called omapi. This tool is notoriously undocumented, so here is a sample transaction to add a host, again you should never do this, but it might be useful for debugging purposes. The DHCP key is the same as the DNS key and is stored in /var/named/Kgreatwhite.+157+65165.key
$ omshell
> server 192.168.1.1
> key greatwhite [DHCP KEY HERE]
> connect
obj:
> new host
obj: host
> set name="huntersVm"
obj: host
name = "huntersVm"
> set ip-address = 192.168.1.200
obj: host
name = "huntersVm"
ip-address = c0:a8:01:c8
> set hardware-address = 00:07:e9:4b:4f:b4
obj: host
name = "huntersVm"
ip-address = c0:a8:01:c8
hardware-address = 00:07:e9:4b:4f:b4
> set hardware-type = 00:00:00:01
obj: host
name = "huntersVm"
ip-address = c0:a8:01:c8
hardware-address = 00:07:e9:4b:4f:b4
hardware-type = 00:00:00:01
> set group= "tigersharkVms"
obj: host
name = "huntersVm"
ip-address = c0:a8:01:c8
hardware-address = 00:07:e9:4b:4f:b4
hardware-type = 00:00:00:01
group = "tigersharkVms"
> create
obj: host
name = "huntersVm"
ip-address = c0:a8:01:c8
hardware-address = 00:07:e9:4b:4f:b4
hardware-type = 00:00:00:01
group = "tigersharkVms"
>
-
iptables: Firewall Control for each individual Virtual Machine is
controlled via iptables scripts on each of the physical machines. Firewalls are
controlled by tashi, however the initial base ruleset must be setup correctly.
The only default rule is to enable NAT'ing on the primary interface:
$ iptables -t nat -A POSTROUTING --out-interface eth0 -j MASQUERADE
When a virtual machine is created, the /etc/qemu-ifup.1 script is run, which creates the virtual network interface for the virtual machine and adds in the base iptables policies for a machine. Modifying the firewall policy after a virtual machine has launched should be done with the firewall argument to the tashi-client.py tool. Here are some examples of how to setup firewall policies.
Allows DNS and SSH leaving the virtual machine.
$ tashi-client.py firewall --instance huntVM --allow up:53,tcp:22 -deny all
Allowing udp port 53
Allowing tcp port 22
Allows users on the internet to SSH into the Virtual Machine
$ tashi-client.py firewall --instance huntVM --deny all --forward tcp:22
Forwarding tigershark.ics.cs.cmu.edu:32768 to huntVM:22
Allow everything except HTTP and HTTPS requests
$ tashi-client.py firewall --instance huntVM --allow all --deny tcp:443,tcp:80
Allow all
Denying tcp port 443
Denying tcp port 80
In order for any NAT'ing to work, IP forwarding must first be setup. This is controlled by the file /proc/sys/net/ipv4/ip_forward, and can be enabled with:
$ echo 1 > /proc/sys/net/ipv4/ip_forward
The Autolab Database is hosted on greatwhite.ics.cs.cmu.edu all state associated with the frontend web interface. We use a MySQL database. The primary table name for the autolab frontend is doohickey_production (this is for historical reasons, don't ask questions. ). The most up-to-date table definition is stored in the production schema document located at /afs/cs.cmu.edu/academic/autolab/autolab2/db/schema.rb . Relationships between tables are definted by the model classess, which are located in /afs/cs.cmu.edu/academic/autolab/autolab2/app/model/*.rb and are named after the table names. A description of the relationships can be found here .
Backups of the database are taken nightly and are stored in /usr/share/autolabBackups/.
- Starting apache:
/etc/init.d/httpd start
- Starting mysqld:
/etc/init.d/mysqld start
- Location of server code, tables, config file, startup/shutdown scripts
The Tashi code is at /usr/share/tashi on greatwhite. Tashi provides both a client library (what Autolab uses), xshell and a command line client tashi-client.py. Before running the command line client, you you'll need to do the following:
- Add /usr/share/tashi/bin to your PATH.
- Initialize PYTHONPATH to /usr/share/tashi/src/:/usr/share/tango
Virtual machines created by Tashi have the domain name name.vmnet, where name is the Tashi VM name. To login to a Tashi VM from greatwhite:
greatwhite> ssh -o "StrictHostKeyChecking no" name.vmnet
Starting Tashi on greatwhite:
0) Delete /var/tmp/nm.dat and /var/tmp/VmControlQemu on all workers (Only needed to clean up inconsistent state) 1) Start dhcpd (/etc/init/dhcpd start) and nfsd (/etc/init.d/nfs start) on greatwhite 2) Start cluster manager (screen -S CLUSTERMANAGER /usr/share/tashi/bin/clustermangaer.py) on greatwhite 3) Start node manager (screen -S NODEMANAGER /usr/share/tashi/bin/nodemanager.py) on each worker 4) Start scheduler (screen -s PRIMITIVE /usr/share/tashi/bin/primitive.py) on greatwhite * At any time after starting a service, it can be detached by typing "CTRL-A d" within the screen ** In the event of any problems, ensure PYTHONPATH is set to include, at least, "/usr/share/tashi/src" *** A good time to fix the DHCP and nfs thing is when we roll to RHEL. We could also fix it now, by soft linking the init.d scripts into appropriately named links within /etc/rc3.d or /etcrc5.dHere is a end-to-end description of everything that happens during an autograding transaction.
- Student uploads a file to autolab. The Autograde module which is included in the assessment configuration file overrides the "handin" action. After the submission is saved to disk, a Tango Job request is built. This consists of a machine specification ( number of processors, amount of ram, firewall) and a list of input files. Input files are specified by the lab author in the autogradeInputFiles function. A request also includes a URL which is retrieved when the autograde job is finished. This URL includes a private key, called the "Dave Key" which is randomly generated, stored in the Autograding UserModule, and then verified when the response comes back.
- The request is then sent over a Thrift RPC connection to the Tango Server. The Tango server will add the job request to its internal list, translate the job request into a virtual machine request that Tashi can understand, and finally send the createVM request to Tashi over an RPyC connection.
- Tashi will recieve the createVM request, add it to it's scheduler queue, which will attempt to assign the virtual machine a physical host in the cluster.
- The Tashi cluster manager server will send a createVM RPyC call to the Tashi node manager service that was chosen. The nodemanager will send the request to the specific vmcontrol module (in our case qemu) to start the virtual machine. All aspects of virtualization that are VMM specific are handled in this module ( The module is located in src/tashi/nodemanager/vmcontrol/qemu.py ).
- The node manager will launch a qemu process to run the virtual machine and keep a watchful eye on it.
- The virtual machine launches instantly because what we told qemu to do was to restore from a suspended image file. And since fortunetly qemu doesn't write back to the suspend image file, all virtual machines running the same Machine Specification can run on the same suspend image file. And since we enable a featured called 'snapshots' (read the man page for qemu for more details), all Virtual Machines can also share their virtual hard drive. Because there is no copying necessary, and the entire state of a running machine is encapsulated in two files, we can boot the machine to a running state almost instantly.
- As soon as the VM comes live, tashi delivers a command to the qemu-prompt (which is controlled via a pts terminal that tashi reads/writes to) to add a pci device (the pci_add command) which you can think of as a small usb flash drive with the specificed Input Files on it.
- The Virtual Machine has a script running that recognizes as soon as this USB drive is plugged in and will mount it, cd into that directory, then type 'make &> output'. This output file is captured and sent back to Autolab. As a side note: before we mount the device, we make every effort possible to sync the software clock with the hardware clock. This is because the virtual machine was suspended back in 2010 and having it wake up to find files made a year in the future then trying to run make (which relies heavily on timestamps) is disasterous. On the few attempts where make failed due to timestamps or other issues, this was gotten around by just having a ./gradeAssessment.sh script that we called instead of a makefile.
- Once the grading process is finished, the Virtual Machine will shutdown. Currently the only mechanism we have of doing this is to actually shutdown -h now and this actually turns out to be the largest element of overhead in the process.
- Tashi will fine the VM dead and report it as shutdown. Tango will find the VM shutdown and go find the USB-key with the student's files on it and read the output file out, copy it to the destination directory it was told about when the request first came in, and then perform a GET on the URL that it was told to when the request first came in.
- This will hit the unofficial.fish.ics.cs.cmu.edu/autogradeDone.rb script with the dave key that was generated earlier. The AutogradeDone script will then find the output file for the student, parse it, copy the grades and the feedback into the gradebook, then delete the output file.
-
Creating a new course for an instructor: Here are the steps
for an Autolab administrator to create a new course for an instructor:
- Instructor creates an AFS course directory called autolab (e.g., /afs/cs/academic/class/15213-f11/private/autolab) with the following permissions:
linux> fs sa . academic.autolab rlidwk
linux> fs sa . academic:admin.autolab rlidwk
- Link to the instructor's course directory:
linux> cd /afs/cs/academic/class/autolab/autolab2/courses
linux> ln -s /afs/cs/academic/class/15213-f11/private/autolab 15213-f11
- Create new course using Admin->Create new course. Key fields are "Course name" (15213-f11), "Semester" (f11), "Display name" (15-213: Introduction to Computer Systems), and "Andrew ID of course instructor". The instructor can go back and change fields such as Late Slack, Grace Days, and Late Penalty, so any values will do here.
- Instructor creates an AFS course directory called autolab (e.g., /afs/cs/academic/class/15213-f11/private/autolab) with the following permissions:
- Monitoring the system
- Restarting the system
The most common issue we have with the backend is a student complaining that their assignment did not get graded. Debugging this can be extremely tricky, but here's the general layout:
IMPORTANT: Only one person should be doing this at a time. This is a somewhat destructive process and a single person needs to have a complete view of the system at a time.
- Is the Student telling the truth? Make sure their assignment really hasn't gotten back from the Autograder, sometimes they have feedback but no grade, and they just don't know to click on the "--/100" to see why they didn't get a grade.
-
Try to regrade the submission. If the submission has a grade, you
can click on "Edit" from the gradesheet view, then "Regrade" on the "Graded By"
line. If there is honestly no grade, You can go to the super secret URL
/#{@course.name}/#{@assessment.name}/regrade/#{@submission.id} .The Submission ID can be gotten by mouse-hovering over one of the download links.- If it comes back with an error: That means that either the connection between Autolab and Tango is dead, or Tango is refusing the job. Log into the Tango prompt (screen -r tango) and see if there are error messages. If not then follow the steps to restart Tango, here. If there are error messages, they should be fairly meaningful, typically they are about missing input files.
- If it comes back with "Job Submitted, ID#": That means that the job was successfully handed over to Tango, and Tango accepted the job.
-
Figure out what part of the process is broken. The following steps
show how to examine in details each part of the process. You are looking for
any error messages or lack of things that should be present.
-
Tango.
If Tango gets the job ( returns "job submitted" on Autolab), then log into the Tango prompt ( screen -r tango) and watch the output on the terminal. This is an example of a totally normal transaction:
INFO:RPCHandler:Creating instance foo_studentname_16-57
****Starting to process...
INFO:ExternalDiskManager:Creating disk tangoExt-vn3Gt
INFO:TashiMonitor:Found new VM instance [foostudentnamel16-57] (2894)
INFO:MachineList:Added Machine DefaultAutograde [2894] to machineList
INFO:TashiMonitor:Found Dead VM [2894]
INFO:TashiMonitor:Cleaning up Job 57
INFO:TashiMonitor:Poking http://unofficial.fish.ics.cs.cmu.edu/autogradeDone.rb
	?dave=xxxxxxxx&submission=11111&course=courseName&assessment=foo
INFO:JobList:Removing Job 57
INFO:MachineList:Removed Machine 2894 from machineList
Anything additional, or missing from that should be investigated.  A comple
common errors:
	<ul>
	<li><b>No available loopback devices</b>.  Run <font
	face=monospace>/root/clusterBatch/wipeLo.sh</font> and re-issue the job.
	</li>
	<li><b>Unable to copy output file</b>.  The Autograder is not writing
	the output file correctly for some reason.  You'll want to skip straight
	to logging into the autograding machine in debug mode.  </li>
	</ul>
<p>Any error that occurs after the VM comes back from Tashi is most likely
caused within the VM, skip down to the Virtual Machine section below. </p>
</li>
<li><i>Tashi</i><p> If the Jobs come back really quickly, or never come back,
then the issue is probably with Tashi.  You can check on the status of
machines within Tashi with	<font face=monospace>tashi-client.py getinstances</font></p>


<p>Instances that stay in "Pending" or "Activating" mean
something funky is happening on the ClusterManagers, most likely in the
Scheduler. If the Instances never
even appear in the instance list, that means the ClusterManager is bouncing
them.  Check <font face=monospace>/var/log/clustermanager.log</font> for
more details on that. Things like
<pre><font face=monospace>Unexpected exit on nurseshark.ics.cs.cmu.edu of instance 2894</font></pre>
are totally okay, that's	just because the Virtual Machines shut down something....rapidly. </p>

<p>	If there are a plethora of jobs in the "Running" state, and you sit there
for 5 minutes, and none of them go away, they could be clogging the system.
Run
<pre><font face=monospace>tashi-client.py destroyVm --instance [instanceName]</font></pre>
to clean those up. Tango might not be too happy about that, so go back and
check on her. </p>
<p>If the ClusterManager log says that things are just fine, but the jobs
are coming back super-quick, this means that the Virtual Machine is
basically failing to start (or dying immediately).  Figure out what host the
machine is on (it will say in the cluster manager log), log into that
machine, and check out <font face=monospace>/var/log/nodemanager.log</font>.
This log file will have the exact command that was executed.  Something
like:
<pre style="color:white;background:#000000">
QEMU command: /usr/local/kvm/bin/qemu-system-x86_64 -clock dynticks -drive file=/mnt/nfs/tashi/images/labGrader.img,if=ide,index=0, snapshot=on,media=disk -net nic,macaddr=52:54:00:ec:bd:9f,model=e1000, vlan=1 -net tap,ifname=tashi2895.0,vlan=1,script=/etc/qemu-ifup.1, downscript=/etc/qemu-ifdown.1 -m 128 -smp 1 -serial none -vnc none -monitor pty -incoming exec: dd if=/mnt/nfs/tashi/suspend/labGrader.img.suspend Copy that command into a text editor. Remove the -incoming to the end (that flag handles the suspend magic and won't run propery from the command line. Also, change the -monitor flag to stdio. The command should run properly and launch a virtual machine (but not do any grading)
If Tashi is just being funky just restart it. Follow the directions here.
-
The Virtual Machine
If up to this point everything looks good, or the only errors are in Tango after the machine comes back, you'll need to take a look into the actual Virtual Machine. This is painful, just a heads up. Issuing a submission in debug mode can only be done on a regrade. Append "?debug=true" to the regrade URL. For example:
autolab.cs.cmu.edu/15213-s11/datalab/regrade/12345?debug=true
This will cause the VM to load, then stop right before it runs the autograding makefile.
From a root-terminal on greatwhite, run
tashi-client.py vmmSpecificCall --instance [instanceName] --arg startVNC
This will give you the hostname and port that the VNC server was started on. Load your favorite VNC client and connect. This will drop you into the prompt for the VM. Change directories to /mnt and you should sitting with all the files. You can type make from here to see what happens. The exact command that is run is make &> output , you can see the entire run-time sequence in /root/runJob.sh (including the debug trap that you hit). When you're done, a shutdown -h now will take care of things.
-
Tango.
- Honestly, if every single job is failing, try restarting everything in the system (short of greatwhite.... don't reboot the physical machine). If just one student's code is failing, blame the student.