Welcome to the Aruba Switching Github repository for Data Center Networking (DCN) automation using Ansible workflows. This repository provides several ready-to-run Ansible playbooks that automate provisioning for AOS-CX switches in DCN architectures.
- DCN Architectures
- Project Prerequisites
- Workflows
- Architecture I - Campus Attached DC ToR
- Architecture II - Dedicated Data Center Two-Tier
- Architecture III - Dedicated Data Center Layer 3 Spine/Leaf Topology - EBGP EVPN (multi-AS) VXLAN with VSX
- Architecture III - Dedicated Data Center Layer 3 Spine/Leaf Topology - IBGP EVPN VXLAN with VSX
- Configure VSX Standalone Playbook
- Configure Muti-Chassis LAG Standalone Playbook
- Project Structure
- How To Contribute
The workflows in this repository provision the switches according to the architectures outlined in the Validated Reference Designs (VRDs). The VRDs have been posted on the Aruba Airheads Community:
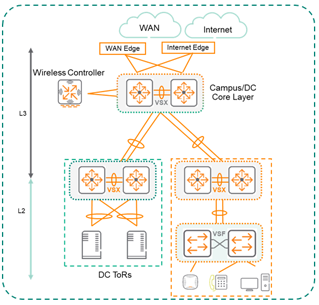
- Architecture I - Campus Attached DC ToR (green box)

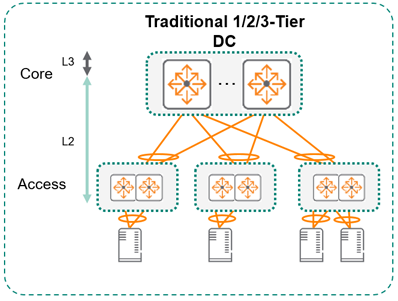
- Architecture II - Dedicated Data Center Two-Tier

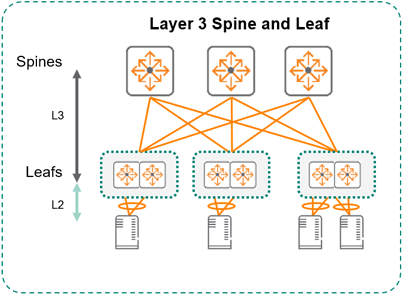
- Architecture III - Layer 3 Spine/Leaf Topology Dedicated Data Center
These workflows can be run on any Unix-based system.
-
The Ansible control machine must have Python3.5+ and at least Ansible 2.9 installed. See Ansible Documentation for more information on Ansible installation.
-
This project requires the AOS-CX Ansible Collection to be installed. The easiest way to install the collection is by executing the
ansible-galaxycommand on therequirements.ymlfile:
ansible-galaxy install -r requirements.yml
For more information on how to use theaoscxCollection visit our Aruba devHub. -
This project requires the Python libraries listed below to be installed. The easiest way to install the required libraries is using the
pipcommand on therequirements.txtfile:
pip install -r requirements.txt
This project contains multiple inventories, each corresponding to a specific workflow. Which inventory files correspond to which workflows is described in the Workflows section of this document.
Typically users use YAML or INI formatted files to define their Ansible inventory and in this project we have multiple YAML inventory files that correspond to specific workflows.
Also in this project you'll find an Ansible inventory plugin, an inventory plugin allows you to specify a data source as your source for dynamically generating your inventory
before executing each playbook. We've created the AOS-CX Data Center inventory plugin inventory_plugins/aoscx_dcn_plugin.py
which allows users to input data into an Excel file that Ansible will then use to configure devices.
Each workflow has a specific Excel template that it uses to generate Ansible values, the Excel files found in files/ can be modified/renamed to match your environment and specifications. Once your Excel file is defined, you simply need to specify the aoscx_dcn_plugin, the directory containing the Excel file, and the name of the Excel file you want to use in your Ansible YAML inventory file like so:
plugin: aoscx_dcn_plugin           # Name of the plugin
path_to_inventory: ./files # Directory location of Excel
excel_file: dedicated_two_tier_DCN_Settings.xlsx # Name of the Excel
Using this inventory plugin in an inventory file with a playbook is exactly the same, just provide the YAML file with the -i option:
ansible-playbook deploy_2tier_dedicated_datacenter.yml -i dynamic_2tier_dedicated_dc_inventory.yml
In this project we have the option of using either the YAML inventory file to define your environment through variables or use the aoscx_dcn_plugin in combination with an Excel template. Either approach works with the provided playbooks, but you should use one or the other.
Each inventory provided is made to be an example. You are encouraged to change IP addressing and interface values to match your environment. Note that these inventories use a logical grouping method of to group VSX Pairs and assumes that each VSX pair of access/leaf switches is in a group. The names of these groups can be any alphanumeric name; this is just one approach to coupling VSX pairs. You can change the "rack#" nomenclature in the example inventory files to your liking as long as you keep the names consistent throughout the inventory.
Each workflow has an Excel template to use in files/, which Excel file corresponds to which workflow is described in the Workflows section of this document. Cells in the Excel file that are protected are used by the aoscx_dcn_plugin to generate/populate variables to be later used in the playbooks, cells that have sample data are for you to change/modify to make your own. In the event that it's required to unprotect the sheets in the workbook, use the password aruba to unlock the sheets.
-
Cells you should not change:


-
Cells you should change:


In addition to populating variables used in Ansible, this plugin will also dynamically generate IP addressing for Loopback Addresses and Fabric Addresses (where applicable) based on values entered in the Network sheet of the Excel template. If you'd like to specify device's interface loopback0 IP address, specify a value for the device's Loopback Interface 0 IP Address cell and enter the value "N/A" for Loopback Addresses in the Network sheet. If you'd like to specify the fabric addressing for the Spine Leaf workflows, it's recommended to use the YAML inventory file method instead of the Excel template.
All the variables in the inventory files are necessary for the workflows to run. There are three broad categories of variables:
- Some variables are static, such as the AOS-CX Ansible connection variables. These variables maintain constant values that should not be changed.
- Some variables' values necessarily must be changed to match device information for your specific environment.
- Some variables have default values that can be changed. Changing these is optional.
Before executing a workflow, look through the inventory file used by that workflow, and change any variable values that must be changed, and also any variables you would like to change.
- Examples of static inventory variables that should not be changed:
ansible_connection: arubanetworks.aoscx.aoscx # DO NOT CHANGE
ansible_network_os: arubanetworks.aoscx.aoscx # DO NOT CHANGE
ansible_httpapi_use_ssl: True # DO NOT CHANGE
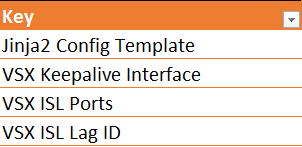
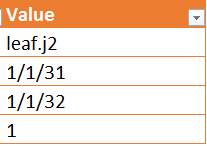
config_template: leaf.j2- Examples of inventory variables that need to be changed:
ansible_host: 10.10.10.56 # IP address of the switch, change to match devices in your environment
server_vlans: [11]    # VLANs to be created on leafs for server traffic
core_mclag_uplink_ports: ['1/1/49', '1/1/50'] # Interfaces that will be a part of the MCLAG connecting access device to core
vsx_keepalive_int: 1/1/31
vsx_isl_ports: ['1/1/32']- Examples of inventory variables that can be changed, but have default values that work:
spine_L3fabric_ips:
  - 192.168.2.1
  - 192.168.2.3
  - 192.168.2.5
  - 192.168.2.7
loopback0_ip: 192.168.1.1
loopback1_ip: 192.168.100.1 This project currently holds the following workflows to provision devices according to each architecture listed in DCN Architectures:
This workflow provisions a campus attached data center set of top of rack AOS-CX switches in a VSX pair based on the validated reference design.
- All prerequisites defined above in Prerequisites
- Ensure the provided Ansible inventory file has been modified to suit your environment, according to the instructions in Inventory Setup above:
- YAML Inventory File : inventory_2tier_dedicated_dc.yml
- Excel Template File : campus_attached_dcToR_DCN_Settings.xlsx
- Example inventory using aoscx_dcn_plugin : dynamic_campus_attached_dc_tor_inventory.yml
- L3 Campus Core
- DC Core switches = 2 AOS-CX switches (8xxx series, use latest firmware available)
- DC Core switches should be in a VSX pair
- Out-of-Band management (OOBM) connection to management port on AOS-CX switches
- Ansible control machine should be reachable via from each device's OOBM
- Playbook : deploy_campus_attached_dc_tor.yml
- Inventory :
- YAML Inventory File : inventory_2tier_dedicated_dc.yml
- Note: This inventory file is also used for the Architecture II workflow, so it contains additional information for access switches (Zone1-Rack<1/3>-Access<1/2/3/4>). Valid values for variables relating to those devices are not necessary for this workflow.
- Excel Template File : campus_attached_dcToR_DCN_Settings.xlsx
- YAML Inventory File : inventory_2tier_dedicated_dc.yml
- Jinja2 Templates : templates/2Tier/core.j2
-
Prior to executing the Ansible playbook, the environment must be in this initial state:
- Zone1-Core<1a/1b> - These devices each have a default configuration with an IP address (DHCP/Static) assigned to the management interface. This IP address should match the value of
ansible_hostfor each device in the inventory.
- Zone1-Core<1a/1b> - These devices each have a default configuration with an IP address (DHCP/Static) assigned to the management interface. This IP address should match the value of
-
The playbook will perform the following actions on every
coredevice in the inventory file, using SSH:-
Generate a configuration based on the template file templates/2Tier/core.j2 and values defined in the inventory
-
Push the generated configuration to the device using the AOS-CX Ansible SSH module
aoscx_config -
Enable 10g speed interface groups (if defined in the inventory) using the AOS-CX Ansible SSH module
aoscx_config -
Create VSX Keepalive L3 Interface
-
Create VSX Inter-switch link
-
Configure VSX attributes on the switch and specify device role as outlined in the inventory
-
Create all VLANs defined as
server_vlansin the inventory -
Create SVIs for all VLANs defined as
core_vlan_interfacesin the inventory -
Configure the multi-chassis LAGs that connect to each access switch and trunk the VLANs in
trunk_vlans.- Note:
vsx_pair_mclagsis a list of VSX Pair (rack# grouping) information for the core devices to use for configuring downlink interfaces. You should modify these values appropriately to match your environment.
- Note:
-
Configure BGP neighbor for iBGP peering between the core switches
-
-
For example final configurations for this workflow, see configs/sample_configs/arch1
Because of path requirements, you must run this workflow from the root level of the cloned repository:
ansible-playbook deploy_campus_attached_dc_tor.yml -i inventory_2tier_dedicated_dc.yml
This workflow provisions a VSX pair of switches acting as a centralized collapsed Data Center core and campus attached access AOS-CX switches in VSX pairs based on the validated reference design.
- All prerequisites defined above in Prerequisites
- Ensure the provided Ansible inventory file has been modified to suit your environment, according to the instructions in Inventory Setup above:
- YAML Inventory File : inventory_2tier_dedicated_dc.yml
- Excel Template File : dedicated_two_tier_DCN_Settings.xlsx
- Example inventory using aoscx_dcn_plugin : dynamic_2tier_dedicated_dc_inventory.yml
- DC Core switches = 2 AOS-CX switches (8xxx series, use latest firmware available)
- DC Core switches should be in a VSX pair
- Access switches = 4 or more AOS-CX switches (8xxx series, use latest firmware available)
- Access switches should be in VSX pairs
- Out-of-Band management (OOBM) connection to management port on AOS-CX switches
- Ansible control machine should be reachable via from each device's OOBM
- Playbook : deploy_2tier_dedicated_datacenter.yml
- Inventory :
- YAML Inventory File : inventory_2tier_dedicated_dc.yml
- Excel Template File : dedicated_two_tier_DCN_Settings.xlsx
- Example inventory using aoscx_dcn_plugin : dynamic_2tier_dedicated_dc_inventory.yml
- Jinja2 Templates :
-
Before the Ansible playbook will be executed, the environment is in this initial state:
- Zone1-Core<1a/1b> + Zone1-Rack<1/3>-Access<1/2/3/4> - These devices each have a default configuration with an IP address (DHCP/Static) assigned to the management interface. This IP address should match the value of
ansible_hostfor each device in the inventory. - Zone1-Rack1-Access<1/2> - These devices are in a VSX pair with their physical links matching the values defined in the inventory
- Zone1-Rack3-Access<3/4> - These devices are in a VSX pair with their physical links matching the values defined in the inventory
- Zone1-Core<1a/1b> - These devices are in a VSX pair with their physical links matching the values defined in the inventory
- Zone1-Core<1a/1b> + Zone1-Rack<1/3>-Access<1/2/3/4> - These devices each have a default configuration with an IP address (DHCP/Static) assigned to the management interface. This IP address should match the value of
-
The playbook will perform the following actions on every device in the inventory file inventory_2tier_dedicated_dc.yml using SSH:
- Generate a configuration based on the template file templates/2Tier/core.j2 or templates/2Tier/access.j2 and values defined in the inventory
- Push the generated configuration to the device using the AOS-CX Ansible SSH module
aoscx_config - Enable 10g speed interface groups (if defined in the inventory)
using the AOS-CX Ansible SSH module
aoscx_config
-
The playbook will perform the following actions on every
coredevice in the inventory file using SSH:-
Create VSX Keepalive L3 Interface
-
Create VSX Inter-switch link
-
Configure VSX attributes on the switch and specify device role as outlined in the inventory
-
Create all VLANs defined as
server_vlansin the inventory -
Create SVIs for all VLANs defined as
core_vlan_interfacesin the inventory -
Configure the multi-chassis LAGs that connect to each access switch and trunk the VLANs in
trunk_vlans.- Note:
vsx_pair_mclagsis a list of VSX Pair (rack# grouping) information for the core devices to use for configuring downlink interfaces. You should modify these values appropriately to match your environment.
- Note:
-
Configure BGP neighbor for iBGP peering between the core switches
-
-
The playbook will perform the following actions on every
accessdevice in the inventory file using SSH:- Create VSX Keepalive L3 Interface
- Create VSX Inter-switch link
- Configure VSX attributes on the switch and specify device role as outlined in the inventory
- Create all VLANs defined as
server_vlansin the inventory - Configure the multi-chassis LAG that connects to each core switch and trunk the
server_vlans
-
For example final configurations for this workflow, see configs/sample_configs/arch2
Because of path requirements, you must run this workflow from the root level of the cloned repository:
ansible-playbook deploy_2tier_dedicated_datacenter.yml -i inventory_2tier_dedicated_dc.yml
Architecture III - Dedicated Data Center Layer 3 Spine/Leaf Topology - EBGP EVPN (multi-AS) VXLAN with VSX
This workflow provisions switches in a Spine/Leaf topology using eBGP EVPN for the Layer3 fabric and L2 VXLAN with VSX
based on the validated reference design.
This workflow does not configure the centralized L3 gateway.
- All prerequisites defined above in Prerequisites
- Ensure the provided Ansible inventory file has been modified to suit your environment, according to the instructions in Inventory Setup above:
- YAML Inventory File : inventory_spine_leaf.yml
- Excel Template File : dedicated_spine_leaf_ebgp_DCN_Settings.xlsx
- Example inventory using aoscx_dcn_plugin : dynamic_ebgp_spine_leaf_inventory.yml
- Spine switches = 2 AOS-CX switches
- spine switches should be in a VSX pair and must support EVPN (8325/8400 required)
- Leaf switches = 4 or more AOS-CX switches
- leaf switches should be in a VSX pair and must support EVPN/VXLAN (8325 required)
- Out-of-Band management connection to management port on AOS-CX switches
- Ansible control machine should be reachable from device OOBM
- Playbook : deploy_ebgp_evpn_vxlan.yml
- Inventory :
- YAML Inventory File : inventory_spine_leaf.yml
- Excel Template File : dedicated_spine_leaf_ebgp_DCN_Settings.xlsx
- Example inventory using aoscx_dcn_plugin : dynamic_ebgp_spine_leaf_inventory.yml
- Jinja2 Templates :
- Before the Ansible playbook will be executed, the environment is in this initial state:
- Zone1-Spine<1/2> + Zone1-Rack1-Leaf<1a/1b> + Zone1-Rack3-Leaf<3a/3b> - These devices have a default configuration with an IP address (DHCP/Static) assigned to
the management interface, this IP address should be the value of
ansible_hostfor each device in the inventory. - Zone1-Rack1-Leaf<1a/1b> - These devices are in a VSX pair with their physical links matching the values defined in the inventory
- Zone1-Rack3-Leaf<3a/3b> - These devices are in a VSX pair with their physical links matching the values defined in the inventory
- Zone1-Spine<1/2> + Zone1-Rack1-Leaf<1a/1b> + Zone1-Rack3-Leaf<3a/3b> - These devices have a default configuration with an IP address (DHCP/Static) assigned to
the management interface, this IP address should be the value of
- The playbook will perform the following actions on every device in the inventory file
using SSH:
- Generate a configuration based on the template file templates/eBGP/spine.j2 or templates/eBGP/leaf.j2
and values defined in the inventory - Push the generated configuration to the device using the AOS-CX SSH Ansible module
aoscx_config - Enable 10g speed interface groups (if defined in the inventory
using the AOS-CX SSH Ansible module
aoscx_config
- Generate a configuration based on the template file templates/eBGP/spine.j2 or templates/eBGP/leaf.j2
- The playbook will perform the following actions on every
spinedevice in the inventory file using SSH:- Configure BGP neighbors and EVPN address families for every leaf's loopback IP address on every leaf's BGP ASN
- The playbook will perform the following actions on every
leafdevice in the inventory file using SSH: 1. s and EVPN address families for every spine's loopback IP address- Create all VLANs defined as
server_vlansin the inventory - Create all EVPN instance and map VLANs defined in
server_vlans
- Create all VLANs defined as
- For example final configurations for this workflow see configs/sample_configs/arch3_eBGP
To run this workflow, you must be at the root level of the cloned repository:
ansible-playbook deploy_ebgp_evpn_vxlan.yml -i inventory_spine_leaf.yml
This workflow provisions switches in a Spine/Leaf topology using OSPF EVPN for the Layer3 fabric and L2 VXLAN with VSX
based on the validated reference design.
This workflow does not configure the centralized L3 gateway.
- All prerequisites defined above in Prerequisites
- Ensure the provided Ansible inventory file has been modified to suit your environment, according to the instructions in Inventory Setup above:
- YAML Inventory File : inventory_spine_leaf.yml
- Excel Template File : dedicated_spine_leaf_ibgp_DCN_Settings.xlsx
- Example inventory using aoscx_dcn_plugin : dynamic_ibgp_spine_leaf_inventory.yml
- Spine switches = 2 AOS-CX switches
- spine switches should be in a VSX pair and must support EVPN (8325/8400 required)
- Leaf switches = 4 or more AOS-CX switches
- leaf switches should be in VSX pairs and must support EVPN/VXLAN (8325 required)
- Out-of-Band management connection to management port on AOS-CX switches
- Ansible control machine should be reachable from device OOBM
- Playbook : deploy_ibgp_evpn_vxlan.yml
- Inventory :
- YAML Inventory File : inventory_spine_leaf.yml
- Excel Template File : dedicated_spine_leaf_ibgp_DCN_Settings.xlsx
- Example inventory using aoscx_dcn_plugin : dynamic_ibgp_spine_leaf_inventory.yml
- Jinja2 Templates :
- Before the Ansible playbook will be executed, the environment is in this initial state:
- Zone1-Spine<1/2> + Zone1-Rack1-Leaf<1a/1b> + Zone1-Rack3-Leaf<3a/3b> - These devices have a default configuration with an IP address (DHCP/Static) assigned to
the management interface, this IP address should be the value of
ansible_hostfor each device in the inventory. - Zone1-Rack1-Leaf<1a/1b> - These devices are in a VSX pair with their physical links matching the values defined in the inventory
- Zone1-Rack3-Leaf<3a/3b> - These devices are in a VSX pair with their physical links matching the values defined in the inventory
- Zone1-Spine<1/2> + Zone1-Rack1-Leaf<1a/1b> + Zone1-Rack3-Leaf<3a/3b> - These devices have a default configuration with an IP address (DHCP/Static) assigned to
the management interface, this IP address should be the value of
- The playbook will perform the following actions on every device in the inventory file
using SSH:
- Generate a configuration based on the template file templates/iBGP/spine.j2 or templates/iBGP/leaf.j2
and values defined in the inventory - Push the generated configuration to the device using the AOS-CX SSH Ansible module
aoscx_config - Enable 10g speed interface groups (if defined in the inventory
using the AOS-CX SSH Ansible module
aoscx_config
- Generate a configuration based on the template file templates/iBGP/spine.j2 or templates/iBGP/leaf.j2
- The playbook will perform the following actions on every
spinedevice in the inventory file using SSH:- Configure BGP neighbors and EVPN address families for every leaf's loopback IP address
- The playbook will perform the following actions on every
leafdevice in the inventory file using SSH:- Configure BGP neighbors and EVPN address families for every spine's loopback IP address
- Create all VLANs defined as
server_vlansin the inventory - Create all EVPN instance and map VLANs defined in
server_vlans
- For example final configurations for this workflow see configs/sample_configs/arch3_iBGP
To run this workflow, you must be at the root level of the cloned repository:
ansible-playbook deploy_ibgp_evpn_vxlan.yml -i inventory_spine_leaf.yml
This playbook is a standalone workflow that configures VSX and its attributes on a AOS-CX switch.
- All prerequisites defined above in Prerequisites
- This playbook uses playbook variables therefore it's only necessary for the inventory file to include all the necessary SSH connection variables for the aoscx Collection.
- Out-of-Band management connection to management port on AOS-CX switches
- Ansible control machine should be reachable from device OOBM
- Playbook : configure_vsx.yml
- Create VSX Keepalive L3 Interface
- Create VSX Inter-switch link for VSX
- Configure VSX attributes on the switch and specify device role as outlined in the playbook variable
This playbook is a standalone workflow that configures a multi-chassis LAG and its interfaces on a AOS-CX switch.
- All prerequisites defined above in Prerequisites
- This playbook uses playbook variables therefore it's only necessary for the inventory file to include all the necessary SSH connection variables for the aoscx Collection.
- Out-of-Band management connection to management port on AOS-CX switches
- Ansible control machine should be reachable from device OOBM
- Playbook : configure_mclag.yml
- Create all VLANs defined as
mclag_vlansin the playbook - Configure the multi-chassis LAG and it's interfaces and trunk the
mclag_vlans
├───configs                                 # Directory for generated configurations
│   ├───sample_configs                          # Sample Final Configurations for all workflows
├───files                                   # Place for any additional files that are used in tasks
│   ├───images                              # Images for README.md
├───filter_plugins                          # Ansible default directory for custom filter plugins
├───tasks                                   # Ansible tasks
│   ├───aoscx                                   # URI Tasks for AOS-CX
├───templates                               # Place to hold Jinja templates for config generation
├───CONTRIBUTING.md                         # Document outlining contributing requirements
├───LICENSE                                 # Project license
├───README.md                               # Document outlining project requirements
├───ansible.cfg                             # Ansible configuration file
├───configure_mclag.yml                     # Standalone playbook for MCLAG configuration
├───configure_vsx.yml                       # Standalone playbook for VSX configuration
├───deploy_2tier_dedicated_datacenter.yml   # Playbook for Architecture II
├───deploy_campus_attached_dc_tor.yml       # Playbook for Architecture I
├───deploy_ebgp_evpn_vxlan.yml              # Playbook for Architecture III - eBGP and EVPN with VXLAN
├───deploy_ibgp_evpn_vxlan.yml              # Playbook for Architecture III - OSPF and EVPN with VXLAN
├───inventory_2tier_dedicated_dc.yml        # Inventory file for Architecture I and Architecture II
├───inventory_2tier_dedicated_dc.yml        # Inventory file for Architecture III workflows
├───requirements.txt                        # Python library requirements for project
├───requirements.yml # Galaxy collection requirements for projectPlease follow our guidelines outlined in our CONTRIBUTING.md