
- Info
Information about the resources used in this project
- Server Dicom
A simple example of dicom server with using PyNetDicom
- Clone and Run Project
how run projects in your computer
INFO
PyDicom is a pure Python package for working with DICOM files. It lets you read, modify and write DICOM data in an easy "pythonic" way.
PyNetDicom is a pure Python package that implements the DICOM networking protocol.
Pillow Pillow is the friendly PIL fork by Alex Clark and Contributors. PIL is the Python Imaging Library by Fredrik Lundh and Contributors.
numpy NumPy is the fundamental package for scientific computing in Python.
DICOM® — Digital Imaging and Communications in Medicine — is the international standard for medical images and related information. It defines the formats for medical images that can be exchanged with the data and quality necessary for clinical use.
DICOM® is implemented in almost every radiology, cardiology imaging, and radiotherapy device (X-ray, CT, MRI, ultrasound, etc.), and increasingly in devices in other medical domains such as ophthalmology and dentistry. With hundreds of thousands of medical imaging devices in use, DICOM® is one of the most widely deployed healthcare messaging Standards in the world. There are literally billions of DICOM® images currently in use for clinical care.
Since its first publication in 1993, DICOM® has revolutionized the practice of radiology, allowing the replacement of X-ray film with a fully digital workflow. Much as the Internet has become the platform for new consumer information applications, DICOM® has enabled advanced medical imaging applications that have “changed the face of clinical medicine”. From the emergency department, to cardiac stress testing, to breast cancer detection, DICOM® is the standard that makes medical imaging work — for doctors and for patients.
DICOM® is recognized by the International Organization for Standardization as the ISO 12052 standard.
read more from official dicom standard website
To start server dicom in your computer type this in terminal (in current directory)
python main.py --startserver <name output dir>
last argument it's name or path of location output files (when you upload files to server this files will be saving in this directory)
To test this server open new page in terminal and run this command(you can download dicom examples files from here)
python -m pynetdicom storescu 127.0.0.1 11112 <path to your dicom file> -v -cx
The 'storescu' application implements a Service Class User (SCU) for the Storage service class. It that comes with pynetdicom.
'-v' verbose mode, prints processing details
'-cx' only request the presentation contexts required for the input DICOM file(s)
after typing you will see in terminal:
I: Requesting Association
I: Association Accepted
I: Sending file: /home/artur/kurs/git_projects/Dicom_server_example/media/1-024.dcm
I: Sending Store Request: MsgID 1, (MR)
I: Received Store Response (Status: 0x0000 - Success)
I: Releasing Association
and back to page with server
D: Request Parameters:
D: ======================= INCOMING A-ASSOCIATE-RQ PDU ========================
D: Their Implementation Class UID:      1.2.826.0.1.3680043.9.3811.2.0.2
D: Their Implementation Version Name:   PYNETDICOM_202
D: Application Context Name:    1.2.840.10008.3.1.1.1
D: Calling Application Name:    STORESCU
D: Called Application Name:     ANY-SCP
D: Their Max PDU Receive Size:  16382
D: Presentation Context:
D:   Context ID:        1 (Proposed)
D:     Abstract Syntax: =MR Image Storage
D:     Proposed SCP/SCU Role: Default
D:     Proposed Transfer Syntax:
D:       =Explicit VR Little Endian
D: Requested Extended Negotiation: None
D: Requested Common Extended Negotiation: None
D: Requested Asynchronous Operations Window Negotiation: None
D: Requested User Identity Negotiation: None
D: ========================== END A-ASSOCIATE-RQ PDU ==========================
I: Accepting Association
D: Accept Parameters:
D: ======================= OUTGOING A-ASSOCIATE-AC PDU ========================
D: Our Implementation Class UID:      1.2.826.0.1.3680043.9.3811.2.0.2
D: Our Implementation Version Name:   PYNETDICOM_202
D: Application Context Name:    1.2.840.10008.3.1.1.1
D: Responding Application Name: resp. AE Title
D: Our Max PDU Receive Size:    16382
D: Presentation Contexts:
D:   Context ID:        1 (Accepted)
D:     Abstract Syntax: =MR Image Storage
D:     Accepted SCP/SCU Role: Default
D:     Accepted Transfer Syntax: =Explicit VR Little Endian
D: Accepted Extended Negotiation: None
D: Accepted Asynchronous Operations Window Negotiation: None
D: User Identity Negotiation Response: None
D: ========================== END A-ASSOCIATE-AC PDU ==========================
D: pydicom.read_dataset() TransferSyntax="Little Endian Implicit"
I: Received Store Request
D: ========================== INCOMING DIMSE MESSAGE ==========================
D: Message Type                  : C-STORE RQ
D: Presentation Context ID       : 1
D: Message ID                    : 1
D: Affected SOP Class UID        : MR Image Storage
D: Affected SOP Instance UID     : 1.3.6.1.4.1.14519.5.2.1.1188.4001.147688000845777571073019851952
D: Data Set                      : Present
D: Priority                      : Low
D: ============================ END DIMSE MESSAGE =============================
D: pydicom.read_dataset() TransferSyntax="Little Endian Explicit"
I: Association Released
If you see this in terminal, and in your dicom server directory a new directory <output directory name> has been created and a file to upload here, then everything works fine
To convert dicom files to ordinary image use this command in terminal:
python manage.py -d <path to dicom file> -c <path to output file>
check your dicom server directory you should see new directory with converted file
If you add argument '-g true' you can save file outside project
python manage.py -d <path to dicom file> -c <global path to output file> -g true
You can change dataset in dicom file and save new changing file
python manage.py -d <path dicom file> -c <part output file> -u [<list of datasets>] -v [<list of arguments>]
The project is not finished yet, come back later
You can run this project in your Virtual Environment gust type
pip install server-d-pnd-123
Pypip page - https://pypi.org/project/server-d-pnd-123/0.0.1/
How to create Virtual Environment see below
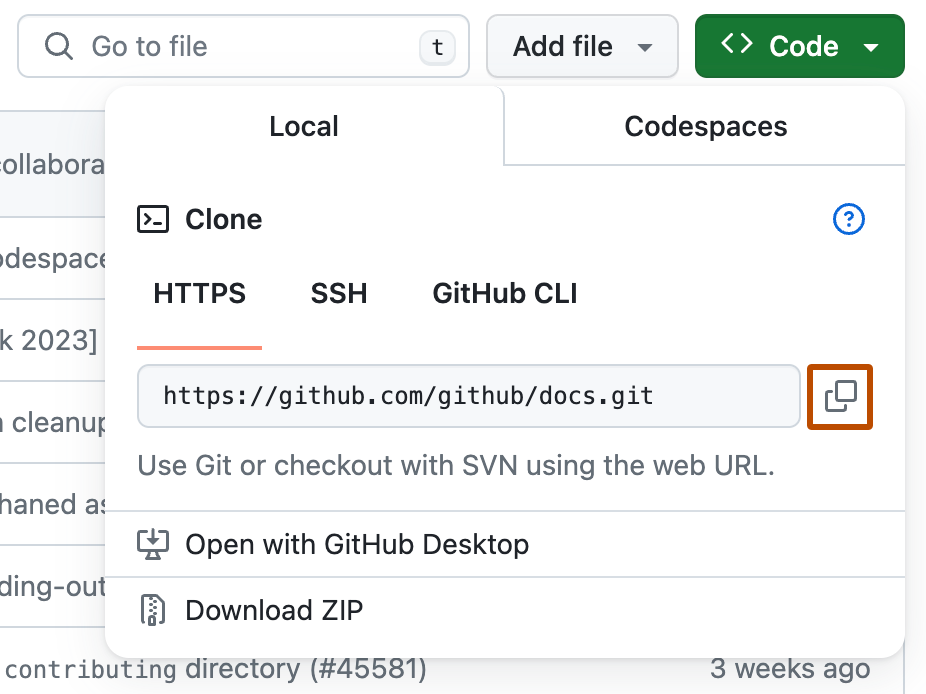
Or if you want you can clone my project from Github:-
Above the list of files, click Code.

Copy the URL for the repository.
- To clone the repository using HTTPS, under "HTTPS", click
- To clone the repository using an SSH key, including a certificate issued by your organization's SSH certificate authority, click SSH, then click
- To clone a repository using GitHub CLI, click GitHub CLI, then click
Open Terminal.
Change the current working directory to the location where you want the cloned directory.
Type git clone, and then paste the URL you copied earlier.
$ git clone https://github.com/YOUR-USERNAME/YOUR-REPOSITORY
Press Enter to create your local clone.
$ git clone https://github.com/YOUR-USERNAME/YOUR-REPOSITORY
> Cloning into `Spoon-Knife`...<br>
> remote: Counting objects: 10, done.
> remote: Compressing objects: 100% (8/8), done.
> remove: Total 10 (delta 1), reused 10 (delta 1)
> Unpacking objects: 100% (10/10), done.
Before diving let’s look at the things we are required to install in our system.
To run App prefer to use the Virtual Environment
pip install virtualenv
Making and Activating the Virtual Environment:-
virtualenv “name as you like”
source “name as you like”/bin/activate
Install the project dependencies:
pip install -r requirements.txt
to run
Please read from above documentation
Have fun
🦁