This is an interface to the popular ESP8266 wifi module. These little modules are incredibly handy if you are going to pull small pieces of information from a HTTP server. It supports both TCP and UDP connections, and it can setup up to 4 server connections. These little modules can be bought here or here or just google ESP8266 and find a cheap one 😄
In order to use the project you will need to have the MSP432 SimpleLink SDK library installed. To install it follow the link and select the SIMPLELINK-MSP432-SDK option, after the installation is complete import this project into Code Composer's Workspace.
The SD Card project is divided into two folders:
-
Hardware: This folder contains all hardware peripheral code
-
Devices: This folder contains MSPIO and ESP8266 source code
IMPORTANT: This project will require a serial terminal open since we will be printing data coming from the ESP8266. Use your prefered serial terminal.
Include the following header files
#include <Hardware/CS_Driver.h>
#include <Devices/MSPIO.h>
#include <Devices/ESP8266.h>
Initialize all the necessary hardware peripherals as follows:
void main()
{
	MAP_WDT_A_holdTimer();

    /*MSP432 Running at 24 MHz*/
	CS_Init();

	/*Initialize required hardware peripherals for the ESP8266*/
	/*We are using UART A0 for MSPIO*/
	UART_Init(EUSCI_A0_BASE, UART0Config);
	/*UART A2 is used for the ESP8266*/
	UART_Init(EUSCI_A2_BASE, UART2Config);
	/*Reset GPIO of the ESP8266*/
    GPIO_Init(GPIO_PORT_P6, GPIO_PIN1);

    MAP_Interrupt_enableMaster();
}
Before sending commands to the ESP8266, a hardware reset is recommended. After the reset, Flush all UART data received from the ESP8266, DO NOT FORGET THIS otherwise you will try to print data that will crash the application
	/*Hard Reset ESP8266*/
    ESP8266_HardReset();
    __delay_cycles(48000000);
    /*flush reset data, we do this because a lot of data received cannot be printed*/
    UART_Flush(EUSCI_A2_BASE);
You can debug if the reset actually happened by looking at the ESP8266. If you can see a blue LED flashing then the reset was successful and the reset data was sent to the MSP432.
To print all received information get a reference to the ESP8266 global buffer by pointing to it. The following function will do that.
    /*Pointer to ESP8266 global buffer*/
    char *ESP8266_Data = ESP8266_GetBuffer();
Call the following function to check if we have a communication link between the MSP432 and the ESP8266
    /*Check UART connection to MSP432*/
    if(!ESP8266_CheckConnection())
    {
        MSPrintf(EUSCI_A0_BASE, "Failed MSP432 UART connection\r\n");
        /*Trap MSP432 if failed connection*/
        while(1);
    }
The function returns true if the communication succeeded, false otherwise. All ESP8266 functions will follow the same logic. It is recommended to trap the the MSP432 in an infinite loop for debugging purposes.
The next thing you will want to do is check for available Access Points (APs)
    /*Check available Access Points*/
    if(!ESP8266_AvailableAPs())
    {
        MSPrintf(EUSCI_A0_BASE, "Failed to obtain Access Points\n\r ERROR: %s \r\n", ESP8266_Data);
        /*Trap MSP432 if failed to obtain access points*/
        while(1);
    }
The available APs will be displayed into the serial terminal
After you see that the desired AP is available and showing in the serial terminal, call the following function to connect to the AP
    /*Connect to Access Point if necessary here*/
    if(!ESP8266_ConnectToAP(YOUR_SSID, YOUR_SSID_PASSWORD))
    {
        /*Trap MSP432 we do not have a connection to an AP*/
       while(1);
    }
If the authentication the AP was successful, the ESP8266 is ready to connect to a server and start sending and receiving data, follow the next steps to connect to an HTTP server:
- Declare server connection variables:
    /*We are connecting to api.themoviedb.org, ESP8266 can resolve DNS, pretty cool huh!*/
	char HTTP_WebPage[] = "api.themoviedb.org";
	/*HTTP is TCP port 80*/
	char Port[] = "80";
	/*Data that will be sent to the HTTP server. This will allow us to query movie data. Get an api key from api.themoviedb.org*/
	char HTTP_Request[] = "GET /3/search/movie?api_key=yourkey&query=a+beautiful+mind HTTP/1.0\r\n\r\n";
	/*Subtract one to account for the null character*/
uint32_t HTTP_Request_Size = sizeof(HTTP_Request) - 1;- Enable multiple connections
	/*Enable multiple connections, up to 4 according to the internet*/
    if(!ESP8266_EnableMultipleConnections(true))
    {
        MSPrintf(EUSCI_A0_BASE, "Failed to set multiple connections\r\n");
        while(1);
}- Establish a connection to the server. The function arguments are: Connection ID, Connection type, Server address and Server port.
 /*Try to establish TCP connection to a HTTP server*/
    if(!ESP8266_EstablishConnection('0', TCP, HTTP_WebPage, Port))
    {
        MSPrintf(EUSCI_A0_BASE, "Failed to connect to: %s\r\nERROR: %s\r\n",         HTTP_WebPage, ESP8266_Data);
        while(1);
}- Send data to the server. In this example we are sending a PHP GET command string to the server. The server will answer by sending the requested data
/*Query data to connected HTTP server, in order to do this look for an API and request a key*/
    if(!ESP8266_SendData('0', HTTP_Request, HTTP_Request_Size))
    {
        MSPrintf(EUSCI_A0_BASE, "Failed to send: %s to %s \r\nError: %s\r\n", HTTP_Request, HTTP_WebPage, ESP8266_Data);
        while(1);
    }

    /*We succesfully sent the data to the HTTP server, we are now going to receive a lot of data from the ESP8266 (or depending
     * on what information you are querying, CHANGE ESP8266 BUFFER SIZE AND UARTA2 BUFFER SIZE, OTHERWISE YOU WILL LOSS DATA!!!!!).*/
MSPrintf(EUSCI_A0_BASE, "Data sent: %s to %s\r\n\r\nESP8266 Data Received: %s\r\n", HTTP_Request, HTTP_WebPage, ESP8266_Data);I also added simple ESP8266 serial terminal that works as a communication bridge between a computer and the ESP8266. This is useful if you want to try new commands or simply setup the ESP8266 by typing the AT commands (It is really tedious 😫, believe me). To enter terminal mode call the following function:
/*ESP8266 serial terminal bridge, will not return*/
void ESP8266_Terminal(void)
The pinout of the ESP8266 can be a little confusing, that is why I included a simple connection diagram on main.c so that you will know how to connect the ESP8266 to the MSP432.
/* VCC = 3.3V
 * GND = GND
 * TX = P3.2
 * RX = P3.3
 * RST = P6.1
 * CH_PD = 3.3V */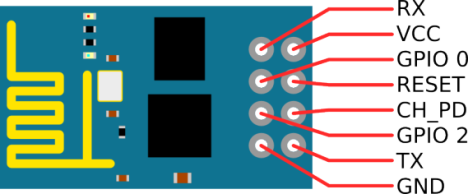
Another confusing detail about the ESP8266 is the default baud rate. I read on several websites that the default baud rate of the ESP8266 is 9600, but that is not the case for all ESP8266 modules. Mine had a default baud rate of 115200, so I think it is best to try different baud rates and call the ESP8266 serial terminal to test the connection.
/* UART Configuration Parameter. These are the configuration parameters to
 * make the eUSCI A UART module to operate with a 115200 baud rate. These
 * values were calculated using the online calculator that TI provides
 * at:
 * http://software-dl.ti.com/msp430/msp430_public_sw/mcu/msp430/MSP430BaudRateConverter/index.html
 */
eUSCI_UART_Config UART2Config =
{
     EUSCI_A_UART_CLOCKSOURCE_SMCLK,
     13,
     0,
     37,
     EUSCI_A_UART_NO_PARITY,
     EUSCI_A_UART_LSB_FIRST,
     EUSCI_A_UART_ONE_STOP_BIT,
     EUSCI_A_UART_MODE,
     EUSCI_A_UART_OVERSAMPLING_BAUDRATE_GENERATION
};

void main()
{
	MAP_WDT_A_holdTimer();

    /*MSP432 Running at 24 MHz*/
	CS_Init();

	/*Initialize required hardware peripherals for the ESP8266*/
	/*We are using UART A0 for MSPIO*/
	UART_Init(EUSCI_A0_BASE, UART0Config);
	/*UART A2 is used for the ESP8266, try different baud rates for your ESP8266*/
	UART_Init(EUSCI_A2_BASE, UART2Config);
	/*Reset GPIO of the ESP8266*/
    GPIO_Init(GPIO_PORT_P6, GPIO_PIN1);

    MAP_Interrupt_enableMaster();

	/*Start ESP8266 serial terminal, will not return*/
	ESP8266_Terminal();
}
You might notice that the delays for the ESP8266 are horrible (2 seconds). This is because some of the functions of ESP8266 require a lot of time to gather and transfer data. In future projects I plan to use timers to synchronize the delays and have a callback function so that the MSP432 can do other things while waiting for the ESP8266. If you can do this before I can do it, please send me a pull request, I will gladly merge your code if it works with this project 😃