This sample app shows how you can "save" a search. The app automatically notifies you when new matching items become available. Saved searches are great for automating repetitive search queries, and to keep up to date with changing content, for example, on websites with real-estate listings and online marketplaces.
The sample app implement the following features:
💾 🔎 Save a search
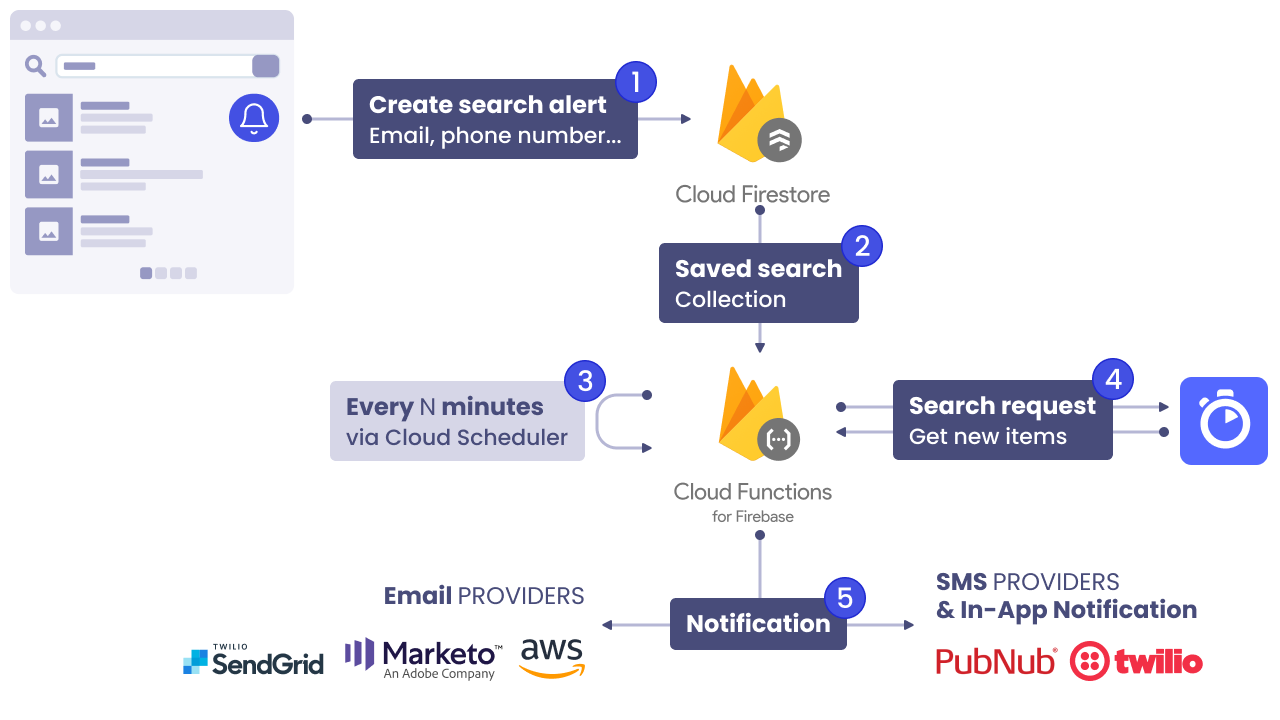
The sample app shows you how to serialize and save the state of a given search (query and facets) using Algolia React InstantSearch and the Algolia JS Helper (1). We are using Cloud Firestore to store the serialized search state (2) and the user's email address and phone number.
🆕 📨 Automatically get notified about new items matching your saved search
Using Firebase Schedule Functions, we regularly run the search (3) to find new matching items. We then notify the users via email, SMS, or In-App notifications (5), using providers like Twillio SMS Service, Twillio SendGrid, Amazon SES.

This sample application is written in JavaScript/TypeScript and has two parts:
- A React front end
- Firebase Cloud Functions as a back end
git clone https://github.com/algolia-samples/saved-search-alerts-with-firebaseCopy the file .env.example and rename it to .env.:
cp .env.example .envTo use this sample app, you need an Algolia account. If you don't have one already, create an account for free. Note your Application ID and API key.
In the .env file, set the environment variables REACT_APP_ALGOLIA_APP_ID and REACT_APP_ALGOLIA_API_KEY to the values from your Algolia account.
REACT_APP_ALGOLIA_APP_ID=<replace-with-your-algolia-app-id>
REACT_APP_ALGOLIA_API_KEY=<replace-with-your-algolia-api-key>The sample app expects the index records to have the following shape:
{
  "surface": 285,
  "features": [
    "Air Conditioning", "Parking"
  ],
  "price": 4554,
  "picture": "https://images.unsplash.com/photo-1590725175785-de025cc60835?crop=entropy&cs=tinysrgb&fit=max&fm=jpg&ixid=MnwyMzYzMTJ8MHwxfHNlYXJjaHwxNzF8fGhvdXNlJTIwaW50ZXJpb3J8ZW58MHx8fHwxNjIyNzA2MzU0&ixlib=rb-1.2.1&q=80&w=1080",
  "createdAt": 16232441080000, // UTC Timestamp
}
If you don't have any data yet, your can use the provided data set from this repository.
To upload your data, you can use the Algolia dashboard or use one of Algolia's API clients.
After creating the index and uploading the data, set the environment variable REACT_APP_ALGOLIA_INDEX_NAME in the .env file:
REACT_APP_ALGOLIA_INDEX_NAME=<replace-with-your-algolia-index-name>Setup Firebase to be able to create your database and deploy your Cloud Functions.
In the .env file, set the REACT_APP_FIREBASE_PROJECT_ID and REACT_APP_FIREBASE_API_KEY environment variables:
REACT_APP_FIREBASE_PROJECT_ID=<your-firebase-project-id>
REACT_APP_FIREBASE_API_KEY=<your-firebase-api-key>
5. Setup and upload your Firebase Cloud Function
If you don't have it installed already, install the Firebase CLI.
Set up the environment configuration for your project.
For example, the environment for Twillio SendGrid and Twillio:
firebase functions:config:set \
algolia.appid="<your-algolia-app-id>" \
algolia.apikey="<your-algolia-api-key>" \
algolia.indexname="<your-algolia-index-name>" \
sendgrid.apikey="<your-sendgrid-index-name>" \
sendgrid.fromemail="<your-sendgrid-from-email>" \
twillio.accountsid="<your-twillio-account-sid>" \
twillio.authtoken="<your-twillio-auth-token>" \
twillio.fromnumber="<your-twillio-from-number>"
Deploy your Cloud Function:
firebase deploy --only functionsRequirements: Node.js, at least version 14.
Install dependencies:
npm installRun the app:
npm startGo to localhost:3000
Some ideas of what to do next:
- Allow users to unsubscribe from a given search alert by adding an additional Cloud Function triggered by an HTTP request.
- Allow users to replay their saved search from the application.