
- 🖥️ Setting GRUB display resolution
- 🖌️ Using a custom background
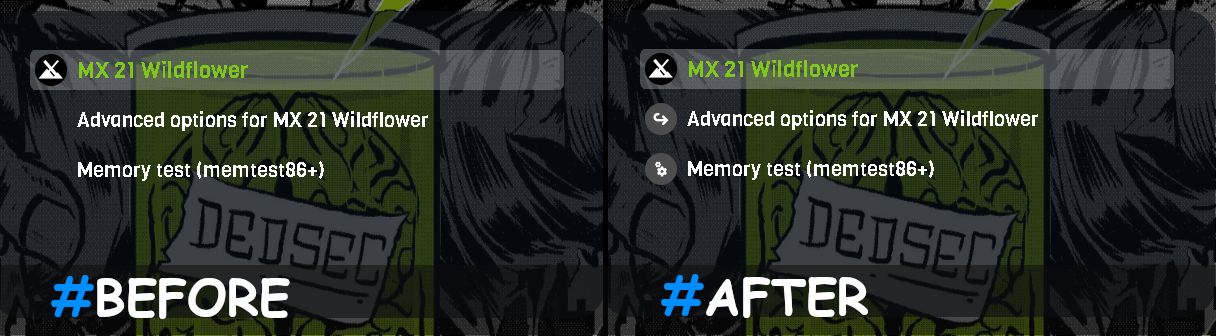
- 🔮 Adding icons for Submenus ㅤㅤㅤㅤㅤㅤㅤㅤㅤㅤㅤㅤㅤㅤㅤㅤ💖 Credits ~ @Brookg
- 🛠 Creating a custom menu layoutㅤㅤ ㅤㅤㅤㅤㅤㅤㅤㅤㅤㅤ ㅤㅤ💖 By ~ @Jacksaur
- 🐲 Setting up GRUB theme in Kali Linux
- 🎩 Fix for GRUB theme not showing up ( Fedora, Ubuntu )
- 🎶 Setting up GRUB init tunes ㅤㅤㅤㅤㅤㅤㅤㅤ ㅤㅤㅤㅤㅤㅤㅤㅤ💖 By ~ @Mage102
- 💿 Restoring a broken GRUB install ㅤㅤㅤㅤㅤㅤㅤㅤㅤㅤㅤㅤㅤㅤ💖 By ~ @Jacksaur
- ✒️ Creating custom fonts (.pf2) for GRUB
- 🧪 Testing your GRUB themes ㅤㅤㅤㅤㅤㅤㅤㅤ ㅤㅤㅤㅤㅤㅤㅤㅤ💖 By ~ @jon4hz
- 🔒 Setting up password for GRUB ㅤㅤ Writing soon...
- 🚀 Speed up GRUB booting time ㅤㅤ Writing soon...
◻️ First find your screen resolution
xdpyinfo | awk '/dimensions/{print $2}'◻️ Open the file /etc/default/grub and edit the line GRUB_GFXMODE=[width]x[height]x32 to match your resolution
◻️ Finally, update your grub config file
# Debian ⛔ Ubuntu ⛔ Arch
sudo grub-mkconfig -o /boot/grub/grub.cfg

# Fedora ⛔ Redhat
sudo grub2-mkconfig -o /boot/grub2/grub.cfg◻️ Make sure to have your background match any of the following resolution
| Class | Resolution ( in pixels ) |
|---|---|
| 1080p | 1920 x 1080 |
| Ultrawide | 2560 x 1080 |
| 2K | 2560 x 1440 |
| Ultrawide 2K | 3440 x 1440 |
| 4K | 3840 x 2160 |
◻️ Place the background image inside the GRUB theme root directory /boot/grub/themes/THEME-DIRECTORY
◻️ Rename it as background.jpg or background.png (the image extension must be same as in theme.txt)
🔹 NOTE 🔹 Make sure to make a backup of the following files just to be on the safe side 😶
🔹 NOTE 🔹 This section will not work if you have used GRUB Customizer at all, as it changes around the files used here. You will need to uninstall GRUB Customizer and restore your original grub.d files to follow the instructions here.
◻️ First navigate to path /etc/grub.d/
◻️ Edit the file 10_linux then find and change the line,
echo "submenu '$(gettext_printf "Advanced options for %s" "${OS}" | grub_quote)' \$menuentry_id_option 'gnulinux-advanced-$boot_device_id' {"to
echo "submenu '$(gettext_printf "Advanced options for %s" "${OS}" | grub_quote)' --class submenu \$menuentry_id_option 'gnulinux-advanced-$boot_device_id' {"◻️ Edit the file 30_uefi-firmware then find and change the line,
menuentry '$LABEL' \$menuentry_id_option 'uefi-firmware' {to
menuentry '$LABEL' --class efi \$menuentry_id_option 'uefi-firmware' {◻️ Edit the file 20_memtest86+ then find and change the line,
menuentry "Memory test (memtest86+)" {to
menuentry --class memtest "Memory test (memtest86+)" {And the line,
menuentry "Memory Test (64-bit UEFI)" {to
menuentry --class memtest "Memory Test (64-bit UEFI)" {◻️ Finally, update your grub config file
# Debian ⛔ Ubuntu ⛔ Arch
sudo grub-mkconfig -o /boot/grub/grub.cfg

# Fedora ⛔ Redhat
sudo grub2-mkconfig -o /boot/grub2/grub.cfg🔸 WARNING 🔸 This section edits crucial GRUB files, relies on a lot of reading, exact copying, and can involve some guesswork. It can leave your GRUB menu completely unusuable if performed incorrectly. Make backups of all files involved, and take great care when performing these actions!

◻️ Navigate to /boot/grub/ and open the grub.cfg file. You will need root permissions to do this.
◻️ Scroll through and find the first menuentry item. Copy the entire menuentry and paste it into a text editor.
◻️ Scroll up until you reach the header for the section the menuentry is in. It'll likely say ### BEGIN /etc/grub.d/10_linux ### or something similar. Make sure you copy any lines between this header and the start of the menuentries. These are important initialisation lines for GRUB. Paste them into your text editor before the menuentry you pasted earlier. For example, my file now looks like this:

◻️ Continue to scroll down the grub.cfg file and copy any further menuentries you want to appear, arranging them in the order you want in your text file. If you copy a Submenu ( Such as Advanced Options for Ubuntu ), make sure you copy every menuentry listed beneath it. Watch the Curly braces carefully, as missing one can break the whole config.
◻️ Once you have your custom menu arranged how you want, you can edit the entries too. You can set the entry's text by editing the first word in quotes, and the icon by adding --class filename after it, with filename being the name of an icon in your current theme. For instance, if I wanted to fix Kubuntu to display properly in GRUB, I would change the entry from
menuentry "Ubuntu" --class ubuntu --class gnu-linux --class gnu --class os$menuentry_id_option 'gnulinux-simple-b3310e6b-8b20-4e99-9c49-f483db07cc5b' {to
menuentry "Kubuntu" --class kubuntu --class gnu-linux --class gnu --class os$menuentry_id_option 'gnulinux-simple-b3310e6b-8b20-4e99-9c49-f483db07cc5b'◻️ When all your customizations are complete, navigate to /etc/grub.d/ and edit the file 40_custom. As the Comment mentions, paste your custom menu layout beneath it, taking care not to edit anything above it. Update your GRUB config with the command
# Debian ⛔ Ubuntu ⛔ Arch
sudo grub-mkconfig -o /boot/grub/grub.cfg

# Fedora ⛔ Redhat
sudo grub2-mkconfig -o /boot/grub2/grub.cfg
And watch for any errors. If there are, you have copied something incorrectly.
◻️ Restart your computer, and GRUB should now display your custom menu options beneath the default ones. Select each of your custom options and reboot after they load to make certain they all work correctly. ( Failing to check this can result in your GRUB Menu becoming completely useless after the next step )
◻️ Once you're certain all your custom options work, you can finally remove the default entries. Create a new folder in /etc/grub.d/ and move ( ❌ Not delete! ) any of the files beginning with 10 or higher into it, leaving your 40_custom file. Run the command mentioned above again, reboot, and make sure GRUB displays correctly. If it has any errors, you've moved a file that affects more than just the menu entries. This may vary by your Distro, restore each file in turn until you find the one that fixes it again.
🔸 WARNING 🔸
40_customwill not update automatically! After each major update to your Distro, you may experience problems if you continue to use the old launch commands tied to your custom menu. Especially if the update changes your distro's kernel version. See below on how to handle updates properly.
◻️ Before Upgrading your Distro, copy your 40_custom file to somewhere outside of the system files, to ensure it's safe. During your Upgrade, if the program asks for permission to edit any GRUB files, allow it every time.
◻️ Delete everything you added to your 40_custom file, below the Comment that warns you not to edit the text above it. Then perform the steps listed in this section from the beginning again, adding the launch options that your Distro will have now updated to work with its new version.
◻️ If after updating your GRUB config you get the error 401 40_custom not found then something has gone wrong, and you need to completely regenerate the file from scratch. Copy the contents of it, delete it, and use the two commands below to create a new file and give it Execute permissions. Open it with a text editor, paste everything back into it, and update GRUB again.
 sudo touch /etc/grub.d/40_custom
 sudo chmod +x /etc/grub.d/40_custom
40_customfile example for Linux Mint by @Axellarator can be found here
◻️ First copy your GRUB theme folder into /boot/grub/themes/
◻️ Now edit the file /etc/default/grub and add the following line.
GRUB_THEME="/boot/grub/themes/YOUR-THEME-DIR/theme.txt"
◻️ Next remove or rename ( maybe to .kali-themes.cfg hidden file ) the file /etc/default/grub.d/kali-themes.cfg
◻️ Now the theme should be working if you run sudo update-grub and reboot, but the terminal output ( one that shows after boot countdown ) will still be Kali themed.
◻️ So to fix that and make GRUB show the terminal theme included with the GRUB theme, like we did before, simply remove or rename the folder /usr/share/grub/themes/kali
◻️ Now update the grub and reboot
sudo update-grub
🎩 Fix for GRUB theme not showing up ( Fedora, Ubuntu )
◻️ Edit the GRUB config file /etc/default/grub
sudo nano /etc/default/grub◻️ Change the lines below (if any present)
GRUB_TERMINAL_OUTPUT=consoleㅤ-->ㅤ #GRUB_TERMINAL_OUTPUT=console

GRUB_TIMEOUT_STYLE="hidden"ㅤ -->ㅤ #GRUB_TIMEOUT_STYLE="hidden"

GRUB_ENABLE_BLSCFG=true   ㅤㅤ-->ㅤ GRUB_ENABLE_BLSCFG=false
◻️ Finally, save the file and update your grub config file
# Debian ⛔ Ubuntu ⛔ Arch
sudo grub-mkconfig -o /boot/grub/grub.cfg

# Fedora ⛔ Redhat
sudo grub2-mkconfig -o /boot/grub2/grub.cfg◻️ Edit the GRUB config file /etc/default/grub
◻️ Uncomment the line #GRUB_INIT_TUNE="480 440 1"
◻️ Now if you want you can keep the default tune or else use one from the CHEATSHEET
📢 Just remember, longer the tune longer the boot time
📢 Music composers are also welcome to contribute in the cheatsheet
◻️ Finally, update your grub config file
# Debian ⛔ Ubuntu ⛔ Arch
sudo grub-mkconfig -o /boot/grub/grub.cfg

# Fedora ⛔ Redhat
sudo grub2-mkconfig -o /boot/grub2/grub.cfg🔹 NOTE 🔹 If you have somehow managed to break your GRUB installation, have lost your grub.d files, or just want to reinstall GRUB to start again from a fresh installation, this program will fully reinstall GRUB with all default settings.
◻️ Backup anything from GRUB you still want to save. This includes themes and any remaining edited grub.d files. Everything inside your grub folders will be deleted.
◻️ Download boot-repair-disk and burn it to a USB. You can use a program like Rufus or Ventoy to do so.
◻️ Shut down your computer, plug in the USB, start the computer and boot off it. Boot-Repair-Disk will now load up and ask whether you want to update. It's highly recommended you do this.
◻️ In the Boot Repair window, click the Advanced Options text in the corner. Make sure Reinstall GRUB is ticked ✅, then move to the GRUB Options tab and tick ✅ the Purge GRUB before reinstalling it option.

◻️ Apply your changes, let the tool run, and it should pop up a window with a few terminal commands to run. Press CTRL + ALT + T to open a terminal, copy the first command from the window, and paste it in with CTRL + SHIFT + V. Run each command in sequence like this and click continue when you have finished. GRUB will now be reinstalled.
◻️ Reboot your system and you will now have a completely default GRUB installation again.
◻️ To convert an OpenTypeFont (otf) to TrueTypeFont (ttf) you can use otf2ttf
◻️ The .pf2 file is the one used by GRUB, so to convert .ttf to .pf2 use
grub2-mkfont -s FONT_SIZE -o OUTPUT_FILE.pf2 INPUT_FILE.ttfExample usage :
grub2-mkfont -s 24 -o ./open-sans-24.pf2 ./open-sans-regular.ttf
grub2-theme-preview is a very handy tool to test your new grub theme without having to reboot or create a vm every time you make a change.
🔹 NOTE 🔹 It takes a theme folder (or just a single picture), creates a temporary bootable image using grub2-mkrescue and launches that image in a virtual machine using KVM/QEMU, all without root privileges.
◻️ First, install the prerequisites :
# for Debian / Ubuntu
sudo apt install grub-common ovmf xorriso qemu qemu-system mtools python3 python3-pip

# for Arch
sudo pacman -S grub-common ovmf xorriso qemu-full mtools python python-pip
◻️ Now use pip to install it :
# for Debian / Ubuntu
pip3 install grub2-theme-preview

# for Arch
pip install grub2-theme-preview
◻️ Usage
grub2-theme-preview /path/to/my/theme-dir
If some error shows up try using the command with
--no-kvmflag
You can visit the project's homepage for more info.
Writing soon...
Writing soon...