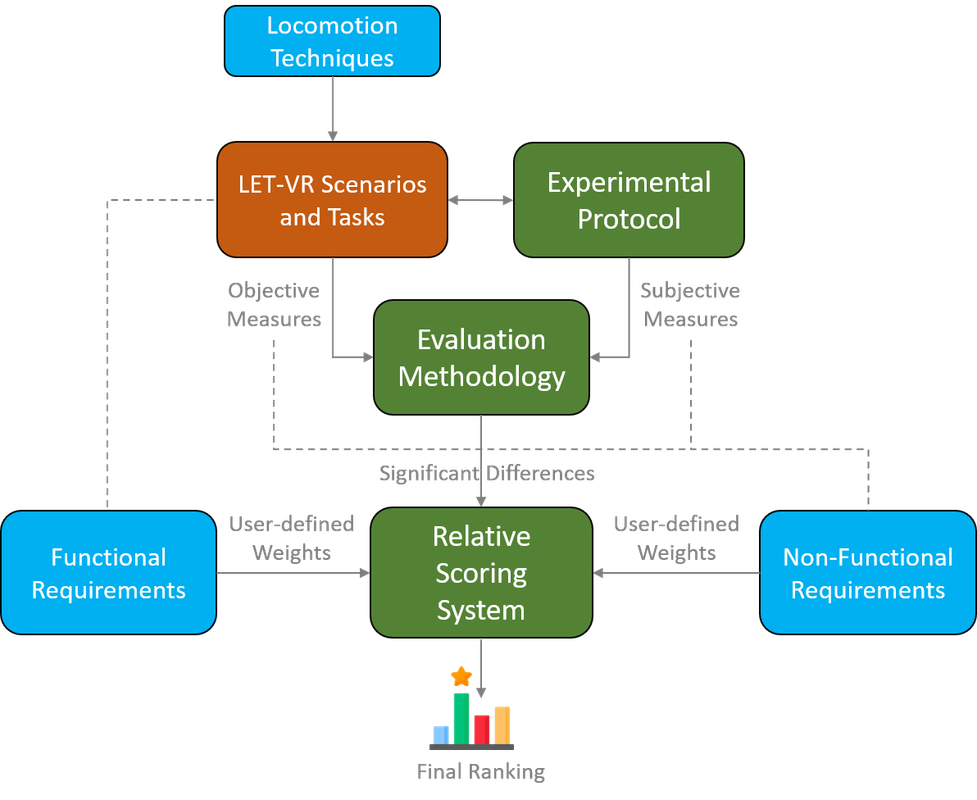
Locomotion Evaluation Testbed VR (or LET-VR) is a research project aimed at supporting a comprehensive comparison of locomotion techniques (for immersive VR) using a provided evaluation testbed. The testbed application is complemented by
- an experimental protocol for collecting objective and subjective measures
- a scoring system able to rank locomotion techniques based on a weighted set of requirements
LET-VR helps to select the best suitable locomotion technique to adopt in a given VR application scenario.
To dig more into the details about the testbed design, you can refer to the paper (see Citation)
- Introduction
- Videos
- Experimental Material
- Builds and Building
- Configuration
- Custom Locomotion Technique
- Forking Policies
- Citation
- Contacts
- License
- Acknowledgements
For an overview of the project have a look at the video here below presented at the
ACM SIGGRAPH Symposium on Interactive 3D Graphics and Games (i3D 2021)
Some videos showing tasks execution with different locomotion techniques (Arm-Swinging, Walking-In-Place, Cyberith Virtualizer, and Joystick) for every scenarios (training included) are available at this Link
Additional material to support the user-study can be found in the Experimental Material/ folder. In particular:
- Administrator Script.odt: Script supporting the test administrator in providing information to the participant
- ( R ) WDB.xlsx: Example of WDB (plus Raw data) with 4 techniques comparison
- Questionnaire.ods: The full questionnaire in a spreadsheet format
- Questionnaire_printable.pdf: The same full questionnaire in a printable format
The latest version of the executables are already available for the download in Release
The application targets only Windows 10/11 and can be deployed to any VR system compatible with the OpenXR API, although minimum modifications may be necessary to support non-tested hand controllers
- The builds have been tested with HTC Vive/Pro w/ controllers (+ Vive Trackers for the WIP) and Oculus Quest 2 ( via AirLink) w/ touch controllers.
- Please note that even tough any OpenXR Runtime can be used, to correctly load the 3D models of the controllers it is required SteamVR (any version) being installed on the host machine.
This is a new version of the project revamped to work with newer Unity versions and the OpenXR backend. If you are looking for the version published in Citation, have a look at the former master_public branch.
Instructions to compile the project:
The project was revamped and tested with Unity 2020.3.x ( LTS)
- NOTE: this project version uses OpenXR and the new Unity Input System integrated into UnityXR. However, for **
backward compatibility** with the Logging system, and consistency with the former version of the project the inputs
and interaction with the virtual environment are NOT managed using the novel UnityXR InteractionToolkit. Have a
look at the class
InputManagement.csresponsible for the wrapping.
The list of package dependencies is in the manifest file and will be automatically managed by the Unity editor. You will need also Blender to be installed (v2.8+), to have Unity correctly load the blend files in the project.
- In Unity, open an existing project and select the UnityProject/ folder
- If package errors are reported, press Continue, open the Package Manager (Window -> Package Manager) and try updating the involved packages, after that restart the project
- Scene files for each scenario are placed inside the UnityProject/Assets/Scenes/
folder. Before building, open each scene file and perform the bake of the lighting (Window -> Lighting Tab ->
Generate Lighting).
- NOTE: baking is a computationally intensive task, and the time required for completing it can vary based on the hardware (in particular, for Scenario 2). By default, Progressive GPU Lightmapper is selected, switch back to CPU in case of low-performance graphics adapters. Also, to pick a specific GPU device to be used for the baking please refer to the official Unity manual page
- The CybSDK and KAT_Walk SDK plug-in required to compile with support to the Cyberith Virtualizer/Kat Walk,
is NOT included within the project source due to licensing. To support the locomotion treadmill it is required to
obtain and import the relative unity package.
- If you are not able to get the CybSDK/KatWalkSDK but want to test LET-VR on the Cyberith Virtualizer/Kat Walk you can use the compiled version in Release
- To Build it from scratch, use the facility in the custom menu VR@POliTO (N.B. remember to bake lighting for all the
scenarios):
- Build All Scenarios Split: build all scenarios in a different path with each executable including just one scenario (e.g. Scenario1.exe)
- Build Launcher (built-in scenarios): build all scenarios embedded into a single executable (Launcher.exe)

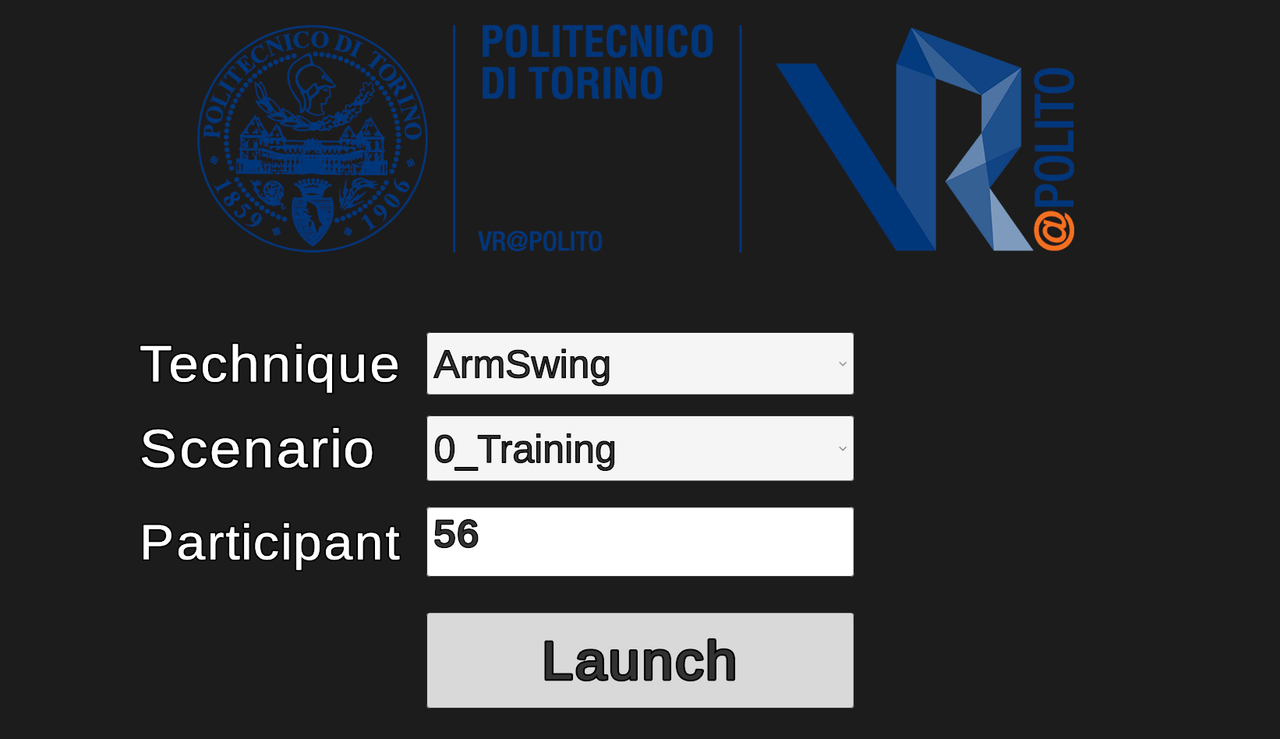
The LET-VR testbed application can be configured with additional parameter without the need to rebuild it every time. If using the Launcher mode this can be done by means of the provided configuration mask.
Otherwise, is possible to manually edit the configuration file. The file is located in the BuildData/ folder,
e.g. ..\LET-VR\Launcher\Launcher_Data\BuildData\config.txt
This is an example of a config.txt file:
#Select scenario to load [Launcher only] {-1 = SelectWithGUI, 0 = Training, 1 = Straight Movements, 2 = Direction Control, 3 = Decoupled Movements, 4 = Agility, 5 = Interaction with objects}
Scenario=-1

#Participant ID (can be a string) [max lenght 15]
ParticipantId=56

#SetLocomotion Technique among {ArmSwing, WalkInPlace, CVirtualizer, Joystick}
LocomotionTechnique=ArmSwing

#Use true to automatically freeze the player at the start/end of each task
AutoFreeze=true
At the first run, a calibration file calibrationData.pgd with the participant data will be created in the User's
document folder, e.g. ..\FooUser\Documents\LET_VR. The file can be automatically populated by using the Tutorial
Scenario or manually by editing the json file.
{
  "_controllerDistance": 1.5,
  "_headHeight": 1.7
}We have not fully documented yet how to integrate a novel technique into the project but we have plans to do. In the
meanwhile you can start by looking at the LocomotionManager.cs which should be enough self-explaining, and at the Prefab of Joystick Controller (and respective JoystickMovement.cs) in a given scene, and explore the hierarchy.
N.B. It is important for the logging system to have your technique to work with the CharacterController
Please contact F. Gabriele Prattico` BEFORE forking the Project
Please cite this paper in your publications if it helps your research.
@article{letvr,
  author = {Cannav{\`o}, Alberto and Calandra, Davide and Prattic{\`o}, Filippo Gabriele and Gatteschi, Valentina and Lamberti, Fabrizio},
  journal = {IEEE Transactions on Visualization and Computer Graphics},
  title = {An Evaluation Testbed for Locomotion in Virtual Reality},
  pages={1871-1889},
  year = {2020},
  doi = {10.1109/TVCG.2020.3032440}
}
The LET-VR design is detailed in:
- An Evaluation Testbed for Locomotion in Virtual Reality
- IEEE TVCG
- ArXiv
- Have a look at the introductory video in Introduction
Maintained by F. Gabriele Prattico` - feel free to contact me!
Experimental material and Unity project are licensed under