RoboRIO program for tuning a flywheel using REV Robotics SparkMax NEO motor(s)
A small WPILib project to quickly tune your REV Robotics NEO powered flywheel.
If you're using a Cross The Road Electronics (CTRE) motor you should use the CTRE Phoenix Tuner.
I highly recommend reading this excellent article on how to tune PIDF for a flywheel. Follow the example in the sidebar to tune an imaginary flywheel.
Check out the CTRE branch for a version of this code that works with Falon 500 motors and the WPI_FalonFX classes.
Before building this project in VS Code, make sure you run the WPILib Set Team Number to your team number.
Build this project and deploy it to your robot.
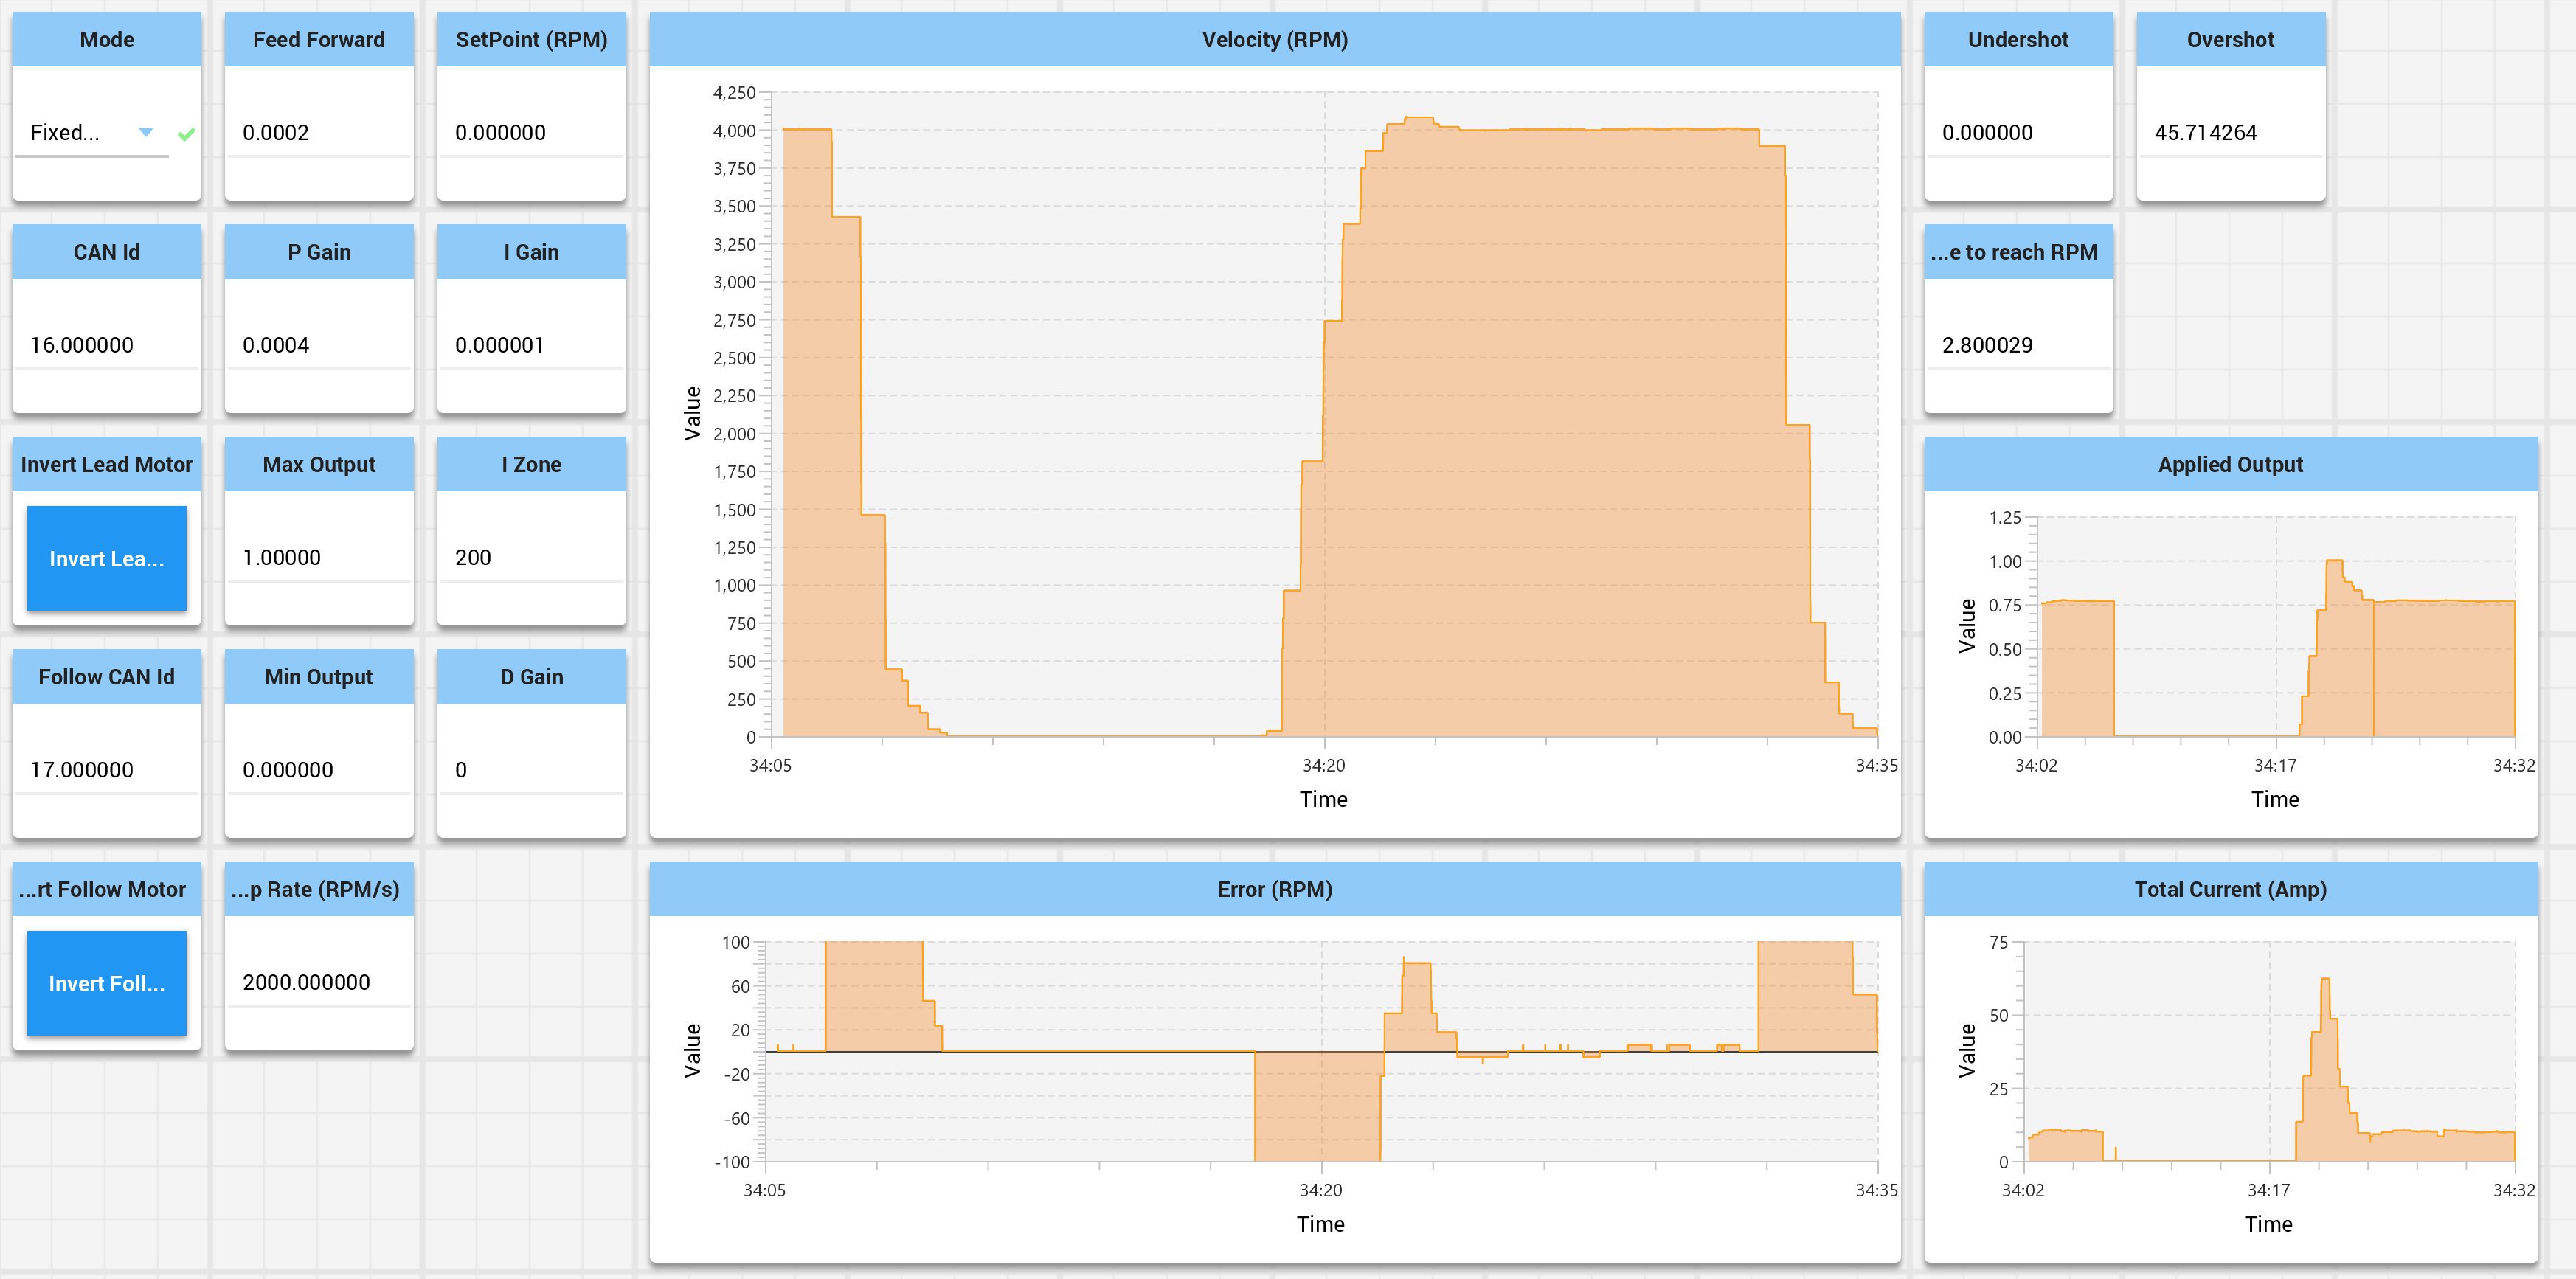
Importing the shuffleboard config, shuffleboard_flywheel_tuner.json, so that the output looks like the image below.
- Set the CAN id to match the motor you are tuning.
- if you have a follower motor configure its CAN Id and (IMPORTANT) set it to be inverted if it rotates counter to the lead motor
- Set the mode to Variable or Fixed
- start with fixed mode, and test the final results with variable mode
- Start tuning.
- First, try to get the RPM close just changing the kF value and leave kP, kD, and kI zero.
- You want the kF value alone to get the RPM to just above the target set point. Tune with a set point close or a little over to your anticipated target RPM. Alternatively tune with an RPM that corresponds to roughly 75% of max throttle.
- Adjust the kP value to shorten the time it takes to reach the set point and decrease the error at your set point. Keep increasing it until, the RPM starts to overshoot and oscillate the set point, then back it off. A small amount of overshoot and oscillation is ok.
- Next, add a little kI and set the iZone. Once you have the system reasonably tuned with kF and kP, add a small amount of kI. Start very small, like 0.00001 times smaller than your kP. The iZone is the error range within the kI value is used. This should be an error range that your kF and kP tuned system will consistently hit. An iZone in the 200-500 RPM range should be sufficient.
- You probably won't need to adjust kD. Only if after tuning everything else that the system is still overreacting.
- Adjust the ramp rate. The ramp rate controls how quickly the set point changes, this is measured in RPM per second. This can prevent
Record your PIDF values! The values are not saved by this program.
There are two modes: Fixed and Variable.
In Fixed mode, use the Xbox controller A, B, Y, X, and right bumper buttons to toggle between RPM set points. The right bumper is zero RPM, A is 1000 RPM, B 2000 RPM, Y 3000 RPM, and X 4000 RPM.
In Variable mode, the left stick controls the set point RPM.
A follow motor can be configured by setting the 'Follow CAN Id' SmartDashboard field. Setting the CAN ID to zero disables follow mode. The 'Invert Follow Motor' field on SmartDashboard indicates if the follow motor turns in the same or opposite direction as the lead motor.
Try determining the feed forward and kP values for a single motor before tuning with the follow motor. Make sure the NEO motors are set to coast in idle mode. Consult the Spark Max quick start guide to confirm. For brushless NEOs, the status LEDs should be magenta (and not cyan).
Depending on your setup, you may want to limit the acceleration and avoid maxing out the voltage to the motors. Applying full power at startup puts more load on the motor, the motor is less efficient, and it will draw more power. Having a kP value big enough to quickly react to errors in velocity might also cause the voltage to be saturated (maxed out) when making big jumps in the set point RPM.
For instance a ramp rate prevents the set point from going directly from 0 to 2000, and increases the set point over time. The effect is that the PIDF closed loop will be chasing the set point as it moves towards the ultimate target RPM.
The recommended way to ramp up to a given velocity is to ramp up the set point over time. Instead of going from a set point of 0 RPM to 4000 RPM, programmatically set the RPM to something lower, say 100 RPM and keep increasing the set point until it reaches the desired 4000 RPM.
The ramp rate is implemented using the WPILib SlewRateLimit class. For more information read the WPILib docs.
Setting a ramp rate using setClosedLoopRampRate() controls the maximum rate at which the motor controller's output is allowed to change. Ramp rate is set in the number of seconds to go from zero to full throttle. CAVEAT: ramp rates can have unintended and bad interactions with closed-loop control. See: https://www.chiefdelphi.com/t/acceleration-management/163286/13
You cannot use Rev Robotics Smart Motion for velocity control. Smart motion is creating a velocity profile to move to a target position. For a flywheel you don't want the flywheel to stop after a fixed number of rotation.
- https://trickingrockstothink.com/blog_posts/2019/10/19/tuning_pid.html Flywheel Tuning PIDF tuning theory explained (Start Here)
- https://www.revrobotics.com/sparkmax-users-manual/#section-3-4 REV Robotics closed loop tuning instructions
- https://phoenix-documentation.readthedocs.io/en/latest/ch16_ClosedLoop.html CTRE closed loop tuning instructions
- https://howdybots.org/wp-content/uploads/2019/12/Dont_Break_Your_Bot_Whitepaper-V1.pdf Howdybots Don't Break Your Bot