今回は Apple 公式の写真撮影のサンプルアプリを題材にします。以下よりサンプルコードをダウンロードして下さい。
https://developer.apple.com/library/content/samplecode/AVCam/Introduction/Intro.html
プロビジョニングプロファイルや証明書の紐付けが自動で行われるように Xcode で Swift のダミーアプリを作成します。
[File]->[New]->[Project]でプロジェクトを作成します。

iOS の Single View Application を選択し、[Next]を押します。

Product Name は AVCamSample にして下さい。 Organization Identifier はユニークな名前になるようにしてください。 [Next]を押します。

AVCamSampleXcodeというフォルダを作成し、その中にプロジェクトを保存してください。

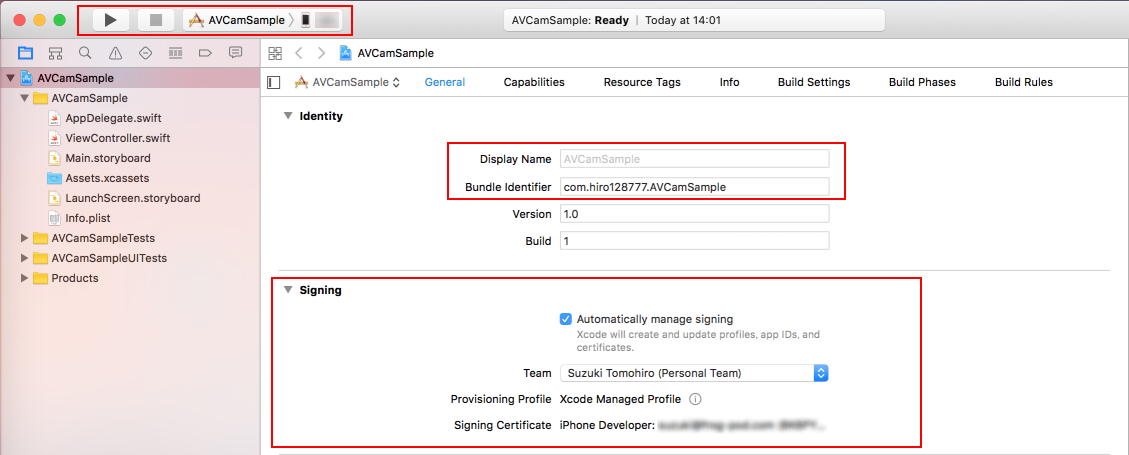
Product Name と Organization Identifier が正しく設定されているのを確認して下さい。 Signing の部分が自動で修正されて、Provisioning Profile と Signing Certificate が下記のように設定されているのを確認してください。 左上のデバッグ実行の部分にご自分の iPhone が認識されているのを確認してください。 全て確認できたらデバッグ実行します。
以下の表示が出たら、[常に許可]を押します。

以下の表示が出たら、実機の設定で開発元を信頼させます。

実機の設定アプリを開き[プロファイルとデバイス管理]を開きます。

デベロッパ APP に[Xcode に設定した Apple ID]が表示されていますのでタップします。

[Xcode に設定した Apple ID]を信頼をタップして信頼させます。

以下の表示が出た場合、ご自分の iPhone の中に AVCamSample と言う名前のアプリが既にインストールされているか確認し、インストールされている場合、アンインストールしてください。

再度、デバッグ実行し、無事アプリが起動して真っ白な画面が表示されたら成功です。
これで、準備作業は完了です。
では、ここからが本題です。まずはソリューションを作成しましょう。
[ファイル]->[新しいソリューション]でソリューションを作成します。
[iOS]->[アプリ]->[単一ビューアプリ]->[次へ]

下記を設定し、[次へ]を押す。
組織の識別子は、com.<ユニークな自分だけの名前>になるようにしてください。 バンドル識別子はさきほど Xcode で設定された Bundle Identifier と一字一句違わぬようにしてください。 一文字でも違っているとアプリは起動しません!!

プロジェクト名などを入力し、[作成]を押す。

以上で、ソリューションの作成は完了です。
PhotoCaptureDelegate.csファイルを作成します。

それではPhotoCaptureDelegate.swiftファイルのコードを見てみましょう。
クラスの定義部分に注目すると、以下のようにクラスの定義とエクステンションがあります。
Swift
class PhotoCaptureProcessor: NSObject {Swift
extension PhotoCaptureProcessor: AVCapturePhotoCaptureDelegate {Swift でAVCapturePhotoCaptureDelegateのように定義済みのプロトコルが利用されている場合、基本的には Xamarin.iOS 側には対応する interface および class が準備されています。
よって、AVCapturePhotoCaptureDelegateのメタ情報を確認すると
C#
public class AVCapturePhotoCaptureDelegate : NSObject, IAVCapturePhotoCaptureDelegate, INativeObject, IDisposableとありますので、AVCapturePhotoCaptureDelegateを継承すれば、NSObjectを継承し、AVCapturePhotoCaptureDelegateを実装するクラスになります。
よって、以下のようにクラスを定義します。
C#
using System;

using Foundation;
using AVFoundation;
using CoreMedia;
using Photos;

namespace AVCamSample
{
    public class PhotoCaptureDelegate : AVCapturePhotoCaptureDelegate
    {
    }
}次に、インスタンス変数(C# ではフィールド)を移植します。
Swift
private(set) var requestedPhotoSettings: AVCapturePhotoSettings

private let willCapturePhotoAnimation: () -> Void

private let livePhotoCaptureHandler: (Bool) -> Void

private let completionHandler: (PhotoCaptureProcessor) -> Void

private var photoData: Data?

private var livePhotoCompanionMovieURL: URL?
Swift では[アクセス修飾子] [var or let] [変数名] : [型名] の順で記述されています。
よって、1行目で言えば、requestedPhotoSettingsが変数名、AVCapturePhotoSettingsが型名です。
これは、C# に簡単に書き換えられます。
AVCapturePhotoSettingsの型も Xamarin.iOS に定義済みです。
もし「型が見つからない」とエラーが出る場合は、using を確認してみてください。
private(set) は、setter のみprivateという意味です。
3行目の場合、willCapturePhotoAnimationが変数名、() -> Voidが型名です。
これは、型名が() -> Voidですから、C#で言うデリゲートですね(Swiftではクロージャ)。->の左辺が引数の型、右辺が戻り値の型です。
9,11行目のData?,URL?は、Xamarin.iOS ではそれぞれNSData,NSUrlになります。
NSがつくのは、Xamarin.iOS は、Objective-C に基づいており、Objective-C で、NSがつく型名になっているからです。
また、NSData,NSUrlを使う場合、using Foundation;が必要になります。
これらを考慮するとフィールド定義は以下のようになります。
C#
using System;

using Foundation;
using AVFoundation;
using CoreMedia;
using Photos;

namespace AVCamSample
{
    public class PhotoCaptureDelegate : AVCapturePhotoCaptureDelegate
    {
        public AVCapturePhotoSettings RequestedPhotoSettings { get; private set; }

        Action willCapturePhotoAnimation;
        Action<bool> capturingLivePhoto;
        Action<PhotoCaptureDelegate> completed;

        NSData photoData;
        NSUrl livePhotoCompanionMovieUrl;
    }
}次に、イニシャライザ(C#ではコンストラクタ)を移植します。
Swift
init(with requestedPhotoSettings: AVCapturePhotoSettings,
     willCapturePhotoAnimation: @escaping () -> Void,
     livePhotoCaptureHandler: @escaping (Bool) -> Void,
     completionHandler: @escaping (PhotoCaptureProcessor) -> Void) {
    self.requestedPhotoSettings = requestedPhotoSettings
    self.willCapturePhotoAnimation = willCapturePhotoAnimation
    self.livePhotoCaptureHandler = livePhotoCaptureHandler
    self.completionHandler = completionHandler
}引数がクロージャであるものに全て@escapingがついていますが、移植する際にはあまり気にしなくても良いです。
※クロージャがスコープから抜けても存在し続けるときに@escapingが必要になります。
selfはC#ではthisです。
あとはベタで移植すれば大丈夫です。
これらを考慮しコンストラクタを追加すると以下のようになります。
C#
using System;

using Foundation;
using AVFoundation;
using CoreMedia;
using Photos;

namespace AVCamSample
{
    public class PhotoCaptureDelegate : AVCapturePhotoCaptureDelegate
    {
        public AVCapturePhotoSettings RequestedPhotoSettings { get; private set; }

        Action willCapturePhotoAnimation;
        Action<bool> capturingLivePhoto;
        Action<PhotoCaptureDelegate> completed;

        NSData photoData;
        NSUrl livePhotoCompanionMovieUrl;

        public PhotoCaptureDelegate(AVCapturePhotoSettings requestedPhotoSettings,
                                     Action willCapturePhotoAnimation,
                                     Action<bool> capturingLivePhoto,
                                     Action<PhotoCaptureDelegate> completed)
        {
            RequestedPhotoSettings = requestedPhotoSettings;
            this.willCapturePhotoAnimation = willCapturePhotoAnimation;
            this.capturingLivePhoto = capturingLivePhoto;
            this.completed = completed;
        }

    }
}次に、メソッドを移植します。
Swift
private func didFinish() {
    if let livePhotoCompanionMoviePath = livePhotoCompanionMovieURL?.path {
        if FileManager.default.fileExists(atPath: livePhotoCompanionMoviePath) {
            do {
                try FileManager.default.removeItem(atPath: livePhotoCompanionMoviePath)
            } catch {
                print("Could not remove file at url: \(livePhotoCompanionMoviePath)")
            }
        }
    }

    completionHandler(self)
}
ここは多少厄介です。なぜなら、Xamarin.iOS は、Objective-C に基づいており、 Swift をそのまま移植できず、若干表現を変えなければならないためです。
ここは、仕方ないので Swift のコードの処理を理解し、同等の処理を Xamarin.iOS で書かなくてはいけません。
まずif letですがこれは、Optional-Binding と呼ばれており、Optional の Unwrap を行っています。
Optionalとは変数にnilの代入を許容するデータ型で、反対にNot Optionalはnilを代入できません。Optionalの変数にはデータ型の最後に「?」か「!」をつけます。
UnwrapとはOptionalからNot Optionalな値を取り出す事です。
右辺のlivePhotoCompanionMovieURL?.pathがnilでなければ、左辺のlivePhotoCompanionMoviePathにNot Optionalな値が取り出され、{}内部を実行します
FileManagerは、Xamarin.iOS ではNSFileManagerです。
このNSがつくかどうかの件については、慣れるとだんだん迷わなくなります。
最初のうちは「型が見つからない」とエラーが出る場合は、まずはusingを確認、
次に、NSをつけてみるという手順を取るとつまづきにくいです。
後は、インテリセンスを利用してNSFileManagerのAPIにあわせて、書き換えていきます。
これらを考慮しDidFinish()を追加すると以下のようになります。
C#
using System;

using Foundation;
using AVFoundation;
using CoreMedia;
using Photos;

namespace AVCamSample
{
    public class PhotoCaptureDelegate : AVCapturePhotoCaptureDelegate
    {
        public AVCapturePhotoSettings RequestedPhotoSettings { get; private set; }

        Action willCapturePhotoAnimation;
        Action<bool> capturingLivePhoto;
        Action<PhotoCaptureDelegate> completed;

        NSData photoData;
        NSUrl livePhotoCompanionMovieUrl;

        public PhotoCaptureDelegate(AVCapturePhotoSettings requestedPhotoSettings,
                                     Action willCapturePhotoAnimation,
                                     Action<bool> capturingLivePhoto,
                                     Action<PhotoCaptureDelegate> completed)
        {
            RequestedPhotoSettings = requestedPhotoSettings;
            this.willCapturePhotoAnimation = willCapturePhotoAnimation;
            this.capturingLivePhoto = capturingLivePhoto;
            this.completed = completed;
        }

        void DidFinish()
        {
            var livePhotoCompanionMoviePath = livePhotoCompanionMovieUrl?.Path;
            if (livePhotoCompanionMoviePath != null)
            {
                if (NSFileManager.DefaultManager.FileExists(livePhotoCompanionMoviePath))
                {
                    NSError error;
                    if (!NSFileManager.DefaultManager.Remove(livePhotoCompanionMoviePath, out error))
                        Console.WriteLine($"Could not remove file at url: {livePhotoCompanionMoviePath}");
                }
            }

            completed(this);
        }

    }
}
これでクラス本体部分の移植が完了しました!
それではPhotoCaptureDelegate.swiftのエクステンション部分のコードを見てみましょう。
プロトコルの実装部分を確認してみると以下のようにコールバックのメソッドが定義されています。 ※実装の中身は省略しています。
Swift
extension PhotoCaptureProcessor: AVCapturePhotoCaptureDelegate {
    /*
     This extension includes all the delegate callbacks for AVCapturePhotoCaptureDelegate protocol
    */

    func photoOutput(_ output: AVCapturePhotoOutput, willBeginCaptureFor resolvedSettings: AVCaptureResolvedPhotoSettings) {
    }

    func photoOutput(_ output: AVCapturePhotoOutput, willCapturePhotoFor resolvedSettings: AVCaptureResolvedPhotoSettings) {
    }

    func photoOutput(_ output: AVCapturePhotoOutput, didFinishProcessingPhoto photo: AVCapturePhoto, error: Error?) {
    }

    func photoOutput(_ output: AVCapturePhotoOutput, didFinishRecordingLivePhotoMovieForEventualFileAt outputFileURL: URL, resolvedSettings: AVCaptureResolvedPhotoSettings) {
    }

    func photoOutput(_ output: AVCapturePhotoOutput, didFinishProcessingLivePhotoToMovieFileAt outputFileURL: URL, duration: CMTime, photoDisplayTime: CMTime, resolvedSettings: AVCaptureResolvedPhotoSettings, error: Error?) {
    }

    func photoOutput(_ output: AVCapturePhotoOutput, didFinishCaptureFor resolvedSettings: AVCaptureResolvedPhotoSettings, error: Error?) {
    }
コールバックメソッドの名前が全てphotoOutputと同じになっています。
ここで、C# の対応するクラスAVCapturePhotoCaptureDelegateのコールバックメソッドのメタ情報を確認してみましょう。
C#
[Export ("captureOutput:didCapturePhotoForResolvedSettings:")]
[BindingImpl (BindingImplOptions.GeneratedCode | BindingImplOptions.Optimizable)]
public virtual void DidCapturePhoto (AVCapturePhotoOutput captureOutput, AVCaptureResolvedPhotoSettings resolvedSettings);

[Export ("captureOutput:didFinishCaptureForResolvedSettings:error:")]
[BindingImpl (BindingImplOptions.GeneratedCode | BindingImplOptions.Optimizable)]
public virtual void DidFinishCapture (AVCapturePhotoOutput captureOutput, AVCaptureResolvedPhotoSettings resolvedSettings, NSError error);

[Export ("captureOutput:didFinishProcessingLivePhotoToMovieFileAtURL:duration:photoDisplayTime:resolvedSettings:error:")]
[BindingImpl (BindingImplOptions.GeneratedCode | BindingImplOptions.Optimizable)]
public virtual void DidFinishProcessingLivePhotoMovie (AVCapturePhotoOutput captureOutput, NSUrl outputFileUrl, CMTime duration, CMTime photoDisplayTime, AVCaptureResolvedPhotoSettings resolvedSettings, NSError error);

[Export ("captureOutput:didFinishProcessingPhotoSampleBuffer:previewPhotoSampleBuffer:resolvedSettings:bracketSettings:error:")]
[Deprecated (PlatformName.iOS, 11, 0, PlatformArchitecture.None, "Use the 'DidFinishProcessingPhoto' overload accepting a 'AVCapturePhoto' instead.")]
[BindingImpl (BindingImplOptions.GeneratedCode | BindingImplOptions.Optimizable)]
public virtual void DidFinishProcessingPhoto (AVCapturePhotoOutput captureOutput, CMSampleBuffer photoSampleBuffer, CMSampleBuffer previewPhotoSampleBuffer, AVCaptureResolvedPhotoSettings resolvedSettings, AVCaptureBracketedStillImageSettings bracketSettings, NSError error);

[Export ("captureOutput:didFinishProcessingPhoto:error:")]
[Introduced (PlatformName.iOS, 11, 0, PlatformArchitecture.All, null)]
[BindingImpl (BindingImplOptions.GeneratedCode | BindingImplOptions.Optimizable)]
public virtual void DidFinishProcessingPhoto (AVCapturePhotoOutput output, AVCapturePhoto photo, NSError error);

[Export ("captureOutput:didFinishProcessingRawPhotoSampleBuffer:previewPhotoSampleBuffer:resolvedSettings:bracketSettings:error:")]
[Deprecated (PlatformName.iOS, 11, 0, PlatformArchitecture.None, "Use the 'DidFinishProcessingPhoto' overload accepting a 'AVCapturePhoto' instead.")]
[BindingImpl (BindingImplOptions.GeneratedCode | BindingImplOptions.Optimizable)]
public virtual void DidFinishProcessingRawPhoto (AVCapturePhotoOutput captureOutput, CMSampleBuffer rawSampleBuffer, CMSampleBuffer previewPhotoSampleBuffer, AVCaptureResolvedPhotoSettings resolvedSettings, AVCaptureBracketedStillImageSettings bracketSettings, NSError error);

[Export ("captureOutput:didFinishRecordingLivePhotoMovieForEventualFileAtURL:resolvedSettings:")]
[BindingImpl (BindingImplOptions.GeneratedCode | BindingImplOptions.Optimizable)]
public virtual void DidFinishRecordingLivePhotoMovie (AVCapturePhotoOutput captureOutput, NSUrl outputFileUrl, AVCaptureResolvedPhotoSettings resolvedSettings);

[Export ("captureOutput:willBeginCaptureForResolvedSettings:")]
[BindingImpl (BindingImplOptions.GeneratedCode | BindingImplOptions.Optimizable)]
public virtual void WillBeginCapture (AVCapturePhotoOutput captureOutput, AVCaptureResolvedPhotoSettings resolvedSettings);

[Export ("captureOutput:willCapturePhotoForResolvedSettings:")]
[BindingImpl (BindingImplOptions.GeneratedCode | BindingImplOptions.Optimizable)]
public virtual void WillCapturePhoto (AVCapturePhotoOutput captureOutput, AVCaptureResolvedPhotoSettings resolvedSettings);
C# ではメソッドは全て違う名前になっています。
ここで Swift と C# のメソッドの定義を良く見比べて下さい。Swiftの第2引数のラベル名にwillBeginCaptureForとあります。C# のWillBeginCaptureメソッドの ExportAttribute を見ると、[Export("captureOutput:willBeginCaptureForResolvedSettings:")]とあります。どちらにも willBeginCaptureForという文字列が含まれているので、このメソッドが対応しているメソッドになります。
Swift
func photoOutput(_ output: AVCapturePhotoOutput, willBeginCaptureFor resolvedSettings: AVCaptureResolvedPhotoSettings) {
}
C#
[Export ("captureOutput:willBeginCaptureForResolvedSettings:")]
[BindingImpl (BindingImplOptions.GeneratedCode | BindingImplOptions.Optimizable)]
public virtual void WillBeginCapture (AVCapturePhotoOutput captureOutput, AVCaptureResolvedPhotoSettings resolvedSettings);
微妙に名前が違うのは、繰り返しになりますが、Xamarin.iOS が、Objective-C に基づいているからです。
試しに Objective-C のメソッド定義を確認してみましょう。
Objective-C
- (void)captureOutput:(AVCapturePhotoOutput *)captureOutput willBeginCaptureForResolvedSettings:(AVCaptureResolvedPhotoSettings *)resolvedSettings
{
}
C# の ExportAttribute [Export("captureOutput:willBeginCaptureForResolvedSettings:")]と、Objective-C のメソッド名captureOutput、第2引数ラベル名willBeginCaptureForResolvedSettingsとなっており見事に名称が一致しています。Swift では残念ながら名称が若干変更されているのでわかりにくくなってしまっています。
これで、エクステンションのコールバックメソッドの部分の対応がわかりました。同じ要領で、全てのコールバックメソッドの定義を追加すると以下のようになります。
C#
using System;

using Foundation;
using AVFoundation;
using CoreMedia;
using Photos;

namespace AVCamSample
{
    public class PhotoCaptureDelegate : AVCapturePhotoCaptureDelegate
    {
        public AVCapturePhotoSettings RequestedPhotoSettings { get; private set; }

        Action willCapturePhotoAnimation;
        Action<bool> capturingLivePhoto;
        Action<PhotoCaptureDelegate> completed;

        NSData photoData;
        NSUrl livePhotoCompanionMovieUrl;


        public PhotoCaptureDelegate(AVCapturePhotoSettings requestedPhotoSettings,
                                    Action willCapturePhotoAnimation,
                                    Action<bool> capturingLivePhoto,
                                    Action<PhotoCaptureDelegate> completed)
        {
            RequestedPhotoSettings = requestedPhotoSettings;
            this.willCapturePhotoAnimation = willCapturePhotoAnimation;
            this.capturingLivePhoto = capturingLivePhoto;
            this.completed = completed;
        }

        void DidFinish()
        {
            var livePhotoCompanionMoviePath = livePhotoCompanionMovieUrl?.Path;
            if (livePhotoCompanionMoviePath != null)
            {
                if (NSFileManager.DefaultManager.FileExists(livePhotoCompanionMoviePath))
                {
                    NSError error;
                    if (!NSFileManager.DefaultManager.Remove(livePhotoCompanionMoviePath, out error))
                        Console.WriteLine($"Could not remove file at url: {livePhotoCompanionMoviePath}");
                }
            }

            completed(this);
        }

        public override void WillBeginCapture(AVCapturePhotoOutput captureOutput, AVCaptureResolvedPhotoSettings resolvedSettings)
        {
        }

        public override void WillCapturePhoto(AVCapturePhotoOutput captureOutput, AVCaptureResolvedPhotoSettings resolvedSettings)
        {
        }

        public override void DidFinishProcessingPhoto(AVCapturePhotoOutput output, AVCapturePhoto photo, NSError error)
        {
        }

        public override void DidFinishRecordingLivePhotoMovie(AVCapturePhotoOutput captureOutput, NSUrl outputFileUrl, AVCaptureResolvedPhotoSettings resolvedSettings)
        {
        }

        public override void DidFinishProcessingLivePhotoMovie(AVCapturePhotoOutput captureOutput, NSUrl outputFileUrl, CMTime duration, CMTime photoDisplayTime, AVCaptureResolvedPhotoSettings resolvedSettings, NSError error)
        {
        }

        public override void DidFinishCapture(AVCapturePhotoOutput captureOutput, AVCaptureResolvedPhotoSettings resolvedSettings, NSError error)
        {
        }
    }
}では、早速、1つ目のコールバックの Swift のコードを見ていきましょう。
Swift
func photoOutput(_ output: AVCapturePhotoOutput, willBeginCaptureFor resolvedSettings: AVCaptureResolvedPhotoSettings) {
    if resolvedSettings.livePhotoMovieDimensions.width > 0 && resolvedSettings.livePhotoMovieDimensions.height > 0 {
        livePhotoCaptureHandler(true)
    }
}その1でご説明したように、livePhotoCaptureHandlerに対応するC#のデリゲートはcapturingLivePhotoですので、そこだけ気をつけて書き換えれば、後はベタに移植するだけです。
C#
public override void WillBeginCapture (AVCapturePhotoOutput captureOutput, AVCaptureResolvedPhotoSettings resolvedSettings)
{
    if (resolvedSettings.LivePhotoMovieDimensions.Width > 0 && resolvedSettings.LivePhotoMovieDimensions.Height > 0)
        capturingLivePhoto (true);
}2つ目です。1つ目同様にC#のデリゲートの対応だけ確認すれば後は簡単です。
Swift
func photoOutput(_ output: AVCapturePhotoOutput, willCapturePhotoFor resolvedSettings: AVCaptureResolvedPhotoSettings) {
    willCapturePhotoAnimation()
}
C#
public override void WillCapturePhoto (AVCapturePhotoOutput captureOutput, AVCaptureResolvedPhotoSettings resolvedSettings)
{
    willCapturePhotoAnimation ();
}3つ目ですが、わかりにくいのは、前にも出てきたif letですが、これは、繰り返しになりますが、Optional-Bindingと呼ばれており、OptionalのUnwrapを行っています。右辺のerrorがnilでなければ、左辺のerrorにNot Optionalな値が取り出され、{}内部を実行します。
このように、if letで、同じ名前の定数を使う事をShadowingと呼びます。
この時点で、右辺の変数errorは、左辺の定数errorの影に隠れて見えなくなります。もちろんOptionalではないことが保証されているので安全です。
しかもif letを抜けた後では、errorはOptionalに戻っています。
あとはベタに移植すれば大丈夫です。
Swift
func photoOutput(_ output: AVCapturePhotoOutput, didFinishProcessingPhoto photo: AVCapturePhoto, error: Error?) {
    if let error = error {
        print("Error capturing photo: \(error)")
    } else {
        photoData = photo.fileDataRepresentation()
    }
}
C#
public override void DidFinishProcessingPhoto(AVCapturePhotoOutput output, AVCapturePhoto photo, NSError error)
{
    if (error != null)
        Console.WriteLine($"Error capturing photo: {error.LocalizedDescription}");
    else
        photoData = photo.FileDataRepresentation;
}4つ目です。livePhotoCaptureHandlerに対応するC#のデリゲートはcapturingLivePhotoです。
Swift
func photoOutput(_ output: AVCapturePhotoOutput, didFinishRecordingLivePhotoMovieForEventualFileAt outputFileURL: URL, resolvedSettings: AVCaptureResolvedPhotoSettings) {
    livePhotoCaptureHandler(false)
}
C#
public override void DidFinishRecordingLivePhotoMovie (AVCapturePhotoOutput captureOutput, NSUrl outputFileUrl, AVCaptureResolvedPhotoSettings resolvedSettings)
{
    capturingLivePhoto (false);
}5つ目です。これもベタに移植するだけです。
Swift
func photoOutput(_ output: AVCapturePhotoOutput, didFinishProcessingLivePhotoToMovieFileAt outputFileURL: URL, duration: CMTime, photoDisplayTime: CMTime, resolvedSettings: AVCaptureResolvedPhotoSettings, error: Error?) {
    if error != nil {
        print("Error processing live photo companion movie: \(String(describing: error))")
        return
    }
    livePhotoCompanionMovieURL = outputFileURL
}
C#
public override void DidFinishProcessingLivePhotoMovie (AVCapturePhotoOutput captureOutput, NSUrl outputFileUrl, CMTime duration, CMTime photoDisplayTime, AVCaptureResolvedPhotoSettings resolvedSettings, NSError error)
{
    if (error != null)
    {
        Console.WriteLine ($"Error processing live photo companion movie: {error.LocalizedDescription})");
        return;
    }
    livePhotoCompanionMovieUrl = outputFileUrl;
}6つ目です。ちょっと長いですが、頑張りましょう。
また、いくつか、C#erにはなじみのない表現が使われています。
まず、guardですが、これもOptional-Bindingです。
guard let photoData = photoData else {}は、Unwrapを行い、UnwrapしたphotoDataをguard~elseブロック外で使用できます。
※ifの場合はif-elseブロックを抜けると条件式でUnwrapされた変数は使えなくなります。
※Unwrapとは、nilを代入できるOptionalからNot Optional(nilを許容しない)な値を取り出すことです。
guardを使うとネストが浅くなるので、効果的に使うと読みやすくなります。
もう一つ、[unowned self]は、非所有参照でselfをキャプチャします。これを使うと、クロージャー内ではクロージャ外のselfとは別の非所有参照のselfを使うのため循環参照が起こりません。
これは、移植時にはメモリリーク防止のおまじないとでも認識しておけば十分です。
PerformChangesメソッドを確認すると以下のようになっていますので、APIにあわせて実装していきます。
C#
public virtual void PerformChanges(Action changeHandler, Action<bool, NSError> completionHandler);Swift
func photoOutput(_ output: AVCapturePhotoOutput, didFinishCaptureFor resolvedSettings: AVCaptureResolvedPhotoSettings, error: Error?) {
    if let error = error {
        print("Error capturing photo: \(error)")
        didFinish()
        return
    }

    guard let photoData = photoData else {
        print("No photo data resource")
        didFinish()
        return
    }

    PHPhotoLibrary.requestAuthorization { [unowned self] status in
        if status == .authorized {
            PHPhotoLibrary.shared().performChanges({ [unowned self] in
                let options = PHAssetResourceCreationOptions()
                let creationRequest = PHAssetCreationRequest.forAsset()
                options.uniformTypeIdentifier = self.requestedPhotoSettings.processedFileType.map { $0.rawValue }
                creationRequest.addResource(with: .photo, data: photoData, options: options)

                if let livePhotoCompanionMovieURL = self.livePhotoCompanionMovieURL {
                    let livePhotoCompanionMovieFileResourceOptions = PHAssetResourceCreationOptions()
                    livePhotoCompanionMovieFileResourceOptions.shouldMoveFile = true
                    creationRequest.addResource(with: .pairedVideo, fileURL: livePhotoCompanionMovieURL, options: livePhotoCompanionMovieFileResourceOptions)
                }

                }, completionHandler: { [unowned self] _, error in
                    if let error = error {
                        print("Error occurered while saving photo to photo library: \(error)")
                    }

                    self.didFinish()
                }
            )
        } else {
            self.didFinish()
        }
    }
}
C#
public override void DidFinishCapture(AVCapturePhotoOutput captureOutput, AVCaptureResolvedPhotoSettings resolvedSettings, NSError error)
{
    if (error != null)
    {
        Console.WriteLine($"Error capturing photo: {error.LocalizedDescription})");
        DidFinish();
        return;
    }

    if (photoData == null)
    {
        Console.WriteLine("No photo data resource");
        DidFinish();
        return;
    }

    PHPhotoLibrary.RequestAuthorization(status => {
        if (status == PHAuthorizationStatus.Authorized)
        {
            PHPhotoLibrary.SharedPhotoLibrary.PerformChanges(() =>
            {
                var options = new PHAssetResourceCreationOptions
                {
                    UniformTypeIdentifier = RequestedPhotoSettings.ProcessedFileType,
                };

                var creationRequest = PHAssetCreationRequest.CreationRequestForAsset();
                creationRequest.AddResource(PHAssetResourceType.Photo, photoData, options);

                var url = livePhotoCompanionMovieUrl;
                if (url != null)
                {
                    var livePhotoCompanionMovieFileResourceOptions = new PHAssetResourceCreationOptions
                    {
                        ShouldMoveFile = true
                    };
                    creationRequest.AddResource(PHAssetResourceType.PairedVideo, url, livePhotoCompanionMovieFileResourceOptions);
                }
            }, (success, err) =>
            {
                if (err != null)
                    Console.WriteLine($"Error occurered while saving photo to photo library: {error.LocalizedDescription}");
                DidFinish();
            });
        }
        else
        {
            DidFinish();
        }
    });
}これで、コールバックメソッドの実装が完了しました。以上でPhotoCaptureDelegateの移植が完了です!
お疲れさまでした。
最後に完成したPhotoCaptureDelegate.csのコードは以下のようになります。
C#
using System;

using Foundation;
using AVFoundation;
using CoreMedia;
using Photos;

namespace AVCamSample
{
    public class PhotoCaptureDelegate : AVCapturePhotoCaptureDelegate
    {
        public AVCapturePhotoSettings RequestedPhotoSettings { get; private set; }

        Action willCapturePhotoAnimation;
        Action<bool> capturingLivePhoto;
        Action<PhotoCaptureDelegate> completed;

        NSData photoData;
        NSUrl livePhotoCompanionMovieUrl;


        public PhotoCaptureDelegate(AVCapturePhotoSettings requestedPhotoSettings,
                                     Action willCapturePhotoAnimation,
                                     Action<bool> capturingLivePhoto,
                                     Action<PhotoCaptureDelegate> completed)
        {
            RequestedPhotoSettings = requestedPhotoSettings;
            this.willCapturePhotoAnimation = willCapturePhotoAnimation;
            this.capturingLivePhoto = capturingLivePhoto;
            this.completed = completed;
        }

        void DidFinish()
        {
            var livePhotoCompanionMoviePath = livePhotoCompanionMovieUrl?.Path;
            if (livePhotoCompanionMoviePath != null)
            {
                if (NSFileManager.DefaultManager.FileExists(livePhotoCompanionMoviePath))
                {
                    NSError error;
                    if (!NSFileManager.DefaultManager.Remove(livePhotoCompanionMoviePath, out error))
                        Console.WriteLine($"Could not remove file at url: {livePhotoCompanionMoviePath}");
                }
            }

            completed(this);
        }

        public override void WillBeginCapture(AVCapturePhotoOutput captureOutput, AVCaptureResolvedPhotoSettings resolvedSettings)
        {
            if (resolvedSettings.LivePhotoMovieDimensions.Width > 0 && resolvedSettings.LivePhotoMovieDimensions.Height > 0)
                capturingLivePhoto(true);
        }

        public override void WillCapturePhoto(AVCapturePhotoOutput captureOutput, AVCaptureResolvedPhotoSettings resolvedSettings)
        {
            willCapturePhotoAnimation();
        }

        public override void DidFinishProcessingPhoto(AVCapturePhotoOutput output, AVCapturePhoto photo, NSError error)
        {
            if (error != null)
                Console.WriteLine($"Error capturing photo: {error.LocalizedDescription}");
            else
                photoData = photo.FileDataRepresentation;
        }

        public override void DidFinishRecordingLivePhotoMovie(AVCapturePhotoOutput captureOutput, NSUrl outputFileUrl, AVCaptureResolvedPhotoSettings resolvedSettings)
        {
            capturingLivePhoto(false);
        }

        public override void DidFinishProcessingLivePhotoMovie(AVCapturePhotoOutput captureOutput, NSUrl outputFileUrl, CMTime duration, CMTime photoDisplayTime, AVCaptureResolvedPhotoSettings resolvedSettings, NSError error)
        {
            if (error != null)
            {
                Console.WriteLine($"Error processing live photo companion movie: {error.LocalizedDescription})");
                return;
            }
            livePhotoCompanionMovieUrl = outputFileUrl;
        }

        public override void DidFinishCapture(AVCapturePhotoOutput captureOutput, AVCaptureResolvedPhotoSettings resolvedSettings, NSError error)
        {
            if (error != null)
            {
                Console.WriteLine($"Error capturing photo: {error.LocalizedDescription})");
                DidFinish();
                return;
            }

            if (photoData == null)
            {
                Console.WriteLine("No photo data resource");
                DidFinish();
                return;
            }

            PHPhotoLibrary.RequestAuthorization(status => {
                if (status == PHAuthorizationStatus.Authorized)
                {
                    PHPhotoLibrary.SharedPhotoLibrary.PerformChanges(() =>
                    {
                        var options = new PHAssetResourceCreationOptions
                        {
                            UniformTypeIdentifier = RequestedPhotoSettings.ProcessedFileType,
                        };

                        var creationRequest = PHAssetCreationRequest.CreationRequestForAsset();
                        creationRequest.AddResource(PHAssetResourceType.Photo, photoData, options);

                        var url = livePhotoCompanionMovieUrl;
                        if (url != null)
                        {
                            var livePhotoCompanionMovieFileResourceOptions = new PHAssetResourceCreationOptions
                            {
                                ShouldMoveFile = true
                            };
                            creationRequest.AddResource(PHAssetResourceType.PairedVideo, url, livePhotoCompanionMovieFileResourceOptions);
                        }
                    }, (success, err) =>
                    {
                        if (err != null)
                            Console.WriteLine($"Error occurered while saving photo to photo library: {error.LocalizedDescription}");
                        DidFinish();
                    });
                }
                else
                {
                    DidFinish();
                }
            });
        }

    }
}これはカメラのプレビューを表示するUIViewです。
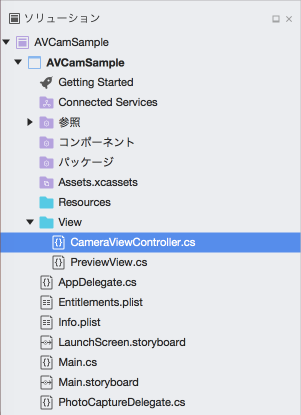
Viewフォルダを作成します。
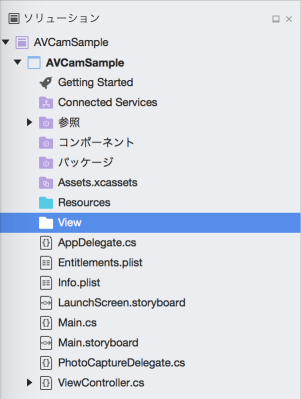
PreviewView.csファイルを作成します。

それではPreviewView.swiftファイルのコードを見てみましょう。
Swift
import UIKit
import AVFoundation

class PreviewView: UIView {
    var videoPreviewLayer: AVCaptureVideoPreviewLayer {
        guard let layer = layer as? AVCaptureVideoPreviewLayer else {
            fatalError("Expected `AVCaptureVideoPreviewLayer` type for layer. Check PreviewView.layerClass implementation.")
        }

        return layer
    }

    var session: AVCaptureSession? {
        get {
            return videoPreviewLayer.session
        }
        set {
            videoPreviewLayer.session = newValue
        }
    }

    // MARK: UIView

    override class var layerClass: AnyClass {
        return AVCaptureVideoPreviewLayer.self
    }
}ここで、新しく出てきた内容は、override class var layerClass: AnyClass { return AVCaptureVideoPreviewLayer.self }です。
通常、UIViewのLayerは自動的に作成され割り当てられます。
デフォルトではLayerはCALayerのインスタンスになりますが、overrideすることでCALayer派生の任意の型を使用できます。
Xamarin.iOS で同じことを実現するには、using ObjCRuntime;を追加し、CALayer派生の任意の型を返す静的メソッド、または静的プロパティを作成し、[Export("layerClass")]を設定します。
具体的には下記のようになります。
C#
public static Class LayerClass
{
    [Export("layerClass")]
    get
    {
        return layerClass = layerClass ?? new Class(typeof(AVCaptureVideoPreviewLayer));
    }
}
または
[Export ("layerClass")]
public static Class GetLayerClass ()
{
    return new Class(typeof(AVCaptureVideoPreviewLayer));
}
あとは、そのまま移植するだけです。
このあたりを詳しくご理解したい方はこちらを参照してください。
あとは、そのまま移植するだけです。
C#
using System;

using UIKit;
using Foundation;
using AVFoundation;
using ObjCRuntime;

namespace AVCamSample
{
    [Register("PreviewView")]
    public class PreviewView : UIView
    {
        static Class layerClass;

        public static Class LayerClass
        {
            [Export("layerClass")]
            get => layerClass = layerClass ?? new Class(typeof(AVCaptureVideoPreviewLayer));
        }

        public AVCaptureSession Session
        {
            get => VideoPreviewLayer.Session;
            set => VideoPreviewLayer.Session = value;
        }

        public AVCaptureVideoPreviewLayer VideoPreviewLayer
        {
            get => (AVCaptureVideoPreviewLayer)Layer;
        }

    }
}ViewController.csファイルを削除します。

CameraViewController.csファイルを作成します。
CameraViewController.swiftでは、撮影処理や録画処理を行っています。この処理はとても量が多いので、今回は時間の都合上翻訳済みのcsファイルを準備しましたのでそちらをお使い下さい。
こちらの内容をCameraViewController.csにペーストしてください。
UI については、storyboardをそのまま利用できます。ですが、実際にアプリを開発すると、storyboardだけで完結するのは難しく、どうしてもコードで UI を記述する場面が出てきます。
ところが、Xamarin.iOS で UI をコードで作成する方法の情報は非常に少ないです。そこで、今回はせっかくの機会なので UI をコードで作成してみましょう。具体的には、Main.storyboardを Xamarin.iOS に翻訳する作業になります。
CameraViewController.csにUIエレメントを割り当てるフィールドを追加します。
C#
public class CameraViewController : UIViewController, IAVCaptureFileOutputRecordingDelegate
{

    PreviewView PreviewView { get; set; }
    UILabel CameraUnavailableLabel { get; set; }
    UIButton ResumeButton { get; set; }
    UIButton RecordButton { get; set; }
    UIButton CameraButton { get; set; }
    UIButton PhotoButton { get; set; }
    UIButton LivePhotoModeButton { get; set; }
    UISegmentedControl CaptureModeControl { get; set; }
UILabel CapturingLivePhotoLabel { get; set; }UIを構築するメソッドを作成します。
C#
private void InitUI()
{
}InitUI()にMain.storyboard 15行目~18行目のViewに関する設定を移植します。
storyboard
<viewController id="BYZ-38-t0r" customClass="CameraViewController" customModule="AVCam" customModuleProvider="target" sceneMemberID="viewController">
    <view key="view" contentMode="scaleToFill" id="8bC-Xf-vdC">
        <rect key="frame" x="0.0" y="0.0" width="375" height="667"/>
        <autoresizingMask key="autoresizingMask" widthSizable="YES" heightSizable="YES"/>
C#
private void InitUI()
{
    View.ContentMode = UIViewContentMode.ScaleToFill;
    View.Frame = new CGRect(0, 0, 375, 667);
    View.AutoresizingMask = UIViewAutoresizing.FlexibleWidth | UIViewAutoresizing.FlexibleHeight;
}Main.storyboard 28行目~34行目のCameraUnavailableLabelに関する設定を移植します。
storyboard
<label hidden="YES" userInteractionEnabled="NO" contentMode="left" horizontalHuggingPriority="251" verticalHuggingPriority="251" text="Camera Unavailable" textAlignment="center" lineBreakMode="tailTruncation" numberOfLines="0" baselineAdjustment="alignBaselines" adjustsFontSizeToFit="NO" translatesAutoresizingMaskIntoConstraints="NO" id="zf0-db-esM" userLabel="Camera Unavailable">
    <rect key="frame" x="83.5" y="319" width="208" height="29"/>
    <color key="backgroundColor" red="0.0" green="0.0" blue="0.0" alpha="0.0" colorSpace="custom" customColorSpace="sRGB"/>
    <fontDescription key="fontDescription" type="system" pointSize="24"/>
    <color key="textColor" red="1" green="1" blue="0.0" alpha="1" colorSpace="custom" customColorSpace="sRGB"/>
    <nil key="highlightedColor"/>
</label>
xmlの各attributeに対応したプロパティを見つけ出し、設定していきます。IntelliSenseをうまく使えば簡単に見つけることができます。
例えばhidden="YES"なら、Hidden = true、userInteractionEnabled="NO"ならUserInteractionEnabled = falseといった要領です。
わかりにくいプロパティはcolor関係とfontですが、それぞれ、colorはpublic static UIColor FromRGBA(nfloat red, nfloat green, nfloat blue, nfloat alpha);、fontはpublic static UIFont SystemFontOfSize(nfloat size);となります。
全部移植すると以下のようになりますので、InitUI()の先ほど追加したコードの下に以下を追加します。
C#
CameraUnavailableLabel = new UILabel
{
    Frame = new CGRect(83.5, 319, 208, 29),
    Hidden = true,
    UserInteractionEnabled = false,
    ContentMode = UIViewContentMode.Left,
    Text = "Camera Unavailable",
    TextAlignment = UITextAlignment.Center,
    LineBreakMode = UILineBreakMode.TailTruncation,
    Lines = 0,
    BaselineAdjustment = UIBaselineAdjustment.AlignBaselines,
    AdjustsFontSizeToFitWidth = false,
    TranslatesAutoresizingMaskIntoConstraints = false,
    BackgroundColor = UIColor.FromRGBA(0.0f, 0.0f, 0.0f, 1.0f),
    Font = UIFont.SystemFontOfSize(24f),
    TextColor = UIColor.FromRGBA(1.0f, 1.0f, 0.0f, 1.0f),
};
CameraUnavailableLabel.SetContentHuggingPriority(251f, UILayoutConstraintAxis.Horizontal);
CameraUnavailableLabel.SetContentHuggingPriority(251f, UILayoutConstraintAxis.Vertical);
View.AddSubview(CameraUnavailableLabel);
では、同じ要領で他のUIエレメントも追加していきましょう。
Main.storyboard 20行目~27行目のPreviewViewに関する設定を移植します。
storyboard
<view contentMode="scaleToFill" translatesAutoresizingMaskIntoConstraints="NO" id="3eR-Rn-XpZ" userLabel="Preview" customClass="PreviewView" customModule="AVCam" customModuleProvider="target">
    <rect key="frame" x="0.0" y="0.0" width="375" height="667"/>
    <color key="backgroundColor" red="0.0" green="0.0" blue="0.0" alpha="1" colorSpace="custom" customColorSpace="sRGB"/>
    <gestureRecognizers/>
    <connections>
        <outletCollection property="gestureRecognizers" destination="fY6-qX-ntV" appends="YES" id="G6D-dx-xU8"/>
    </connections>
</view>InitUI()の先ほど追加したコードの下に以下を追加します。
C#
PreviewView = new PreviewView
{
    Frame = new CGRect(0, 0, 375, 667),
    ContentMode = UIViewContentMode.ScaleToFill,
    TranslatesAutoresizingMaskIntoConstraints = false,
    BackgroundColor = UIColor.FromRGBA(0.0f, 0.0f, 0.0f, 1f),
};
View.AddSubview(PreviewView);Main.storyboard 68行目~87行目のPhotoButtonに関する設定を移植します。
storyboard
<button opaque="NO" contentMode="scaleToFill" contentHorizontalAlignment="center" contentVerticalAlignment="center" buttonType="roundedRect" lineBreakMode="middleTruncation" translatesAutoresizingMaskIntoConstraints="NO" id="uCj-6P-mHF" userLabel="Photo">
    <rect key="frame" x="147.5" y="617" width="80" height="30"/>
    <color key="backgroundColor" red="0.0" green="0.0" blue="0.0" alpha="0.29999999999999999" colorSpace="custom" customColorSpace="sRGB"/>
    <constraints>
        <constraint firstAttribute="height" constant="30" id="NtC-UN-gTs"/>
        <constraint firstAttribute="width" constant="80" id="dxU-UP-4Ae"/>
    </constraints>
    <fontDescription key="fontDescription" type="system" pointSize="20"/>
    <state key="normal" title="Photo">
        <color key="titleShadowColor" red="0.5" green="0.5" blue="0.5" alpha="1" colorSpace="custom" customColorSpace="sRGB"/>
    </state>
    <userDefinedRuntimeAttributes>
        <userDefinedRuntimeAttribute type="number" keyPath="layer.cornerRadius">
            <integer key="value" value="4"/>
        </userDefinedRuntimeAttribute>
    </userDefinedRuntimeAttributes>
    <connections>
        <action selector="capturePhoto:" destination="BYZ-38-t0r" eventType="touchUpInside" id="o5K-SC-fYn"/>
    </connections>
</button>
わかりにくい箇所をご説明しますと、
buttonType="roundedRect"はXamarin.iOSではコンストラクタでの設定となり、PhotoButton = new UIButton(UIButtonType.RoundedRect)となります。
はViewに設定した仮想解像度、幅:375, 高さ:667に対し、PhotoButtonの高さを30に設定しなさいという制約です。
これは、Xamarin.iOSではNSLayoutConstraint.Create(PhotoButton, NSLayoutAttribute.Height, NSLayoutRelation.Equal, 1.0f, 30)となります。
widthも同じ要領で設定できます。
<action selector="capturePhoto:" destination="BYZ-38-t0r" eventType="touchUpInside" id="o5K-SC-fYn"/>はイベントハンドラの設定です。
CameraViewController.swiftの521行目を確認すると
Swift
@IBAction private func capturePhoto(_ photoButton: UIButton) {とありますので、これがイベントハンドラです。Xamarin.iOSではイベントが準備されていますので、C#側のハンドラメソッドのCapturePhoto()を設定すれば大丈夫です。
全部移植すると以下のようになりますので、InitUI()の先ほど追加したコードの下に以下を追加します。
C#
PhotoButton = new UIButton(UIButtonType.RoundedRect)
{
    Frame = new CGRect(147.5, 617, 80, 30),
    Opaque = false,
    ContentMode = UIViewContentMode.ScaleToFill,
    HorizontalAlignment = UIControlContentHorizontalAlignment.Center,
    VerticalAlignment = UIControlContentVerticalAlignment.Center,
    LineBreakMode = UILineBreakMode.MiddleTruncation,
    TranslatesAutoresizingMaskIntoConstraints = false,
    BackgroundColor = UIColor.FromRGBA(0.0f, 0.0f, 0.0f, 0.3f),
    Font = UIFont.SystemFontOfSize(20f),
};

PhotoButton.SetTitle("Photo", UIControlState.Normal);
PhotoButton.SetTitleShadowColor(UIColor.FromRGBA(0.5f, 0.5f, 0.5f, 1.0f), UIControlState.Normal);
PhotoButton.Layer.CornerRadius = 4f;
PhotoButton.TouchUpInside += (s, e) => CapturePhoto();
PhotoButton.AddConstraint(NSLayoutConstraint.Create(PhotoButton, NSLayoutAttribute.Height, NSLayoutRelation.Equal, 1.0f, 30));
PhotoButton.AddConstraint(NSLayoutConstraint.Create(PhotoButton, NSLayoutAttribute.Width, NSLayoutRelation.Equal, 1.0f, 80));
View.AddSubview(PhotoButton);Main.storyboard 88行目~103行目のCameraButtonに関する設定を移植します。
storyboard
<button opaque="NO" contentMode="scaleToFill" contentHorizontalAlignment="center" contentVerticalAlignment="center" buttonType="roundedRect" lineBreakMode="middleTruncation" translatesAutoresizingMaskIntoConstraints="NO" id="rUJ-G6-RPv" userLabel="Camera">
    <rect key="frame" x="247.5" y="617" width="80" height="30"/>
    <color key="backgroundColor" red="0.0" green="0.0" blue="0.0" alpha="0.29999999999999999" colorSpace="custom" customColorSpace="sRGB"/>
    <fontDescription key="fontDescription" type="system" pointSize="20"/>
    <state key="normal" title="Camera">
        <color key="titleShadowColor" red="0.5" green="0.5" blue="0.5" alpha="1" colorSpace="custom" customColorSpace="sRGB"/>
    </state>
    <userDefinedRuntimeAttributes>
        <userDefinedRuntimeAttribute type="number" keyPath="layer.cornerRadius">
            <integer key="value" value="4"/>
        </userDefinedRuntimeAttribute>
    </userDefinedRuntimeAttributes>
    <connections>
        <action selector="changeCamera:" destination="BYZ-38-t0r" eventType="touchUpInside" id="3W0-h3-6fc"/>
    </connections>
</button>全部移植すると以下のようになりますので、InitUI()の先ほど追加したコードの下に以下を追加します。
C#
CameraButton = new UIButton(UIButtonType.RoundedRect)
{
    Frame = new CGRect(147.5, 617, 80, 30),
    Opaque = false,
    ContentMode = UIViewContentMode.ScaleToFill,
    HorizontalAlignment = UIControlContentHorizontalAlignment.Center,
    VerticalAlignment = UIControlContentVerticalAlignment.Center,
    LineBreakMode = UILineBreakMode.MiddleTruncation,
    TranslatesAutoresizingMaskIntoConstraints = false,
    BackgroundColor = UIColor.FromRGBA(0.0f, 0.0f, 0.0f, 0.3f),
    Font = UIFont.SystemFontOfSize(20f),
};

CameraButton.SetTitle("Camera", UIControlState.Normal);
CameraButton.SetTitleShadowColor(UIColor.FromRGBA(0.5f, 0.5f, 0.5f, 1.0f), UIControlState.Normal);
CameraButton.Layer.CornerRadius = 4f;
CameraButton.TouchUpInside += (s, e) => ChangeCamera();
View.AddSubview(CameraButton);Main.storyboard 52行目~67行目のRecordButtonに関する設定を移植します。
storyboard
<button opaque="NO" contentMode="scaleToFill" contentHorizontalAlignment="center" contentVerticalAlignment="center" buttonType="roundedRect" lineBreakMode="middleTruncation" translatesAutoresizingMaskIntoConstraints="NO" id="eRT-dK-6dM" userLabel="Record">
    <rect key="frame" x="47.5" y="617" width="80" height="30"/>
    <color key="backgroundColor" red="0.0" green="0.0" blue="0.0" alpha="0.29999999999999999" colorSpace="custom" customColorSpace="sRGB"/>
    <fontDescription key="fontDescription" type="system" pointSize="20"/>
    <state key="normal" title="Record">
        <color key="titleShadowColor" red="0.5" green="0.5" blue="0.5" alpha="1" colorSpace="custom" customColorSpace="sRGB"/>
    </state>
    <userDefinedRuntimeAttributes>
        <userDefinedRuntimeAttribute type="number" keyPath="layer.cornerRadius">
            <integer key="value" value="4"/>
        </userDefinedRuntimeAttribute>
    </userDefinedRuntimeAttributes>
    <connections>
        <action selector="toggleMovieRecording:" destination="BYZ-38-t0r" eventType="touchUpInside" id="9R7-Ok-FpB"/>
    </connections>
</button>全部移植すると以下のようになりますので、InitUI()の先ほど追加したコードの下に以下を追加します。
C#
RecordButton = new UIButton(UIButtonType.RoundedRect)
{
    Frame = new CGRect(47.5, 617, 80, 30),
    Opaque = false,
    ContentMode = UIViewContentMode.ScaleToFill,
    HorizontalAlignment = UIControlContentHorizontalAlignment.Center,
    VerticalAlignment = UIControlContentVerticalAlignment.Center,
    LineBreakMode = UILineBreakMode.MiddleTruncation,
    TranslatesAutoresizingMaskIntoConstraints = false,
    BackgroundColor = UIColor.FromRGBA(0.0f, 0.0f, 0.0f, 0.3f),
    Font = UIFont.SystemFontOfSize(20f),
};

RecordButton.SetTitle("Record", UIControlState.Normal);
RecordButton.SetTitleShadowColor(UIColor.FromRGBA(0.5f, 0.5f, 0.5f, 1f), UIControlState.Normal);
RecordButton.Layer.CornerRadius = 4f;
RecordButton.TouchUpInside += (s, e) => ToggleMovieRecording();
View.AddSubview(RecordButton);Main.storyboard 35行目~51行目のResumeButtonに関する設定を移植します。
storyboard
<button hidden="YES" opaque="NO" contentMode="scaleToFill" contentHorizontalAlignment="center" contentVerticalAlignment="center" buttonType="roundedRect" lineBreakMode="middleTruncation" translatesAutoresizingMaskIntoConstraints="NO" id="FZr-Ip-7WL" userLabel="Resume">
    <rect key="frame" x="105" y="314" width="165" height="39"/>
    <color key="backgroundColor" red="0.0" green="0.0" blue="0.0" alpha="0.29999999999999999" colorSpace="custom" customColorSpace="sRGB"/>
    <fontDescription key="fontDescription" type="system" pointSize="24"/>
    <inset key="contentEdgeInsets" minX="10" minY="5" maxX="10" maxY="5"/>
    <state key="normal" title="Tap to resume">
        <color key="titleShadowColor" red="0.5" green="0.5" blue="0.5" alpha="1" colorSpace="custom" customColorSpace="sRGB"/>
    </state>
    <userDefinedRuntimeAttributes>
        <userDefinedRuntimeAttribute type="number" keyPath="layer.cornerRadius">
            <integer key="value" value="4"/>
        </userDefinedRuntimeAttribute>
    </userDefinedRuntimeAttributes>
    <connections>
        <action selector="resumeInterruptedSession:" destination="BYZ-38-t0r" eventType="touchUpInside" id="42K-1B-qJd"/>
    </connections>
</button>全部移植すると以下のようになりますので、InitUI()の先ほど追加したコードの下に以下を追加します。
C#
ResumeButton = new UIButton(UIButtonType.RoundedRect)
{
    Frame = new CGRect(105, 314, 165, 39),
    Hidden = true,
    Opaque = false,
    ContentMode = UIViewContentMode.ScaleToFill,
    HorizontalAlignment = UIControlContentHorizontalAlignment.Center,
    VerticalAlignment = UIControlContentVerticalAlignment.Center,
    LineBreakMode = UILineBreakMode.MiddleTruncation,
    TranslatesAutoresizingMaskIntoConstraints = false,
    BackgroundColor = UIColor.FromRGBA(0.0f, 0.0f, 0.0f, 0.3f),
    Font = UIFont.SystemFontOfSize(24f),
};
ResumeButton.SetTitle("Tap to resume", UIControlState.Normal);
ResumeButton.SetTitleShadowColor(UIColor.FromRGBA(0.5f, 0.5f, 0.5f, 1f), UIControlState.Normal);
ResumeButton.Layer.CornerRadius = 4f;
ResumeButton.TouchUpInside += (s, e) => ResumeInterruptedSession();
View.AddSubview(ResumeButton);Main.storyboard 104行目~113行目のCaptureModeControlに関する設定を移植します。
今度はSegmentedControlですが、要領は同じです。
storyboard
<segmentedControl opaque="NO" contentMode="scaleToFill" contentHorizontalAlignment="left" contentVerticalAlignment="top" segmentControlStyle="plain" selectedSegmentIndex="0" translatesAutoresizingMaskIntoConstraints="NO" id="FAC-co-10c" userLabel="Capture Mode">
    <rect key="frame" x="136" y="569" width="103" height="29"/>
    <segments>
        <segment title="Photo"/>
        <segment title="Movie"/>
    </segments>
    <connections>
        <action selector="toggleCaptureMode:" destination="BYZ-38-t0r" eventType="valueChanged" id="SKd-67-ZHh"/>
    </connections>
</segmentedControl>
ちょっとわかりにくい箇所としては、
<segments>
    <segment title="Photo"/>
    <segment title="Movie"/>
</segments>の部分は、InsertSegmentメソッドが準備されているので、それを使うと以下のようになります。
CaptureModeControl.InsertSegment("Photo", 0, true);
CaptureModeControl.InsertSegment("Movie", 1, true);
このあたりのコンストラクタ引数なのか、プロパティなのか、メソッドなのかというさじ加減も慣れると迷わなくなります。
全部移植すると以下のようになりますので、InitUI()の先ほど追加したコードの下に以下を追加します。
C#
CaptureModeControl = new UISegmentedControl
{
    Frame = new CGRect(136, 569, 103, 29),
    Opaque = false,
    ContentMode = UIViewContentMode.ScaleToFill,
    HorizontalAlignment = UIControlContentHorizontalAlignment.Left,
    ControlStyle = UISegmentedControlStyle.Plain,
    VerticalAlignment = UIControlContentVerticalAlignment.Top,
    TranslatesAutoresizingMaskIntoConstraints = false,
};
CaptureModeControl.InsertSegment("Photo", 0, true);
CaptureModeControl.InsertSegment("Movie", 1, true);
CaptureModeControl.SelectedSegment = 0;
CaptureModeControl.ValueChanged += (s, e) => ToggleCaptureMode();
View.AddSubview(CaptureModeControl);Main.storyboard 130行目~146行目のLivePhotoModeButtonに関する設定を移植します。
storyboard
<button opaque="NO" contentMode="scaleToFill" contentHorizontalAlignment="center" contentVerticalAlignment="center" buttonType="roundedRect" lineBreakMode="middleTruncation" translatesAutoresizingMaskIntoConstraints="NO" id="eI6-gV-W7d" userLabel="Live Photo Mode">
    <rect key="frame" x="96.5" y="41" width="182" height="25"/>
    <color key="backgroundColor" red="0.0" green="0.0" blue="0.0" alpha="0.29999999999999999" colorSpace="custom" customColorSpace="sRGB"/>
    <constraints>
        <constraint firstAttribute="height" constant="25" id="om7-Gh-HVl"/>
    </constraints>
    <fontDescription key="fontDescription" type="system" pointSize="20"/>
    <state key="normal" title="Live Photo Mode: On"/>
    <userDefinedRuntimeAttributes>
        <userDefinedRuntimeAttribute type="number" keyPath="layer.cornerRadius">
            <integer key="value" value="4"/>
        </userDefinedRuntimeAttribute>
    </userDefinedRuntimeAttributes>
    <connections>
        <action selector="toggleLivePhotoMode:" destination="BYZ-38-t0r" eventType="touchUpInside" id="JqX-wJ-Xf1"/>
    </connections>
</button>全部移植すると以下のようになりますので、InitUI()の先ほど追加したコードの下に以下を追加します。
C#
LivePhotoModeButton = new UIButton(UIButtonType.RoundedRect)
{
    Frame = new CGRect(96.5, 41, 182, 25),
    Opaque = false,
    ContentMode = UIViewContentMode.ScaleToFill,
    HorizontalAlignment = UIControlContentHorizontalAlignment.Center,
    VerticalAlignment = UIControlContentVerticalAlignment.Center,
    LineBreakMode = UILineBreakMode.MiddleTruncation,
    TranslatesAutoresizingMaskIntoConstraints = false,
    BackgroundColor = UIColor.FromRGBA(0.0f, 0.0f, 0.0f, 0.3f),
    Font = UIFont.SystemFontOfSize(20f),
};

LivePhotoModeButton.SetTitle("Live Photo Mode: On", UIControlState.Normal);
LivePhotoModeButton.SetTitleShadowColor(UIColor.FromRGBA(0.5f, 0.5f, 0.5f, 1f), UIControlState.Normal);
LivePhotoModeButton.Layer.CornerRadius = 4f;
LivePhotoModeButton.TouchUpInside += (s, e) => ToggleLivePhotoMode();

LivePhotoModeButton.AddConstraint(NSLayoutConstraint.Create(LivePhotoModeButton, NSLayoutAttribute.Height, NSLayoutRelation.Equal, 1.0f, 25));

View.AddSubview(LivePhotoModeButton);Main.storyboard 147行目~158行目のLivePhotoModeButtonに関する設定を移植します。
storyboard
<label hidden="YES" opaque="NO" clipsSubviews="YES" userInteractionEnabled="NO" contentMode="left" horizontalHuggingPriority="251" verticalHuggingPriority="251" text="Live" textAlignment="center" lineBreakMode="tailTruncation" baselineAdjustment="alignBaselines" adjustsFontSizeToFit="NO" translatesAutoresizingMaskIntoConstraints="NO" id="Pii-2r-R2l" userLabel="Capturing Live Photo">
    <rect key="frame" x="172" y="74" width="31" height="20.5"/>
    <color key="backgroundColor" red="0.0" green="0.0" blue="0.0" alpha="0.29999999999999999" colorSpace="custom" customColorSpace="sRGB"/>
    <fontDescription key="fontDescription" type="system" pointSize="17"/>
    <color key="textColor" red="1" green="1" blue="0.0" alpha="1" colorSpace="custom" customColorSpace="sRGB"/>
    <nil key="highlightedColor"/>
    <userDefinedRuntimeAttributes>
        <userDefinedRuntimeAttribute type="number" keyPath="layer.cornerRadius">
            <integer key="value" value="4"/>
        </userDefinedRuntimeAttribute>
    </userDefinedRuntimeAttributes>
</label>全部移植すると以下のようになりますので、InitUI()の先ほど追加したコードの下に以下を追加します。
C#
CapturingLivePhotoLabel = new UILabel
{
    Frame = new CGRect(172, 74, 31, 20.5),
    Hidden = true,
    Opaque = false,
    UserInteractionEnabled = false,
    ContentMode = UIViewContentMode.Left,
    Text = "Live",
    TextAlignment = UITextAlignment.Center,
    LineBreakMode = UILineBreakMode.TailTruncation,
    Lines = 0,
    BaselineAdjustment = UIBaselineAdjustment.AlignBaselines,
    AdjustsFontSizeToFitWidth = false,
    TranslatesAutoresizingMaskIntoConstraints = false,
    BackgroundColor = UIColor.FromRGBA(0.0f, 0.0f, 0.0f, 0.3f),
    Font = UIFont.SystemFontOfSize(17f),
    TextColor = UIColor.FromRGBA(1.0f, 1.0f, 0.0f, 1.0f),
};

CapturingLivePhotoLabel.Layer.CornerRadius = 4f;

CapturingLivePhotoLabel.AddConstraint(NSLayoutConstraint.Create(CapturingLivePhotoLabel, NSLayoutAttribute.Height, NSLayoutRelation.Equal, 1.0f, 25));
CapturingLivePhotoLabel.AddConstraint(NSLayoutConstraint.Create(CapturingLivePhotoLabel, NSLayoutAttribute.Width, NSLayoutRelation.Equal, 1.0f, 40));

View.AddSubview(CapturingLivePhotoLabel);次に制約を移植します。個別のUIエレメント内で完結する制約はUIエレメントを生成する箇所に記載していますので、ここでは、複数のUIエレメントの関係性の制約を移植します。
複数のUIエレメントの関係性の制約は161行目~188行目に記述されています。
1つ目の制約を見てみましょう。
<constraint firstItem="3eR-Rn-XpZ" firstAttribute="centerX" secondItem="nyU-fN-aJh" secondAttribute="centerX" id="125-kC-WZF"/>firstItem, secondItemにそれぞれ文字列が入っていますが、これはそれぞれ特定のUIエレメントを指し示しています。
firstItemの3eR-Rn-XpZを検索すると、20行目に、id="3eR-Rn-XpZ"とあります。
<view contentMode="scaleToFill" translatesAutoresizingMaskIntoConstraints="NO" id="3eR-Rn-XpZ" userLabel="Preview" customClass="PreviewView" customModule="AVCam" customModuleProvider="target">よって3eR-Rn-XpZはPreviewViewを指し示しています。
同様にsecondItemのnyU-fN-aJhを検索すると、189行目に、id="nyU-fN-aJh"とあります。
<viewLayoutGuide key="safeArea" id="nyU-fN-aJh"/>safeAreaとはiPhone Xを考慮した上下左右のマージンを取った領域です。safeAreaは、コードにすると、View.SafeAreaLayoutGuideになります。
よってidをUIエレメントに置き換えて記述すると、以下のようになります。
C#
View.AddConstraint(NSLayoutConstraint.Create(PreviewView, NSLayoutAttribute.CenterX, NSLayoutRelation.Equal, View.SafeAreaLayoutGuide, NSLayoutAttribute.CenterX, 1.0f, 0));同様にその他の制約を移植すると以下のようになります。 ※一部制約変更しています。
storyboard
<constraint firstItem="eI6-gV-W7d" firstAttribute="top" secondItem="9i1-NX-Qxg" secondAttribute="bottom" constant="8" id="6iA-0j-auu"/> /* iOS10対応のため変更あり */
<constraint firstItem="eI6-gV-W7d" firstAttribute="centerX" secondItem="nyU-fN-aJh" secondAttribute="centerX" id="ACB-oH-2jU"/>
<constraint firstItem="uCj-6P-mHF" firstAttribute="height" secondItem="eRT-dK-6dM" secondAttribute="height" id="AEV-ew-H4g"/>
<constraint firstItem="Pii-2r-R2l" firstAttribute="top" secondItem="eI6-gV-W7d" secondAttribute="bottom" constant="8" id="B43-ME-uK5"/>
<constraint firstItem="3eR-Rn-XpZ" firstAttribute="height" secondItem="8bC-Xf-vdC" secondAttribute="height" id="Ice-47-M9N"/>
<constraint firstItem="uCj-6P-mHF" firstAttribute="top" secondItem="rUJ-G6-RPv" secondAttribute="top" id="NFm-e8-abT"/>
<constraint firstItem="FZr-Ip-7WL" firstAttribute="centerX" secondItem="nyU-fN-aJh" secondAttribute="centerX" id="OaZ-uO-vXY"/>
<constraint firstItem="FAC-co-10c" firstAttribute="centerX" secondItem="nyU-fN-aJh" secondAttribute="centerX" id="Oow-A6-mDp"/>
<constraint firstItem="9i1-NX-Qxg" firstAttribute="top" secondItem="8bC-Xf-vdC" secondAttribute="top" constant="8" id="PNv-qh-VmU"/> /* 削除 */
<constraint firstItem="zf0-db-esM" firstAttribute="centerY" secondItem="8bC-Xf-vdC" secondAttribute="centerY" id="Ris-mI-8lA"/>
<constraint firstItem="Pii-2r-R2l" firstAttribute="centerX" secondItem="nyU-fN-aJh" secondAttribute="centerX" id="SXi-MU-H9D"/>
<constraint firstItem="zf0-db-esM" firstAttribute="centerX" secondItem="nyU-fN-aJh" secondAttribute="centerX" id="W6q-xJ-jfF"/>
<constraint firstItem="uCj-6P-mHF" firstAttribute="height" secondItem="rUJ-G6-RPv" secondAttribute="height" id="aQi-F7-E2b"/>
<constraint firstItem="uCj-6P-mHF" firstAttribute="top" secondItem="FAC-co-10c" secondAttribute="bottom" constant="20" id="aSR-Je-0lW"/>
<constraint firstItem="uCj-6P-mHF" firstAttribute="top" secondItem="eRT-dK-6dM" secondAttribute="top" id="bQd-ro-0Hw"/>
<constraint firstItem="nyU-fN-aJh" firstAttribute="bottom" secondItem="uCj-6P-mHF" secondAttribute="bottom" constant="20" id="eWs-co-Aaz"/>
<constraint firstItem="3eR-Rn-XpZ" firstAttribute="centerY" secondItem="8bC-Xf-vdC" secondAttribute="centerY" id="igk-MQ-CGt"/>
<constraint firstItem="rUJ-G6-RPv" firstAttribute="leading" secondItem="uCj-6P-mHF" secondAttribute="trailing" constant="20" id="lsk-Hm-rTd"/>
<constraint firstItem="nyU-fN-aJh" firstAttribute="centerX" secondItem="uCj-6P-mHF" secondAttribute="centerX" id="m8a-cF-Rf0"/>
<constraint firstItem="uCj-6P-mHF" firstAttribute="width" secondItem="rUJ-G6-RPv" secondAttribute="width" id="o8j-gw-35B"/>
<constraint firstItem="3eR-Rn-XpZ" firstAttribute="width" secondItem="8bC-Xf-vdC" secondAttribute="width" id="pSC-xP-dl0"/>
<constraint firstItem="uCj-6P-mHF" firstAttribute="width" secondItem="eRT-dK-6dM" secondAttribute="width" id="s8u-Y8-n27"/>
<constraint firstItem="FZr-Ip-7WL" firstAttribute="centerY" secondItem="8bC-Xf-vdC" secondAttribute="centerY" id="sTY-i6-czN"/>
<constraint firstItem="9i1-NX-Qxg" firstAttribute="centerX" secondItem="nyU-fN-aJh" secondAttribute="centerX" id="wWj-VD-34F"/> /* 削除 */
<constraint firstItem="uCj-6P-mHF" firstAttribute="leading" secondItem="eRT-dK-6dM" secondAttribute="trailing" constant="20" id="zwj-TX-t6O"/>
C#
View.AddConstraint(NSLayoutConstraint.Create(LivePhotoModeButton, NSLayoutAttribute.Top, NSLayoutRelation.Equal, View, NSLayoutAttribute.Top, 1.0f, 80f));// iOS10対応のため変更あり
View.AddConstraint(NSLayoutConstraint.Create(LivePhotoModeButton, NSLayoutAttribute.CenterX, NSLayoutRelation.Equal, View, NSLayoutAttribute.CenterX, 1.0f, 0));
View.AddConstraint(NSLayoutConstraint.Create(PhotoButton, NSLayoutAttribute.Height, NSLayoutRelation.Equal, RecordButton, NSLayoutAttribute.Height, 1.0f, 0f));
View.AddConstraint(NSLayoutConstraint.Create(CapturingLivePhotoLabel, NSLayoutAttribute.Top, NSLayoutRelation.Equal, LivePhotoModeButton, NSLayoutAttribute.Bottom, 1.0f, 8.0f));
View.AddConstraint(NSLayoutConstraint.Create(PreviewView, NSLayoutAttribute.Height, NSLayoutRelation.Equal, View, NSLayoutAttribute.Height, 1.0f, 0f));
View.AddConstraint(NSLayoutConstraint.Create(PhotoButton, NSLayoutAttribute.Top, NSLayoutRelation.Equal, CameraButton, NSLayoutAttribute.Top, 1.0f, 0f));
View.AddConstraint(NSLayoutConstraint.Create(ResumeButton, NSLayoutAttribute.CenterX, NSLayoutRelation.Equal, View, NSLayoutAttribute.CenterX, 1.0f, 0f));
View.AddConstraint(NSLayoutConstraint.Create(CaptureModeControl, NSLayoutAttribute.CenterX, NSLayoutRelation.Equal, View, NSLayoutAttribute.CenterX, 1.0f, 0f));
View.AddConstraint(NSLayoutConstraint.Create(CameraUnavailableLabel, NSLayoutAttribute.CenterY, NSLayoutRelation.Equal, View, NSLayoutAttribute.CenterY, 1.0f, 0f));
View.AddConstraint(NSLayoutConstraint.Create(CapturingLivePhotoLabel, NSLayoutAttribute.CenterX, NSLayoutRelation.Equal, View, NSLayoutAttribute.CenterX, 1.0f, 0));
View.AddConstraint(NSLayoutConstraint.Create(CameraUnavailableLabel, NSLayoutAttribute.CenterX, NSLayoutRelation.Equal, View, NSLayoutAttribute.CenterX, 1.0f, 0));
View.AddConstraint(NSLayoutConstraint.Create(PhotoButton, NSLayoutAttribute.Height, NSLayoutRelation.Equal, CameraButton, NSLayoutAttribute.Height, 1.0f, 0f));
View.AddConstraint(NSLayoutConstraint.Create(PhotoButton, NSLayoutAttribute.Top, NSLayoutRelation.Equal, CaptureModeControl, NSLayoutAttribute.Bottom, 1.0f, 20f));
View.AddConstraint(NSLayoutConstraint.Create(PhotoButton, NSLayoutAttribute.Top, NSLayoutRelation.Equal, RecordButton, NSLayoutAttribute.Top, 1.0f, 0f));
View.AddConstraint(NSLayoutConstraint.Create(View, NSLayoutAttribute.Bottom, NSLayoutRelation.Equal, PhotoButton, NSLayoutAttribute.Bottom, 1.0f, 20f));
View.AddConstraint(NSLayoutConstraint.Create(PreviewView, NSLayoutAttribute.CenterY, NSLayoutRelation.Equal, View, NSLayoutAttribute.CenterY, 1.0f, 0f));
View.AddConstraint(NSLayoutConstraint.Create(CameraButton, NSLayoutAttribute.Leading, NSLayoutRelation.Equal, PhotoButton, NSLayoutAttribute.Trailing, 1.0f, 20f));
View.AddConstraint(NSLayoutConstraint.Create(View, NSLayoutAttribute.CenterX, NSLayoutRelation.Equal, PhotoButton, NSLayoutAttribute.CenterX, 1.0f, 0f));
View.AddConstraint(NSLayoutConstraint.Create(PhotoButton, NSLayoutAttribute.Width, NSLayoutRelation.Equal, RecordButton, NSLayoutAttribute.Width, 1.0f, 0f));
View.AddConstraint(NSLayoutConstraint.Create(PreviewView, NSLayoutAttribute.Width, NSLayoutRelation.Equal, View, NSLayoutAttribute.Width, 1.0f, 0f));
View.AddConstraint(NSLayoutConstraint.Create(PhotoButton, NSLayoutAttribute.Width, NSLayoutRelation.Equal, RecordButton, NSLayoutAttribute.Width, 1.0f, 0f));
View.AddConstraint(NSLayoutConstraint.Create(ResumeButton, NSLayoutAttribute.CenterY, NSLayoutRelation.Equal, View, NSLayoutAttribute.CenterY, 1.0f, 0f));
View.AddConstraint(NSLayoutConstraint.Create(PhotoButton, NSLayoutAttribute.Leading, NSLayoutRelation.Equal, RecordButton, NSLayoutAttribute.Trailing, 1.0f, 20f));これで、InitUIメソッドは完成です。コード全体は以下のようになります。
C#
private void InitUI()
{

    View.ContentMode = UIViewContentMode.ScaleToFill;
    View.Frame = new CGRect(0, 0, 375, 667);
    View.AutoresizingMask = UIViewAutoresizing.FlexibleWidth | UIViewAutoresizing.FlexibleHeight;

    CameraUnavailableLabel = new UILabel
    {
        Frame = new CGRect(83.5, 319, 208, 29),
        Hidden = true,
        UserInteractionEnabled = false,
        ContentMode = UIViewContentMode.Left,
        Text = "Camera Unavailable",
        TextAlignment = UITextAlignment.Center,
        LineBreakMode = UILineBreakMode.TailTruncation,
        Lines = 0,
        BaselineAdjustment = UIBaselineAdjustment.AlignBaselines,
        AdjustsFontSizeToFitWidth = false,
        TranslatesAutoresizingMaskIntoConstraints = false,
        BackgroundColor = UIColor.FromRGBA(0.0f, 0.0f, 0.0f, 1.0f),
        Font = UIFont.SystemFontOfSize(24f),
        TextColor = UIColor.FromRGBA(1.0f, 1.0f, 0.0f, 1.0f),
    };
    CameraUnavailableLabel.SetContentHuggingPriority(251f, UILayoutConstraintAxis.Horizontal);
    CameraUnavailableLabel.SetContentHuggingPriority(251f, UILayoutConstraintAxis.Vertical);
    View.AddSubview(CameraUnavailableLabel);

    PreviewView = new PreviewView
    {
        Frame = new CGRect(0, 0, 375, 667),
        ContentMode = UIViewContentMode.ScaleToFill,
        TranslatesAutoresizingMaskIntoConstraints = false,
        BackgroundColor = UIColor.FromRGBA(0.0f, 0.0f, 0.0f, 1f),
    };
    View.AddSubview(PreviewView);

    PhotoButton = new UIButton(UIButtonType.RoundedRect)
    {
        Frame = new CGRect(147.5, 617, 80, 30),
        Opaque = false,
        ContentMode = UIViewContentMode.ScaleToFill,
        HorizontalAlignment = UIControlContentHorizontalAlignment.Center,
        VerticalAlignment = UIControlContentVerticalAlignment.Center,
        LineBreakMode = UILineBreakMode.MiddleTruncation,
        TranslatesAutoresizingMaskIntoConstraints = false,
        BackgroundColor = UIColor.FromRGBA(0.0f, 0.0f, 0.0f, 0.3f),
        Font = UIFont.SystemFontOfSize(20f),
    };
    PhotoButton.SetTitle("Photo", UIControlState.Normal);
    PhotoButton.SetTitleShadowColor(UIColor.FromRGBA(0.5f, 0.5f, 0.5f, 1f), UIControlState.Normal);
    PhotoButton.Layer.CornerRadius = 4f;
    PhotoButton.TouchUpInside += (s, e) => CapturePhoto();
    PhotoButton.AddConstraint(NSLayoutConstraint.Create(PhotoButton, NSLayoutAttribute.Height, NSLayoutRelation.Equal, 1.0f, 30));
    PhotoButton.AddConstraint(NSLayoutConstraint.Create(PhotoButton, NSLayoutAttribute.Width, NSLayoutRelation.Equal, 1.0f, 80));
    View.AddSubview(PhotoButton);

    CameraButton = new UIButton(UIButtonType.RoundedRect)
    {
        Frame = new CGRect(147.5, 617, 80, 30),
        Opaque = false,
        ContentMode = UIViewContentMode.ScaleToFill,
        HorizontalAlignment = UIControlContentHorizontalAlignment.Center,
        VerticalAlignment = UIControlContentVerticalAlignment.Center,
        LineBreakMode = UILineBreakMode.MiddleTruncation,
        TranslatesAutoresizingMaskIntoConstraints = false,
        BackgroundColor = UIColor.FromRGBA(0.0f, 0.0f, 0.0f, 0.3f),
        Font = UIFont.SystemFontOfSize(20f),
    };
    CameraButton.SetTitle("Camera", UIControlState.Normal);
    CameraButton.SetTitleShadowColor(UIColor.FromRGBA(0.5f, 0.5f, 0.5f, 1f), UIControlState.Normal);
    CameraButton.Layer.CornerRadius = 4f;
    CameraButton.TouchUpInside += (s, e) => ChangeCamera();
    View.AddSubview(CameraButton);

    RecordButton = new UIButton(UIButtonType.RoundedRect)
    {
        Frame = new CGRect(47.5, 617, 80, 30),
        Opaque = false,
        ContentMode = UIViewContentMode.ScaleToFill,
        HorizontalAlignment = UIControlContentHorizontalAlignment.Center,
        VerticalAlignment = UIControlContentVerticalAlignment.Center,
        LineBreakMode = UILineBreakMode.MiddleTruncation,
        TranslatesAutoresizingMaskIntoConstraints = false,
        BackgroundColor = UIColor.FromRGBA(0.0f, 0.0f, 0.0f, 0.3f),
        Font = UIFont.SystemFontOfSize(20f),
    };
    RecordButton.SetTitle("Record", UIControlState.Normal);
    RecordButton.SetTitleShadowColor(UIColor.FromRGBA(0.5f, 0.5f, 0.5f, 1f), UIControlState.Normal);
    RecordButton.Layer.CornerRadius = 4f;
    RecordButton.TouchUpInside += (s, e) => ToggleMovieRecording();
    View.AddSubview(RecordButton);

    ResumeButton = new UIButton(UIButtonType.RoundedRect)
    {
        Frame = new CGRect(105, 314, 165, 39),
        Hidden = true,
        Opaque = false,
        ContentMode = UIViewContentMode.ScaleToFill,
        HorizontalAlignment = UIControlContentHorizontalAlignment.Center,
        VerticalAlignment = UIControlContentVerticalAlignment.Center,
        LineBreakMode = UILineBreakMode.MiddleTruncation,
        TranslatesAutoresizingMaskIntoConstraints = false,
        BackgroundColor = UIColor.FromRGBA(0.0f, 0.0f, 0.0f, 0.3f),
        Font = UIFont.SystemFontOfSize(24f),
    };
    ResumeButton.SetTitle("Tap to resume", UIControlState.Normal);
    ResumeButton.SetTitleShadowColor(UIColor.FromRGBA(0.5f, 0.5f, 0.5f, 1f), UIControlState.Normal);
    ResumeButton.Layer.CornerRadius = 4f;
    ResumeButton.TouchUpInside += (s, e) => ResumeInterruptedSession();
    View.AddSubview(ResumeButton);

    CaptureModeControl = new UISegmentedControl
    {
        Frame = new CGRect(136, 569, 103, 29),
        Opaque = false,
        ContentMode = UIViewContentMode.ScaleToFill,
        HorizontalAlignment = UIControlContentHorizontalAlignment.Left,
        ControlStyle = UISegmentedControlStyle.Plain,
        VerticalAlignment = UIControlContentVerticalAlignment.Top,
        TranslatesAutoresizingMaskIntoConstraints = false,
    };
    CaptureModeControl.InsertSegment("Photo", 0, true);
    CaptureModeControl.InsertSegment("Movie", 1, true);
    CaptureModeControl.SelectedSegment = 0;
    CaptureModeControl.ValueChanged += (s, e) => ToggleCaptureMode();
    View.AddSubview(CaptureModeControl);

    LivePhotoModeButton = new UIButton(UIButtonType.RoundedRect)
    {
        Frame = new CGRect(96.5, 41, 182, 25),
        Opaque = false,
        ContentMode = UIViewContentMode.ScaleToFill,
        HorizontalAlignment = UIControlContentHorizontalAlignment.Center,
        VerticalAlignment = UIControlContentVerticalAlignment.Center,
        LineBreakMode = UILineBreakMode.MiddleTruncation,
        TranslatesAutoresizingMaskIntoConstraints = false,
        BackgroundColor = UIColor.FromRGBA(0.0f, 0.0f, 0.0f, 0.3f),
        Font = UIFont.SystemFontOfSize(20f),
    };

    LivePhotoModeButton.SetTitle("Live Photo Mode: On", UIControlState.Normal);
    LivePhotoModeButton.SetTitleShadowColor(UIColor.FromRGBA(0.5f, 0.5f, 0.5f, 1f), UIControlState.Normal);
    LivePhotoModeButton.Layer.CornerRadius = 4f;
    LivePhotoModeButton.TouchUpInside += (s, e) => ToggleLivePhotoMode();

    LivePhotoModeButton.AddConstraint(NSLayoutConstraint.Create(LivePhotoModeButton, NSLayoutAttribute.Height, NSLayoutRelation.Equal, 1.0f, 25));

    View.AddSubview(LivePhotoModeButton);

    CapturingLivePhotoLabel = new UILabel
    {
        Frame = new CGRect(172, 74, 31, 20.5),
        Hidden = true,
        Opaque = false,
        UserInteractionEnabled = false,
        ContentMode = UIViewContentMode.Left,
        Text = "Live",
        TextAlignment = UITextAlignment.Center,
        LineBreakMode = UILineBreakMode.TailTruncation,
        Lines = 0,
        BaselineAdjustment = UIBaselineAdjustment.AlignBaselines,
        AdjustsFontSizeToFitWidth = false,
        TranslatesAutoresizingMaskIntoConstraints = false,
        BackgroundColor = UIColor.FromRGBA(0.0f, 0.0f, 0.0f, 0.3f),
        Font = UIFont.SystemFontOfSize(17f),
        TextColor = UIColor.FromRGBA(1.0f, 1.0f, 0.0f, 1.0f),
    };
    CapturingLivePhotoLabel.Layer.CornerRadius = 4f;

    CapturingLivePhotoLabel.AddConstraint(NSLayoutConstraint.Create(CapturingLivePhotoLabel, NSLayoutAttribute.Height, NSLayoutRelation.Equal, 1.0f, 25));
    CapturingLivePhotoLabel.AddConstraint(NSLayoutConstraint.Create(CapturingLivePhotoLabel, NSLayoutAttribute.Width, NSLayoutRelation.Equal, 1.0f, 40));

    View.AddSubview(CapturingLivePhotoLabel);

    View.AddConstraint(NSLayoutConstraint.Create(PreviewView, NSLayoutAttribute.CenterX, NSLayoutRelation.Equal, View, NSLayoutAttribute.CenterX, 1.0f, 0));
    View.AddConstraint(NSLayoutConstraint.Create(LivePhotoModeButton, NSLayoutAttribute.Top, NSLayoutRelation.Equal, View, NSLayoutAttribute.Top, 1.0f, 80f));
    View.AddConstraint(NSLayoutConstraint.Create(LivePhotoModeButton, NSLayoutAttribute.CenterX, NSLayoutRelation.Equal, View, NSLayoutAttribute.CenterX, 1.0f, 0));
    View.AddConstraint(NSLayoutConstraint.Create(PhotoButton, NSLayoutAttribute.Height, NSLayoutRelation.Equal, RecordButton, NSLayoutAttribute.Height, 1.0f, 0f));
    View.AddConstraint(NSLayoutConstraint.Create(CapturingLivePhotoLabel, NSLayoutAttribute.Top, NSLayoutRelation.Equal, LivePhotoModeButton, NSLayoutAttribute.Bottom, 1.0f, 8.0f));
    View.AddConstraint(NSLayoutConstraint.Create(PreviewView, NSLayoutAttribute.Height, NSLayoutRelation.Equal, View, NSLayoutAttribute.Height, 1.0f, 0f));
    View.AddConstraint(NSLayoutConstraint.Create(PhotoButton, NSLayoutAttribute.Top, NSLayoutRelation.Equal, CameraButton, NSLayoutAttribute.Top, 1.0f, 0f));
    View.AddConstraint(NSLayoutConstraint.Create(ResumeButton, NSLayoutAttribute.CenterX, NSLayoutRelation.Equal, View, NSLayoutAttribute.CenterX, 1.0f, 0f));
    View.AddConstraint(NSLayoutConstraint.Create(CaptureModeControl, NSLayoutAttribute.CenterX, NSLayoutRelation.Equal, View, NSLayoutAttribute.CenterX, 1.0f, 0f));
    View.AddConstraint(NSLayoutConstraint.Create(CameraUnavailableLabel, NSLayoutAttribute.CenterY, NSLayoutRelation.Equal, View, NSLayoutAttribute.CenterY, 1.0f, 0f));
    View.AddConstraint(NSLayoutConstraint.Create(CapturingLivePhotoLabel, NSLayoutAttribute.CenterX, NSLayoutRelation.Equal, View, NSLayoutAttribute.CenterX, 1.0f, 0));
    View.AddConstraint(NSLayoutConstraint.Create(CameraUnavailableLabel, NSLayoutAttribute.CenterX, NSLayoutRelation.Equal, View, NSLayoutAttribute.CenterX, 1.0f, 0));
    View.AddConstraint(NSLayoutConstraint.Create(PhotoButton, NSLayoutAttribute.Height, NSLayoutRelation.Equal, CameraButton, NSLayoutAttribute.Height, 1.0f, 0f));
    View.AddConstraint(NSLayoutConstraint.Create(PhotoButton, NSLayoutAttribute.Top, NSLayoutRelation.Equal, CaptureModeControl, NSLayoutAttribute.Bottom, 1.0f, 20f));
    View.AddConstraint(NSLayoutConstraint.Create(PhotoButton, NSLayoutAttribute.Top, NSLayoutRelation.Equal, RecordButton, NSLayoutAttribute.Top, 1.0f, 0f));
    View.AddConstraint(NSLayoutConstraint.Create(View, NSLayoutAttribute.Bottom, NSLayoutRelation.Equal, PhotoButton, NSLayoutAttribute.Bottom, 1.0f, 20f));
    View.AddConstraint(NSLayoutConstraint.Create(PreviewView, NSLayoutAttribute.CenterY, NSLayoutRelation.Equal, View, NSLayoutAttribute.CenterY, 1.0f, 0f));
    View.AddConstraint(NSLayoutConstraint.Create(CameraButton, NSLayoutAttribute.Leading, NSLayoutRelation.Equal, PhotoButton, NSLayoutAttribute.Trailing, 1.0f, 20f));
    View.AddConstraint(NSLayoutConstraint.Create(View, NSLayoutAttribute.CenterX, NSLayoutRelation.Equal, PhotoButton, NSLayoutAttribute.CenterX, 1.0f, 0f));
    View.AddConstraint(NSLayoutConstraint.Create(PhotoButton, NSLayoutAttribute.Width, NSLayoutRelation.Equal, RecordButton, NSLayoutAttribute.Width, 1.0f, 0f));
    View.AddConstraint(NSLayoutConstraint.Create(PreviewView, NSLayoutAttribute.Width, NSLayoutRelation.Equal, View, NSLayoutAttribute.Width, 1.0f, 0f));
    View.AddConstraint(NSLayoutConstraint.Create(PhotoButton, NSLayoutAttribute.Width, NSLayoutRelation.Equal, RecordButton, NSLayoutAttribute.Width, 1.0f, 0f));
    View.AddConstraint(NSLayoutConstraint.Create(ResumeButton, NSLayoutAttribute.CenterY, NSLayoutRelation.Equal, View, NSLayoutAttribute.CenterY, 1.0f, 0f));
    View.AddConstraint(NSLayoutConstraint.Create(PhotoButton, NSLayoutAttribute.Leading, NSLayoutRelation.Equal, RecordButton, NSLayoutAttribute.Trailing, 1.0f, 20f));
}InitUI()をViewDidLoad()内でコールするようにします。
C#
public override void ViewDidLoad()
{
    base.ViewDidLoad();

    View.BackgroundColor = UIColor.FromRGBA(0.0f, 0.0f, 0.0f, 1f);

InitUI();最後にAppDelegate.csに起動処理を追加します。FinishedLaunchingを書き換えてください。
C#
public override bool FinishedLaunching(UIApplication application, NSDictionary launchOptions)
{
    Window = new UIWindow(UIScreen.MainScreen.Bounds);

    var controller = new CameraViewController();

    Window.RootViewController = controller;
    Window.MakeKeyAndVisible();
    Window.TintColor = UIColor.FromRGBA(1.0f, 1.0f, 0.0f, 1.0f);

    return true;
}
お疲れ様でした、これでコードは完成しました!それでは、実機で起動してみましょう。
どうでしょうか? 残念ながらアプリが強制終了してしまいましたね。
iOS10以降で、カメラやフォトライブラリなどのユーザーデータへアクセスする場合、特定のキーと使用目的を Info.plist ファイルに記述する必要があります。
記述しない場合、先ほどのようにアプリが強制終了します。
では、早速info.plistに使用目的を追加しましょう。
info.plistをXcodeで開いてください。
Camera Usage Descriptionを追加します。

残りのキーも追加し、利用目的を入力してください。

これで完了です。もう一度アプリをデバッグ実行してみましょう。今度は強制終了せず、起動できましたね。
カメラへのアクセスの許可を求められるの「OK」を選択してください。

同様に、マイクロフォンとフォトライブラリへのアクセス許可も求められるので全て「OK」を選択してください。
これで、アプリの移植は無事完成しました!

お疲れ様でした。これで本日のハンズオンは終了です。