-
Notifications
You must be signed in to change notification settings - Fork 677
Configuration: Google+
###Activating the Plugin
There are two ways to activate the Google+ plugin.
-
If you are on a fresh install of ThinkUp without any other services installed then you can just click on the link to setup services after logging in for the first time.
 -
Use the settings link in the top right corner when there is already a service installed on ThinkUp.
After clicking the link, the user should now be on the settings page. The default tab should be the plugins tab already, but if this is not the current tab then click the one labeled "Plugins." Here you will see a list of available plugins that can be activated.
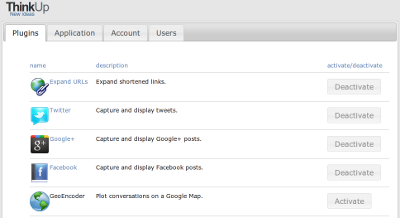One of the plugins will be title "Google+." If the button to the right is labeled "Activate" then click this to turn on the plugin. Now click the Google+ title or plugin icon to go to this plugin's settings page.
###Obtaining The Client ID and Secret
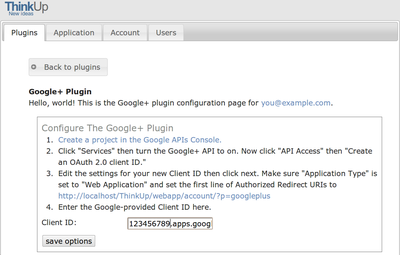
In order for the Google+ plugin to work, there needs to be a "Client ID" and "Client Secret" to get the data from the Google servers. To obtain this ID and secret the user will need to be on the Google+ plugin's settings page and click the link that says, "Create a project in the Google APIs Console."
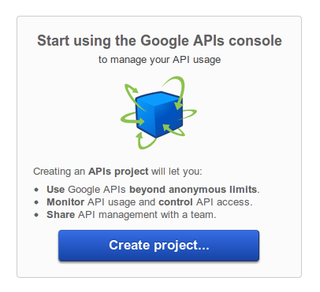
Now you should be on a page with a big blue button that says, "Create Project..." Click that button to continue on.
That link will bring you to the Google APIs Console for creating IDs for the different Google APIs. First, we need to turn the Google+ API on. Click on the "Services" link on the left-side navigation console. This will bring you to a list of all the Google API services available.
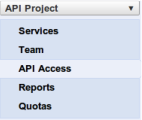
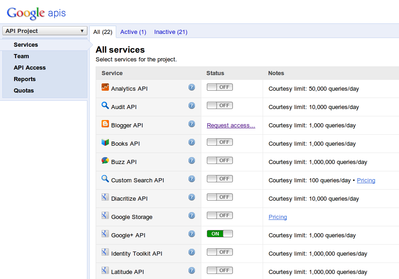In this list there is one for Google+. Click the "On/Off button" so that the "On" is highlighted in green (You will have to accept their TOS to continue). Now that the API is turned on for your account you can click the "API Access" link in the left navigation area.
Now, click the "Create an OAuth 2.0 client ID..." button.
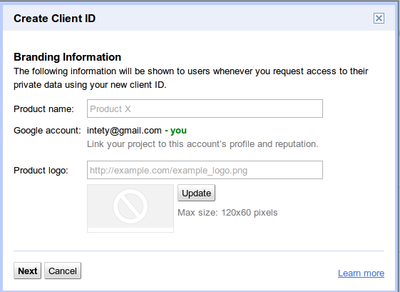
Enter the name that you want to give this Client ID in the "Product name" box. Also, if you wish to upload an image for it then feel free, but it won't make a difference in how ThinkUp will work. Click the "Next" button when you are done.
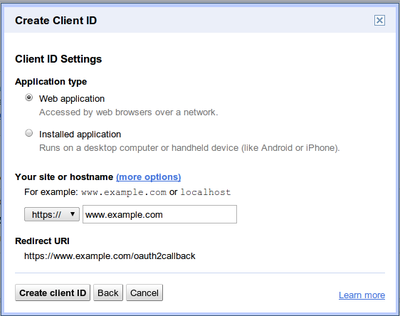
You will now come to the Client ID Settings box. First, make sure the "Web Application" is ticked in the Application Type choices. In the "Your site or hostname" box, enter the location of your ThinkUp server or hosting directory followed by "/webapp/account/?p=googleplus". Most people that are hosting locally will use "http://localhost/ThinkUp/webapp/account/?p=googleplus" for their hostname. Finally, click the "Create Client ID" button to finish up.
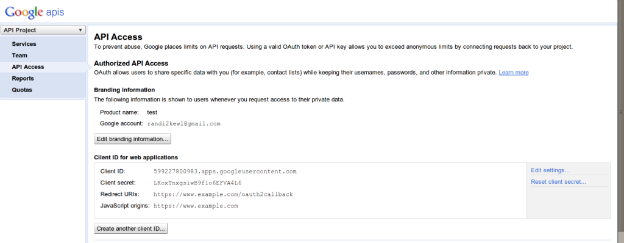
Copy the Client ID on the API Access page and return to the Google+ settings page in your ThinkUp application. Paste the Client ID in and click "Save options" to save the ID in your application. Also, copy the Client Secret then paste that into the appropriate box on the Google+ Plugin settings page.
Now you are all set to start using Google+ with your ThinkUp.