Step By Step Tutorial
This page shows how to create a behavior from scratch. It is highly advisable that you understand how Terasology's behavior system works - it is explained here.
If you are here, it means you want to assign a behavior to an entity or creature in the game. We will not cover the basics of creating a new creature - you can find more about this subject in this tutorial.
The first thing to do is to model what your creature is supposed to do. Let's say that you want your creature to do the following:
- Go from where it stands to another location;
- Stay at the new location for a couple of seconds;
- Do it again.
You will (eventually) find that this is pretty much what the stray behavior does: the creature walks around the field, moving from one spot to another from time to time. Now - assuming that you already know about Terasology's behavior system, you also know that we will need to represent this behavior as a behavior tree. This is what it looks like:
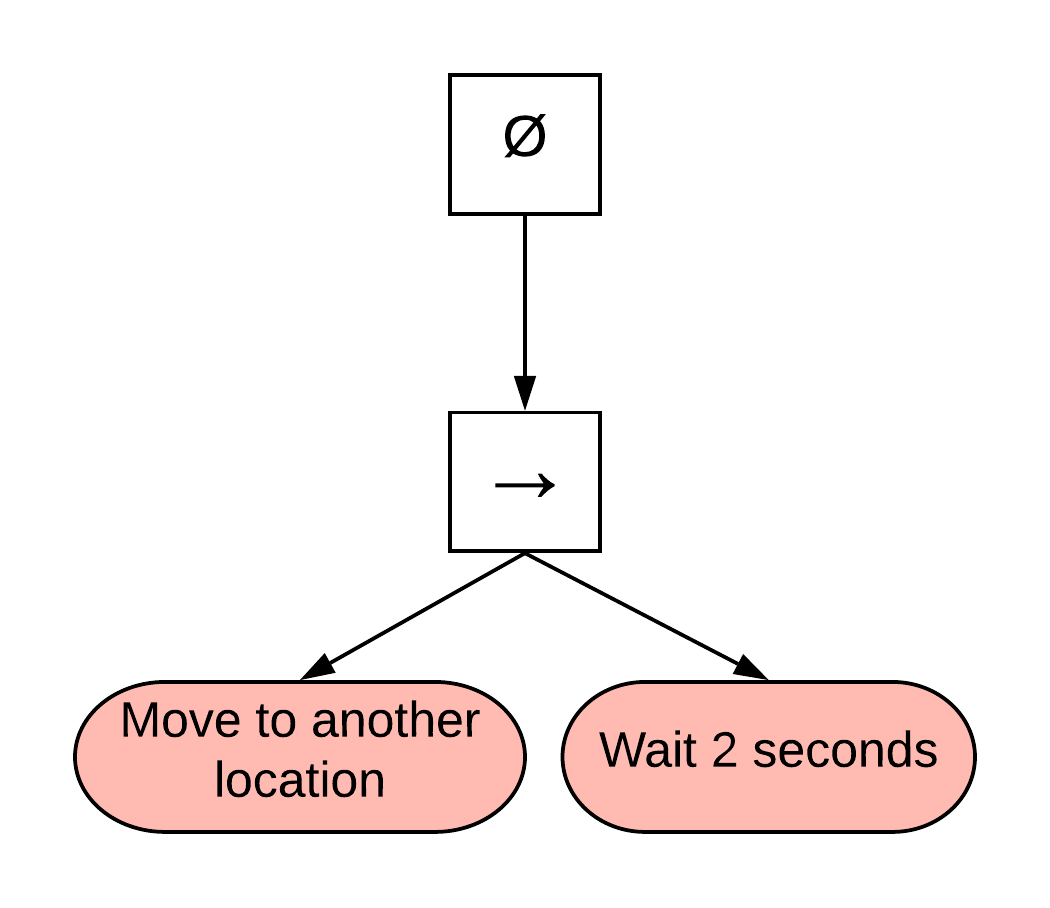
The right arrow in the picture represents a sequence node, and the red containers represent the actions that will be executed. This is, of course, a very simplified view of our behavior tree. For example, let's assume that you are using a creature that already possesses a movement-related component, such as the ones you'll find in the Wild Animals module. In this case, in order to initiate/end the creature's movement, it is necessary to alter its speed: when the creature is moving, is possesses a speed greater than zero. Similarly, when the creature stops its speed is set to zero.
In the Wild Animals module, the creature's movement can be controlled through the CharacterMovement component. Here's how it looks like in the creature's prefab (we are using the deer.prefab file as an example - you can find it in Wild Animals' asset folder):
"CharacterMovement" : {
	"groundFriction" : 16,
	"speedMultiplier" : 0.3,
	"distanceBetweenFootsteps" : 0.2,
	"distanceBetweenSwimStrokes" : 2.5,
	"height" : 1.6,
	"radius" : 0.3,
	"jumpSpeed" : 12
}
Observe that it contains a parameter called speedMultiplier. Modifying this parameter is how we can control the character's speed: if we set it to zero, the base speed of the creature is multiplied by zero (so it stops). If we set if to a value other than zero, the creature goes faster or slower, according to what we want to do. For now, let's just say that we need to get the creature to a speed greater than zero when it starts moving, and then back to zero when it stops. Now our behavior tree looks like this:
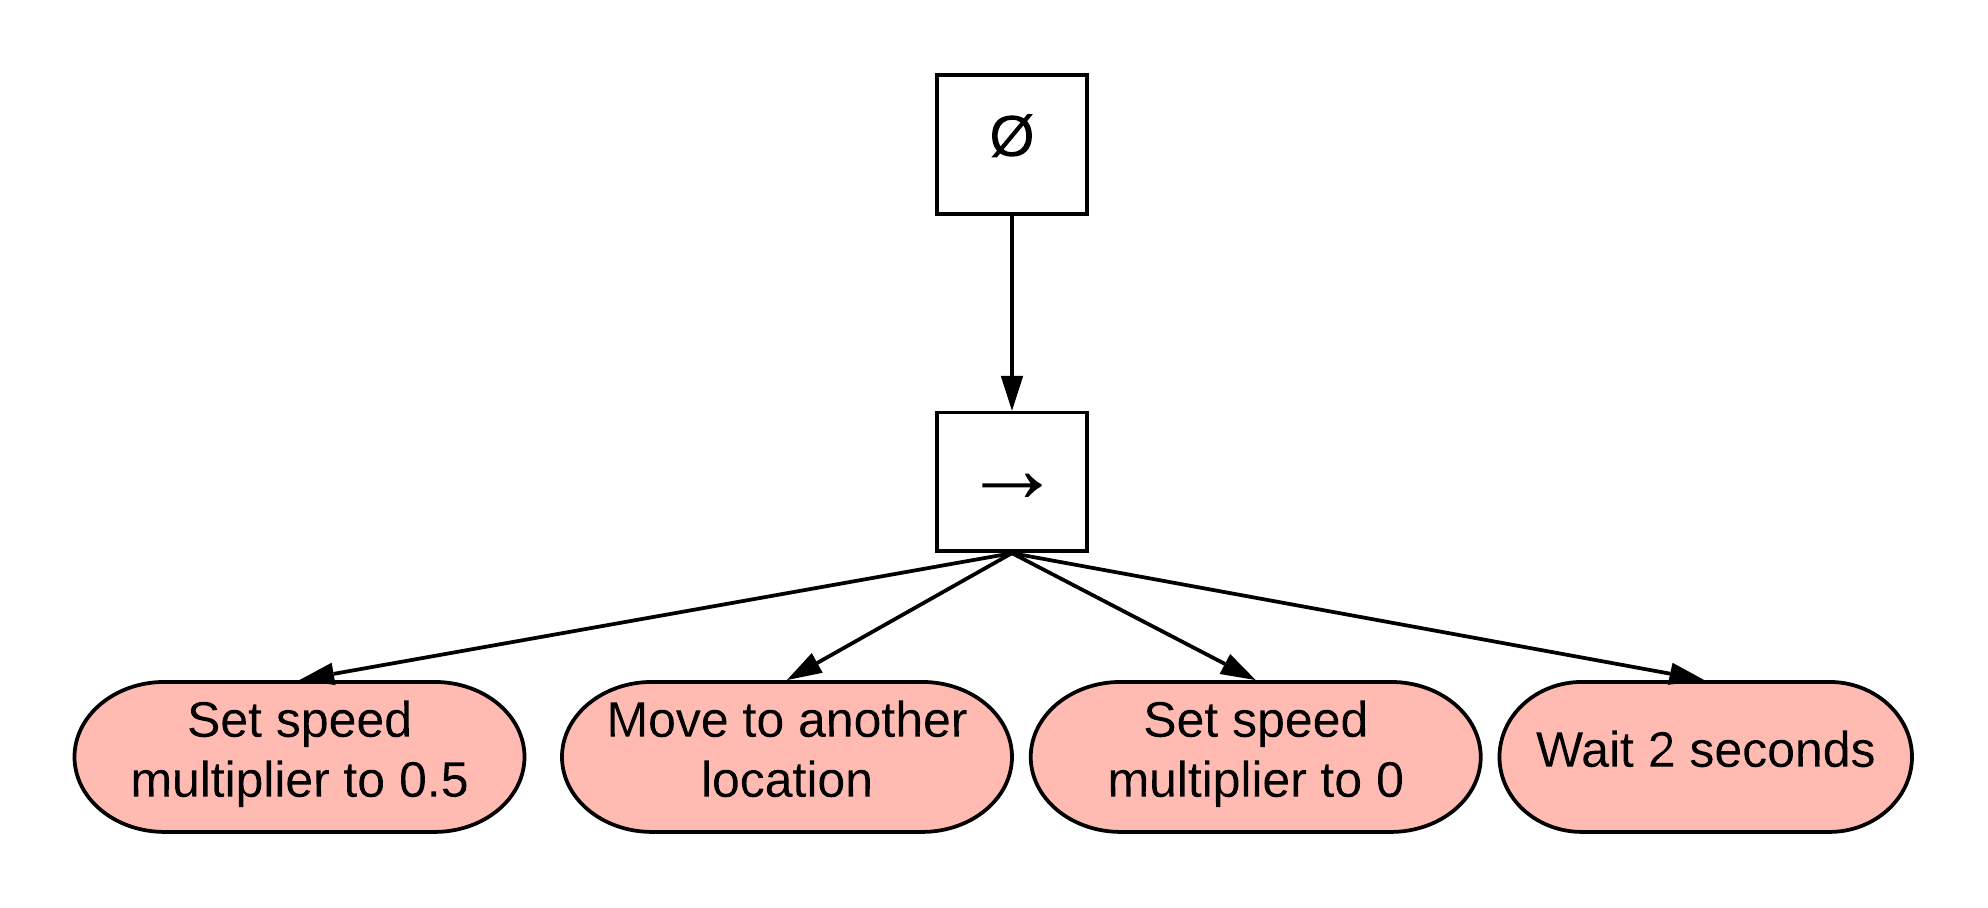
Observe that we have two different actions here:
- One action that changes the speed multiplier of the
CharacterMovementcomponent; and - One action that actually tells the creature to move from one place to another.
Part of the beauty of using behavior trees is that you can reuse other existing behavior trees. To illustrate that - and for the sake of simplicity - let's reuse an existing behavior tree associated with the movement action. In the Behaviors module there is a behavior tree that does exactly that: moves the creature from a spot to a new, random one. This behavior tree is called doRandomMove. So let's use it - the only requisite is that the Behaviors module is listed as a dependency of the module you are currently working on (check the module development guide for more details on how to add dependencies in your modules). Your new behavior tree should look like this:
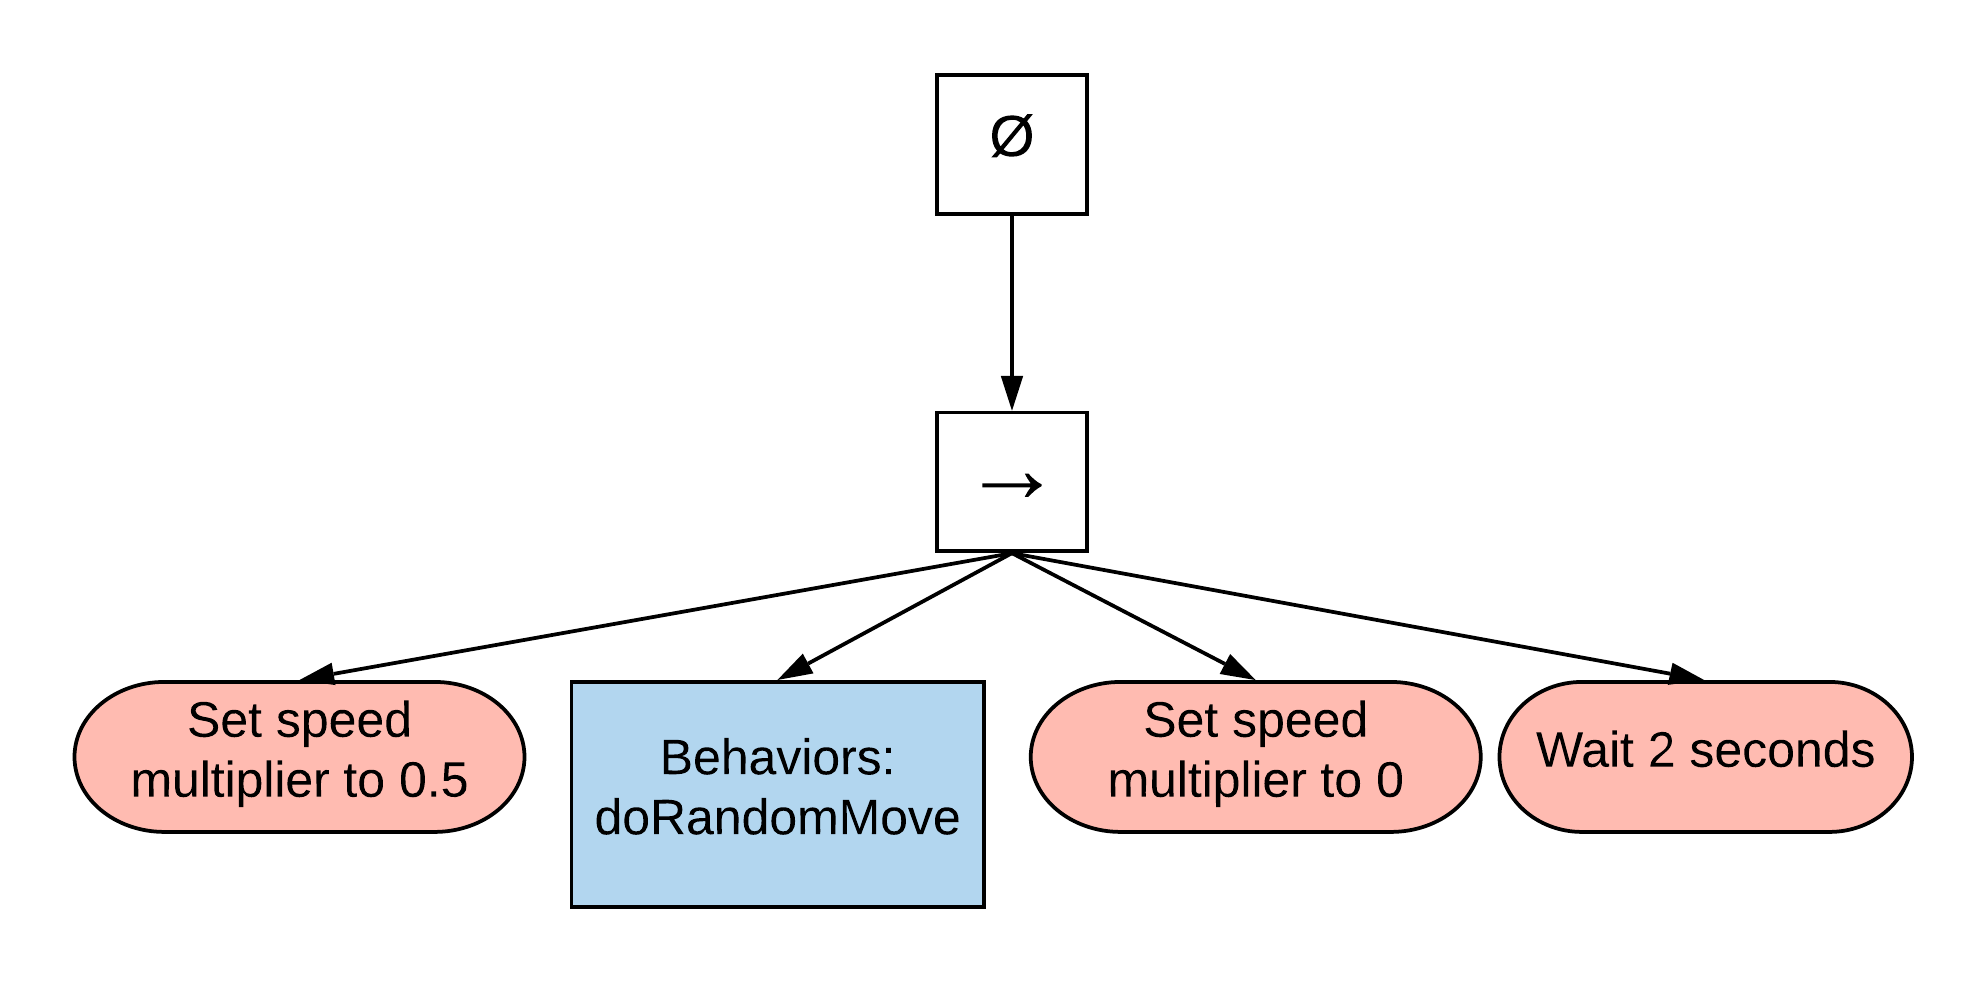
The blue box is the behavior tree that we are reusing from the Behaviors module.
Now that you already have your behavior tree, let's represent it using a .behavior file. In the module you are working on, go to the assets/behaviors folder and create a file called basicStray.behavior. For a quick reference, you can find more details on the structure of a .behavior file here. Open the newly created file in any text editor and - using the proper semantics - translate it to the used JSON-like format. After editing, your file should look like this:
{

      sequence : [
        {
          change_speed : { speedMultiplier: 0.5 }
        },
        {
          lookup: { tree: "Behaviors:doRandomMove" }
          }
        },
        {
          change_speed : { speedMultiplier: 0 }
        },
        {
          sleep : {
            time : 2
          }
        }
      ]
}
...and that's about it - you have a new behavior. Don't forget to include it in your creature's prefab:
"Behavior" : {
    "tree" : "<your-module>:basicStray"
}It is true that the behavior file was already created - but what should you do about the actual, well, actions? In the case of moving the creature, we used an existing behavior tree, which uses actions that are already implemented, etc. But there's still the matter of changing the speed multiplier in the CharacterMovement component.
You can find more about developing within the Terasology environment here - but for now, we only need to create an action. After setting up your development environment:
- Go to your source package folder;
- Create a sub-package (sub-folder) called
actions; - Create a new class called
ChangeSpeedAction.
If you created your module using groovyw (or if you are modifying an existing module), you should have something like:

We won't go through all the development points of an action - you can check existing examples in different modules. However, here are a few important points:
- Any action must extend the
BaseActionclass, overriding themodifymethod to return the appropriate behavior state after its execution. - The
BehaviorActionannotation specifies the action name referred in the.behaviorfile. They must be one and the same, otherwise you will get a compilation error. - Any action parameters used in the
.behaviorfile must be declared as a private field in the class implementation.
With that in mind, here's a simple implementation of the action changeSpeed:
@BehaviorAction(name = "change_speed")
public class ChangeSpeedAction extends BaseAction {
    private float speedMultiplier;

    @Override
    public void construct(Actor actor) {
        if(actor.hasComponent(CharacterMovementComponent.class)) {
            EntityRef entityRef = actor.getEntity();
            CharacterMovementComponent characterMovementComponent = entityRef.getComponent(CharacterMovementComponent.class);
            characterMovementComponent.speedMultiplier = speedMultiplier;
            entityRef.saveComponent(characterMovementComponent);
        }
    }

    @Override
    public BehaviorState modify(Actor actor, BehaviorState result) {
        return BehaviorState.SUCCESS;
    }

}We can use our newly created behavior (or any existing other) with groups. There are different behavioral scenarios where groups can be used - if you don't know how they work yet, please check this page.
First - let us consider that you just want to identify a group of entities. You can do that either by pre-assigning a group to all entities of the same type, or you can do that in-game (according to a specific system logic). In the case you want all entities of the same type to be identified as members of the same group, just include the GroupTag component in their .prefab file:
"GroupTag" : {
     "groups" : [ "<your-group-name>" ]
   }
Or - you can do it in your system logic:
for (EntityRef entityRef : entityCollectionFromYourCriteria) {
            GroupTagComponent groupTag = new GroupTagComponent();
            groupTag.groupLabel = "<your-group-name>";
            entityRef.saveComponent(groupTag);

        }
You can then retrieve all entities belonging to <your-group-name> using the same GroupTag component:
for (EntityRef entityRef : entityManager.getEntitiesWith(GroupTagComponent.class)) {
            if (entityRef.getComponent(GroupTagComponent.class).groups.contains("<your-group-name>")) {
                //do stuff
            }
}Now that you have a group, let us assume that you want to assign your newly created <your-module>:basicStray behavior to all members of this group. Assuming that your entity does not have a previous behavior, the simplest way is to hard-code it in your system logic:
for (EntityRef entityRef : entityManager.getEntitiesWith(GroupTagComponent.class)) {
            if (entityRef.getComponent(GroupTagComponent.class).groups.contains("<your-group-name>")) {
              BehaviorTree groupBT = assetManager.getAsset("<your-module>:basicStray", BehaviorTree.class).get();

              BehaviorComponent behaviorComponent = new BehaviorComponent();
              behaviorComponent.tree = groupBT;
              behaviorComponent.interpreter = new Interpreter(new Actor(entityRef));
              behaviorComponent.interpreter.setTree(groupBT);

              entityRef.saveComponent(behaviorComponent);

            }
        }
It might be the case, however, that our entity has a previous behavior - and not only that, but you don't want to lose it (neither the behavior state associated with it). You can save both the original entity's behavior and its state using the GroupTag component:
for (EntityRef entityRef : entityManager.getEntitiesWith(GroupTagComponent.class)) {
            if (entityRef.getComponent(GroupTagComponent.class).groups.contains("<your-group-name>")) {
              //saving the original behavior
              BehaviorComponent behaviorComponent = entityRef.getComponent(BehaviorComponent.class);

              GroupTagComponent groupTagComponent = entityRef.getComponent(GroupTagComponent.class);

              groupTagComponent.backupBT = behaviorComponent.tree;
              groupTagComponent.backupRunningState = new Interpreter(behaviorComponent.interpreter);
              entityRef.saveComponent(groupTagComponent);

              //assigning a new behavior
              BehaviorTree groupBT = assetManager.getAsset("<your-module>:basicStray", BehaviorTree.class).get();

              behaviorComponent.tree = groupBT;
              behaviorComponent.interpreter = new Interpreter(new Actor(entityRef));
              behaviorComponent.interpreter.setTree(groupBT);

              entityRef.saveComponent(behaviorComponent);

            }
        }
It is important to notice that if you have multiple groups and related group behaviors, it would be a good idea to use .group files. This will allow you to programatically assign different behaviors to different groups in your system logic. For more information on how to create .group files please click here.
There is a case study on creating a module and adding behavior to creatures in a group here. Also - a complete example of using groups in different scenarios can be found in the WildAnimalMadness module. For more examples of behaviors used in modules, please check our curated list.