This Demo Project was made to help create a visual aid on the Unity.Mathmatics noise functions in the Unity.Mathmatics package.
This works on multiple versions of Unity since it is using basic Quads and C# code
Users can modify various attributes to change the out of various noise functions.
Currently 3D and 4D methods are not visualized but are planned for a future release.
for more information on noise functions and how to use them take a look at this pdf.
http://weber.itn.liu.se/~stegu/simplexnoise/simplexnoise.pdf
https://github.com/Unity-Technologies/Unity.Mathematics/tree/master/src/Unity.Mathematics/Noise
With the source of the functions here:
https://github.com/stegu/webgl-noise
I made this for a game I'm working on and decided to share my work.
I hope you enjoy it and feel free to donate if you want by clicking the donate link.
Here is a discord link if you have any comment or needs some help :)
Startup
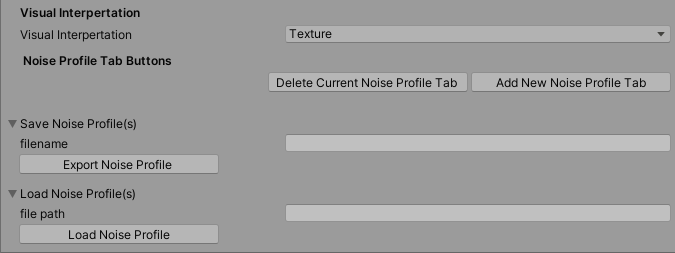
when you start the demo you'll see the noise component script display a couple of options: Visual Interpertation, Noise Profile Tab Buttons, Save Noise Profile(s), and Load Noise Profile(s).
A Noise Proile is the settings, data, and options that gives a resulting noise image. The Final Noise Profile will refer to the final rendering of all Noise Profiles.
Note: The system uses triggers to update Noise Profiles and textures. If you make a change and it doesn't update right away just toggle a value or option to force an update. This is intentional because calculations can get hefty when dealing with a lot of Noise Profiles.
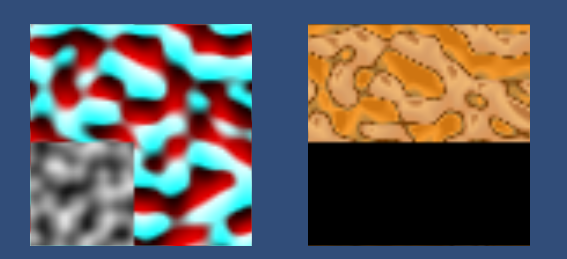
The left Quad displays the Final Noise Profile and the right Quad displays the active tab's Noise Profile.
The Noise Profile Tab Buttons are for Copying, Creating, and Deleting Nosie Profiles. Hitting Add New Noise Profile Tab creates a new tab and hitting the Delete Current Noise Profile Tab deletes the active tab. An active Noise Profile refers the the Noise Profile corresponding the currently active tab.

When a new Noise Profile tab is created you get a bunch ot options and settings to modify the it which in turn modifies the Final Noise Profile.
Profile Mode lets you set the mode of the Noise Profile.
Deafult mode that allows you to modify the Final Noise Profile with changes made to the active Noise Profile.
This lets you modify the active Noise Profile without affecting the Final Noise Profile however, you will still affect the look of the Visual Interpertation of the Final Noise Profile. NOTE: Map mode will be foreced to act as a texture if there is only 1 Noise Profile.
allows you to make edtis to the active Noise Profile without affecting anything

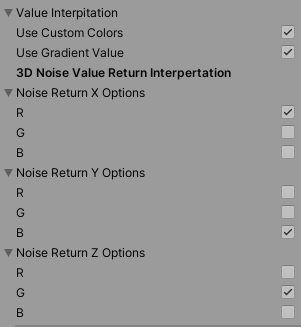
Value Interpertation refers to the amount of values returned by a noise function.
1D = 1 float value was returned.
2D = 2 float values returned (usually the 1st derivative)
3D = 3 float values returnf (usually the 1st and 2d derivative)[Check the links above for more information]
With Value Interpertation you can choose which RGB value each return value affects.
You can also choose to replace the return value's resulting color with your own by toggling the Custom Color checkbox to true. After you toggle that you can choose to add fixed colors that only affect return colors with a matchinig or greater "height" value. (height refers to the return value with a range of 0-1)
Once you select the Use Custom Colors checkbox another checkbox named Use Gradient Value will appear.
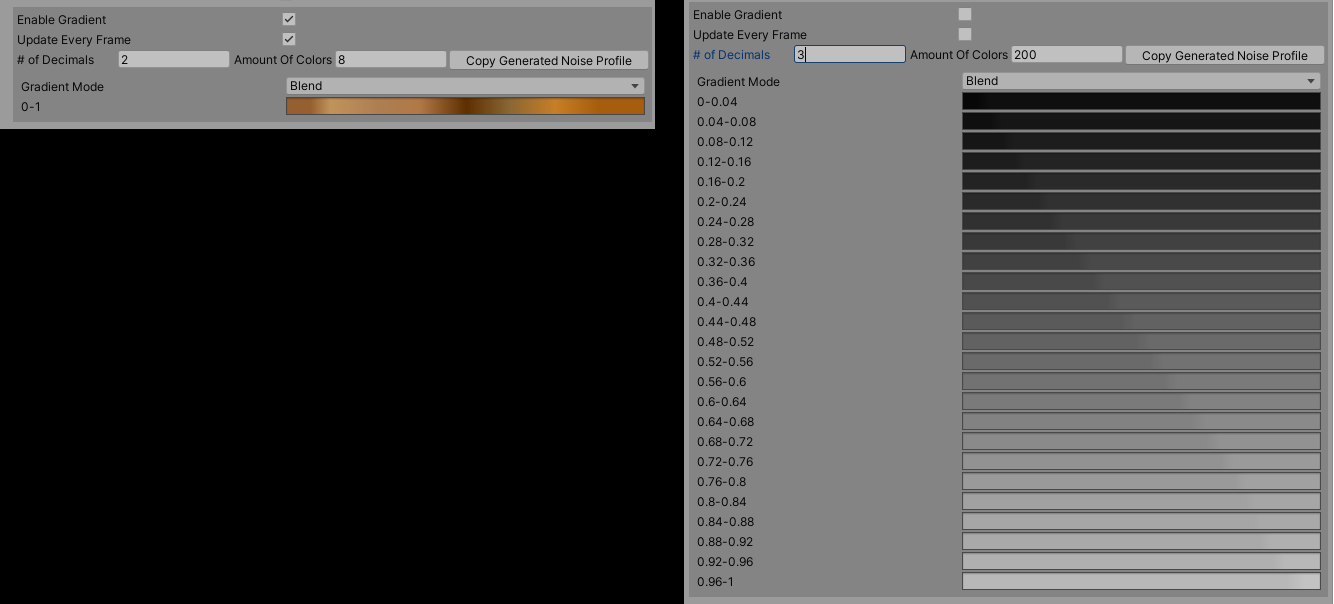
If you toggle the Use Gradient Value checkbox to true a new set of options appear called the MegaGradient
By default a gradient has a maximum of 8 AlphaKeys and 8 ColorKeys so you can only have 8 colors per gradient. What the MegaGradient does is completly destroys that rule and allows you to have n gradients or infinite gradients. The MegaGradient itself emulates a range from 0-1f no matter how many gradients you use. If you were load the Extreme_test_1788_Colors eaxample you can see that there are 224 gradients with 1788 colors that represent a heightmap with a range between 0-1f. This allows for high fidelity customization.
this toggles whether or not you want the gradients to affect the active Noise Profile.
By default due to the calculations and conversion of the system any change made will not immediately affect the active Noise Profile. Toggle this to true to force updates.
this determines the number of decimal places used in calculations when you hit the Copy Generated Noise Profile button.
this detemines how many colors you want in the MegaGradient. The amount of gradients produced can be calculated by using this: Amount of colors / 8
This takes the active Noise Profile and converts it into a MegaGradient of color values. Each color value corresponds to a height with range 0-1. Check the code for more information on how it works...send help.
NOTE: when dealing with complex 2D and 3D Noise functions and multiple colors the generated Noise Profile may have undesired blips of color. this may be due to the algorithm choosing the most popular color at a geiven height, or that fact that rgb isn't completly linear. In any case you could always go back and remove those blips.
Use this to set the Gradient Mode of all the gradients in the egaGradient.
The gradients in the MegaGradient can be edited just like any normal gradient expect the gradient mode will be overrided by the Gradient Mode dropdown.
These attributes allow you to modify the texture of the active Noise Profile as well as the noise function inputs (if there are extra values to be added).
this acts as a zoom in/out.
this sets extra attributes Min and Max possible Gradients and Rotations values to the value of scale. Since most function won't do anything if you go beyond the scale number value this is set to true by default. If this is set to false you can set the min and max by setting the Min Max Value option values.

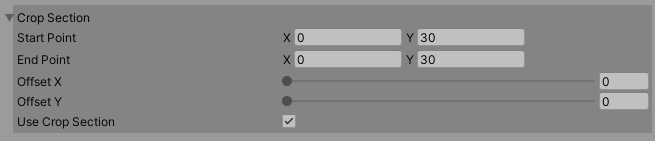
the crop section allows you to crop the active Noise Profile making the cropped section the only modified section of the Noise Profile.
starting crop point.
end crop point.
offsets the crop area on the X-axis.
offsets the crop area on the Y-axis.
set the min and max width of the texture. *this affects noise calculations.
set the min and max width of the texture. *this affects noise calculations.
set the actual width of the texture. *this affects noise calculations.
set the actual height of the texture. *this affects noise calculations.

These only appear for certain noise profiles and can affect the speed of calculates is the numbers are set to high. NOTE: depth and length are placeholder names due to the calculations involving the 3rd and 4th dimensions (I might be wrong about that)
set the min and max depth. *this affects noise calculations.
set the min and max length. *this affects noise calculations.
set the actual depth. *this affects noise calculations.
set the actual length. *this affects noise calculations.
These are the extra varibles added to the noise calulatations and are pretty self explanitory. if you do want more information i siggest reading the article at the top of the page.

Now that we go Value Interpertation out of the way we can now talk about Visual Interpertation. Visual Interpertation is what the Final Noise Profile & Maps are interpered as. You are given 3 options currently which are described below.
Allows you to see the Final Noise Profile as a Texture2D image on a <codeQuad.
Allows you to see the Final Noise Profile as a Texture2D on one of Unity's default shapes.
Set the scale of the shape. (it won't be visible if all 3 value are 0)
Choose what shape you want to look at.
This allows you to see the Final Noise Profile as a terrain.
Set the scale of the shape. (it won't be visible if all 3 value are 0)
This allows you set the maximum y value a point can have when the "height" of the Final Noise Profile is at 1f.
This sets the texture of the terrian to a usually ugly repeating texture of the Final Noise Profile.
Remeber the Map Mode? This is where the maps will be used and displayed based on their height values.

Arithmetic is a feature that only appear when you create more than 1 Noise Profile. The Starting Texture refers to the the texture that the arithmetic will be execute on. You can set 1 Noise Profile to be the starting texture by toggling the Use As Arithmetic Starting Texture located under Profile Mode. If no Noise Profile is choosen then black will be the default Starting Texture. The arithmetic is done by using the given values in the operations string based on symbols of a particular format. The amount of symbols must match the number of created Noise Profiles otherwise the corresponding Noise Profile is ignored or no arithmetic takes place.
format: "+ + - / avg * i"
symbols:
+ : adds the corresponding Noise Profile's values to the current Starting Texture values.
- : subtracts the corresponding Noise Profile's values to the current Starting Texture values.
/ : divides the corresponding Noise Profile's values to the current Starting Texture values.
* : adds the corresponding Noise Profile's values to the current Starting Texture values.
avg : averages the corresponding Noise Profile's values to the current Starting Texture values.
i : ignores the corresponding Noise Profile's values to the current Starting Texture values.
Basically it's just simple matrix math.
There are 2 seperate Arithmetic options: Arithmetic Operation String and Map Arithmetic Operation String.
This string only affect Noise Profiles set to Texture mode.
NOTE: all Non-Texture Mode Noise Profiles will be ignore regardless if you put a non-i symbol
This string only affects Noise Profiles set to Map mode.
NOTE: all Non-Map Mode Noise Profiles will be ignore regardless if you put a non-i symbol
Setting Perform Arithmetic and/or Perform Map Arithmetic to true will attempt to perform the arithmetic as well as attempt to fix some user error. If something is wrong it will output a warning with the reason and set those checkboxes to false.
This saves all the Noise Profiles, heightmaps, and images into the Application.persistantData folder on your computer under "NoiseSaves", the NoiseType, and given filename. (most likely in your %AppData% folder)
NOTE: if you're saving more than one Noise Profile then your NoiseType will be Mixed.
This loads all the Noise Profiles and thier data to the demo. NOTE: if you change the names of the files or folders the Demo will not be able to load your data properly. NOTE: you must provide the root folder of the where the data is stored. e.g.: C:/User/Blah/AppData/Local/DefaultCompany/Unity_Mathmatics_Noise_Samples/NoiseSaves/PerlinNoise/CoolName
Questions and Answers:
I Get An Error: "UnityException: Texture 'Default-Checker-Gray' is not readable, the texture memory can not be accessed from scripts. You can make the texture readable in the Texture Import Settings." What's wrong?
Answer: this happens because you don't have a Noise Profile with one of the Noise Value Return Interpertation RGB optoins checked. Since none of them are checked the Visual Interperation tries to use the Default one loaded from Unity but Unity doesn't allow that. Just set one of the RGB values to true then unpause the demo.
I can't get the Width or Height to go under 1 why is that?
Answer: the width and height are not only passed to the noise functions but are also the width and height of the texture and you can't have negative width or height. You can have negative depth and length values just as long as they are not 0 (but the negative values are usually the mirror of the positives)