Impact analysis of software change leveraging ML, NLP models from huge number of test cases and requirement documents written in English – Python , Tensorflow / ElMo or equivalent model
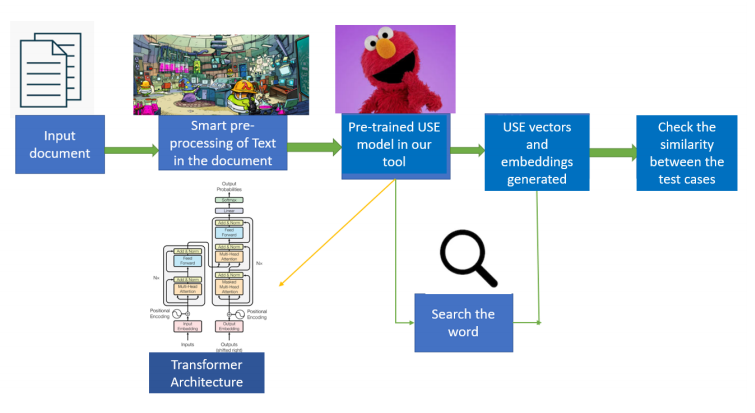
Pre-Processing of Data - Data preprocessing is done to make the text in a form that can be used to analyze and predict the task. A task can be extracting text or keywords from the data file or sentiment analysis or checking sentence similarity. A large number of test cases written in english in a doc file need to be pre-processed before feeding into the model.
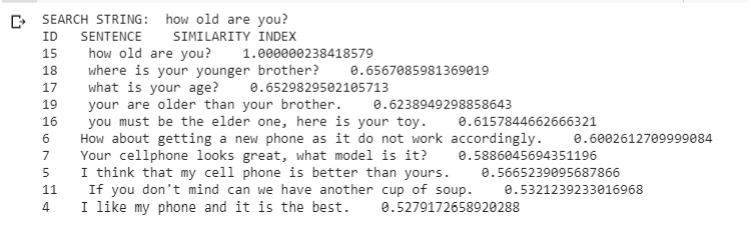
The USE model provides better similarity index as compared to other models (ELMO, BERT). A simple example showing the cosine similarity using USE model is as follows:
-
Download the USE model.
-
Zip file named 5.tar will be downloaded (Please do not change this name)
-
Clone the Github Repository Impact Analysis
-
Create a new folder named model_use in code_files and extract all the files of the 5.tar in model_use.
-
Create two folders named: separate_test_doc & main_document in folder code_files.
-
To create the first embeddings of the test cases -
-
Run the
python3 automate_cre.py. -
Place the document file containing the test cases (SampleTestCases.docx) in the main_document folder and terminate the process by selecting Ctrl+C, a file named mainfile.data will be created and then run
python3 embeddings_update.py. -
After getting the message “saved”, check for the 2 “.npz files” (“embeddings.npz” and “id.npz”) in the folder where all the python files have been saved.
-
Search through the document: run the
python3 search_engine.py. -
The console will ask for the user to enter either a keyword or a test-id.
-
Then, it will ask the user to set up a threshold value. Enter the threshold value in the range of 0-1.
-
If the given keyword is not found as per the threshold value, the tool will ask if the user still wants to search some similar matching test-cases (y/n). If yes, then type ‘y’ and enter.
-
After the search is completed, you will get the csv file containing the output of the search. The name of the file will be of the format: Similar_to_SearchedString.csv”
-
To search for both test-id and keyword, you can run
python3 keyword+testid.pyand enter the input values asked in the command line.
- Run
python3 main_GUI.py(it will take some time in the first time due to loading the model) then you can enter only keyword or only test-id or both. Provide the threshold value as per the need. You can also set the Default threshold value for all the three cases by editing the threshold.csv file.


- To get a graph plot, run
python3 graph_plot.py. Enter the test-id for which you want to get the nearest test cases and press ENTER. The threshold value can be changed by editing the threshold.csv file. A new graph plot will be shown on the screen along with their test-ids.
-
If your test cases are in two or more .docx files then there are two steps you can follow:
-
Delete the existing doc file from the main_document and save it somewhere. Run
python3 automate_cre.pyand place all the doc files ONE BY ONE (copying one file and pasting it and repeating the same procedure for all the files) in the main_document folder. -
Merge all the doc files (along with the existing one) in a single doc file and after deleting the existing doc file from main_document, run
python3 automate_cre.pyand place the Merged doc file in the main_document folder.
-
-
Now after doing any one of the above steps, terminate the automate_cre.py and run
python3 embeddings_update.py. You will get a message of embeddings getting saved.