This plugin consists of three widgets that allows to configure Ticketing Integration microservice, create tickets and view tickets.
This plugin is supported for Cumulocity IoT UI version >= 1016.x.x and Application Builder version >= 2.0.0.
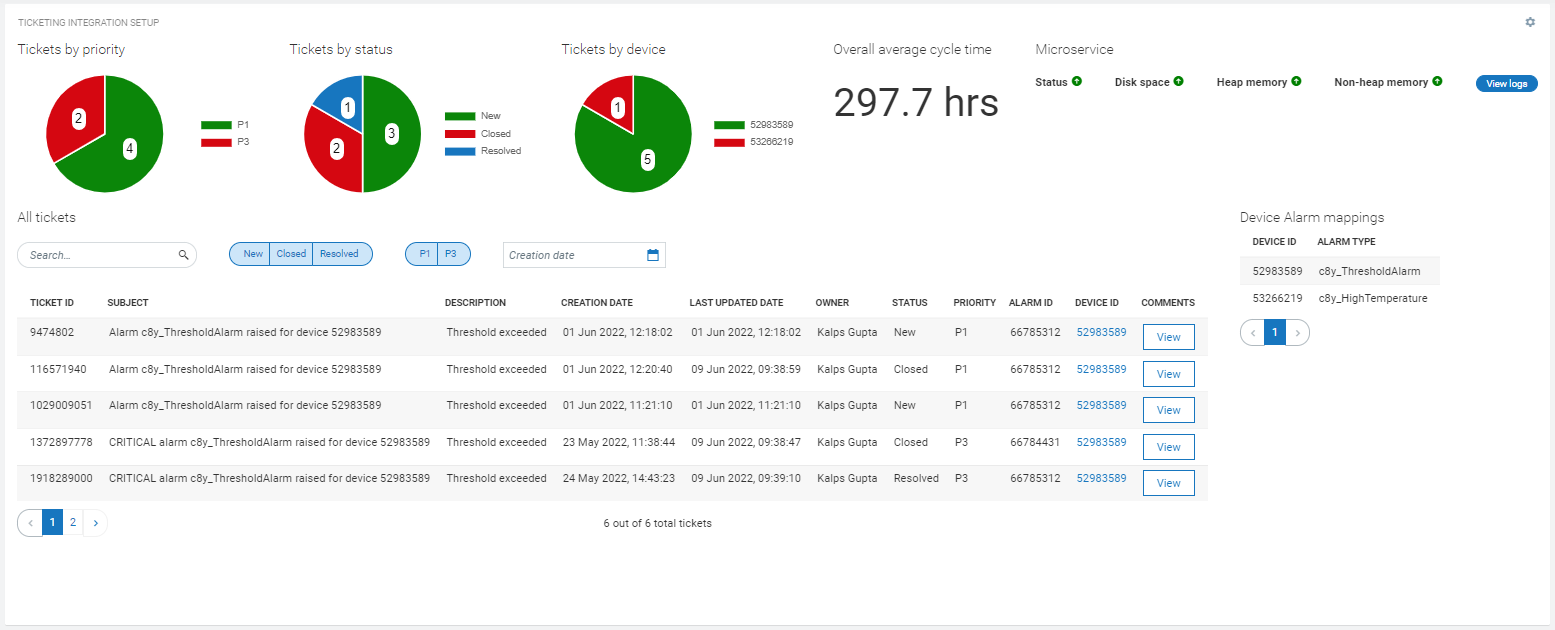
This widget allows to configure the Ticketing Integration microservice, list the tickets and draw related charts for analysis.
- Make sure you have successfully installed the plugin.
- Go to an application's dashbord and click on
Add widget. - Choose
Ticketing Integration Setupwidget. Titleis the title of widget. Provide a relevant name. You may choose to hide this. Go toAppearancetab and chooseHiddenunderWidget header style.Platformis ticketing platform.- Choose
webMethods AgileAppsto integrate with webMethods AgileApps directly.Tenant urlis base url of ticketing platform. It must not end on '/'. Example: https://testtenant.agileappslive.comUsernameis username of AgileApps tenant account.Passwordis password of AgileApps tenant account.Account idis customer account record id to which all the tickets created will be related to.
- Choose
External REST APIsto integrate with any ticketing platform using custom integration.Tenant urlis base url of custom APIs. It must not end with '/'.Usernameis username of user account to access the APIs using basic authentication.Passwordis password of user account to access the APIs using basic authentication.Download Swaggerto download the swagger file. Swagger file define the APIs that are expected by Ticketing Integration Microservice.
- Choose
Ticket record template urlis the template url for ticket record in the ticketing platform. Ticket id is defined by '{id}' placeholder which gets replaced by actual ticket id. Example: https://testticketingplatform.com/records/{id}.Create tickets automatically on device alarm mapping matchedcontrols whether tickets should be created automatically on alarm creation or not.Change alarm status to ACKNOWLEDGE automcatically after creating ticketcontrols whether to change alarm status to 'Acknowledge' automatically after ticket creation or not.- Click
Save configurationto save ticketing platform configuration. - Add or remove
Device Alarm Mappingsand click Save Mappings buttons. Mappings means for which device id and alarm type ticket needs to be created. Maximum total ticketsis how many total tickets need to be fetched from the ticketing platform.Tickets page sizeis how many tickets need to be shown in the table at once.- Add and remove
Chart colorsfor tickets by priority, tickets by status and tickets by device charts. - Click
Saveto add the widget on the dashboard. - In case you see unexpected results on the widget, refer to browser console to see if there are error logs.
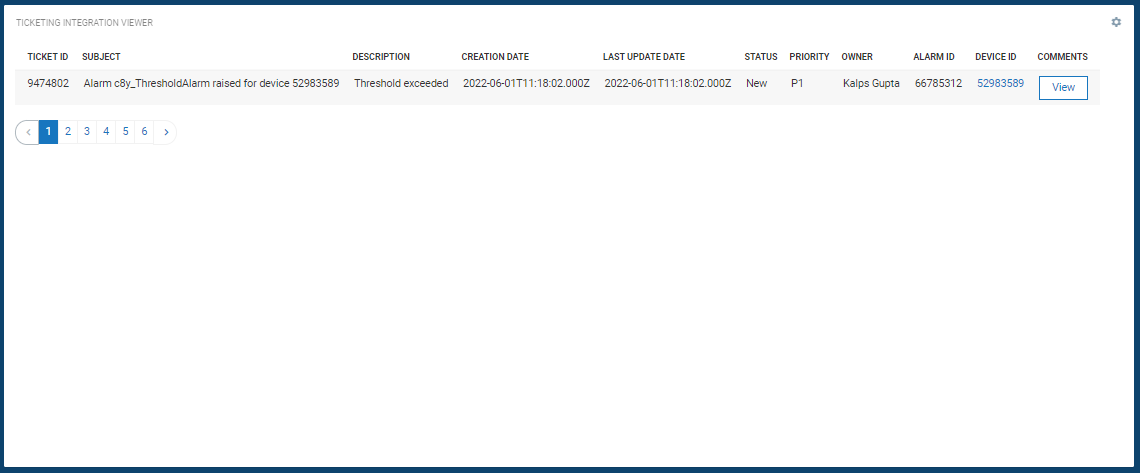
This widget allows to view tickets from the configured Ticketing Platform using Ticketing Integration microservice.
- Make sure you have successfully installed the plugin.
- Go to an application's dashbord and click on
Add widget. - Choose
Ticketing Integration Viewerwidget. Titleis the title of widget. Provide a relevant name. You may choose to hide this. Go toAppearancetab and chooseHiddenunderWidget header style.- Choose
Target assets or devicesto view tickets for that specific device or leave unselected to view all tickets. - Select or unselect respective table columns in
Show columnsto be shown in table. Max total ticketsis total number of tickets to be retrieved from ticketing platform.Page sizeis total number of tickets to shown at once in a table.- Click
Saveto add the widget on the dashboard. - In case you see unexpected results on the widget, refer to browser console to see if there are error logs.
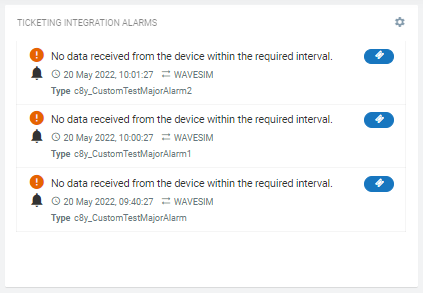
This widget shows active alarms related to a device and allows to create tickets using the Ticketing Integration microservice.
- Make sure you have successfully installed the plugin.
- Go to an application's dashbord and click on
Add widget. - Choose
Ticket Integration Alarmswidget. Titleis the title of widget. Provide a relevant name. You may choose to hide this. Go toAppearancetab and chooseHiddenunderWidget header style.- Choose a device using
Target assets or devicesfor which you want to see the active alarms. It shows maximum 50 alarms at the moment. - Click
Saveto add the widget on the dashboard. - In case you see unexpected results on the widget, refer to browser console to see if there are error logs.
- Once widget is added to the dashboard, it lists all the active alarms related to a device.
- On hovering an alarm, there can be 3 buttons
- Green button to CLEAR an alarm.
- Orange button to ACKNOWLDGE an alarm.
- Blue button to CREATE A TICKET for an alarm.
- It is only available if there is no ticket already created for an alarm.
- Clicking this button will show a pop-up which allows you to write an additional description about an alarm before you create a ticket.
- If there is already a ticket related to an alarm, ticket id is shown. Clicking the ticket id will redirect you to the ticket record in Ticketing platform in a new browser tab.
- Clone the repository on local machine using
git clone https://github.com/SoftwareAG/c8y-ticketing-integration-plugin.git. - Run
npm installto download the module dependencies. - Install c8ycli
npm install -g @c8y/cliif not already. - Run
npm startto start the server. - Open the URL in the logs to view and test your changes.
- (Optional) push the changes back to this repository.
- Finish the development and testing on your local machine.
- Run
npm install -g gulpto install gulp if not already. - Run
npm run buildto start the build process. - Use
c8y-ticketing-integration-plugin-{version}.zipfile in thedistfolder as a distribution.
These tools are provided as-is and without warranty or support. They do not constitute part of the Software AG product suite. Users are free to use, fork and modify them, subject to the license agreement. While Software AG welcomes contributions, we cannot guarantee to include every contribution in the master project.
For more information you can Ask a Question in the TECHcommunity Forums.
You can find additional information in the Software AG TECHcommunity.