我是20级学生,由于出国交换导致延后一年补这门课设,当时只有前三个Lab,但是今年多了Lab4,并且加入了新的challenge实验。
所以关于Lab4我并没有完成基础实验而是在通读代码的基础上直接做的challenge实验,故本Repo里并无lab4的基础内容以及涉及到具体上学期相关实验的解答,仅限本课设相关完成部分。
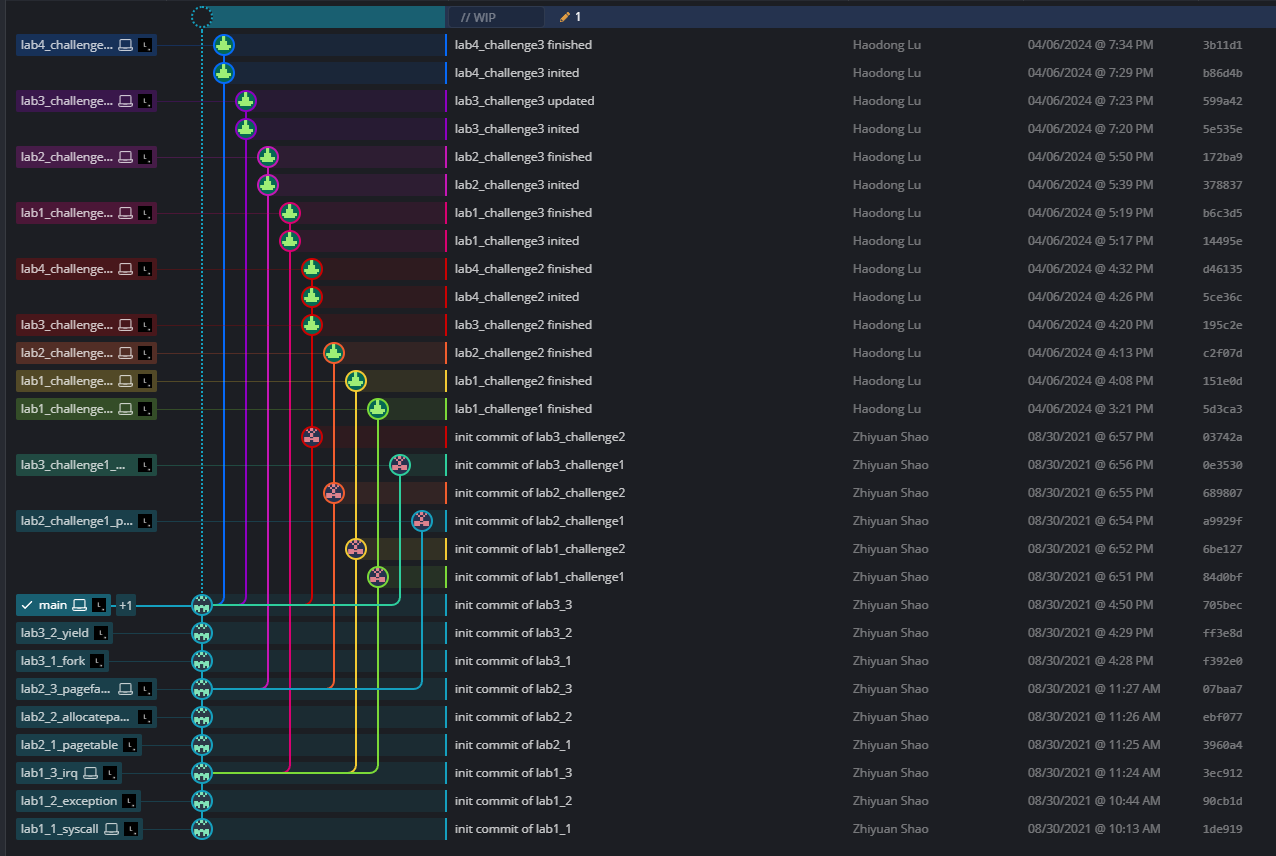
本Repo分支均为重新整理,提交日期以头歌平台提交日期为准。
这是main分支,没有具体代码完成部分,只有报告,分支情况如下图所示:
Documents in Chinese can be found here. There is still no dedicated documents in English yet, but the in-line comments in our codes as well as the self-explaining names for variables and functions will help on your journey of PKE.
PKE is an open source project (see LICENSE.txt for license information) for the educational purpose of the Operating System Engineering course, given to undergraduate students majored in CS (Computer Science) or EECS ( Electrical Engineering and Computer Science) in universities.
PKE provides a series of labs that cover the engineering-side knowledge points of the Operating System, including:
Lab1(3 basic labs+2 challenge labs): traps (syscalls), exceptions and interrupts (IRQs in Intel terminology).
Lab2 (3 basic labs+2 challenge labs): memory management.
Lab3 (3 basic labs+2 challenge labs): processes.
Lab4 (3 basic labs): devices (tied with experiments on RISC-V on PYNQ).
Lab5: file systems (not presented yet).
The experiments in the REPO may be different (with more actual labs) from the above list with the passing of time.
Different from many famous OS educational projects (like xv6 (JOS when earlier) used in MIT 6.828 and ucore taught in Tsinghua University) that use complete or near-complete OS kernels containing almost everything like process management, file systems and many other modules, PKE is NOT a complete OS kernel (actually, PKE never intends to be one of them.).
PKE is built around the idea of Proxy Kernel (proposed in PK, an open source project of the RISC-V software ecology), that emphasizes to construct a "just-enough" OS kernel for a given application. With such an idea, we design a series of labs in PKE that gradually "upgrades" the OS kernel by giving a set of applications, from simple to complex. During the upgradations, you can learn more and more sophisticated ideas of modern operating systems, and more importantly, play with them by following the labs, one after another.
In each lab, PKE starts with an application (placed in the ./user/ folder, with the "app_" prefix) and an incomplete proxy OS kernel. During the lab, you need to 1) understand the interaction between applicaion and proxy OS kernel (sometimes, also the RISC-V machine emulated by using Spike); 2) follow the code from the given application to the OS kernel based on the understanding; 3) complete the proxy OS kernel to make the application (or the system) to execute correctly and smoothly.
In the labs of PKE, we tried our best to control and minimize the code scale of each lab, hoping to help you to stay focus on the key components of Operating System, and minimize the efforts at the same time. Contact us if you have further suggestions on reducing the code scale, thanks in advance!
1. Install Operating system (Virtual machine or Windows Subversion Linux)
(preferred) Ubuntu 16.04LTS or higher, 64-bit
2. Install tools for building cross-compiler and emluator
$ sudo apt-get install autoconf automake autotools-dev curl python3 libmpc-dev libmpfr-dev libgmp-dev gawk build-essential bison flex3. Install RISC-V cross-compiler
$ export RISCV=/path-to-install-RISCV-toolchains
$ git clone --recursive https://github.com/riscv/riscv-gnu-toolchain.git
$ cd riscv-gnu-toolchain
$ ./configure --prefix=$RISCV
$ make -j$(nproc)
$ sudo make install
In above commands, $(nproc) stands for the number of threads you want to invoke during building. Generelly, $(nproc) should equal to the number of cores that your computer have. After this step, you should find executables, like riscv64-unknown-elf-gcc, riscv64-unknown-elf-gdb, riscv64-unknown-elf-objdump, and many others (with the name prefix of "riscv64-unknown-elf-") in your /path-to-install-RISCV-toolchains/bin directory.
4. Install emulator (Spike)
$ sudo apt-get install device-tree-compiler
$ git clone https://github.com/riscv/riscv-isa-sim.git
$ cd riscv-isa-sim
$ mkdir build
$ cd build
$ ../configure --prefix=$RISCV
$ make -j$(nproc)
$ sudo make install
After this step, you should find executables like spike, spike-dasm in your /path-to-install-RISCV-toolchains/bin directory.
5. Clone PKE REPO
$ git clone https://github.com/MrShawCode/riscv-pke.gitAfter this step, you will have the pke directory containing the PKE labs.
6. Build/Run PKE
$ make [run]7. (optional) Install OpenOCD for debugging
$ git clone https://github.com/riscv/riscv-openocd.git
$ cd openocd
$ ./bootstrap (when building from the git repository)
$ ./configure --prefix=$RISCV
$ make -j$(nproc)
$ sudo make install
After installing OpenOCD, you can debug the PKE kernel. Simply use following command:
$ make gdbIn this lab, we are going to learn the basic priciples of trap (also called as the syscall in many textbooks).
A trap (for example, printf that is in our daily use) is generally issued by an application, and evetually handled by the kernel. It is very important for an OS to provide such facility, since applications running in less priviledged modes (e.g., User-mode in RISC-V) need to frequently perform legal operations like I/Os that require to be conducted in higher priviledge modes (e.g., Supervisor or Machine modes in RISC-V).
Lab1_1 gives an application in "user/lab1_1_helloworld.c", whose main() function calls a function printu that has the same functionality as printf, but under a slightly different name. printu is defined in "user/do_print.c", and actually invokes the trap by the ecall instruction (see the inline assemblies in the function of do_user_print).
The structure of Lab1_1 is listed in the following:
.
├── LICENSE.txt
├── Makefile
├── README.md
├── .spike.cfg
├── kernel
│   ├── config.h
│   ├── elf.c
│   ├── elf.h
│   ├── kernel.c
│   ├── kernel.lds
│   ├── machine
│   │   ├── mentry.S
│   │   └── minit.c
│   ├── process.c
│   ├── process.h
│   ├── riscv.h
│   ├── strap.c
│   ├── strap.h
│   ├── strap_vector.S
│   ├── syscall.c
│   └── syscall.h
├── spike_interface
│   ├── atomic.h
│   ├── dts_parse.c
│   ├── dts_parse.h
│   ├── spike_file.c
│   ├── spike_file.h
│   ├── spike_htif.c
│   ├── spike_htif.h
│   ├── spike_memory.c
│   ├── spike_memory.h
│   ├── spike_utils.c
│   └── spike_utils.h
├── user
│   ├── app_helloworld.c
│   ├── user.lds
│   ├── user_lib.c
│   └── user_lib.h
└── util
    ├── functions.h
    ├── load_store.S
    ├── snprintf.c
    ├── snprintf.h
    ├── string.c
    ├── string.h
    └── types.h
The root directory mainly contains the documents (i.e., the md files), the license text and importantly, the make file (named as Makefile). The kernel sub-directory contains the OS kernel, while the user sub-directory contains the given application (in app_helloworld.c) as well as the source-code files containing the supporting routings, which should be placed in the user library in full-pledged OS like Linux.
To understand the PKE OS kernel (of Lab1_1) and accomplish the lab, you should start from the given application. Therefore, we start the tourism from user/app_helloworld.c:
  1 /*
  2  * Below is the given application for lab1_1.
  3  *
  4  * You can build this app (as well as our PKE OS kernel) by command:
  5  * $ make
  6  *
  7  * Or run this app (with the support from PKE OS kernel) by command:
  8  * $ make run
  9  */
 10
 11 #include "user_lib.h"
 12
 13 int main(void) {
 14   printu("Hello world!\n");
 15
 16   exit(0);
 17 }
From the code, we can observe that there is a newly defined function called printu, whose functionality equals to printf of our daily use. The reason we define a new function instead of using printf is that printf is already defined in the newlib of the RISC-V cross-compiling tool chain.
The prototype and implementation of printu can be found in user/user.h and user/do_print.c respectively.
After having finished a lab (and committed your solution), you can continue the practicing of following labs. For example, after finishing lab1_1, you can commit your solution by:
$ git commit -a -m "your comments to lab1_1"then, switch to next lab (lab1_2) by:
$ git checkout lab1_2_exceptionand merge your solution in previous lab by:
$ git merge lab1_1_syscall -m "continue lab1_2"After all these, you can proceed to work on lab1_2.
Note: Never merge challenge labs, such as lab1_challenge1_backtrace, lab2_challenge1_pagefaults, etc.
That's all. Hope you enjoy!