Before you start, remember that the entire community, from alumni to mentors, are rooting for you. The aim of these projects is to help you experience what its like to be part of a real-life engineering team building a real-world solution. Sometimes things may feel overwhelming or too stressful - your team are here to support you, and part of the reason you want to work in tech is because it should be challenging, supportive, and fun! Keep perspective, learn as much as you can, and remember that the fundamental thing people hire from School of Code are people with the right mindset and attitude to work in a high-performance tech team.
- The most important part of any project is making sure the team members are all bought into it and all working together to make the team environment the best that it can be. You will be assessed on your teamwork from the beginning of the project onward as this is crucial in what our employers look for.
- In great teams, each member puts the team above themselves. Egos are left at the door; we're all in it to help each other.
- What are the strengths, preferences, weaknesses, and goals of each person, and how can you all work together to maximise each others' potential?
- How will you keep it a happy, fun, and effective team environment?
- Remember all your teamwork, communication, and self-awareness sessions!
- The key thing here is to learn and have fun in an engineering team, and deliver a great product… That’s what you’ll be doing hopefully for the rest of your careers, so start off in the right way.
- Spend time crafting your team manifesto, and keep referring to it throughout the project - use it as a living document, especially when the going gets tough.
- Managing yourselves as a team is vital to success.
- Everything moves more slowly if you can’t ship code quickly and roll back/forward quickly when you break stuff. Spend time in the first sprint getting work workflow slick. Every commit goes to prod - build that momentum. Elite teams prioritise developer experience. Think about picking a tech stack that has very good docs, consider picking items in your tech stack that are designed to work well together. For instance - it is very common to use React with Redux. Because it’s common there are lots of docs, straightforward tutorials and brilliant developer tooling. Another example might be, it’s possible to create your own React application from scratch, containerise the application and and have it deploy a Azure Container Instance … but it’s a lot easier and quicker to use two or three commands to spin up a blank Next.js app and hook it up to deploy on Netlify. If you have limited time it better to lean towards common tech stacks and easy deployment.
- Agree up front how you will manage the project including:
- How you will keep in contact (regular stand-ups, retros, and getting together as a team however often you see fit to help each other stay on the same page and address any issues)
- How you will resolve conflicts (if there's a deadlock of ideas, how will you move forward?)
- How you will make sure everyone is heard (good tactics are using the SOC Spinner or throwing around the virtual ball so that everyone gets a turn to have uninterrupted speaking time)
- How will you facilitate brainstorming online (such as using a Jam Board or other tool, take a few minutes at the start of a session to allow everyone to write down their ideas, and then go through each of them - this can help all thinking styles get the most out of the session)
- How you will make decisions as a team (What happens when there isn't a unanimous decision?) Remember the tools covered during mindset sessions such as dot voting and Roman voting, and agree which you’ll use. It’s also worth looking into decision-making frameworks such as consensus decision making and consent decision making.
- Who will facilitate each meeting - will it be random or a rota? Or one person for each type of meeting?
- What are your responsibilities? (e.g. is someone keeping the team on track with time? Is someone the deciding vote?)
- How will you handle taking regular breaks or knowing when you are going too deep into a problem and need to chat to get perspective? Will someone be in charge of keeping an eye on time for breaks?
- Decide on a strategy for dividing up work and still keeping people in the loop and working as part of a team. Your code is team-owned - no member should be going off and adding code without communicating/agreeing as a team.
- Remember, no plan survives contact with the enemy - you don't plan so that you rigidly stick to it even when it's not working. You plan so you are prepared and can iterate towards a solution. But the more thinking you do upfront, the more robust your plan is and the cheaper it is to iterate through possibilities and changes.
- For your project, you and your team are coming together as problem-solvers who will identify and agree on a real-world problem or opportunity that you’ll focus your development on to solve as a business team.
- Start with a problem - don’t start with an idea. If people are kicking in ideas of what to build stop and start again. Find a real problem.
- In industry, people talk about four risks to manage when building a product, and they’re worth being aware of as you figure out what problem you’re going to solve with your product.
- Product market fit. This means does this solve a problem big enough/annoying enough that someone will pay for it. It’s the most important thing to get right.
- Feasibility. So we’ve found a hard problem/valuable problem, when we start doing ideating, could we actually build the solution?
- Usability. So we’ve found a hard problem, technically we can build a solution. But is it useable. You want to build something people love using.
- Viability. Does the solution work for the business. Or does the cost of building/providing mean it’s not worth it. Maybe there’s strong competition. Maybe it would cannibalise the market share of a product you already have? The key here is active decision making. Be aware of the competitive/business risk. You can make something others have already made, but be clear how you’ll be different.
- In industry, people talk about four risks to manage when building a product, and they’re worth being aware of as you figure out what problem you’re going to solve with your product.
- Put users at the centre of your project. How can you use technology to solve a problem affecting your user? How can what you build make their life easier? Ideate, plan, and build a full-stack application that addresses this problem for your users.
- Is your solution viable as a business idea? Is it sustainable and maintainable?
- Brainstorm about the problem you want to solve as a team. Have some time to think through individually, and then list the ideas you’ve all come up with and discuss and agree together. Once you’ve chosen your idea as a team, you can move on to the next phases of understanding the problem, ideating, and planning.
- Take time to understand who the user is and what their problem is.
- Don't take the problem at face value - delve into it. If Henry Ford only listened to what people were asking for, he would have just bred faster horses. Instead, he analysed the deeper problem of people wanting to get from A to B as quickly as possible. Understand the why!
- What is the underlying value this software should provide?
- What are the existing solutions?
- What is bad/good about them?
- How will success be measured?
- What are the most important things to the user?
- What are the most important things to the customer?
- Discuss your initial thoughts and find the holes in your understanding
- From the initial discussions in your team, ask any other questions you need to
- Use Disney ideation to bring to life lots of different solutions, and hone down your favourites
- It’s important to show companies your skills in planning, including the whole system - if you left tomorrow, your plan needs to be at a level of detail that another team could still pick it up and build the software as you designed it. This is the true value you have for companies! So spend plenty of time in these planning stages, and be sure to document as you go so you can articulate about them and tell the story of your planning process to employers at the end.
- Be strict on what is in the MVP and what isn’t. Draw a line on the board. Only allow a certain number of features above the line (MVP). Be very ruthless about what is below. Those bits can be stretch goals in later sprints.
- Create user personas to get to know your users
- Create user stories to help map through what a user wants to do and why
- Start planning the tech behind that solution
- A large part of this time should be spent on research:
- What is out there that can help?
- Who can you speak to/get information from for user research?
- Find some inspiration for designing and branding your platform
- Plan what assets you may need for the client and what you are missing
- Create low-fidelity wireframes/sketches of the user experience, and really think through what makes a good, smooth, and easy user experience
- Plan what data is needed in your application and what models are needed to represent that data
- Try and use diagrams to share a vision between your team. These diagrams can and should be used for anything and everything - it’s easier to know you are all looking at the same picture when it’s in front of you, rather than getting wires crossed
- Here’s a guide for drawing Architectural Diagrams, and you can use apps like LucidChart or Draw.io
- Here’s a guide for designing databases, and again LucidChart or Draw.io, but also other tools like DBDiagram
- As well as the diagramming tools, you could also try a diagram language, such as Pintora or Mermaid
- Remember, Draw.io has a great VSCode plugin and installable app
- You will for sure be making assumptions about what your solution should be. The goal is to make a hypothesis, then build the smallest/fastest test you can, show it to users, learn, and pivot. An example of this might be that it’s often fastest to test something by having users play with a Figma, record their audio and screen. Watch it back and pivot what you build.
- Think of the contracts needed between each part of your application:
- What is the agreed upon interface to interact with a certain part, for example:
- Plan the API needed in order to allow you and other developers to interact with that data
- Specify what routes you will have and what the response will be
- Establish that design as the contract, so that before the thing is built, consumers of the API know what routes to call and what they will get back, and developers of the API know what routes to create and what to return in a response; this will help front end and back end teams to develop concurrently while knowing that when they connect, there won’t be any surprises!
- As you develop, you may find you need more functionality than you first predicted… This is fine, and you’d just have a quick conversation along these lines between the consumer and the developer of the API to again establish the contract. It’s useful to keep your schema in a shared doc where you can have edit/comment notification and can change/diff easily.
- As an example, Swagger is a great tool to use for teams in industry when planning and documenting APIs. We wouldn’t recommend using it for your projects, as time is tight and it’s very involved, but you can see an example of the documentation produced and manually use the same sort of approach.
- What is the agreed upon interface to interact with a certain part, for example:
- Delve deeper into the front-end:
- What is critical to build, and what isn’t? Critical can be for your learning experience but also critical to the product. Some portions of the UI aren’t as important to build as others, and it’s important to identify and prioritise this in your planning.
- What should it look like?
- What is the theme / feel / color scheme
- What assets will you need?
- What will the user be able to do?
- What will you show the user?
- How will you get the data into your front-end application? What data will your front end expect?
- Break your plan up into epics, milestones and issues.
- Keep track using Jira, Trello, GitHub Projects, or another kanban/project management system.
- Estimate the complexity using story point poker (here’s an online tool to help you do it remotely).
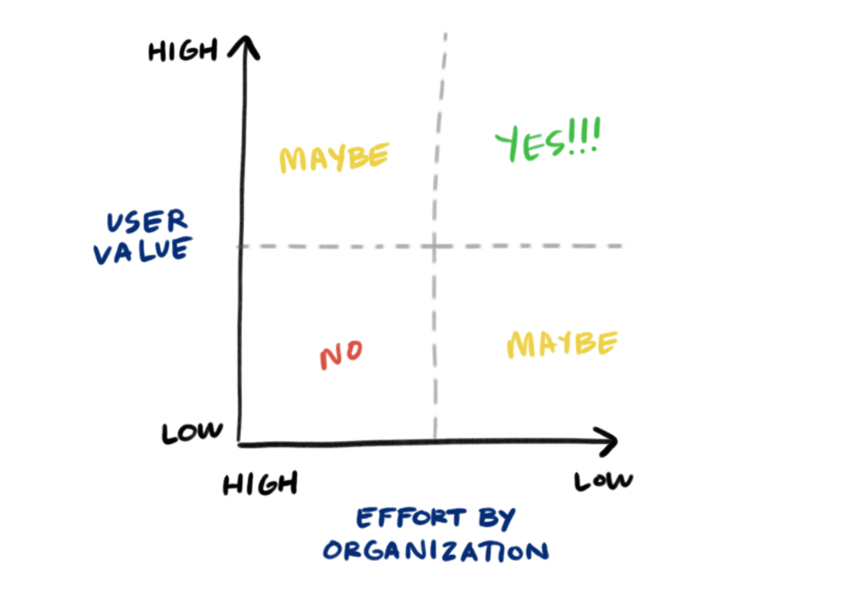
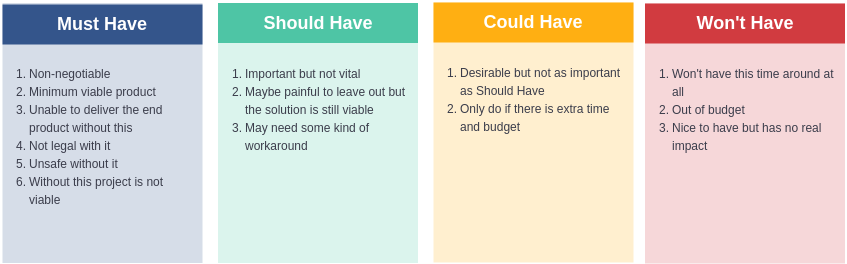
- Prioritise - you can use any method, such as a feature priority matrix or a MoSCoW board.
- Find out which issues are blockers for others (which things need to be completed before something else can be started).
- Plan your sprints:
- Your sprints should be no longer than a week.
- Sort what is in each sprint, what constitutes your MVP, what is in your stretch goals, and what is the future vision.
- Delegate to sub-teams (these could be dynamic, and different sizes for different tasks)
- Record anything that could be good when reviewing your project. Take pictures and record from the start and all the way through!
- Remember that you will be telling the story of your project later, so record anything that would help (photos, videos, diagrams, etc.)
- Enable yourselves to tell the whole story - ideas that didn't make it, problems that you encountered, how you resolved them or found solutions, etc.
- Do you want to measure how effective your estimation was? Agree upfront, and then measure how long it takes compared to what you thought before starting the task
- Each team member should keep note of individual achievements in a brag document.
- Keep notes for feedback for your teammates as you move through each sprint as well. What did you love about working with people? What could have gone better? Keep a record - note these down in the moment because you’ll forget once it isn’t fresh in your mind. You should be sharing your feedback with your group members at the end of each sprint as part of your sprint retrospectives. Be sure your feedback contains actionable elements your teammates can take into the next sprint.
- Do not start this section until you have thoroughly planned!
- This phase is best done as a whole team sprint with a preference for mob programming so you are all on the same page
- We will provide GitHub Classrooms links to allow you to get started; if you need more, just ask.
- There are many options for how you organise your project. Here are just two examples:
Monorepo
- In a monorepo pattern, all your project files live under one git repo
- Think about how you want to architect the files and folders in there to keep things neat - e.g. a front-end and back-end folder, or folders for each service
- When you come to deploy, you will likely need to specify how to navigate from the top-level folder to the specific folder you're deploying
- The benefit is all code in one place
Multirepos
- In a multirepos pattern, your distinct services will have their own git repos - e.g. front-end and back-end
- Deployment can be done through each top-level repo easily
- Disparate codebase will need communication to be clear
In terms of initialising the rest of your environment, decide as a team on any core libraries or integrations you will need to achieve your goals, and make sure to align your configurations so that code standards are consistent across team members (using shared configuration files for services like Prettier, and/or pre-commit hooks like husky can be a good idea).
- All team members should now pull down the repos into the same structure.
- Start working on your features.
- Remember the process:
- Do not push to main!
- Agree on a Git strategy up front with your team. For example, you could branch off main, creating a dev branch, then branch off from dev, naming your branch whatever the issue/feature you are working on is.
- Make small commits as often as possible to ensure nothing can go too wrong!
- Co-author your commits - it'll be important to share the credit in your git history and to show you've contributed even when pairing/mobbing; click here to see how.
- You may find it useful to raise a pull request early on in the process, and then you can ask for a review as you go (the request can be open whilst the branch is actively worked on, and will just update automatically until approved and merged). We'd suggest when you think you are 30% done. Ask the team - "here's what I'm thinking - any suggestions early on?", and when you think you are 90% done: "I think I've cracked it. Any last pointers before it's ready to submit?"
- A healthy development environment encourages positive comments, constructive comments, and pondering! It’s great to see engineers geeking out and praising people in PR comments. 🙂
- When your issue is complete, raise a pull request (if you haven’t already) against your development branch.
- Have someone else from the team pull it in - take time to review the code together and make sure someone else knows what's happening, and get some feedback if possible.
- Once the merge is accepted, delete the branch.
- You can then raise a pull request from dev into the master/main branch.
- For APIs, Postman is still invaluable, and has a lot of support and guidance online for developing APIs.
- Remember that Jest and Supertest are good libraries for testing APIs, but you can also look into how to achieve this with Postman or through any other method.
Have you ever done the teambuilding activity where you’re given dry spaghetti, string, and a marshmallow and are asked to build the tallest tower with the marshmallow on top? The most successful teams will test their structures with the marshmallow from the very beginning rather than building a rickety, swaying tower, popping the marshmallow on at the last minute, and seeing it crumple.
The moral of this can be applied to your projects as well. Prototype your core functionality from the start. What’s most important? What does everything else depend on? What makes you the most nervous? These are your marshmallows - put them into your early sprints to get the most out of working an an agile way.
Practice pragmatic testing.
Recognise that when you start building a product the requirements will change often since you’re discovering what works in real time. Sprint goals should pivot depending on demo feedback from stakeholders and user feedback from discovery. If what you’re building becomes a stable product, add more tests to aid future refactoring and to document the full requirements.
An example of this might be - if you have ten core user stories then write ten high level Cypress tests. In the real world people tend to test everything from the start, or they test nothing, both not great. The first of these ways is too slow (speed is the life blood of start-ups), and the other is too risky.
You will be working like an independent company of developers to execute your goal together. As coaches, we’re an extra layer of support if needed - we will act in a coach/mentor capacity. We’ll be asking you for updates on how the team is getting on, and we’ll equally be on hand if you’re stuck in a rut that as a team you cannot escape from.
You can also request code reviews from your mentors, each other, or School of Code Coach for segments of work; these reviews can help keep you on the right track, prompt you to take in best practises, and keep us informed on your progress so we can spot problems early!
- Plan your presentation, and bring the audience along the journey
- All of your team should contribute to the presentation
- Don't fill your slides with text! Tell the story yourselves, and use imagery and data to help paint the picture and emphasise points
- A guideline structure for a project presentation could be:
- Introduce the team
- Problem: Introduce the problem how you saw it
- Market: Who is this for, and is there a wider need for the solution?
- Solution: LIVE Demo time. Show off your solution
- Journey: How did you get to your solution - from ideation to delivery
- Management: How did you manage your project
- Analysis: Give a summary of how the project went, or what value it delivers
- Vision: Where could this project go - and have you made any steps to help see not only the far-off vision, but where you could take it immediately given more time?
- Q & A
- Practice by running through the presentation a few times with your team if possible, especially the live demo and product walk-through
Agree as a team which tools you will be using for the job. Here are some possibilities, but it's by no means limited to this list!
Decision Making and Project Guidance
Project Hosting
- Netlify
- AWS
- Heroku
- Docker
Database Hosting
- AWS
- Heroku
- ElephantSQL
- Google Cloud
- Azure
- Firebase
- MongoDB Atlas
Designing/Ideation/Discovery
- Figma
- FigJam
- JamBoard
- Balsamiq
- Mural
- Whiteboards (apps, in Zoom, or physical)
- Draw.io (download the VS code extension!)
- Google Sheets
- Good old pen and paper
Project Management
- Jira
- GitHub Projects/Issues
- Trello
- Notion
Boilerplate Applications
- Next.JS
- Create React App
- Gatsby
Linting
- Prettier
- ES Lint
Documenting components
- Storybook
Testing
- Jest
- Cypress
- React Testing Library
- Supertest
- Postman
- Selenium
Continuous Integration and DevOps
- GitHub actions
- GitLab Runners
- CircleCI
- Travis
Infrastructure as Code
- Terraform
Logging / Observability / Bug Tracking
- Sentry
- Log Rocket
- Grafana
Communication
- Slack
- Zoom
- Discord
Libraries to help with your building features
- … literally all over the web
- Search npm
- Search for cool react libraries that do the job you’re looking for
- Search everywhere
- Component libraries; examples include (but aren’t limited to!) the libraries below. There will be dedicated React versions of most UI libraries.
- Chakra
- AntDesign
- MaterialUI
- SemanticUI
- Remember to check out a library’s documentation (if it’s rubbish, it could be hard to bug-fix later) and usage (the more people it’s used by and rated by, the more likely it is to be good for your project)
“Good artists copy. Great artists steal.” - Steve Jobs.
Obviously, we’re being a bit tongue in cheek when we reference this quote, but use the collective genius out there! However, this is a topic where balance and critical thinking is needed. Often it’s better not to build everything, but you should be deliberate in what you choose to use from elsewhere vs. build yourself.
Using a package or service is a great way to write less code, ship faster and focus on your core product. For instance, there are great UI libraries that give you well built core components (buttons, drop downs etc etc). You can save a lot of time by using them and just customising them to match your UI. This is time that you can then use to focus on other areas of your app.
But as with all things, there is a balance. When you’re learning or trying to get a job, it’s often worth building something you don’t need to build for the challenge! Be deliberate and note down your decisions - it’s a great thing to show off to prospective employers.