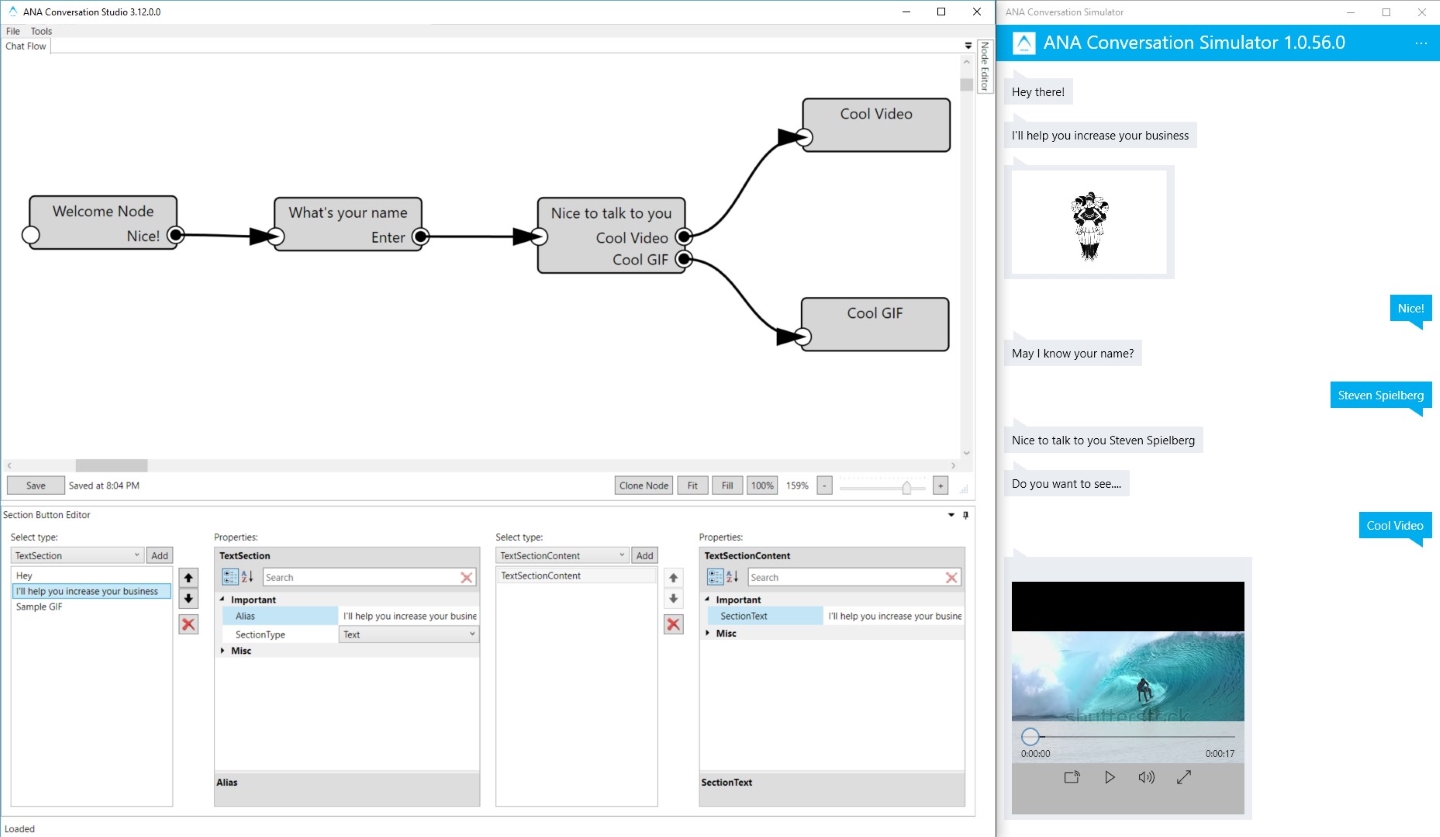
World's first Open Source Conversation Platform which comes with a Graphical Chat Flow Designer and Chat Simulator. Absolutely modular architecture, ability to add your own customizations and infinitely scalable.
Setup time less than 30 minutes. Edit content and flow without changing any code. Android & iOS SDK available on request.
Launching soon:
Web & Messenger SDK
ANA Conversation Suite contains 3 components:
- Platform: Backend API which serves the chat requests. This component is responsible for merging the chat flow template with the chat content and returning the flow when requested by the clients.
- Studio: Graphical designer of the chat flow. This can be helpful when designing the chat flow and reduce the amount of unnecessary effort needed down by 80%. This also enables non-devs to edit the flow and it's content at any given point of time, changes being reflected instantly.
- Simulator: Used to test and experience the chat flow.
Pre-requisites:
- Windows/Linux/Mac to host the Backend API
- Mongo DB
- Windows PC with .NET Framework 4.5 to run Conversation Studio
- Windows 10 PC to use Conversation Simulator (UWP App)
Setup Platform:
- Clone the repo.
- In ANA Conversation Platform project, open appsettings-Sample.json and edit DatabaseConnectionSettings section to match your MongoDB details.
- Change Collection names to new/empty collections.
- Save and Rename appsettings-Sample.json to appsettings.json
- Build and publish the project to the server as usual. It's an ASP.NET Core 1.1 project, which can be hosted on Windows, Linux and Mac.
Setup Studio:
- Build the ANA Conversation Studio project yourself or download the binary directly. Open the exe once done.
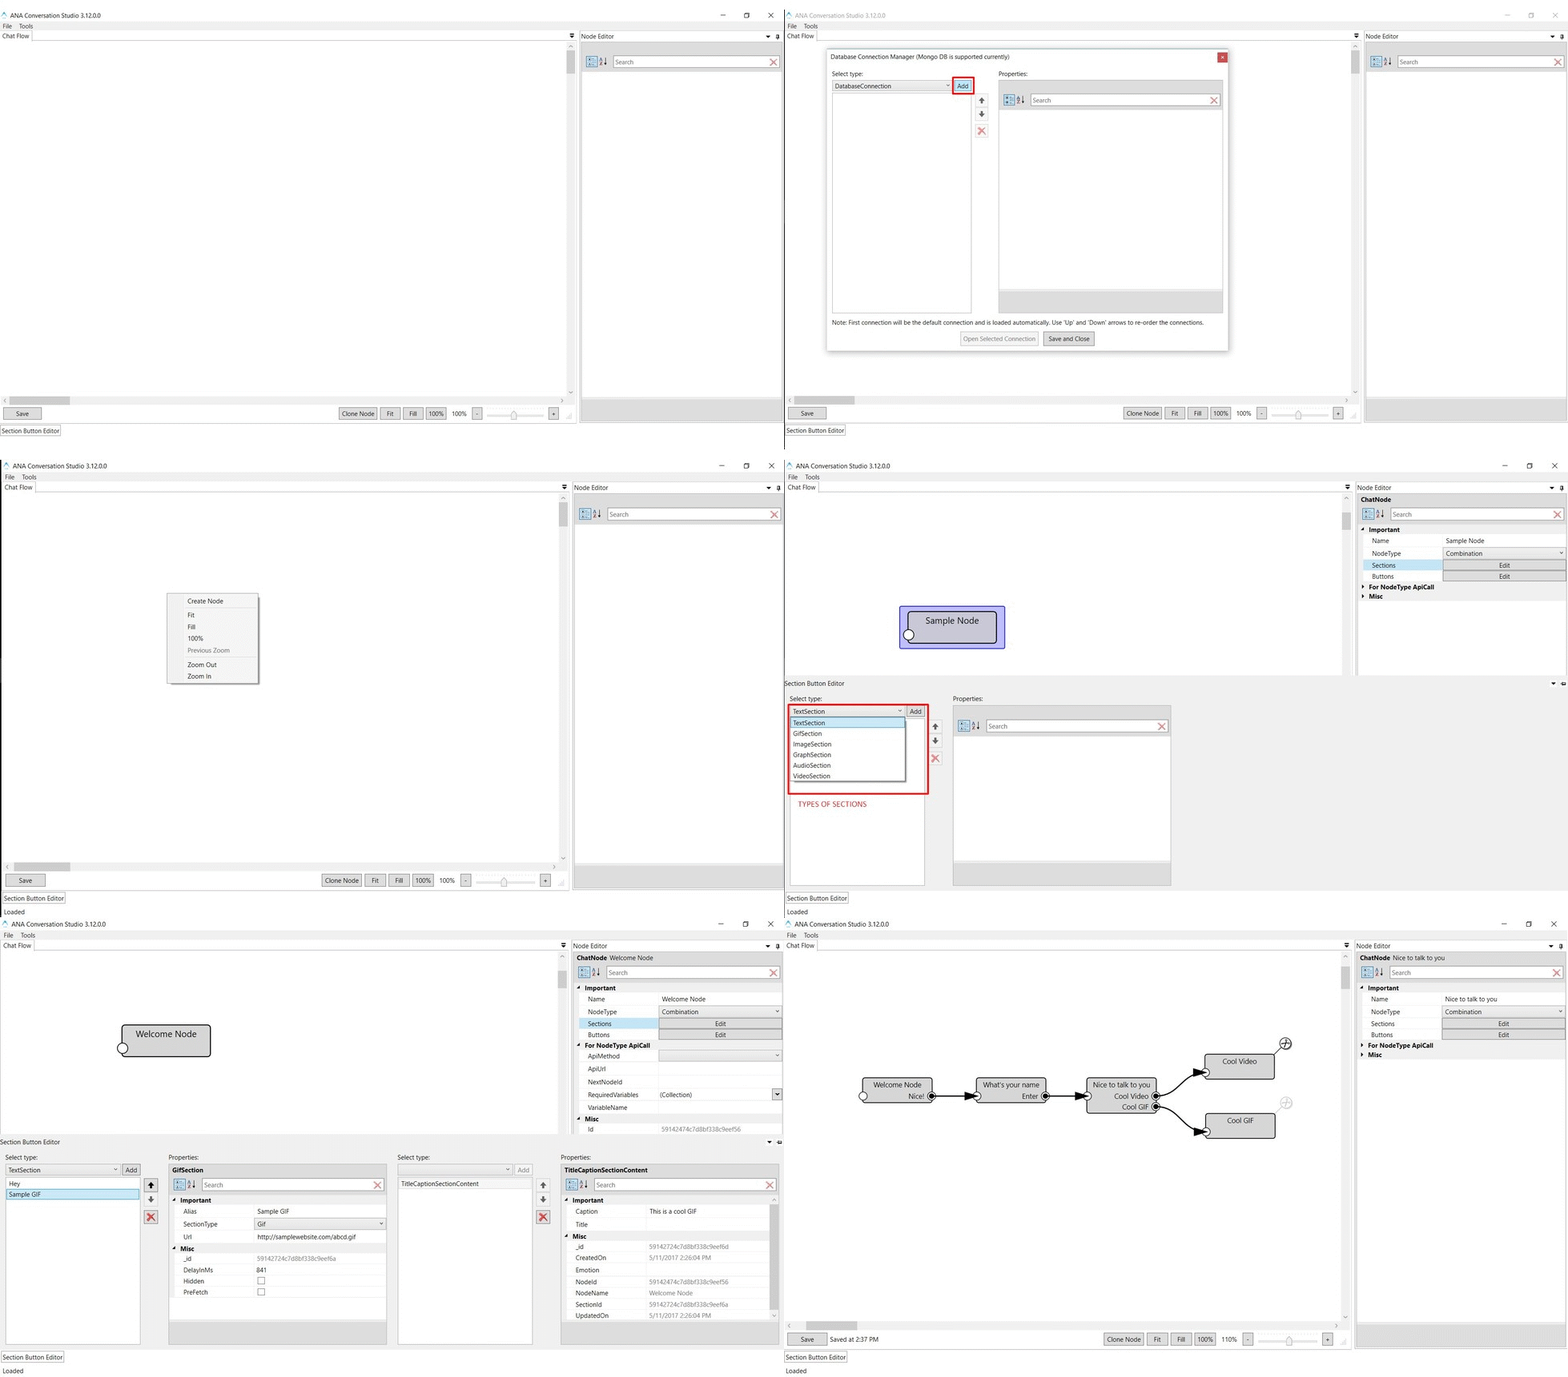
- Add the details of the same collections and MongoDB connection string used in the Platform Setup in (File -> Manage Connections->Add. Click 'Save and close'.
- An additional MongoDB Collection name is asked as "LayoutCollectionName", this should be a new/empty collection.
- To create a sample chat flow, right click on the studio document(white area) and click 'Create new node'.
- Add buttons and sections to it using the Node Editor and Section Button Editor. Also, add content to each button and section you have added with the help of Content Editor.
- Set the 'IsStartNode' of the Node to 'true'.
- Save the flow.
Setup Simulator:
- To build the ANA Conversation Simulator project, you will need Visual Studio 2017 + UWP SDK.
- Already built app package is also provided in releases section. Download, extract and run the .ps1 script as admin using PowerShell. That will install the Simulator into your system as a Windows 10 App. Developer mode should be turned on on your PC.
- Open the app by searching in the Start Menu or from ANA Conversation Studio->Tools->Launch ANA Conversation Simulator.
- First time of the launch, you will be asked for the Chat and UploadFile APIs. Edit it to match the URL of your hosted ANA Conversation Platform.
- If everything went as it should, your chat should have started and you should see the content of the first node -> first section.
- If you choose to build the app instead of using the built package, obtain your own MapToken required by the UWP Map Control from your developer.microsoft.com account and place it in Config-Sample.json. Then rename the file to Config.json and build the project.
Creating your first flow
The ability to switch from a predefined structured flow to a live chat agent is now part of ANA Platform. This can be used if users are stuck at some point in the chat flow due to lack of clarity or they want some manual assistance.
-
Pre-requisites:
Rocket Chat server: Rocket Chat is a full flege open source chat application. This is used as the agent chat platform here. A running Rocket Chat Server with admin access is needed to configure Agent Chat. Follow their docs and setup your rocket chat server. Note down the server URL, admin username and password.
-
Agent Chat Setup:
This process assumes you have already setup ANA without agent chat by following above instructions.
Setting up agent chat involves the following steps.
- Setup LiveClientSockets Server:
- Deploy the NodeJS project 'LiveClientSocketsManager' (included in the repo) on a server. The server can be same or different than the one ANA Platform is deployed on.
- Note: If you are not using IISNode to host it or you are not hosting it in IIS server, make sure the variables 'auth_username' and 'auth_password' are accessible via process.env to the node js code. IISNode does that automatically as these variables are defined in web.config
- Once the code is deployed. Make note of two things..
- Server URL: http://<your-domain.com>/
- Basic Auth Base64:
- Which is the base 64 of <auth_username>:<auth_password> of the values you set as in the web.config.
- Default is agentchat:agentchat and its Basic Auth Base64 will be 'YWdlbnRjaGF0OmFnZW50Y2hhdA=='
- Configure Rocket Chat:
- Login to rocket chat with admin user.
- Goto /admin/integrations
- Create a new outgoing integration
- This is basically setting up a web hook to notify ANA about a new message sent from Rocket Chat.
- Set the fields of the integration as following
- Event Trigger: Message Sent
- Enabled: true
- Channel: all_direct_messages
- URLs: http://<your-ANA-domain.com>/api/AgentChat/CallbackReceivedFromRocketChatServerAsync
- Impersonate: False
- Post as: [Use any existing user]. This callback will not post anything using the call back response to this 'Post as' does not matter.
- Create a new outgoing integration
- Goto /admin/Layout
- Inside 'User Interface' section, set everything to true, mainly, 'Use Real Name' option. This will display the actual name of the user in the rocket chat threads. It is picked up from 'PERSON_NAME' variable from Memory Stack of the simulator. Make sure 'PERSON_NAME' is captured in your chat flow before switching to agent chat.
- Create few users in rocket chat other than admin. They will be the users which agents have to login with. ANA automatically assigns agents to new chat requests, depending on availability.
- Make another user account which will act as the default user to which ANA will assign new incoming agent chat requests if none of the agents are available.
- Configure ANA Platform:
- Open appsettings-sample.json
- Fill in all the new fields present in the json by the ones which you have noted above and move those settings to your existing appsettings.json file.
- Setup the simulator:
- Install the latest simulator app and open it.
- Choose the 'Update APIs' option from the top right options button (…).
- Enter the above noted sockets server URL in the specified field.
- Update the 'Chat Flow URL' to end with 'HybridChat' instead of 'Chat', which was previously the case.
- Click Ok to save.
- Trying out Agent Chat:
- Login to a user in rocket chat. Make sure the status is online if the user is not the default agent chat user!
- Open the simulator app. Assuming you have your own chat flow setup and working, simulator will start the structured chat as usual. After completing 1-2 steps of your chat flow, to switch to an agent, click the 'Agent Chat' option in the top right options menu.
- If everything is working fine, the current chat flow history should come into the rocket chat thread, text input box should appear in the simulator. From now on, Simulator and Rocket Chat user can chat two ways. Whatever typed in the simulator will be sent to the rocket chat user and vice versa.
- Sending the chat flow user (simulator user) back to a structured flow from agent chat is a planned feature comming soon.
- Setup LiveClientSockets Server:
This is just the setup documentation. ANA Conversation Platform has much more scope than predefined flows. You can call your own APIs from the chat nodes. Create and store variables at the mobile client app, use them to take decisions at the server and direct the user to respected nodes. You can take different types of inputs from the user like button click, text, image, video and act on them at the server side. For now, explore the code to get to know all the possibilities.
Detailed documentation is on its way.
ANA Conversation Suite is available under the GNU GPLv3 license.


