
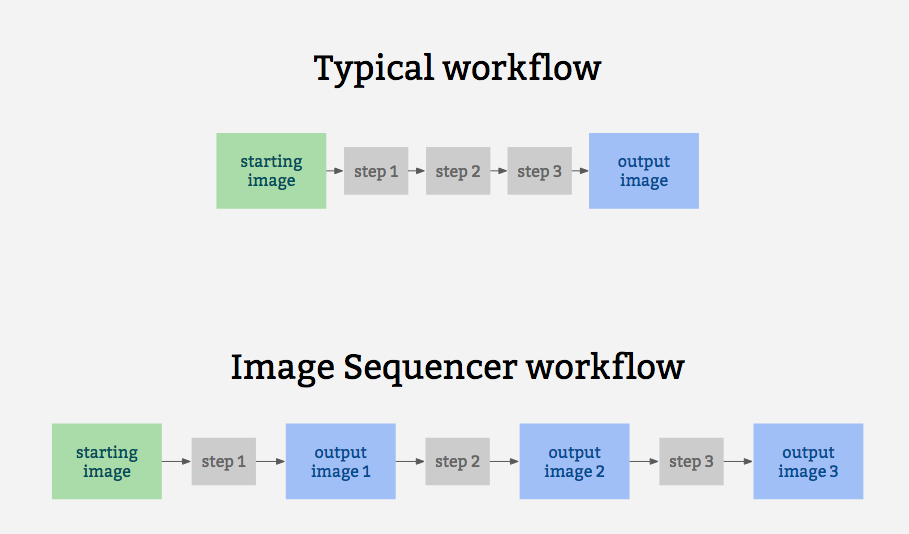
Image Sequencer is different from other image processing systems in that it's non-destructive: instead of modifying the original image, it creates a new image at each step in a sequence. This is because it:
- produces a legible trail of operations, to "show your work" for evidential, educational, or reproducibility reasons
- makes the creation of new tools or "modules" simpler -- each must accept an input image, and produce an output image
- allows many images to be run through the same sequence of steps
- works identically in the browser, on Node.js, and on the commandline
It is also for prototyping some other related ideas:
- filter-like image processing -- applying a transform to any image from a given source, like a proxy. I.e. every image tile of a satellite imagery web map
- test-based image processing -- the ability to create a sequence of steps that do the same task as some other image processing tool, provable with example before/after images to compare with
- logging of each step to produce an evidentiary record of modifications to an original image
- cascading changes -- change an earlier step's settings, and see those changes affect later steps
- "small modules"-based extensibility: see Contributing
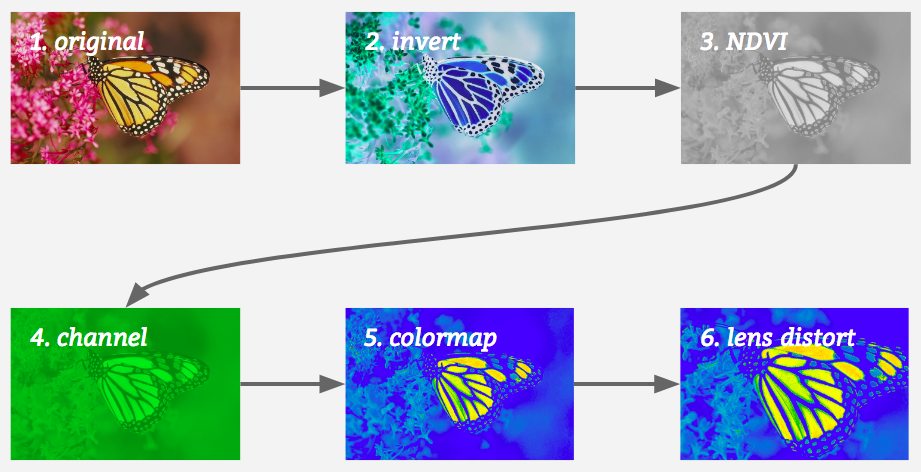
A diagram of this running 5 steps on a single sample image may help explain how it works:
- Installation
- Quick Usage
- CLI Usage
- Classic Usage
- Method Chaining
- Multiple Images
- Creating a User Interface
- Contributing
- Submit a Module
- Get Demo Bookmarklet
This library works in the browser, in Node, and on the commandline (CLI), which we think is great.
Just include image-sequencer.js in the Head section of your web page. See the demo here!
(You must have NPM for this)
Add image-sequencer to your list of dependancies and run $ npm install
Globally install Image Sequencer:
$ npm install image-sequencer -g
(You should have Node.JS and NPM for this.)
$ npm run debug invert
Image Sequencer can be used to run modules on an HTML Image Element using the
replaceImage method. The method accepts two parameters - selector and steps.
selector is a CSS selector. If it matches multiple images, all images will be
modified. steps may be the name of a module or array of names of modules.
Note: Browser CORS Restrictions apply. Some browsers may not allow local images form other folders, and throw a Security Error instead.
sequencer.replaceImage(selector,steps,optional_options);optional_options allows to pass additional arguments to the module itself.
For example:
  sequencer.replaceImage('#photo','invert');
sequencer.replaceImage('#photo',['invert','ndvi-red']);Image Sequencer also provides a CLI for applying operations to local files. The CLI takes the following arguments:
-i  | --image [PATH/URL] | Input image URL. (required)
-s  | --step [step-name] | Name of the step to be added. (required)
-b  | --basic            | Basic mode only outputs the final image
-o  | --output [PATH]    | Directory where output will be stored. (optional)
-c  | --config {object} | Options for the step. (optional)
The basic format for using the CLI is as follows:
$ ./index.js -i [PATH] -s step-name
NOTE: On Windows you'll have to use node index.js instead of ./index.js.
The CLI also can take multiple steps at once, like so:
$ ./index.js -i [PATH] -s "step-name-1 step-name-2 ..."
But for this, double quotes must wrap the space-separated steps.
Options for the steps can be passed in one line as json in the details option like
$ ./index.js -i [PATH] -s "brightness" -d '{"brightness":50}'
Or the values can be given through terminal prompt like

The CLI is also chainable with other commands using &&
sequencer -i <Image Path> -s <steps> && mv <Output Image Path> <New path>
The Image Sequencer Library exports a function ImageSequencer which initializes a sequencer.
var sequencer = ImageSequencer();The loadImage method is used to load an image into the sequencer. It accepts
a name and an image. The method also accepts an optional callback.
sequencer.loadImage(image_src,optional_callback);On Node.js the image_src may be a DataURI or a local path or a URL.
On browsers, it may be a DatURI, a local image or a URL (Unless this violates CORS Restrictions). To sum up, these are accepted:
- Images in the same domain (or directory - for a local implementation)
- CORS-Proof images in another domain.
- DataURLs
return value: none (A callback should be used to ensure the image gets loaded) The callback is called within the scope of a the sequencer. For example: (addSteps is defined later)
sequencer.loadImage('SRC',function(){
  this.addSteps('module-name');
});
The this refers to all the images added in the parent loadImages function only.
In this case, only 'SRC'.
The addSteps method is used to add steps on the image. One or more steps can
be added at a time. Each step is called a module.
sequencer.addSteps(modules, optional_options);If only one module is to be added, modules is simply the name of the module.
If multiple images are to be added, modules is an array of the names of modules
which are to be added, in that particular order.
optional_otions is just additional parameters, in object form, which you might want to provide to the modules. It's an optional parameter.
return value: sequencer (To allow method chaining)
Once all steps are added, This method is used to generate the output of all these modules.
sequencer.run();Additionally, an optional callback can be passed to this method.
sequencer.run(function(out){
  // this gets called back.
  // "out" is the DataURL of the final image.
});
return value: sequencer (To allow method chaining)
The removeSteps method is used to remove unwanted steps from the sequencer.
It accepts the index of the step as an input, or an array of the unwanted indices
if there are more than one.
For example, if the modules ['ndvi-red','crop','invert'] were added in this order, and I wanted to remove 'crop' and 'invert', I can either do this:
sequencer.removeSteps(2);
sequencer.removeSteps(3);
or:
sequencer.removeSteps([2,3]);return value: sequencer (To allow method chaining)
The insertSteps method can be used to insert one or more steps at a given index
in the sequencer. It accepts the index where the module is to be inserted, name of
the module, and an optional options parameter. index is the index of the inserted
step. Only one step can be inserted at a time. optional_options plays the same
role it played in addSteps.
Indexes can be negative. Negative sign with an index means that counting will be
done in reverse order. If the index is out of bounds, the counting will wrap in
the original direction of counting. So, an index of -1 means that the module is
inserted at the end.
sequencer.insertSteps(index,module_name,optional_options);return value: sequencer (To allow method chaining)
Methods can be chained on the Image Sequencer:
- loadImage()/loadImages() can only terminate a chain.
- run() can not be in the middle of the chain.
- If the chain starts with loadImage() or loadImages(), the following methods are applied only to the newly loaded images.
- If no name is provided to the image, a name will be generated for it. The name will be of the form "image". For ex: "image1", "image2", "image3", etc.
Valid Chains:
sequencer.loadImage('red',function(){
  this.addSteps('invert').run(function(out){
    //do something with ouptut.
  });
})
sequencer.addSteps(['ndvi-red','invert']).run();
et cetra.
Invalid Chains:
sequencer.addSteps('invert').run().addSteps('ndvi-red');Image Sequencer is capable of handling multiple images at once.
This is just like before.
var sequencer = ImageSequencer();Multiple images can be loaded by the method loadImages. Everything is the same,
except that now, a unique identification called image_name has to be provided
with each image. This is a string literal.
- 3/2 parameters :
sequencer.loadImages(image_name,
  image_src,optional_callback);
- 1/2 parameters (JSON) :
sequencer.loadImages({
  images: {
    image1_name: image_src,
    image2_name: image_src,
    ...
  },
  callback: optional_callback
});
return value: none
The same method addSteps is used for this. There's just a slight obvious change
in the syntax that the image name has to be supplied too. image_name as well as
module_name in the following examples can be either strings or arrays of strings.
sequencer.addSteps(image_name,module_name,optional_options);If no Image Name is specified, the module is added to all images.
sequencer.addSteps(module_name,optional_options);All this can be passed in as JSON:
sequencer.addSteps({
  image1_name: {name: module_name, o: optional_options},
  image2_name: {name: module_name, o: optional_options},
  ...
});
return value: sequencer (To allow method chaining)
The same run method can be used with a slight change in syntax.
The run method accepts parameters image and from. from is the index from
where the function starts generating output. By default, it will run across all
the steps. (from = 1) If no image is specified, the sequencer will be run over all
the images. image_name may be an array of image names.
sequencer.run(); //All images from first stepsequencer.run(image_name,from); //Image 'image' from 'from'The run method also accepts an optional callback just like before:
  sequencer.run(image_name,from,function(out){
    // This gets called back.
    // "out" is the DataURL of final image.
  });
JSON Input is also acceptable.
sequencer.run({
  image1_name: from,
  image2_name: from,
  ...
});
return value: sequencer (To allow method chaining)
Similarly, removeSteps can also accept an image_name parameter. Either, both,
or none of image_name and steps them may be an array. JSON input is also acceptable.
sequencer.removeSteps("image_name",[steps]);sequencer.removeSteps("image_name",step);sequencer.removeSteps({
image1_name: [steps],
image2_name: [steps],
...
});return value: sequencer (To allow method chaining)
The insertSteps method can also accept an image_name parameter. image_name
may be an array. Everything else remains the same. JSON Inout is acceptable too.
sequencer.insertSteps("image",index,"module_name",o);sequencer.insertSteps([image],index,"module_name",o);sequencer.insertSteps({
image1: [
{index:index1, name: module_name1, o:optional_options1},
{index:index2, name: module_name2, o:optional_options2},
...
]
});return value: sequencer (To allow method chaining)
Image Sequencer provides the following events which can be used to generate a UI:
onSetup: this event is triggered when a new module is set up. This can be used, for instance, to generate a DIV element to store the generated image for that step.onDraw: This event is triggered when Image Sequencer starts drawing the output for a module. This can be used, for instance, to overlay a loading GIF over the DIV generated above.onComplete: This event is triggered when Image Sequencer has drawn the output for a module. This can be used, for instance, to update the DIV with the new image and remove the loading GIF generated above.onRemove: This event is triggered when a module is removed. This can be used, for instance, to remove the DIV generated above.
How to define these functions:
sequencer.setUI({
  onSetup: function(step) {},
  onDraw: function(step) {},
  onComplete: function(step) {},
  onRemove: function(step) {}
});
These methods can be defined and re-defined at any time, but it is advisable to
set them before any module is added and not change it thereafter. This is because
the setUI method will only affect the modules added after setUI is called.
The onComplete event is passed on the output of the module.
Image Sequencer provides a namespace step for the purpose of UI Creation in
the scope of these definable function. This namespace has the following
predefined properties:
step.name: (String) Name of the stepstep.ID: (Number) An ID given to every step of the sequencer, unique throughout.step.imageName: (String) Name of the image the step is applied to.step.output: (DataURL String) Output of the step.step.inBrowser: (Boolean) Whether the client is a browser or not
In addition to these, one might define their own properties, which shall be accessible across all the event scopes of that step.
For example :
sequencer.setUI({
  onSetup: function(step){
    // Create new property "step.image"
    step.image = document.createElement('img');
    document.body.append(step.image);
  },
  onComplete: function(step){
    // Access predefined "step.output" and user-defined "step.image"
    step.image.src = step.output;
  },
  onRemove: function(step){
    // Access user-defined "step.image"
    step.image.remove();
  }
});
Note: identity.imageName is the "name" of that particular image. This name can
be specified while loading the image via sequencer.loadImage("name","SRC"). If
not specified, the name of a loaded image defaults to a name like "image1",
"image2", et cetra.
Details of all modules can be sought using sequencer.modulesInfo().
This method returns an object which defines the name and inputs of the modules. If a module name (hyphenated) is passed in the method, then only the details of that module are returned.