Application to show how PubNub can be used for IoT use cases, displaying and controlling worldwide IoT assets in real time
PubNub can help you manage your distributed portfolio of IoT devices, either built into an existing product you produce or by integrating with 3rd party sensors. Using PubNub you can communicate bidirectionally with global assets in real time with minimum latency.
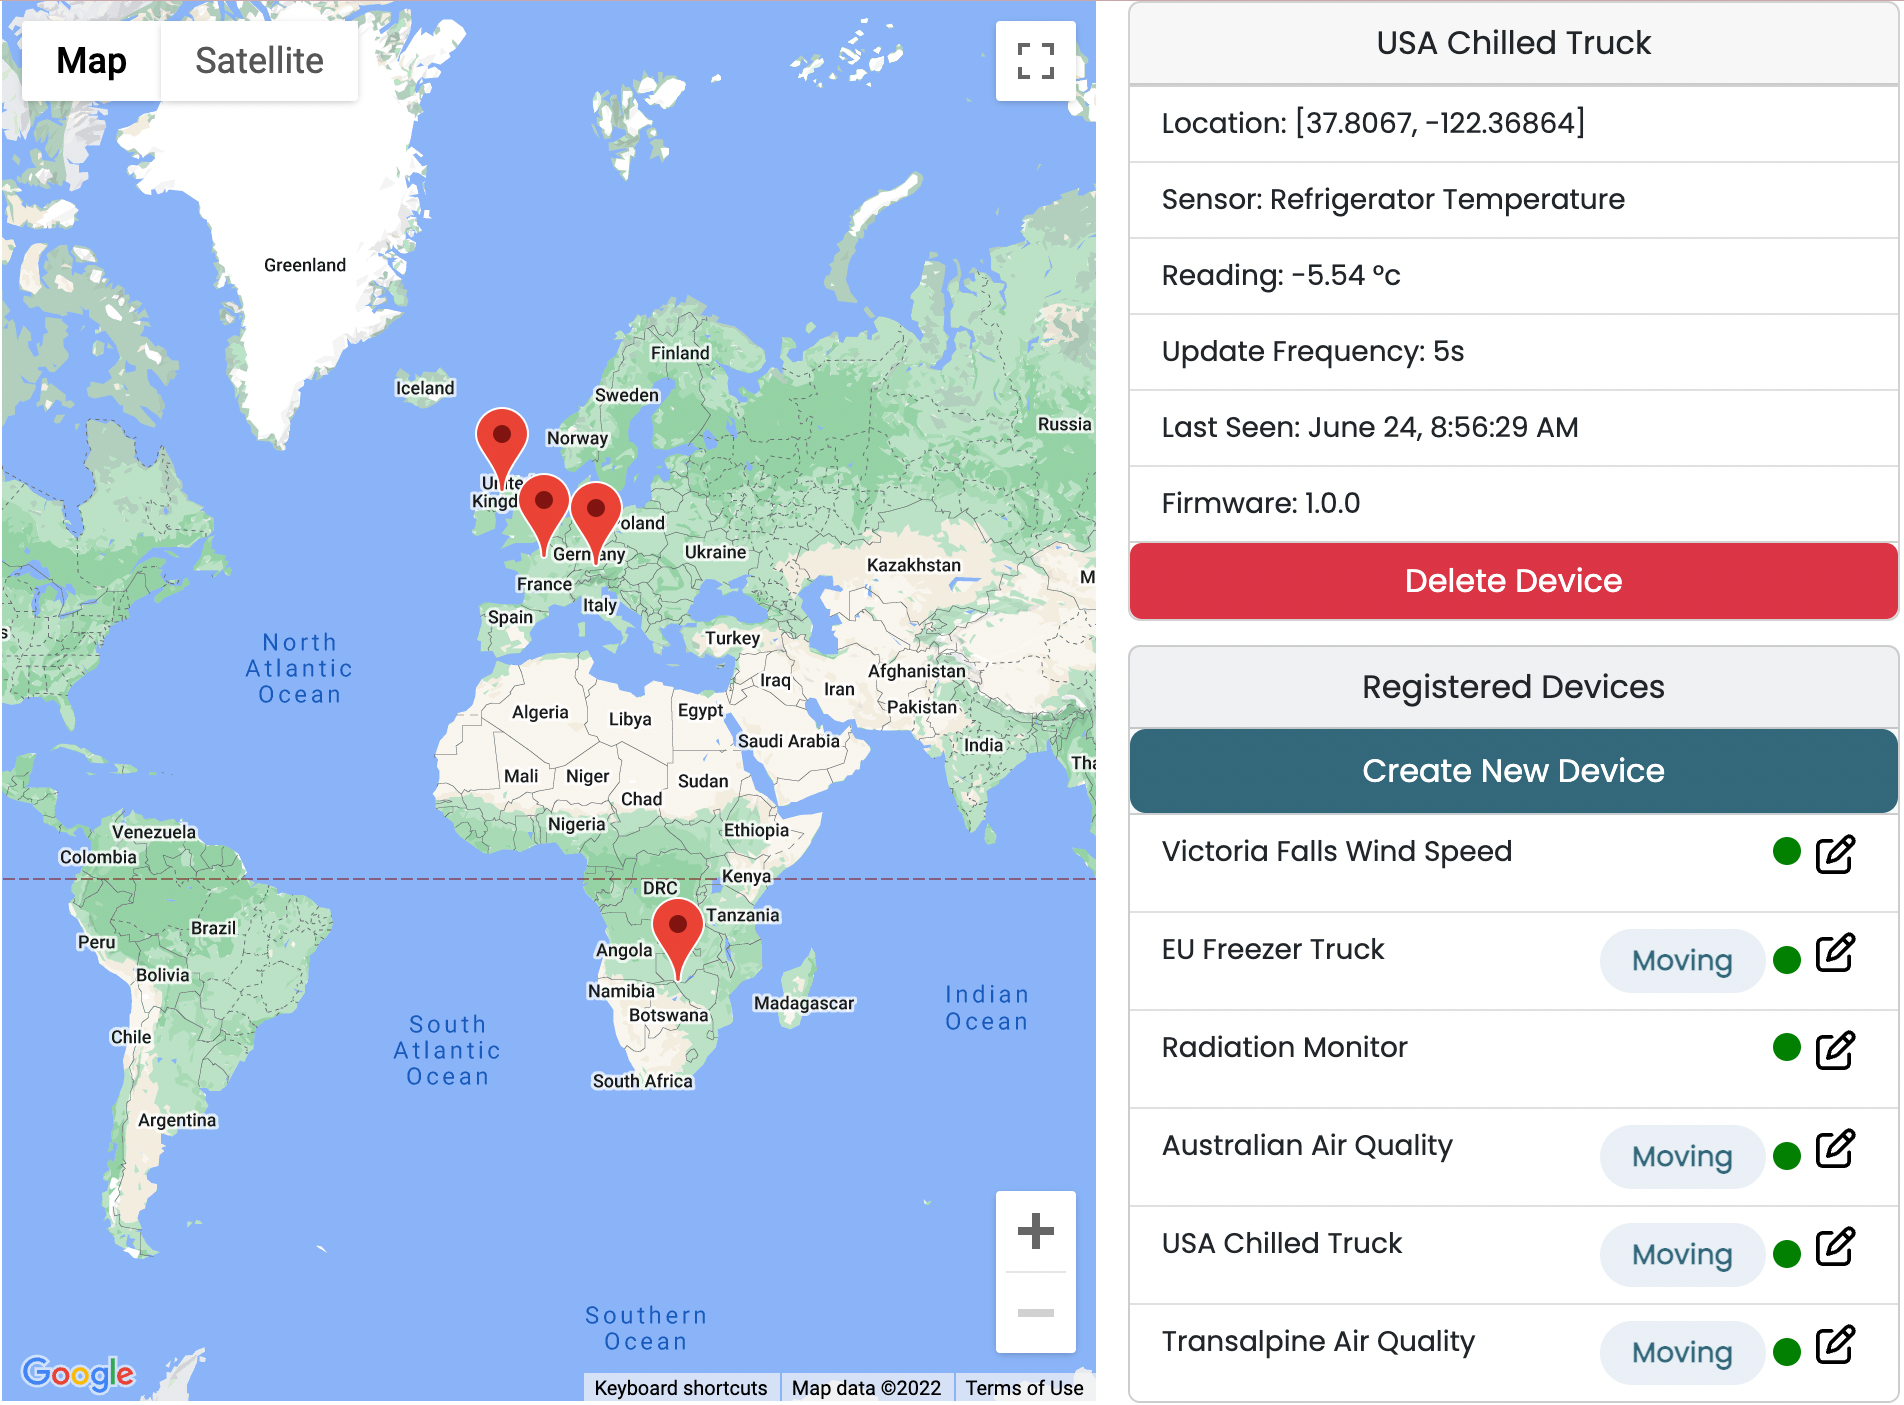
This IoT dashboard shows how an IoT solution managed by PubNub might look - remote devices will periodically report their status and sensor readings. You can view device location as well as their online / offline state.
This application is designed to show how an IoT solution with PubNub might look and is deliberately a canned demo. For information on how to take this concept to production, please see the next steps section at the end of this ReadMe.
A hosted version of this demo can be found at https://www.pubnub.com/demo/iot-dashboard/
- Communicates over the PubNub network - devices send sensor data and location which is displayed on the dashboard
- Administrative tasks such as firmware update and remote device reboot can be performed from the dashboard
- Uses JavaScript WebWorkers to simulate real hardware.
- Experience the real time, scalable performance delivered by PubNub
This dashboard uses Node, npm and express to show how a PubNub IoT dashboard might look. For ease of use, devices are simulated but please see PubNub.com for previous blogs on integrating real IoT hardware such as Arduino and Raspberry Pi.
To run this project yourself you will need a PubNub account and, optionally, a Google Maps API key.
- Node.js
- PubNub Account (Free)

-
You’ll first need to sign up for a PubNub account. Once you sign up, you can get your unique PubNub keys from the PubNub Developer Portal.
-
Sign in to your PubNub Dashboard.
-
Click Apps, then Create New App.
-
Give your app a name, and click Create.
-
Click your new app to open its settings, then click its keyset.
-
Enable the Presence feature for your keyset.
-
Enable the Stream Controller feature for your keyset.
-
Enable the Files feature for your keyset.
-
Copy the Publish and Subscribe keys and paste them into your app as specified in the next step.
-
You'll need to run the following commands from your terminal.
-
Clone the GitHub repository.
git clone https://github.com/PubNubDevelopers/iot-dashboard-javascript-demo.git
-
Navigate to the application directory.
cd iot-dashboard-javascript-demo -
Add your pub/sub keys to
/public/js/keys.js -
(optional) Add your Google Maps API key which supports the JS Maps API to
public/js/keys.js. See 'Using your own Google Maps API key', below. -
Install dependencies.
npm install
-
Run the application:
npm run start
Please fork the repository if you'd like to contribute. Pull requests are always welcome.
Checkout the following lins for more information on developing IoT solutions with PubNub:
- IoT use cases with PubNub: https://www.pubnub.com/use-case/iot-device-control/
- IoT customers and case studies: https://www.pubnub.com/industry/iot-and-connected-devices/
- IoT PubNub developer path: https://www.pubnub.com/developers/internet-of-things-developer-path/
This project comes with a provided Maps key for ease of setup but should that key be subject to abuse and blocked by Google, you can provide your own as a workaround.
The steps to do this are as follows:
- Visit https://developers.google.com/maps/documentation/javascript/get-api-key and follow the instructions to create a project and API keys
- Make sure you have the following APIs enabled: 'Maps Embed API', 'Maps JavaScript API'. Both of these are free.
- Add your Google Maps API key to
public/js/keys.js.
A Note about Signals
PubNub offers the signal() method as an alternative to publish() for short lived, ephemeral data which goes out of date quickly. The same delivery guarantees do not exist for signals but signal pricing can be lower than publish. The primary limitation of signals, besides not being able to be stored in history or trigger push messages, is that they are limited to 64bytes. This demo opts to use a more descriptive message payload and therefore uses publish() but if you want to limit your updates to 64bytes, e.g. just passing a lat/long, then you could potentially save costs on your overall solution by using signal().
Provisioning
This demo has been built to be expanded in the future to handle real IoT devices. You may see strange workflows in the code, for example, assigning the simulator an ID and then asking that same simulator for the ID it was just assigned. The intention is to show that these two pieces of information would usually come from a provisioning server in production and hence the workflow is separated.
Message Persistence:
- For ease of use, this demo lacks any kind of serverside message persistence. Most customers deploying an IoT solution with PubNub to production will choose to use PubNub App Context to store attributes of the device. This is analogous to a 'device shadow' in AWS or 'twin device' in Azure.
- Because entities are only stored locally, if you refresh the page you will lose any created simulators. This is a limitation of the demo, not a limitation of PubNub.
- You will also see this if you open multiple instances of this application in different browser tabs. Any device (simulator) you create will only have its messages subscribed to by the tab in which you created the device.
MQTT:
- Most IoT solutions will use MQTT to exchange messages between devices and a server. PubNub offer an MQTT bridge to integrate devices that communicate via MQTT and many of our IoT customers choose to take advantage of this. The simulated devices spawned by this application only support the PubNub JavaScript SDK - This is a limitation of the demo, not a limitation of PubNub. MQTT integration is best done using real devices.
- Real Devices: Although this dashboard has been designed to integrate with real devices, the step-by-step tutorial to do this is left for a future exercise.
Events & Actions
- PubNub's "Events & Actions" feature allows you to listen for specific, configurable events and take the appropriate action such as invoking a webhook or PubNub Function. Events & Actions are ideal for IoT use cases, for example alerting the dashboard if a temperature sensor indicates food is stored above an acceptable temperature, the person monitoring the dashboard could then take immediate action to resolve the situation.
- This demo does not include Events & Actions but this is left for a future exercise.