THIS GUIDE IS MEANT FOR Pac/Apt LINUX USERS
for a better / more verbose guide on which linux to use; watch this vid from SOG here
To prepare, make sure you have virtualization enabled in your BIOS.
For AMD this could be done by enabling
• IOMMU
• NX Mode
• SVM Mode
For you lame Intel users, just enable
• VT-d
• VT-x
Install the drivers for your linux if your using nvidia:
If you haven't done so already; you can use this git repo here, only works for ubuntu/debian.
The Nvidia Drivers for APT based distros.
git clone https://github.com/Scotchman0/NVIDIA_Drivers.git
And then clone the repository by typing:
git clone https://github.com/Nthompson096/KVM-GPU-Passthrough.git && cd KVM-GPU-Passthrough
And then you should be good to go.
Preparing GRUB is very simple. Just follow these instructions.
-
Mark the script as executable: for AMD:
chmod +x grub_setup_amd.sh
for Intel:
chmod +x grub_setup_intel.sh
AMD:
chmod +x ./grub_setup_amd.sh
-
Then run either of these scripts:
-
AMD:
sudo ./grub_setup_amd.sh -
Intel:
sudo ./grub_setup_intel.sh -
Then just follow the instructions in script.
To configure libvirt chmod +x the appropriate script for your distro which configures libvirt and QEMU for you by typing
sudo sh ./libvirt_configuration_distroname.sh
swtpm will give you issues, it's best to add it in as a PPA and then update via terminal.
For previous 21.10 release you can use a PPA as shown below:
sudo add-apt-repository ppa:thopiekar/swtpm
sudo apt-get update
sudo apt-get install swtpm
For 20.04 LTS, use different PPA as shown below:
sudo add-apt-repository ppa:itrue/swtpm
sudo apt-get update
sudo apt-get install swtpm
- Download the latest ISO for Windows 10
- Open up Virt Manager and create a new virtual machine.
- Select local install media, and choose your Windows 10 ISO. Then choose how much ram you want, and how many CPUs you want. You can select your own custom storage, but for the sake of this guide I will be using the default location. Make sure to allocate at least 60 gigabytes.
- Name the Virtual Machine Win10, and tick the box which says customize configuration before install.
- Make sure your firmware is set to OVMF_CODE.fd, because you need the special UEFI firmware for the VM to boot properly.


- Lastly, go into your boot settings and make sure that your optical disk is checked.

- And then you should be able to click begin installation!
- After you finish installing windows, you should be good to shut down the VM and follow along with the next steps.
To create a rom you would need to download the following tools in a windows machine (dualboot), if you are dualbooting from windows be sure to create a backup with cloning software i personally use acronis but you can use clonezilla if that's a thing; just be sure you have an addtional hard drive around and that drive has enough space for all partitions.
- Gpu-Z
click on what has been circled and click write to file, it will save it as a rom; be sure to save it to where arch has access to it otherwise you will have to create a mount point. For AMD users the process should be the same.

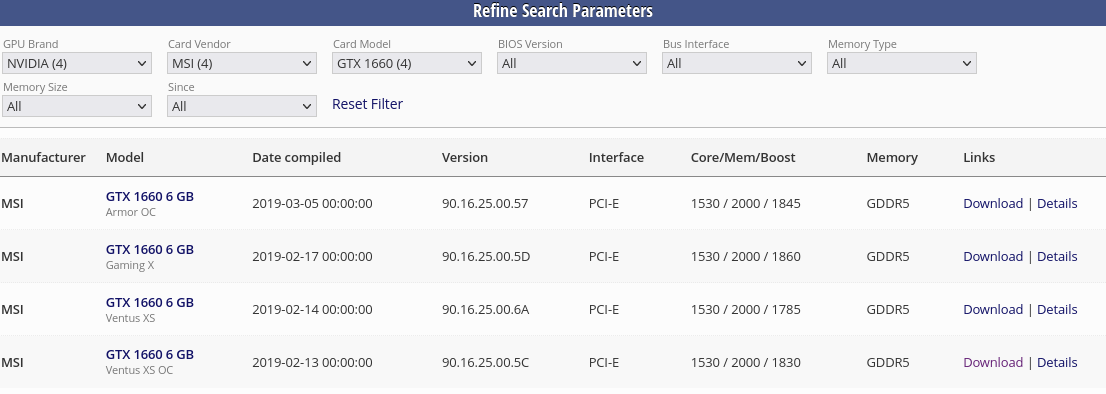
To view the vbios from arch you will simply need to install nvidia-settings for nvidia users, then on the GPU tab you will be able to view the vbios.

then do some google-fu site:techpowerup.com <vbios goes here>
Example site:techpowerup.com 86.04.99.00.06
You would have to try this tool, haven't tried it because I do not have an AMD gpu; sorry. just simply follow the instructions on how to save the vbios in linux, do not write.
NOTICE FOR APT (ubuntu/debian) Users Bless crashes and is NOT useable, for clearity sake you can just use hexed.it
- Go to this download link and download the ROM of your exact GPU (or do some google-fu).
-
Once you have your rom downloaded, type in
sudo pacman -S blessto download the hex editor to patch your rom. -
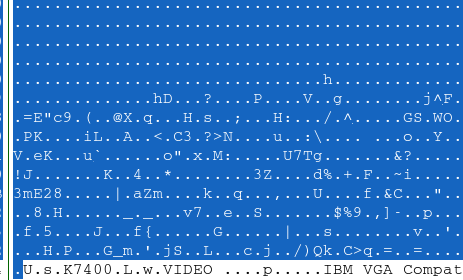
Open your ROM with the Bless hex editor, and as muta says: "This is where the real arcane s#!% happens."
-
Press CTRL + F to search, and search for "VIDEO" as text.

- Then, delete everything before the "U.s" or "U.y" or whatever, and save your ROM as something simple (i.e: patch.rom).
-
Once your ROM has been patched, open your terminal in the folder which you have your ROM saved in, and type in
sudo mkdir /var/lib/libvirt/vbios/ && sudo mv <RENAME TO YOUR ROM>.rom /var/lib/libvirt/vbios
For Ubuntu/Debian Based it should be placed inside /usr/share/vgabios/, the config libvirt script for Ubuntu should create the dir for you if it doesn't exist, just place it there.
and make sure to rename to what you named your ROM.
- Then your ROM should be all patched and good to go!
This is an amazing hook script made by @risingprismtv on gitlab. What this script does is stop your display manager service and all of your running programs, and unhooks your graphics card off of Linux and rehooks it onto the Windows VM.
-
Clone Risngprism's single GPU passthrough gitlab page:
git clone https://gitlab.com/risingprismtv/single-gpu-passthrough && cd single-gpu-passthrough. -
Run the install script as sudo:
sudo ./install-hooks.sh. -
The scripts will successfully install into their required places without issue!
For the VM to actually pass the gpu, you need to add the PCI device to your VM. Here is how to do so.
Before we edit pass through our GPU, make sure to enable XML editing.

NOTE: This is great if you're trying to use software that has macros for gaming on a keyboard/mouse, would highly recommend doing this instead of doing a full USB 3.0 passthough as it will detect the mouse and keyboard potentially as a generic interface.
- Add every PCI device which has to do with your graphics card to the VM.
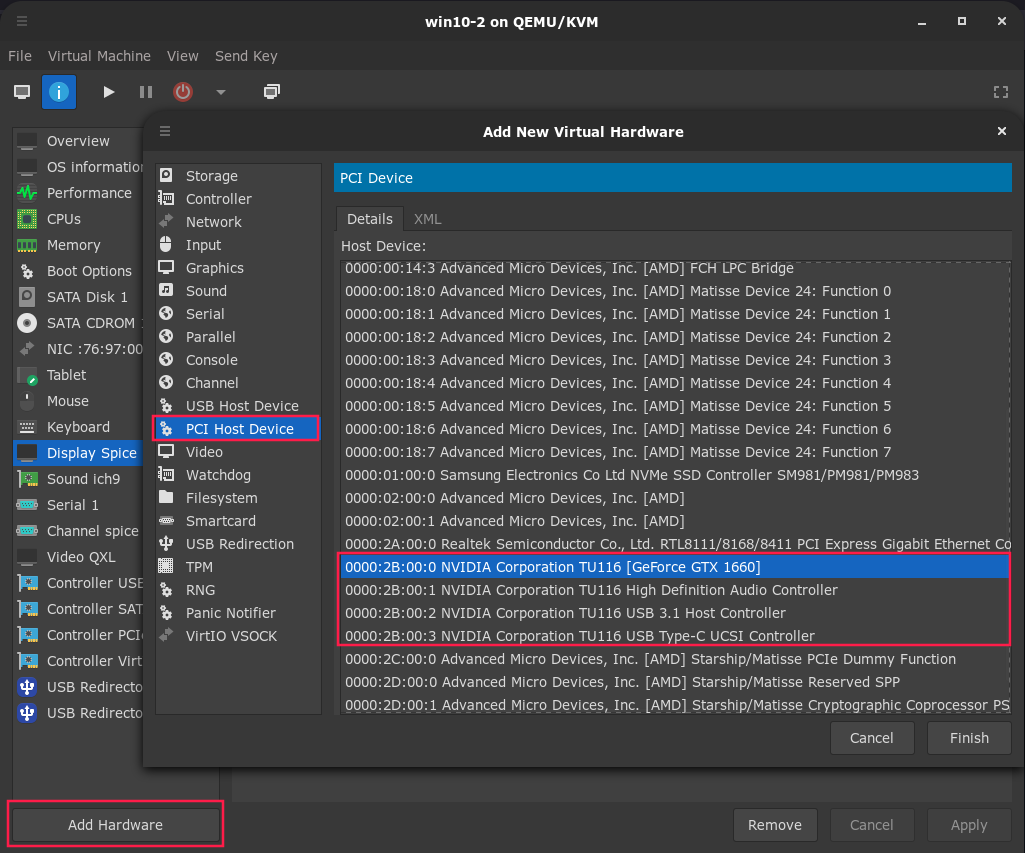
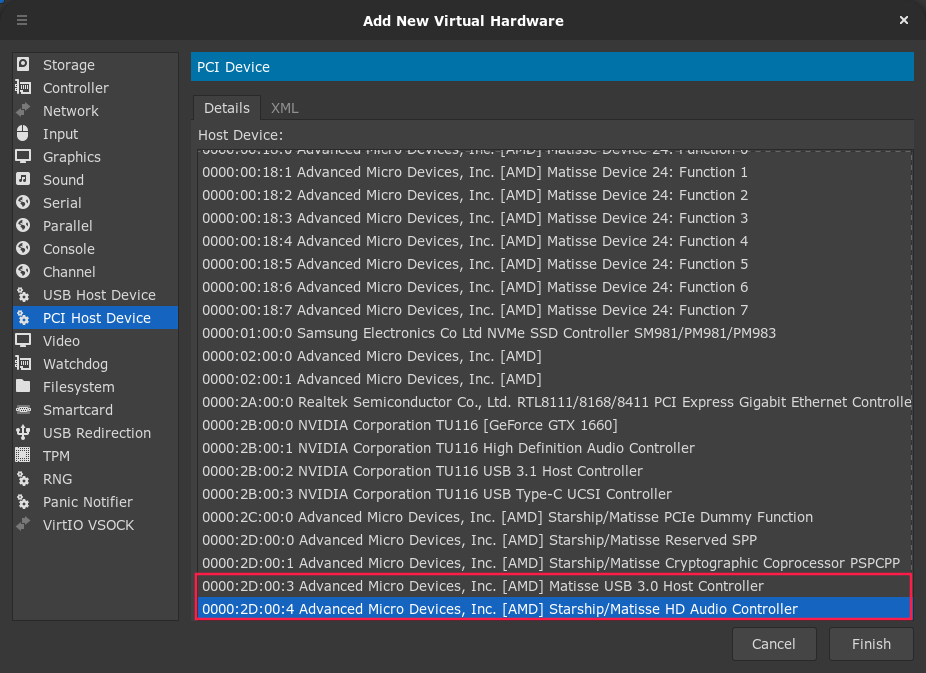
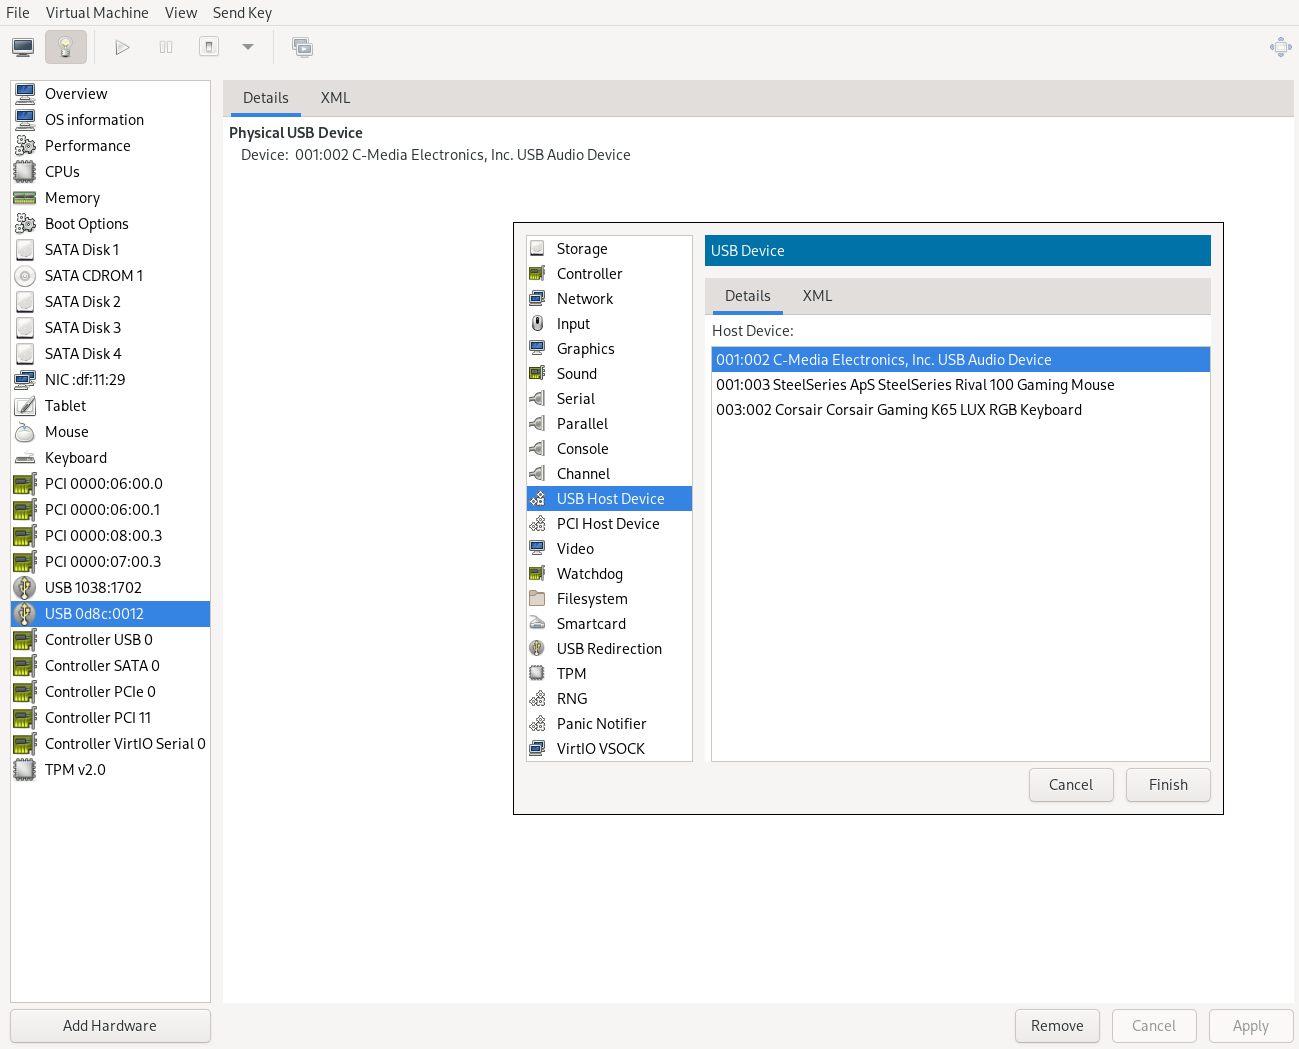
- Pass through your audio device and your USB controller.
- usb redirect any usb devices that are having issues, i would redirect your headset for headset users and the mouse. add hardware > usb host device > the desired device
USB Host Redirection example
-
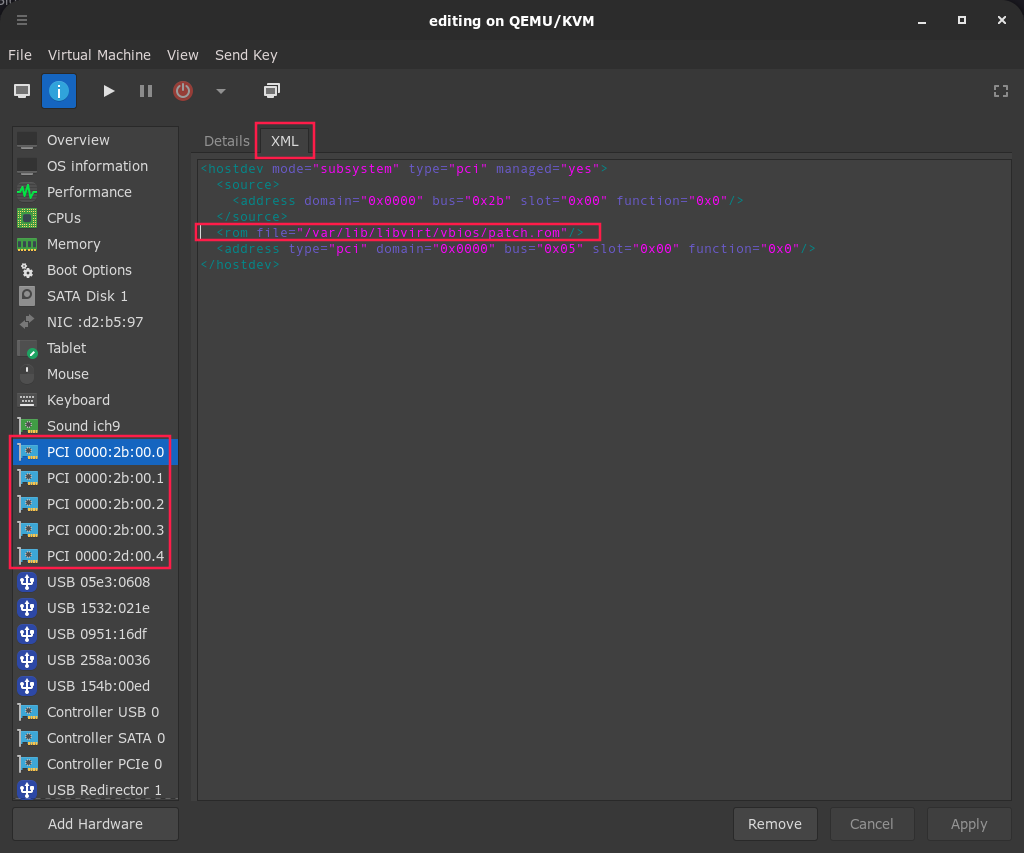
Remember the ROM we patched? Well we're gonna use it now.
-
Edit the XML of each passed through PCI device that has to do with your GPU and add the line
<rom file="/var/lib/libvirt/vbios/<ROMFILE>.rom"/>.
Make sure to rename ROMFILE to what you named your ROM.
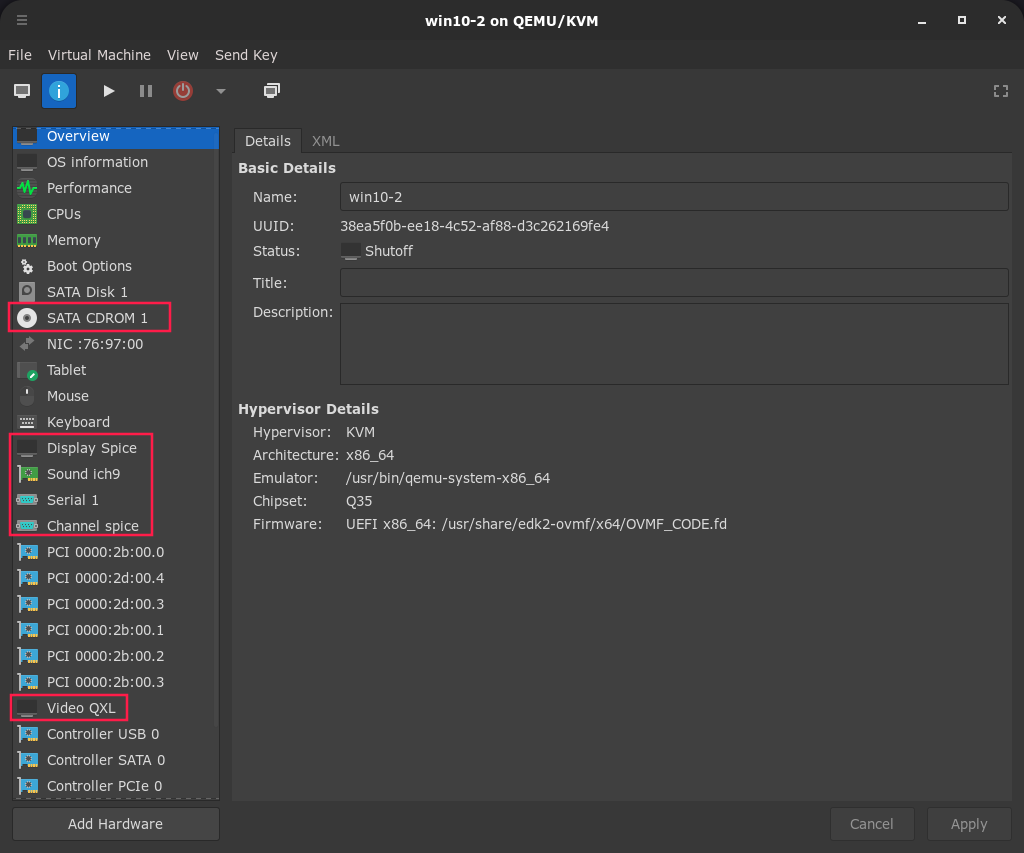
- Lastly, remove every spice/qxl device from your virtual machine
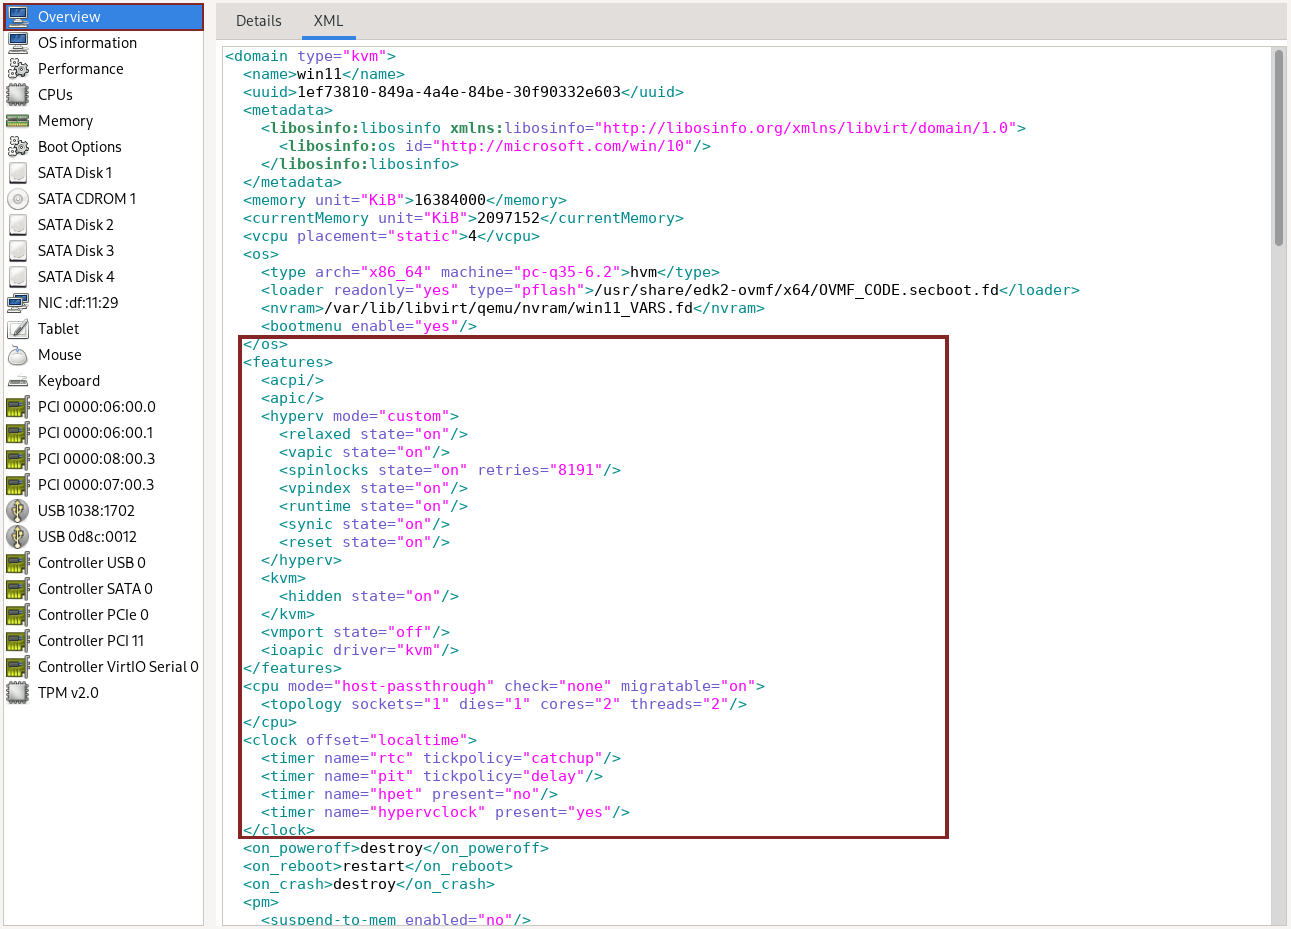
- If you are using an NVIDIA graphics card, add these lines to your XML overview. Also this could be used to hide your VM so I would go ahead an add anyway, be sure to turn ON hyper-v in windows features.
   </os>
   <features>
   <acpi/>
   <apic/>
   <hyperv mode="custom">
   <relaxed state="on"/>
   <vapic state="on"/>
   <spinlocks state="on" retries="8191"/>
   <vpindex state="on"/>
   <runtime state="on"/>
   <synic state="on"/>
   <reset state="on"/>
   </hyperv>
   <kvm>
   <hidden state="on"/>
   </kvm>
   <vmport state="off"/>
   <ioapic driver="kvm"/>
   </features>
To make sure virtual machine is not found in the VM set feature hypervisor off like so under CPU:
   <cpu mode="host-passthrough" check="none" migratable="on">
   <topology sockets="1" dies="1" cores="2" threads="2"/>
   <feature policy="disable" name="hypervisor"/>
   </cpu>
Be aware that you'd have to edit the amount of core/socks/threads to reflect on the amount of vcpu placments like so
<vcpu placement="static">4</vcpu>
and that <feature policy="disable" name="hypervisor"/> hides the hypervisor.
clock settings:
   <clock offset="localtime">
   <timer name="rtc" tickpolicy="catchup"/>
   <timer name="pit" tickpolicy="delay"/>
   <timer name="hpet" present="no"/>
   <timer name="hypervclock" present="yes"/>
   </clock>
for clock offset, you can either use windows localtime or linux UTC; if you're having issues with localtime set the
offset of the clock to UTC and vise versa. more info found Here.
If you wanted to hide virtualization inside task manager, which wouldn't hurt keep this code as is or remove:
<feature policy="disable" name="hypervisor"/> Under <CPU>
and for the sake of it, here's a windows 11 example, do copy paste if you want and feel free to use.
<sysinfo type="smbios">
<bios>
<entry name="vendor">Fake BIOS Vendor</entry>
<entry name="version">Fake BIOS Version</entry>
</bios>
<system>
<entry name="manufacturer">Fake Manufacturer</entry>
<entry name="product">Fake Product</entry>
</system>
</sysinfo>
<!-- other XML nodes -->
<os>
<!-- other XML nodes -->
<smbios mode="sysinfo"/>
</os>
More info can be found out on this; here.
These would be used for a Hard Drive pass though, basically handing off your hard drive to the vm. the process is the same as usb-host, just add the hard drive by selecting storage than manage and the path, usually it starts with /dev/sxx; a good example is /dev/sdc you can find info about this using sudo fdisk -l, I would be careful about handing off hard drives this way and to not edit the xml docs, just boot up virt-manager and remove the hard drive, DO NOT DELETE WHEN ASKED; just remove the storage device.
For people having issues with games such as red dead 2 Enter this value here inside the XML document for your new/current VM:
The first part which is the domain
<domain xmlns:qemu="http://libvirt.org/schemas/domain/qemu/1.0" type="kvm">
Specifically add in this part;
xmlns:qemu="http://libvirt.org/schemas/domain/qemu/1.0"
The Emulator Path, edit accordingly.
<pm>
<suspend-to-mem enabled="no"/>
<suspend-to-disk enabled="no"/>
</pm>
<devices>
<emulator>/path/to/qemu-system-x86_64-pass</emulator>
And the QEMU Command Line
<qemu:commandline>
<qemu:arg value="-smbios"/>
<qemu:arg value="type=2,manufacturer=ASRock,product=X470 Taichi,version=AM4,serial=S4M88119"/>
<qemu:arg value="-smbios"/>
<qemu:arg value="type=4,manufacturer=AMD,version=1000"/>
<qemu:arg value="-smbios"/>
<qemu:arg value="type=17,manufacturer=Micron"/>
</qemu:commandline>
Also do not forgot to set your smbios mode to host like so if all else fails:
<smbios mode="host"/>
</os>
You can use other manufacturers such as gigabyte, asus, etc; if you want to reflect on your physical motherboard be sure to look at the specs at the website of the manufacturer, usually found at the motherboards website (usually it's the CPU and stuff) after pulling up
sudo dmidecode -t 2
and
lspci
for the semiconductor info and serial number, cannot find the serial number? Then it shouldn't matter much and you can use the value provided or open her up (welcome to the real world) and look for a sticker.
You also need to patch the binary of qemu-system-x86_64, you can cp the file inside a new dir from /usr/bin/qemu-system-x86_64 to a new file such as /home/"username"/patch/qemu/qemu-system-x86_64, or you may keep it inside it's current directory with a new name such as the one listed above for safe keeping; be sure to run sudo.
I have an error about /qemu-7.0.0/accel/accel-softmmu.c:82:accel_init_ops_interfaces: assertion failed: (ops != NULL)
do the following below.
Here is a shell command script, save the script and run the script as root (sudo) if you are running it inside /usr/bin, otherwise save it to where you copied the emulator; edit the values when needed. Also be sure to chmod +x binary as an executable as sudo.
#!/bin/bash

hexdump -ve '1/1 "%.2x"' ./qemu-system-x86_64 |
sed -e 's/424f4348/434f4348/g' -e 's/42585043/44585043/g' |
xxd -r -p > ./qemu-system-x86_64-pass
This is usefull for people who want to name their VMs to something other than win10.
-
Edit the hooks script by typing
sudo nano /etc/libvirt/hooks/qemu -
On the line with the if then statement, add in
|| [[ $OBJECT == "RENAME TO YOUR VM" ]]before the;.

- Now you should be good to turn on your VM! On Windows drivers will auto install.
If you want use gparted to delete the ntfs volume, recovery volume; anything microsoft (except the efi-partitons, unless if that's mounted somewhere else in linux, don't touch the linux partitions), when finished delete the bios options to boot from windows with efibootmgr; be sure to resize the disk accordingly.
view entries with efibootmgr:
efibootmgr -v
then delete the entry with
efibootmgr -b # -B #
There is a GUI for efibootmgr, you can check out this repo from Elinvention
Be careful doing this as this can mess up booting from EFI-bios, be sure to know what you are doing.
use this just scroll down the KMS Activiator and download 7zip, follow the directions.