By Chen Liu, Kihwan Kim, Jinwei Gu, Yasutaka Furukawa, and Jan Kautz
This paper will be presented (Oral) in IEEE CVPR 2019.
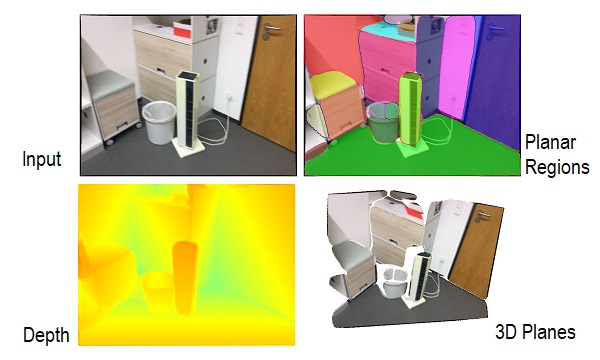
This paper proposes a deep neural architecture, PlaneR-CNN, that detects arbitrary number of planes, and reconstructs piecewise planar surfaces from a single RGB image. For more details, please refer to our paper and video, or visit project website. The code is implemented using PyTorch.
- Chen Liu, Washington University in St. Louis
- Kihwan Kim, NVIDIA
- Jinwei Gu, SenseTime
- Yasutaka Furukawa, Simon Fraser University
- Jan Kautz, NVIDIA
Copyright (c) 2018 NVIDIA Corp. All Rights Reserved. This work is licensed under the Creative Commons Attribution NonCommercial ShareAlike 4.0 License.
Clone repository:
git clone https://github.com/NVlabs/planercnn.git
Please use Python 3. Create an Anaconda environment and install the dependencies:
conda create --name planercnn
conda activate planercnn
conda install -y pytorch=0.4.1
conda install pip
pip install -r requirements.txt
Equivalently, you can use Python virtual environment to manage the dependencies:
pip install virtualenv
python -m virtualenv planercnn
source planercnn/bin/activate
pip install -r requirements.txt
Now, we compile nms and roialign as explained in the installation section of pytorch-mask-rcnn. To be specific, you can build these two functions using the following commands with the right --arch option:
| GPU | arch |
|---|---|
| TitanX | sm_52 |
| GTX 960M | sm_50 |
| GTX 1070 | sm_61 |
| GTX 1080 (Ti), Titan XP | sm_61 |
More details of the compute capability are shown in NVIDIA
cd nms/src/cuda/
nvcc -c -o nms_kernel.cu.o nms_kernel.cu -x cu -Xcompiler -fPIC -arch=[arch]
cd ../../
python build.py
cd ../


cd roialign/roi_align/src/cuda/
nvcc -c -o crop_and_resize_kernel.cu.o crop_and_resize_kernel.cu -x cu -Xcompiler -fPIC -arch=[arch]
cd ../../
python build.py
cd ../../
Please note that, the Mask R-CNN backbone does not support cuda10.0 and gcc versions higher than 7. If you have troubles compiling these two libraries, try to downgrade PyTorch to 0.4.0 before compilation and upgrade back to 0.4.1 after compilation. You might also want to find more information on their original repository.
Models are saved under checkpoint/. You can download our trained model from here, and put it under checkpoint/ if you want to fine-tune it or run inferences.
In this project, plane parameters are of absolute scale (in terms of meters). Each plane has three parameters, which equal to plane_normal * plane_offset. Suppose plane_normal is (a, b, c) and plane_offset is d, every point (X, Y, Z) on the plane satisfies, aX + bY + cZ = d. Then plane parameters are (a, b, c)*d. Since plane normal is a unit vector, we can extract plane_normal and plane_offset from their multiplication.
python evaluate.py --methods=f --suffix=warping_refine --dataset=inference --customDataFolder=example_imagesResults are saved under "test/inference/". Besides visualizations, plane parameters (#planes x 3) are saved in "*_plane_parameters_0.npy" and plane masks (#planes x 480 x 640) are saved in "*_plane_masks_0.npy".
Please put your images (.png or .jpg files), and camera intrinsics under a folder ($YOUR_IMAGE_FOLDER). The camera parameters should be put under a .txt file with 6 values (fx, fy, cx, cy, image_width, image_height) separately by a space. If the camera intrinsics is the same for all images, please put these parameters in camera.txt. Otherwise, please add a separate intrinsics file for each image, and name it the same with the image (changing the file extension to .txt). And then run:
python evaluate.py --methods=f --suffix=warping_refine --dataset=inference --customDataFolder=$YOUR_IMAGE_FOLDERPlease first download the ScanNet dataset (v2), unzip it to "$ROOT_FOLDER/scans/", and extract image frames from the .sens file using the official reader.
Then download our plane annotation from here, and merge the "scans/" folder with "$ROOT_FOLDER/scans/". (If you prefer other locations, please change the paths in datasets/scannet_scene.py.)
After the above steps, ground truth plane annotations are stored under "$ROOT_FOLDER/scans/scene*/annotation/". Among the annotations, planes.npy stores the plane parameters which are represented in the global frame. Plane segmentation for each image view is stored under segmentation/.
To generate such training data on your own, please refer to data_prep/parse.py. Please refer to the README under data_prep/ for compilation.
Besides scene-specific annotation under each scene folder, please download global metadata from here, and unzip it to "$ROOT_FOLDER". Metadata includes the normal anchors (anchor_planes_N.npy) and invalid image indices caused by tracking issues (invalid_indices_*.txt).
To train on custom data, you need a list of planes, where each plane is represented using three parameters (as explained above) and a 2D binary mask. In our implementation, we use one 2D segmentation map where pixels with value i belong to the ith plane in the list. The easiest way is to replace the ScanNetScene class with something interacts with your custom data. Note that, the plane_info, which stores some semantic information and global plane index in the scene, is not used in this project. The code is misleading as global plane indices are read from plane_info here, but they are used only for debugging purposes.
python train_planercnn.py --restore=2 --suffix=warping_refineoptions:
--restore:
- 0: training from scratch (not tested)
- 1 (default): resume training from saved checkpoint
- 2: training from pre-trained mask-rcnn model

--suffix (the below arguments can be concatenated):
- '': training the basic version
- 'warping': with the warping loss
- 'refine': with the refinement network
- 'refine_only': train only the refinement work
- 'warping_refine_after': add the warping loss after the refinement network instead of appending both independently

--anchorType:
- 'normal' (default): regress normal using 7 anchors
- 'normal[k]' (e.g., normal5): regress normal using k anchors, normal0 will regress normal directly without anchors
- 'joint': regress final plane parameters directly instead of predicting normals and depthmap separately
Temporary results are written under test/ for debugging purposes.
To evaluate the performance against existing methods, please run:
python evaluate.py --methods=f --suffix=warping_refineOptions:
--methods:
- f: evaluate PlaneRCNN (use --suffix and --anchorType to specify configuration as explained above)
- p: evaluate PlaneNet
- e: evaluate PlaneRecover
- t: evaluate MWS (--suffix=gt for MWS-G)
Statistics are printed in terminal and saved in logs/global.txt for later analysis.
Note that PlaneNet and PlaneRecover are under the MIT license.
To evaluate on the NYU Depth dataset, please first download the labeled dataset from the official website, and the official train/test split from here. Put them under the same folder "$NYU_FOLDER". To evaluate, please run,
python evaluate.py --methods=f --suffix=warping_refine --dataset=nyu --dataFolder="$NYU_FOLDER"Note that the numbers are off with the provided model. We retrained the model after cleaning up the code, which is different from the model we tested for the publication.
If you have any questions, please contact the primary author Chen Liu <chenliu@wustl.edu>, or Kihwan Kim <kihwank@nvidia.com>.
Our implementation uses the nms/roialign from the Mask R-CNN implementation from pytorch-mask-rcnn, which is licensed under MIT License