
Status: Development Only
OpenCore Version: 0.9.8
Download now »
Report Bug
·
Recent Changes
·
YouTube Review
·
Original Repo
Development is a bit complex right now considering I don't have a working T440s. However, I am still maintaining this EFI so I will have the community test it and give feedback.
Recent Changes ⌚️
03.27.2024 : Updated to OpenCore 0.9.8 .
03/27/2023 : Updated to OpenCore 0.9.0 .
02/01/2023 : Updated to OpenCore 0.8.8 .
12/14/2022 : Updated to OpenCore 0.8.7 .
11/14/2022 : Updated to OpenCore 0.8.6 .
11/09/2022 : Changed the SMBIOS from MacBookPro12,1 to MacBookPro14,1 for better power management.
10/25/2022 : Downgraded back to OpenCore 0.8.3 to avoid kernel panics and improve stability.
10/14/2022 : Changed the SMBIOS from MacBookPro11,5 to MacBookPro12,1 and finally added support for video out in macOS Monterey.
10/12/2022 : Updated from OpenCore 0.8.3 to OpenCore 0.8.5
09/29/2022 : Added TrackPoint support and fixed the Instant Wake Issue when in sleep mode.
09/26/2022 : Added Bluetooth support for macOS Monterey & fixed the slow startup issue.
09/18/2022 : Changed the SMBIOS from MacBookPro11,1 to MacBookPro11,5 for macOS Monterey.
My ThinkPad T440s Hardware Specs 💻
| Model | Lenovo ThinkPad T440s |
|---|---|
| Processor | Intel Core i5-4300U (2C, 4T, 1.9GHz / 2.5GHz) vPro (The best compatibility with macOS) |
| Graphics | Integrated Intel HD Graphics 4400 |
| Memory | 12 GB DDR3 (4GB Soldered + 8GB SODIMM DDR3, dual-channel) |
| Display | 14" HD (1600x900) TN, non-touch |
| Storage | 1 TB Pioneer SATA SSD + 16 GB mSATA SSD |
| Ethernet | Intel Ethernet |
| WLAN + Bluetooth | Intel Wifi 7260ngw + Bluetooth 4.0 |
| Camera | 720p resolution, low light sensitive, fixed focus |
| Audio support | HD Audio, Realtek ALC3245 codec, stereo speakers 1Wx2, dual array microphone, combo audio/microphone jack |
| Keyboard | 6-row, spill-resistant, multimedia Fn keys, LED backlight |
| Battery | Internal Li-Polymer 3-cell (68) and External Li-Ion 6-cell (68+) |
Hardware Compatibility 🧰
- Intel HD Graphics 4400 QE/CI
- Brightness Control
- TouchScreen with Gestures
- Keyboard & Backlit
- TrackPoint (TrackPoint / Nipple Mouse Warriors, rejoice!)
- TouchPad with Gestures
- Dual Battery Support
- Secure Boot
- FileVault
- Sleep and Wake
- Audio and DisplayPort Audio
- Power Management
- USB Ports
- LAN
- DisplayPort
- VGA
- Wireless and Bluetooth
- SD Card Reader
- Docking Station USB Ports
- Docking Station LAN
- Docking Station DisplayPort
- Docking Station VGA Port
- Docking Station DVI Port
- Docking Station DisplayPort Audio
- DRM content
- FingerPrint Reader
Photos 📷


macOS Ventura Compatibility
Warning macOS Ventura support is currently in ALPHA which means it is extremely unstable. Use at your own risk!
Getting Started
To start you'll need the following:
You must have the following items:
- Lenovo ThinkPad T440s (Obviously 😁).
Please note that it is recommended your ThinkPad T440s has an Intel Core i5-4210U in order for macOS to boot.
- Access to a working Windows machine with Python installed.
- A pendrive with more than 4 GB (Keep in mind, during the preperation we will format the disk to create the install media).
- an Internet connection via Ethernet.
- 1-2 hours of your time.
Creating the USB Installer
- To grab legacy installers is super easy, first grab a copy of OpenCorePkg and head to /Utilities/macrecovery/. Next copy the folder path for the macrecovery folder.
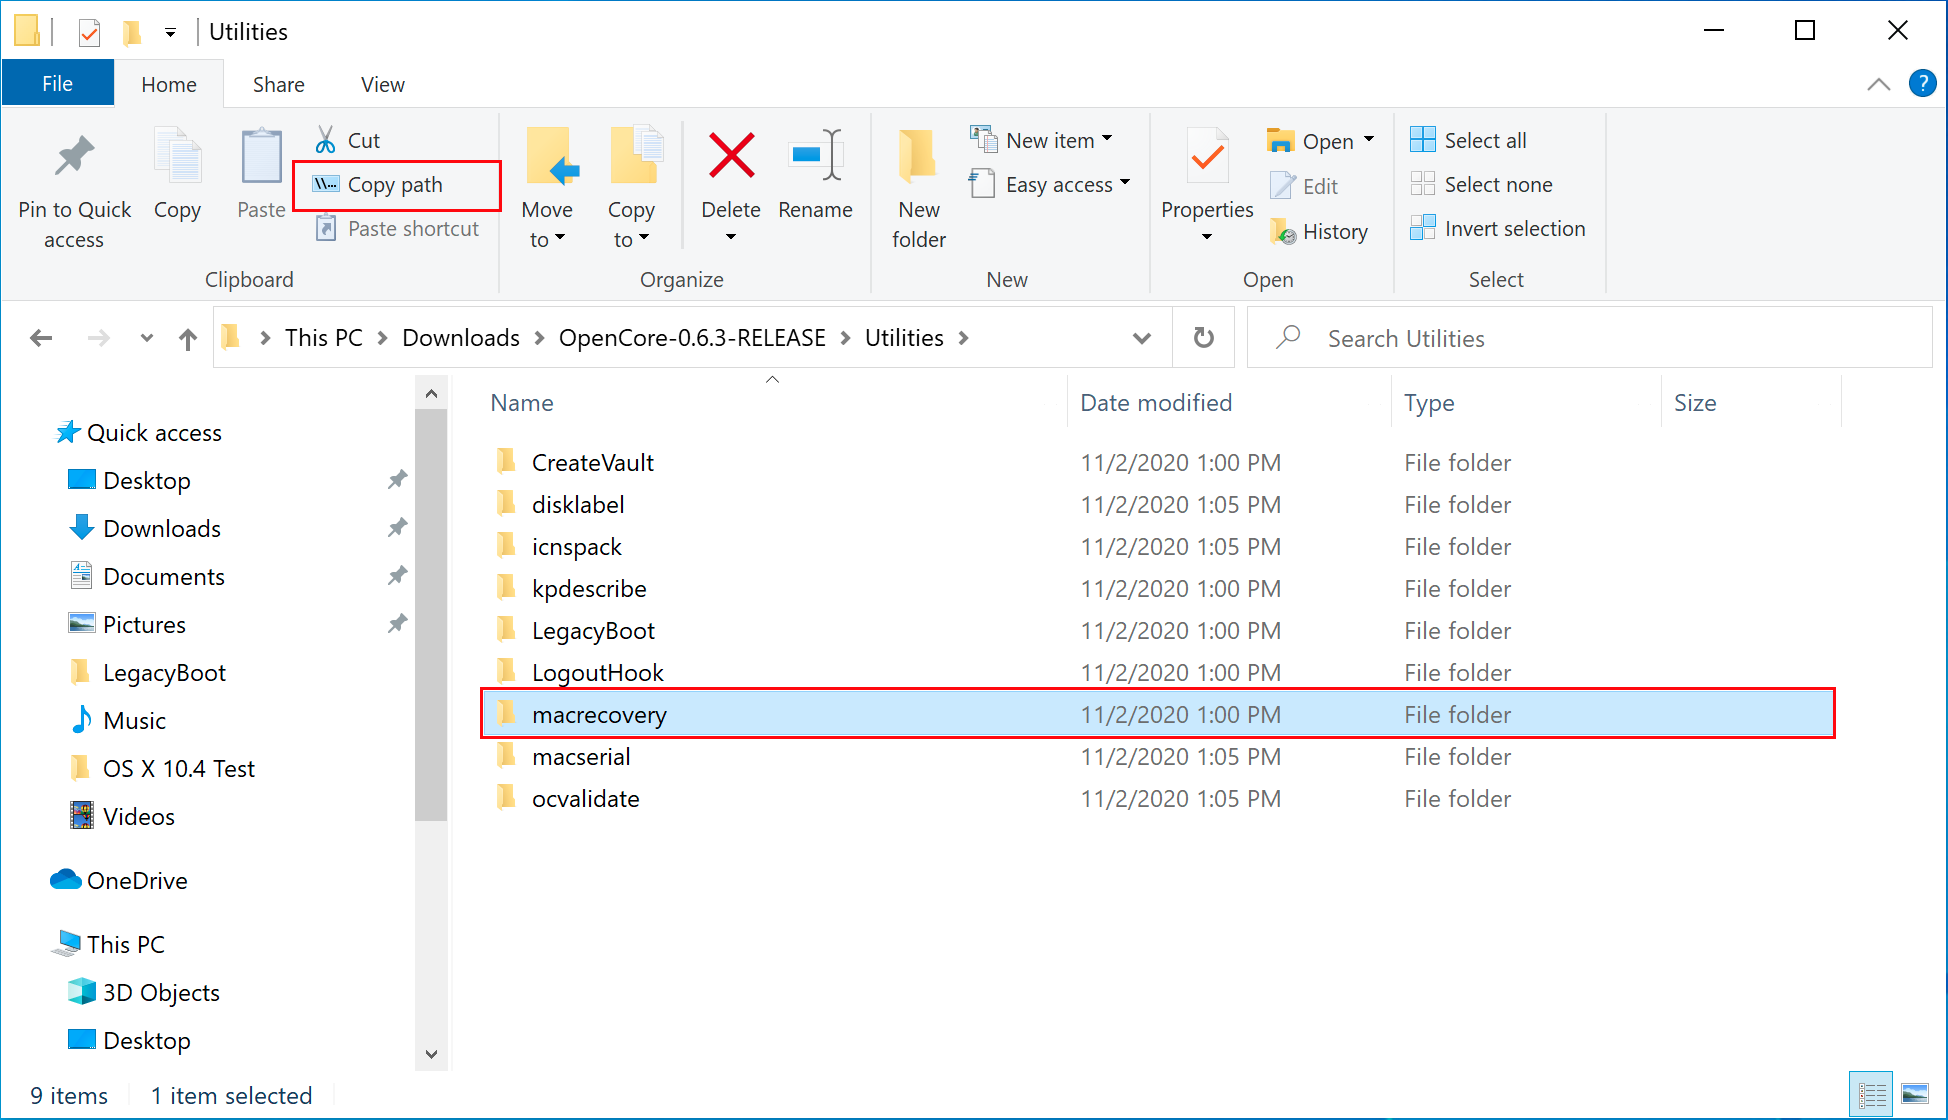
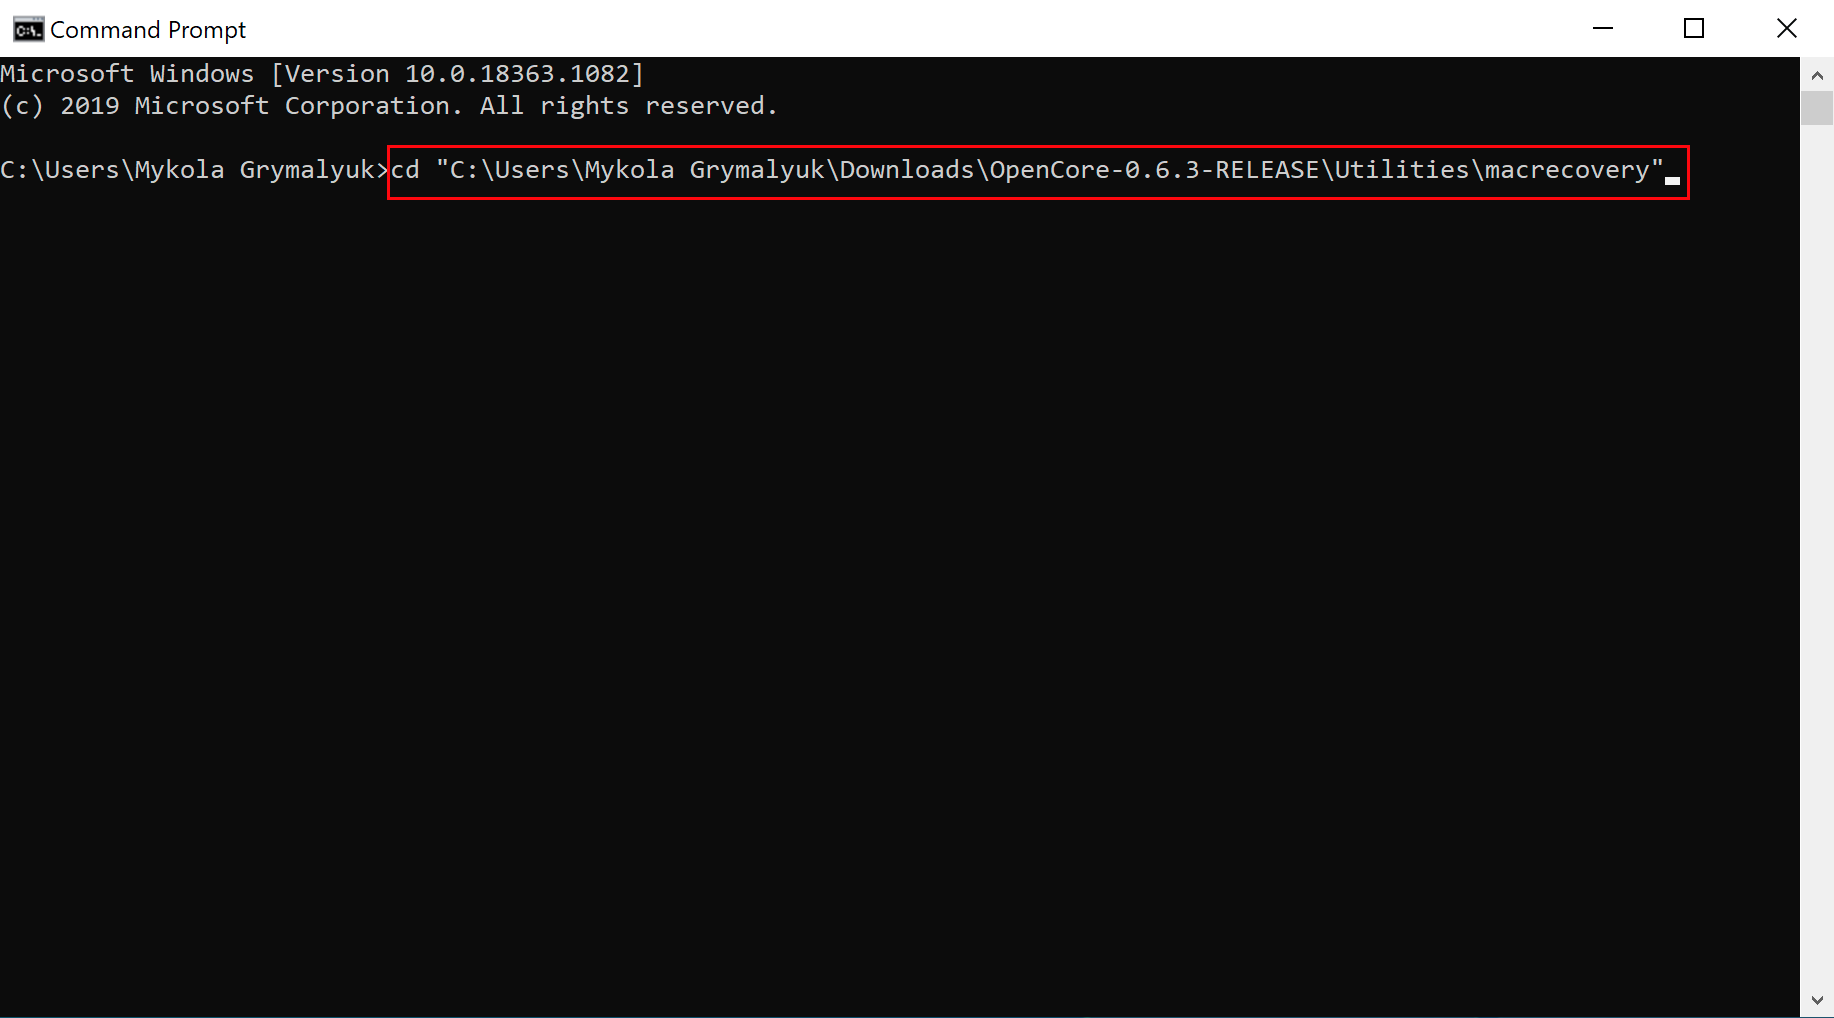
- From here, you'll want to open up a Command Prompt and cd into the macrecovery folder that we copied earlier:
cd Paste_Folder_Path
- Now run one of the following depending on what version of macOS you want(Note these scripts rely on Python support, please install if you haven't already):
# Mojave (10.14)
python macrecovery.py -b Mac-7BA5B2DFE22DDD8C -m 00000000000KXPG00 download

# Catalina (10.15)
python macrecovery.py -b Mac-00BE6ED71E35EB86 -m 00000000000000000 download

# Big Sur (11)
python macrecovery.py -b Mac-42FD25EABCABB274 -m 00000000000000000 download

# Monterey (12)
python macrecovery.py -b Mac-E43C1C25D4880AD6 -m 00000000000000000 download

# Ventura (13) (Work in progress)
python3 macrecovery.py -b Mac-4B682C642B45593E -m 00000000000000000 download
macOS 12 and above note: As recent macOS versions introduce changes to the USB stack, it is highly advisable that you map your USB ports (with USBToolBox) before installing macOS.
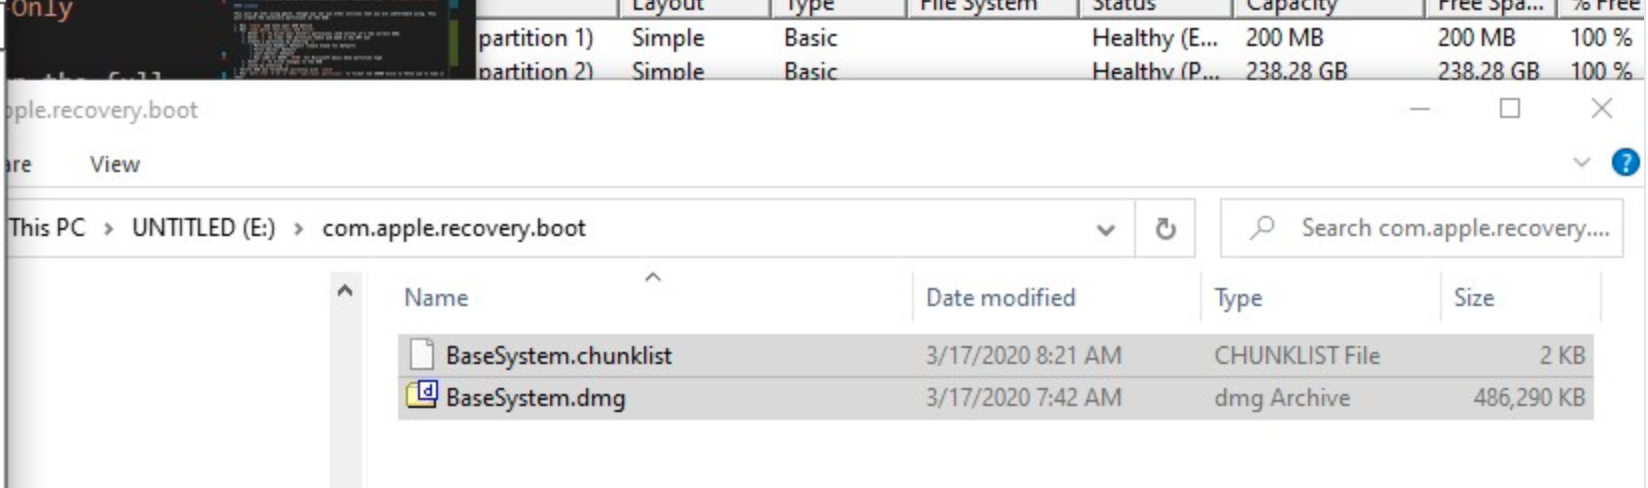
This will take some time, however once you're finished you should get either BaseSystem or RecoveryImage files:


- Download Rufus, set the BOOT selection as not bootable, set File System as Large FAT32, click Start, and delete all file autorun in USB Drive partition.

- Next, go to the root of this USB drive and create a folder called com.apple.recovery.boot. Then move the downloaded BaseSystem or RecoveryImage files. Please ensure you copy over both the .dmg and .chunklist files to this folder:
-
Open up and extract the EFI folder archive you downloaded earlier.
-
Copy the folder named, "EFI," to the root of your USB Drive.
-
Restart your computer.
Installing macOS
-
Open the BIOS and disable all the security options. (Security Chip, Intel (R) AT Module Activation, and Computrace Module)
-
Boot via your Flash Drive.
-
Boot the macOS installer.
-
Now open Disk Utility and format your internal or external Hard Drive or SSD as APFS.
-
Follow the on-screen prompts and install macOS.
-
Your system might reboot during the installation.
-
Now after install again boot into your usb drive and then select the drive that you installed macOS on.
-
Download and install OpenCore Configurator.
-
Open OpenCore Configurator and Mount the EFI partition of the drive you want to boot off of.
-
Now copy the EFI Folder to the EFI Partition and overwrite it with the one system created.
-
Now try booting macOS without the USB drive.
-
Congratulations, you've successfully hackintoshed your Lenovo ThinkPad T440s.
Updating OpenCore
- Download and install the OpenCore Updater.
- When the app opens, press Get Started. A dialog will appear asking you to select the EFI directory.
- Mount the EFI Partition on your drive using OpenCore Configurator.
- Select your EFI directory. It's usually /Volumes/EFI/EFI. It should have BOOT and OC directories inside.
- If your OpenCore version is detected, your OpenCore version and list of kexts you are using will be displayed. If your OpenCore version is not detected, you will be asked to select the OpenCore version you are using. Select the version you are using and press Select this version.
- If you are not using the latest version of OpenCore, the app will ask you to update. Press Update to update OpenCore.
- The app will start to download OpenCore, kexts, and Binary Data. this might take some time and you might see the spinning beach ball. DO NOT CLOSE THE APP.
- When the app finishes downloading, it will create a backup of your old EFI and will swap files with the new ones.
- Then, it will update config.plist. When it's done, it will display that it's done. It will also display the list of not updated kexts, the backup directory, and that OpenCore Vault is disabled(if it was enabled). You need to reboot your computer to see the changes.
Post-Install Tweaks
These are the recommended settings to have everything working properly:
Security Tab:
Security Chip > Security Chip [Disabled]Anti-Theft > Intel (R) AT Module Activation > Current Setting [Disabled]Anti-Theft > Computrace > Computrace Module Activation > Current Setting [Disabled]
Note: These laptops do have whitelist which doesn't allow you to use other Card than the Intel AC7260. In order to use a different / supported card, you need to mod your bios (remove whitelist) or downgrade to Bios v2.36
- Bios v2.36 doesn't have whitelist so downgrading allows you to use any wireless card that you want.
Users with 1366x768 or 1600x900 displays can go ahead and enable secure boot and enjoy it.
Users with upgraded displays to 1080p or native 1080p displays will have garbled screen if CSM is disabled in BIOS (which can't be left enabled if Secure Boot enabled)
In order to fix this problem we need to patch Display-EDID.
First we need to download these three Applications: Hackintool, AWEDIDEditor and HexFiend
- Open Hackintool and go to the
Displaystab and click the Export icon/button on the bottom-right side. - On desktop, you will see some new files appeared, now open the
EDID-***-****-orig.binfile with AWEDIDEditor - Go to
Detailed Datatab and changeH. Sync Width:value to100. - Save the EDID as
Patched-EDIDor whatever name you like just to know which one is the patched one - Open the
Patched-EDIDwith HexFiend and make sure you expand it so it contains 8 columns of code bytes. - Copy the 128 bytes code and paste it into:
EFI>OC>Config.plist>DeviceProperties>PciRoot(0x0)/Pci(0x2,0x0)>AAPL00,override-no-connect - Save the config.plist file and reboot, Enjoy Secure Boot without garbled screen.
If your Lenovo ThinkPad T440s doesn't have a TouchScreen display, it is required for you to disable the kext responsible for TouchScreen.
Go to EFI/OC/Config.plist > Kernel > Add > and disable the 4 following kexts:
VoodooI2CServices.kext - Enabled = NoVoodooGPIO.kext - Enabled = NoVoodooI2C.kext - Enabled = NoVoodooI2CHID.kext - Enabled = No
Most of the users have probably already upgraded to a Lenovo ThinkPad T450s Touchpad (the one with Physical Buttons) and this one does work natively, no need to touch anything. For you users that have the standard Touchpad that came with this laptop, you have to do some changes as VoodooRMI doesn't seem to work very well with them.
Go to EFI/OC/Config.plist > Kernel > Add and disable the VoodooRMI kexts:
VoodooRMI.kext - Enabled = NoVoodooRMI.kext/Contents/PlugIns/RMISMBus.kext - Enabled = NoVoodooRMI.kext/Contents/PlugIns/VoodooTrackpoint.kext - Enabled = NoVoodooRMI.kext/Contents/PlugIns/VoodooInput.kext - Enabled = No
Once done, enable the VoodooPS2Controller kexts for Touchpad:
VoodooPS2Controller.kext/Contents/PlugIns/VoodooInput.kext - Enabled = YesVoodooPS2Controller.kext/Contents/PlugIns/VoodooPS2Trackpad.kext - Enabled = YesVoodooPS2Controller.kext/Contents/PlugIns/VoodooPS2Mouse.kext - Enabled = Yes
Now enable the SSDT-TPD.aml for Touchpad to work with VoodooPS2:
EFI/OC/Config.plist > ACPI > Add > SSDT-TPD.aml > Enabled = Yes
To have working Keyboard Function Keys (Fn) and Fan reading etc, you need to install the YogaSMCPane and the YogaSMC App. YogaSMC.kext is already included in the EFI so when yo go to releases tab, you download the YogaSMC-App-release.dmg
ALCPlugFIx is required to fix static noise on headphones, however Black-Dragon74 released a Swift version that doesn't require hda-verb, alc-verb or CodecCommander kext. the ALCPlugFix.zip is included in the Tools folder.
Installation:
- Extract ALCPlugFix zip into desktop
- Open terminal and type following commands one by one on the listed order:
sudo spctl --master-disablesudo mkdir /usr/local/bin/cd desktop/ALCPlugFixsudo cp -R ALC3232.plist /usr/local/bin/./install.sh- Now the installer will ask you to drop the
ALC3232.plistinto the terminal window. - Open a new finder window and press
Shift + Cmd(Alt) + Gto open a newgo to folder:window - Now type:
/usr/local/bin/ - Drag the
ALC3232.plistfrom the/usr/local/binfolder into the terminal window and press enter. - Done
Users with Intel AC7260 cards can enjoy out of the box support for both Wireless and Bluetooth.
Keep in mind that Airportitlwm/itlwm is still in early development and only N speeds are supported.
Users with one of these two cards first need to disable the intel kexts:
EFI/OC/Config.plist > Kernel > Add > Airportitlwm > Enabled = NoEFI/OC/Config.plist > Kernel > Add > IntelBluetoothInjector > Enabled = NoEFI/OC/Config.plist > Kernel > Add > IntelBluetoothFirmware > Enabled = No
Then enable the corresponding kexts for those two cards:
EFI/OC/Config.plist > Kernel > Add > AirportBrcmFixup > Enabled = YesEFI/OC/Config.plist > Kernel > Add > AirPortBrcm4360_Injector > Enabled = YesEFI/OC/Config.plist > Kernel > Add > BrcmBluetoothInjector > Enabled = YesEFI/OC/Config.plist > Kernel > Add > BrcmFirmwareData > Enabled = YesEFI/OC/Config.plist > Kernel > Add > BrcmPatchRAM3 > Enabled = Yes
This card uses the same kexts as DW1560, DW1830 but needs this additional injector:
EFI/OC/Config.plist > Kernel > Add > AirPortBrcmNIC_Injector > Enabled = Yes
We also need to disable pci-aspm-default to fix system freezes caused from this card:
Go into EFI/OC/Config.plist > DeviceProperties > and rename / uncomment:
#PciRoot(0x0)/Pci(0x1C,0x1)/Pci(0x0,0x0)toPciRoot(0x0)/Pci(0x1C,0x1)/Pci(0x0,0x0)and the device property:#pci-aspm-defaulttopci-aspm-default
This card is the best one you can find for the moment, it is the same as the Apple BCM94360CS2 which works natively but it does have a standard NGFF form factor.
This is the native Apple Wireless and Bluetooth card that can be found on MacBookPro(s). In order to fit this one you will have to buy the NGFF adapter and the extending cable module. There is not enough room to fit the full height so you will be required to place it somewhere else.
Some countries have different 5GHz bands and may not be supported for some, the default one is set as US. You can specify other country codes like: US, CN, #a, etc by going into:
EFI/OC/Config.plist > DeviceProperties > Add > PciRoot(0x0)/Pci(0x1C,0x1)/Pci(0x0,0x0)and rename/uncomment:#country-codetocountry-codeand set the desired value (#a is the preset value, replace with the country code that you need)
⚠️ Anti-Piracy Warning / Disclaimer ⚠️
I do not endorse or condone the use of pre-configured Hackintosh Distros because not only they cause unnecessary harm to your machine but it is considered to be a form of Software Piracy. Software Piracy is a serious crime according to copyright law and is punishable for up to 10 years in prison.
Special Thanks to...
- zhen-zen for YogaSMC and BrightnessKeys
- benbender for SSDT-BATX, Touchscreen Gestures and ACPI refinements
- Sniki for creating the original OC EFI files to make this hackintosh project possible.
- ShiftHackZ and valnoxy for making macOS Monterey on a ThinkPad T440s possible.
- mswgen for the OpenCore Updater application for macOS.
- chendianVista for making macOS Ventura on a ThinkPad T440s possible.