- It's a subset of the Modern Honey Network project that's set up to run in docker.
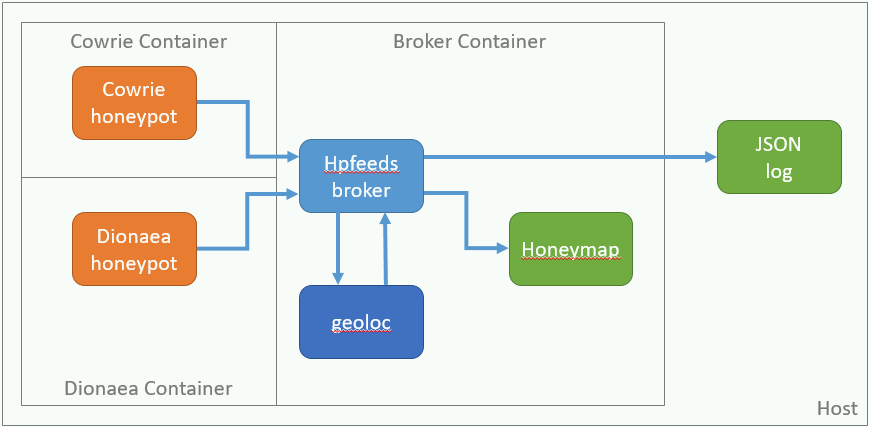
- The "broker" image runs an hpfeeds broker. The broker allows clients to publish to channels or subscribe to channels.
- The "cowrie" image runs the cowrie honeypot. It connects to the broker and publishes events to it.
- The "dionaea" image runs the dionaea honeypot. It connects to the broker and publishes events to it, and it stores captured binaries.
- In the broker container, an application called "geoloc" subscribes to the cowrie channel events and publishes a second channel with geolocation info added.
- Also in the broker container, an application called "honeymap" subscribes to the geoloc channel and makes a pretty map. It listens on port 3000.
Create a docker network so you can statically IP your containers:
docker network create --subnet 192.168.0.0/24 honeynet
Clone the repository, change to the broker directory, and build the docker image.
git clone https://github.com/MattCarothers/mhn-core-docker
cd broker
docker build -t broker .
Start the broker image. Your host OS will now be listening on port 3000 for http requests into honeymap. If you prefer to forward ports with iptables or use a reverse proxy, leave out the -p flag. Events from hpfeeds will be written to /var/log/broker/mhn-json.log.
docker run --name broker -v /var/log/broker:/var/log/mhn -d \
	--restart unless-stopped \
	-p 3000:3000 \
	--net honeynet --ip 192.168.0.2 broker
Add an hpfeeds auth key for the cowrie honeypot by inserting it into the mongo database. You should edit this script and change the key. Especially if you plan to expose hpfeeds outside of your host. You'll need to change it in cowrie/Dockerfile too.
cd ..
./add_cowrie_user.sh
Optional: create a honeypot user on the host OS to own the cowrie log directory. Set the uid of the new user in cowrie/Dockerfile.
Create the honeypot image.
cd cowrie
docker build -t cowrie .
Create a log directory for the honeypot. Change ownership to uid 1000 (default) or whatever your honeypot user is if you created one. Creating this directory isn't strictly necessary, but it's helpful for troubleshooting.
mkdir /var/log/cowrie
chown 1000 /var/log/cowrie
Start the honeypot. Your host will now be listening on 22 and 23. If you're forwarding ports with iptables, leave out the -p flags. NB: If your host has ssh running on port 22 already, docker won't be able to bind to it.
docker run -d --name cowrie -v /var/log/cowrie:/opt/cowrie/log \
	--restart unless-stopped \
	--net honeynet --ip 192.168.0.3 --link broker \
	-p 22:22 -p 23:23 \
	cowrie
Add an hpfeeds auth key for the dionaea honeypot by inserting it into the mongo database. You should edit this script and change the key. Especially if you plan to expose hpfeeds outside of your host. You'll need to change it in dionaea/Dockerfile too.
cd ..
./add_dionaea_user.sh
Optional: edit the dionaea config file and set any options you want.
vi dionaea/dionaea.conf
Optional: create a honeypot user on the host OS to own the dionaea log directory. Set the uid of the new user in dionaea/Dockerfile.
Create the honeypot image.
cd dionaea
docker build -t dionaea .
Create a log directory for the honeypot. Change ownership to uid 1000 (default) or whatever your honeypot user is if you created one. You'll want to map a directory on the host OS if you're storing binaries, sqllite logs, or other stuff you want to access. The default config stores binaries and sends events via hpfeeds to the broker.
mkdir /var/log/dionaea
chown 1000 /var/log/dionaea
Start the honeypot. Your host will now be listening on a bunch of ports. If you're forwarding ports with iptables, leave out the -p flags.
docker run -d --name dionaea -v /var/log/dionaea:/opt/dionaea/var/dionaea \
	--net honeynet --ip 192.168.0.4 --link broker \
	--restart unless-stopped \
	-p 21:21 -p 42:42 -p 80:80 -p 135:135 -p 443:443 -p 445:445 -p 1433:1433 \
	-p 1723:1723 -p 1883:1883 -p 3306:3306 -p 5060:5060 -p 5061:5061 \
	-p 69:69/udp -p 1900:1900/udp -p 5060:5060/udp \
	dionaea
If you have a dark subnet routed to your host, you'll need to perform some additional configuration in order to get packets to the honeypot.
# Clear existing rules
iptables -F
iptables -F -t nat

# Permit docker containers to NAT
iptables -A FORWARD -s 172.17.0.0/16 -j ACCEPT
iptables -A FORWARD -s 192.168.0.0/24 -j ACCEPT
iptables -A FORWARD -m state --state ESTABLISHED -j ACCEPT

# Permit specific hosts to reach exposed docker container ports (e.g.
# honeymap or hpfeeds)
iptables -A FORWARD -s YOUR_TRUSTED_SOURCE_IP -d 172.17.0.0/16 -j ACCEPT
iptables -A FORWARD -s YOUR_TRUSTED_SOURCE_IP -d 192.168.0.0/24 -j ACCEPT

# Permit locahost
iptables -A FORWARD -s 127.0.0.0/8 -j ACCEPT
iptables -A FORWARD -d 127.0.0.0/8 -j ACCEPT

# Allow traffic to honeypots on the ports they need
# Cowrie
iptables -A FORWARD -d 192.168.0.3 -p tcp --destination-port 22 -j ACCEPT
iptables -A FORWARD -d 192.168.0.3 -p tcp --destination-port 23 -j ACCEPT

# Dionaea
iptables -A FORWARD -d 192.168.0.4 -p tcp --destination-port 21 -j ACCEPT
iptables -A FORWARD -d 192.168.0.4 -p tcp --destination-port 42 -j ACCEPT
iptables -A FORWARD -d 192.168.0.4 -p tcp --destination-port 80 -j ACCEPT
iptables -A FORWARD -d 192.168.0.4 -p tcp --destination-port 135 -j ACCEPT
iptables -A FORWARD -d 192.168.0.4 -p tcp --destination-port 443 -j ACCEPT
iptables -A FORWARD -d 192.168.0.4 -p tcp --destination-port 445 -j ACCEPT
iptables -A FORWARD -d 192.168.0.4 -p tcp --destination-port 1433 -j ACCEPT
iptables -A FORWARD -d 192.168.0.4 -p tcp --destination-port 1723 -j ACCEPT
iptables -A FORWARD -d 192.168.0.4 -p tcp --destination-port 1883 -j ACCEPT
iptables -A FORWARD -d 192.168.0.4 -p tcp --destination-port 3306 -j ACCEPT
iptables -A FORWARD -d 192.168.0.4 -p tcp --destination-port 5060 -j ACCEPT
iptables -A FORWARD -d 192.168.0.4 -p tcp --destination-port 5061 -j ACCEPT

iptables -A FORWARD -d 192.168.0.4 -p udp --destination-port 69 -j ACCEPT
iptables -A FORWARD -d 192.168.0.4 -p udp --destination-port 1900 -j ACCEPT
iptables -A FORWARD -d 192.168.0.4 -p udp --destination-port 5060 -j ACCEPT

# Don't forward any other packets.  It's very important that you enable this rule before you
# turn on ip forwarding.  Otherwise you create a routing loop.
iptables -P FORWARD DROP

# Permit traffic to the host OS from approved sources
iptables -A INPUT -m state --state ESTABLISHED -j ACCEPT
iptables -A INPUT -s YOUR_TRUSTED_SOURCE_IP -j ACCEPT

# Don't accept any other connections
iptables -P INPUT DROP

# NAT specific ports on specific destination IPs to docker containers
iptables -t nat -A PREROUTING -i eth0 -j DNAT -d YOUR_DARK_IP --to-destination 192.168.0.3
iptables -t nat -A PREROUTING -i eth0 -j DNAT -d YOUR_DARK_IP --to-destination 192.168.0.4

# In practice you'll probably want to script that:
HOSTS=`cat /etc/mhn/ssh-honeypots`
for host in $HOSTS; do
        echo $host '->' 192.168.0.3
        iptables -t nat -A PREROUTING -i eth0 -j DNAT -d $host --to-destination 192.168.0.3
done

HOSTS=`cat /etc/mhn/dionaea-honeypots`
for host in $HOSTS; do
        echo $host '->' 192.168.0.4
        iptables -t nat -A PREROUTING -i eth0 -j DNAT -d $host --to-destination 192.168.0.4
done

# And here's a script to clear out the honeypot nat rules:
RULES=`iptables -t nat -nL PREROUTING --line-numbers | grep '192.168.0.[3456789]' | awk '{print $1}' | sort -rn`

for rule in $RULES; do
        echo iptables -t nat -D PREROUTING $rule
        iptables -t nat -D PREROUTING $rule
done