ROS wrapper for Yolact. This repository extends the main one it was forked from by utilizing a depth image to generate 3D bounding boxes and pointclouds of the detected objects.
- Support yolact_edge
- Support ROS2
- Checking the
TODOs in the code - A complete code refactoring to move the whole depth and pointcloud topics and all their features to a C++ node to utilise the pcl and transformation tools available there and this would make it orders of magnitude faster.
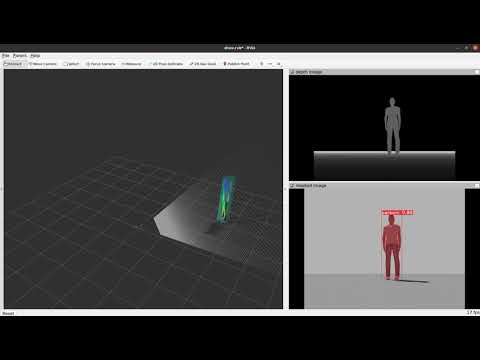
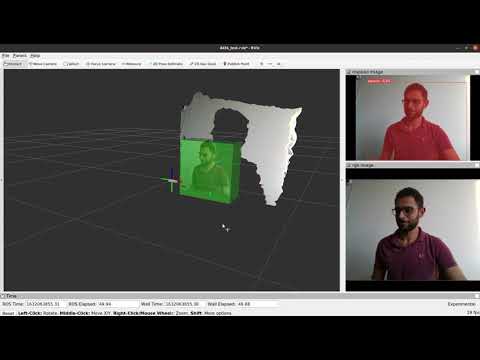
The following videos shows the package in use. The first video is in a gazebo simulation. The second shows the package working with a D435 camera in realtime.
yolact_ros_msgs: Provides messages for publishing the detection results.
depth_yolact_test: The test package that was used to make the demo videos.
Yolact uses Python 3. If you use a ROS version built with Python 2, additional steps are necessary to run the node.
- Set up a Python 3 virtual environment.
- Install the packages required by Yolact. See the Readme on https://github.com/dbolya/yolact for details.
- Additionally, install the packages rospkg and empy in the virtual environment.
- You need to build the cv_bridge module of ROS with Python 3. I recommend using a workspace separate from other ROS packages. Clone the package to the workspace. You might need to adjust some of the following instructions depending on your Python installation.
git clone -b melodic https://github.com/ros-perception/vision_opencv.git
- If you use catkin_make, compile with
catkin_make -DCMAKE_BUILD_TYPE=Release -DPYTHON_EXECUTABLE=/usr/bin/python3 -DPYTHON_INCLUDE_DIR=/usr/include/python3.6m -DPYTHON_LIBRARY=/usr/lib/x86_64-linux-gnu/libpython3.6m.so
- For catkin tools, use
catkin config -DCMAKE_BUILD_TYPE=Release -DPYTHON_EXECUTABLE=/usr/bin/python3 -DPYTHON_INCLUDE_DIR=/usr/include/python3.6m -DPYTHON_LIBRARY=/usr/lib/x86_64-linux-gnu/libpython3.6m.so
catkin build
- add the following lines to the postactivate script of your virtual environment (Change the paths according to your workspace path, virtual environment and Python installation):
source $HOME/ros_python3/devel/setup.bash
export OLD_PYTHONPATH="$PYTHONPATH"
export PYTHONPATH="$HOME/.virtualenvs/yolact/lib/python3.6/site-packages:$PYTHONPATH"
- add the following lines to the postdeactivate script of your virtual environment:
export PYTHONPATH="$OLD_PYTHONPATH"
First, download (or train) a model to use. You can find pre-trained models here. The default model is yolact_base_54_800000.pth. If you want to use a Yolact++ model, you'll have to install DCNv2 (see Yolact installation instructions). Note that the DCN version shipped with Yolact does currently not work with the newest Pytorch release. An updated version can be found here.
You can run yolact using rosrun:
rosrun depth_yolact_ros depth_yolact_rosIf you want to change the default parameters, e.g. the model or image topic, you can specify them:
rosrun depth_yolact_ros depth_yolact_ros _model_path:="$(rospack find depth_yolact_ros)/weights/yolact_base_54_800000.pth" _image_topic:="/camera/color/image_raw"Alternatively, you can add the node to a launch file. An example can be found in the launch folder. You can run that launch file using:
roslaunch depth_yolact_ros depth_yolact_ros.launchAll parameters except for the model path are dynamically reconfigurable at runtime. Either run "rqt" and select the dynamic reconfigure plugin (Plugins -> Configuration), or run rqt_reconfigure directly ("rosrun rqt_reconfigure rqt_reconfigure"). Then select "depth_yolact_ros" from the sidebar to see the available parameters.
The following parameters are available:
| Parameter | Description |
|---|---|
| image_topic | Image topic used for subscribing |
| use_compressed_image | Subscribe to compressed image topic |
| depth_topic | Image topic used for subscribing |
| use_compressed_depth | Subscribe to compressed depth topic |
| publish_pointcloud | Publish pointcloud of detected objects |
| publish_bboxes | Publish 3d bounding boxes (MarkerArray) |
| publish_visualization | Publish images with detections |
| publish_detections | Publish detections as message |
| display_masks | Whether or not to display masks over bounding boxes |
| display_bboxes | Whether or not to display bboxes around masks |
| display_text | Whether or not to display text (class [score]) |
| display_scores | Whether or not to display scores in addition to classes |
| display_fps | When displaying video, draw the FPS on the frame |
| score_threshold | Detections with a score under this threshold will not be considered |
| crop_masks | If true, crop output masks with the predicted bounding box |
| use_kmeans | Whether to use kmeans to filter the outliers after masking the depth image |
| initial_centroid | The initial value used for the outliers cluster in kmeans |
| use_gaussian | Whether or not to further use a gaussian model to eliminateg outliers |
| std_multiplier | Multiplier for the gaussian standard deviation. |
| use_bboxes_world_frame | If true world frame is used in the bboxes topic, if false the camera frame is used |
| world_frame | Name of the world frame |