![]()

Note: this integrations has been replaced by the new integration. It will keep working, but for new functionality, consider switching to the new one.
This Home Assistant integration allows you to send notifications to HASS.Agent, a Windows-based Home Assistant client.
Need help? Check the documentation, visit the dedicated HA forum thread or join on Discord.
Note: it won't be of much use if you don't have HASS.Agent installed & configured on at least one PC (or Windows based device).
- Functionality
- Installation
- Configuration
- Installation and Configuration Summary
- Usage
- Help
- Debugging
- License
Send normal (text-based) and image notifications, and configure them to be actionable to directly interact with Home Assistant.
The easiest way to install is to use HACS. Simply search for HASS.Agent Notifier, install and restart Home Assistant.
If you want to manually install, copy the hass_agent_notifier folder into the config\custom_components folder of your Home Assistant instance, and restart.
This integration exposes itself as a notifications integration, and can be configured by adding this snippet in your configuration.yaml file:
notify:
  name: "hass agent test device"
  platform: hass_agent_notifier
  resource: http://{device_ip}:5115/notify
Replace {device_ip} with the IP of the device that has an HASS.Agent instance running. To find your IP, run ipconfig in a command prompt on your PC. Look for the value after IPv4 Address. Optionally replace 5115 if you've configured a different port, normally you shouldn't have to.
Restart Home Assistant to load your configuration.
The port needs to be open on the target device. HASS.Agent will offer to do this for you during the onboarding process. To do so manually, you can run this command in an elevated prompt:
netsh advfirewall firewall add rule name="HASS.Agent Notifier" dir=in action=allow protocol=TCP localport=5115
Quick summary to get things working:
- Install HASS.Agent-Notifier integration, either through HACS or manually
- Reboot Home Assistant
- Create a
notifyentity, make sure you enter the right IP for your PC - Reboot Home Assistant
- Start adding the new entity to your automations & scripts :)
Currently, there are four variables you can set:
message: the message you want to showtitle: the title of your popup [optional]image: http(s) url containing the location of an image [optional]duration: duration (in seconds) for which the popup will be shown [optional]
  action:
    - service: notify.hass_agent_test_device
      data:
message: "This is a test message." action:
- service: notify.hass_agent_test_device
data:
message: "This is a test message with title and 3 sec duration."
title: "HASS.Agent Test"
data:
duration: 3 action:
- service: notify.hass_agent_test_device
data:
message: "This is a test message with an image."
data:
image: "http://10.0.0.6:1234/jpeg/image.jpg"As pointed out by @brianhanifin in this issue, you can also use Home Assistant's camera proxy. This way you don't have to share the credentials etc. of your camera. Home Assistant will provide a token that's valid for 5 minutes, so it's safe to use.
Example script:
notification_test:
  alias: Notification Test
  variables:
    image: |
      {%- set image = "http://hass.local:8123" + state_attr("camera.garden","entity_picture") %}
      {{ image }}
  sequence:
  - service: notify.hass_agent_test
    data:
      title: Test
      message: "This is a test message with an image."
      data:
        image: "{{ image }}"
  mode: single
  icon: mdi:bell
Optionally change hass.local to the mDNS/IP of your Home Assistant instance, and change garden to the name of your camera - or use another variable as provided in the linked issue.
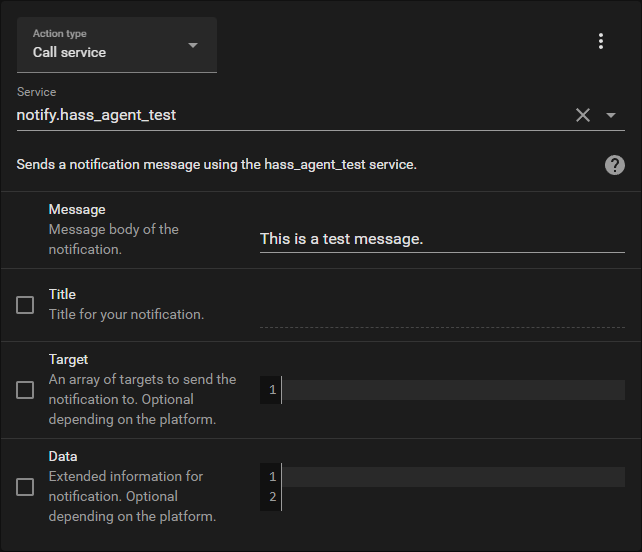
This is the sequence part of a test script to send a text-only message, created through the Home Assistant GUI:
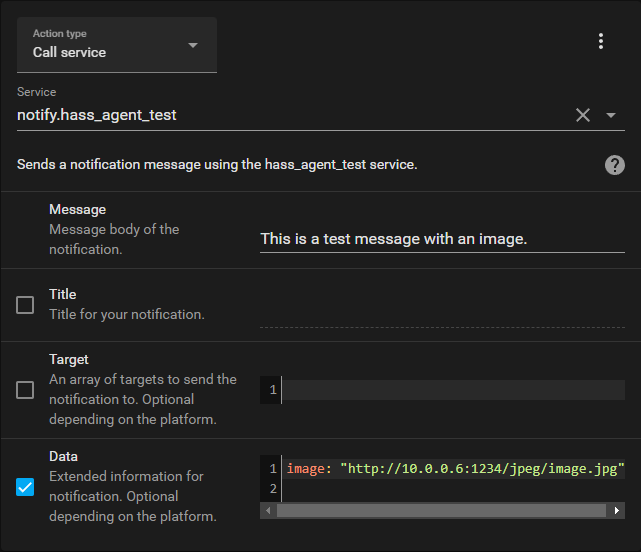
This is the same script, but with an image added to the notification:
You can use the new Button Card to trigger your test scripts.
There's a section dedicated to notification support in the documentation. It'll help you troubleshoot common problems, and provide some examples.
Note: make sure you check the documentation for common troubleshooting help.
If something's not working as it should, while everything's configured and HASS.Agent isn't showing any errors in its logs, browse to the following URL from another PC on the same network as HASS.Agent: http://{hass_agent_ip}:5115. Make sure to change {hass_agent_ip} to the IP of the PC where HASS.Agent's installed.
If HASS.Agent is configured and the firewall rule's active, you'll see: HASS.Agent Active.
If not, something is blocking access to HASS.Agent. Add the following snippet to your configuration.yaml to enable debug logging for the integration:
logger:
  default: warning
  logs:
    custom_components.hass_agent_notifier: debug
Reboot Home Assistant. Whenever you send a message, this should show up in your logs:

If not, please open a ticket and post your log output.
HASS.Agent Notifier and HASS.Agent are released under the MIT license.