URL: Vast.ai
Create a Github account and fork this repository:
-
If you don't have your own GitHub account, sign up at https://github.com
-
Once signed up, log in to your GitHub account and fork my repo to your own public repository. Forking the repository is simple. Navigate to https://github.com/JozefJarosciak/xgpu, then in the top-right corner of the page, you will find a button labelled "Fork". Click on this button. GitHub will take a few moments to create a copy of my repository in your own account. Once it's done, you will be redirected to the new fork in your GitHub account.
-
Navigate to the forked repository. In there you'll find several files named
vast.sh(..., vast4.sh, vast8.sh, etc.). Each is named by the number of GPUs it supports. So if you're planning to mine on a single GPU Vast.ai machine, we'll need to editvast.sh. If you're planning to mine on 4 GPU Vast.ai machine, you'll need to edit 'vast4.sh' file.
Edit forked copy of the 'vast.sh' file
So let's say you want to mine on a 4 GPU Vast.ai machine. How do you edit the file?
-
Once you have forked my original repository, navigate to your fork, and find the vast4.sh, file in your repository.
-
To Edit the File: Open the file by clicking on it. Look for the pencil icon (Edit this file) in the upper right corner of the file view. Click on the pencil icon, which will open the web-based editor.
-
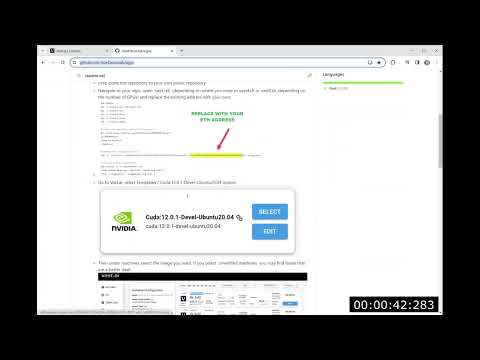
Here you need to replace the existing ETH address with your own (as illustrated in this image):

-
Once done, save the change by pressing the 'Commit Changes' green button at the top right-hand corner
Order VAST.ai server Now, we need to go to Vast.ai to order a GPU server to mine the XenBlocks. To do so follow these steps:
- Sign up at Vast.ai for your own account
- Once signed up, deposit some cash at https://cloud.vast.ai/billing/ (note, they also support Ethereum deposits via Coinbase)
- When you have the cash in the account, navigate to https://cloud.vast.ai/templates/
- Here we need to select the template that supports XenBlocks mining. It's this one: / Cuda:12.0.1-Devel-Ubuntu20.04 and it'll look like this on the page. Press the select button when you find it:

-
Once done, under machines select the server you want to use for mining XenBlocks. The choice will depend on the cost and number of GPUs. Also, note, that you can select 'unverified machines' on the left side, which sometimes allows you to find a better deal (but note, often those servers are more problematic or do not run at all):

-
When you find a server you want, press the RENT button and within a couple of seconds the server will appear in your rented list of instances at: https://cloud.vast.ai/instances/. Wait for a moment, until the blue button on it -- turns from LOADING state to 'CONNECT' state.
-
Before pressing the 'CONNECT' button, you need to generate the RSA SSH public/private key pair. This is easy, just follow these instructions:
For Linux: [https://cloud.vast.ai/templates/](https://vast.ai/faq#how-do-i-connect-to-an-ssh-instance-on-linuxmac](https://vast.ai/faq#how-do-i-connect-to-an-ssh-instance-on-linuxmac?ref_id=87911)
Or the following instructions if you're planning to connect from Windows: https://vast.ai/docs/guides/windows-ssh-scp-guide
-
Once done, click on the CONNECT button, copy the connect URL and paste it into your choice of command line tool.
START MINING XENBLOCKS
-
Now, that we're connected to our server of choice. Copy a single line command below to get a new GPU server up and running mining XenBlocks.
-
Important Note: In the below one-liner commands, replace (JozefJarosciak/xgpu/main/vast.sh, or vash4.sh or vast8.sh, etc.) with a path to your own fork of my repository
For single GPU use vast.sh:
sudo apt update && sudo apt -y install wget && sudo wget https://raw.githubusercontent.com/JozefJarosciak/xgpu/main/vast.sh && sudo chmod +x vast.sh && sudo ./vast.shFor 4 X GPU use vast4.sh:
sudo apt update && sudo apt -y install wget && sudo wget https://raw.githubusercontent.com/JozefJarosciak/xgpu/main/vast4.sh && sudo chmod +x vast4.sh && sudo ./vast4.shFor 8 X GPU use vast8.sh:
sudo apt update && sudo apt -y install wget && sudo wget https://raw.githubusercontent.com/JozefJarosciak/xgpu/main/vast8.sh && sudo chmod +x vast8.sh && sudo ./vast8.shFor 12 X GPU use vast8.sh:
sudo apt update && sudo apt -y install wget && sudo wget https://raw.githubusercontent.com/JozefJarosciak/xgpu/main/vast12.sh && sudo chmod +x vast12.sh && sudo ./vast12.shFor 14 X GPU use vast8.sh:
sudo apt update && sudo apt -y install wget && sudo wget https://raw.githubusercontent.com/JozefJarosciak/xgpu/main/vast14.sh && sudo chmod +x vast14.sh && sudo ./vast14.sh
VAST.AI - VIDEO DEMO:
- To better illustrate the entire process, please follow this video guide:
RUNPOD Mining - runpod.io (unverified):
The steps are the same as above, just update runpod.sh file (with your ETH address) instead of vast.sh file.
apt update && apt -y install wget && wget https://raw.githubusercontent.com/JozefJarosciak/xgpu/main/runpod.sh && chmod +x runpod.sh && ./runpod.sh
This section is to show some comments you may find useful.
Tail logs:
tail -f /root/XENGPUMiner/miner.log
tail -f /root/XENGPUMiner/xengpuminer.log
tail -f /root/XENGPUMiner/xengpuminer-0.log (to xengpuminer-7.log)
Download the latest miner.py file only:
wget https://raw.githubusercontent.com/shanhaicoder/XENGPUMiner/main/miner.py
Maintenance - this is how you can kill multiple instances when needed
pkill -f "xengpuminer"
pkill -f "python3"
Start Miner.py in the background (in case you need to stop it):
sudo nohup python3 miner.py --gpu=true > miner.log 2>&1 &
Renaming directory:
mv XENGPUMiner XENGPUMiner2