- Micro-services Architecture
Microservices architecture is an architectural style that structures an application as a collection of small, loosely coupled, and independently deployable services. In this approach, an application is decomposed into a set of smaller services, each responsible for a specific business capability.
Each microservice is self-contained and can be developed, deployed, and scaled independently of the others. They communicate with each other through well-defined APIs (Application Programming Interfaces) such as REST (Representational State Transfer) or messaging protocols like AMQP (Advanced Message Queuing Protocol).

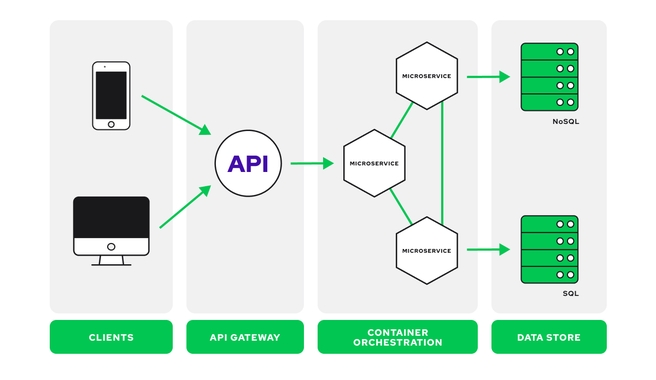
Microservices architecture offers several advantages, including improved scalability, agility, resilience, and the ability to adopt new technologies. However, it also introduces challenges such as distributed system complexity, service coordination, and network communication overhead.
Microservices architecture is well-suited for various use cases, particularly in complex and rapidly evolving systems. It's important to note that microservices architecture introduces additional complexity in terms of communication, data consistency, and operational overhead. It's crucial to carefully consider the trade-offs and assess whether the benefits outweigh the challenges for a specific use case before adopting microservices architecture.
Here are some common use cases where microservices architecture can be beneficial:
-
Scalability and Performance: Microservices allow for independent scaling of individual services based on their specific needs. This is particularly useful when certain services experience high demand or require additional resources to handle increased workloads.
-
Modularity and Maintainability: Microservices promote modularity by breaking down an application into smaller, self-contained services. This makes it easier to understand, develop, and maintain each service independently, which can improve overall code quality and system maintainability.
-
Independent Deployment and Continuous Delivery: With microservices, each service can be developed and deployed independently of others. This enables faster release cycles, continuous integration, and continuous delivery practices, allowing teams to iterate on and deploy individual services more frequently.
-
Team Autonomy and Scalable Development: Microservices enable organizations to assign individual teams to develop and manage specific services. This empowers teams to work independently, make technology choices suitable for their services, and deliver value faster. It also allows for scaling development efforts by adding more teams to work on different services simultaneously.
-
Integration with Third-Party Systems: Microservices facilitate seamless integration with external systems or third-party services. Each microservice can handle specific integration requirements, enabling efficient communication and data exchange between multiple systems.
-
Heterogeneous Technology Stacks: Microservices architecture allows different services to use different technologies and programming languages. This flexibility enables teams to choose the most suitable technology stack for their specific service requirements, leveraging the strengths of different technologies.
-
Resilience and Fault Isolation: Microservices offer better fault isolation, meaning that failures in one service do not bring down the entire system. Each service can be designed to handle failures independently, leading to improved system resilience and fault tolerance.
-
Legacy System Modernization: Microservices can be used to gradually modernize legacy systems by breaking them down into smaller, more manageable services. This enables organizations to update and replace individual services over time without disrupting the entire system.
Some notable companies and organizations that have embraced microservices include:
Netflix: Netflix is a popular streaming service that utilizes microservices architecture to handle millions of streaming requests daily. They have a highly distributed architecture with numerous independent microservices that enable them to scale and deliver personalized content to their users efficiently.
Amazon: Amazon, one of the world's largest e-commerce platforms, employs microservices architecture extensively. They use microservices to power various aspects of their business, such as product catalogs, customer reviews, order processing, and inventory management.
Uber: Uber, the ride-sharing platform, utilizes microservices to handle a complex ecosystem of services such as user management, ride requests, real-time tracking, payment processing, and driver dispatching. Microservices enable Uber to scale their platform and handle high volumes of requests across different geographic regions.
Spotify: Spotify, the popular music streaming service, uses microservices architecture to manage their vast catalog of songs, playlists, user recommendations, and social features. Microservices allow Spotify to deliver a personalized and seamless music experience to millions of users.
Airbnb: Airbnb, the online marketplace for accommodations, relies on microservices to power various features such as search, booking, reviews, payments, and messaging. Microservices enable Airbnb to handle a diverse range of listings and provide a smooth user experience.
Google: Google has adopted microservices architecture to power its services like Gmail, Google Maps, and Google Drive. Microservices allow Google to scale its applications, provide high availability, and handle complex functionalities with independent services.
Twitter: Twitter utilizes microservices to handle its real-time messaging platform. Different microservices manage functionalities like user authentication, tweet storage, timeline generation, and notification delivery, allowing Twitter to handle millions of tweets and users.
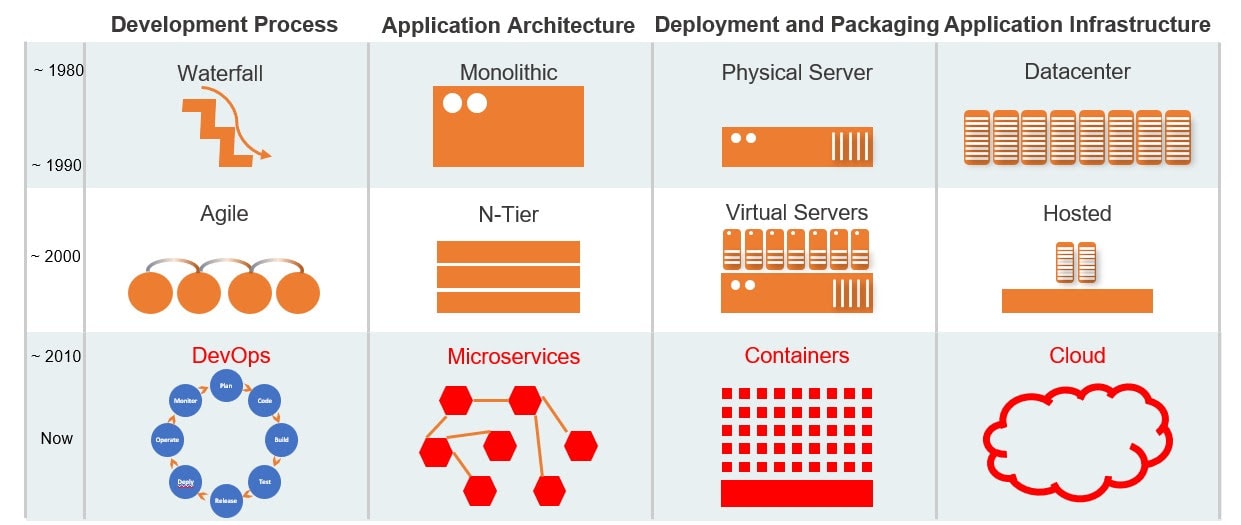
Microservices, monolithic architecture, and two-tier architecture are different architectural approaches for building applications.

The choice of architecture depends on various factors such as the complexity of the application, scalability requirements, development team structure, and the need for flexibility and independent deployment. Organizations often consider trade-offs and select the architecture that best suits their specific needs and constraints.
Summary of their key characteristics:
| Architecture | Key Characteristics |
|---|---|
| Microservices Architecture | |
| Monolithic Architecture | |
| Two-Tier Architecture |
-
Microservices Architecture: Microservices architecture is an approach where an application is divided into a set of small, loosely coupled, and independently deployable services. Each service focuses on a specific business capability and can be developed, deployed, and scaled independently. Microservices architecture promotes flexibility, scalability, and agility. However, it introduces complexity in terms of service coordination, network communication, and operational overhead.
-
Monolithic Architecture: Monolithic architecture is the traditional approach where an application is built as a single, tightly coupled unit. In this architecture, all components of the application, such as user interface, business logic, and data access, are tightly integrated into a single codebase and deployed as a single artifact. Monolithic architectures are relatively simpler to develop and deploy but can become challenging to scale and maintain as the application grows. Changes or updates to one component may require redeployment of the entire application.
-
Two-Tier Architecture: Two-tier architecture, also known as client-server architecture, is an older architectural style commonly used for desktop applications. In this approach, the application consists of two tiers: the client tier and the server tier. The client tier handles the user interface and presentation logic, while the server tier manages the business logic and data access. Two-tier architecture can be effective for simpler applications with a limited number of users and functionalities. However, it may lack scalability and flexibility for larger and more complex systems.
Docker is an open-source platform that allows you to automate the deployment, scaling, and management of applications using containerization. It provides a way to package an application and its dependencies into a standardized unit called a container. Containers are lightweight, isolated environments that encapsulate the application code, runtime, system tools, and libraries required to run the application.
Docker simplifies the process of building, distributing, and running applications by providing a consistent and reproducible environment across different systems.

Benefits of using Docker include:
-
Portability: Docker allows applications to run consistently across different environments, from development to production, irrespective of the underlying infrastructure or host system.
-
Isolation: Containers provide process-level isolation, ensuring that applications and their dependencies are encapsulated and do not interfere with each other or the host system.
-
Efficiency: Containers are lightweight and have fast startup times, making them efficient for resource utilization and scalability.
-
Versioning and Rollbacks: Docker images can be versioned, enabling easy rollbacks to previous versions of applications if needed.
-
Ecosystem and Community: Docker has a vast ecosystem of tools, libraries, and community support, making it easier to integrate with other technologies and leverage a wide range of pre-built images.
Docker has revolutionized application deployment and management by providing a standardized and efficient way to package and distribute software. It has become a popular choice for developers, DevOps teams, and organizations looking to improve application deployment workflows, scalability, and infrastructure efficiency.
- Download Docker WSL2 from DockerHub.
- Run the downloaded 'Docker Desktop Installer.exe' file.
- Follow the prompts to continue the installation. Use
WSL 2instead ofHyper-Voption on the Configuration page. - Run
wsl --updatein your terminal to add the Windows Subsystem for Linux (WSL). - Ensure successful installation by running
docker --versionin your terminal to get the version of docker you have downloaded and installed eg.Docker version 24.0.2, build cb74dfc. - Your device will need to restart. (You may need to enable 'Hardware assisted virtualization and data execution protection' in the BIOS).
- To test docker installation run:
docker run hello-worldin terminal. It should look for this build locally and when it does not find it it should look online for an online repo. It should return the following/similar:
Unable to find image 'hello-world:latest' locally
latest: Pulling from library/hello-world
719385e32844: Pulling fs layer
719385e32844: Verifying Checksum
719385e32844: Download complete
719385e32844: Pull complete
Digest: sha256:fc6cf906cbfa013e80938cdf0bb199fbdbb86d6e3e013783e5a766f50f5dbce0
Status: Downloaded newer image for hello-world:latest

Hello from Docker!
This message shows that your installation appears to be working correctly.

To generate this message, Docker took the following steps:
 1. The Docker client contacted the Docker daemon.
 2. The Docker daemon pulled the "hello-world" image from the Docker Hub.
    (amd64)
 3. The Docker daemon created a new container from that image which runs the
    executable that produces the output you are currently reading.
 4. The Docker daemon streamed that output to the Docker client, which sent it
    to your terminal.

To try something more ambitious, you can run an Ubuntu container with:
 $ docker run -it ubuntu bash

Share images, automate workflows, and more with a free Docker ID:
 https://hub.docker.com/

For more examples and ideas, visit:
 https://docs.docker.com/get-started/
- Once this has been successful you can terminate the container with
docker rm <container-id> -freplace '' with the container ID found usingdocker ps -a.
- Create a DockerHub Account if you do not already have one.
- Log in to DockerHub and you may create a repository and give it an appropriate name.
- Open Git Bash or other terminal as Administrator and use
docker login --username=<DockerHubUsername> --password=<DockerHubPassword>to set up your dockerhub login from your terminal, replace with your username and password. (Note: To do this more securely create a filedockerhub_password.txtthat contains your password, then runcat dockerhub_password.txt | docker login --username=<DockerHubUsername> --password-stdin). - After the initial setup in step 3 you can use
docker loginwhen you need to push to dockerhub.
- Open Git Bash or other terminal as Administrator.
- Use
docker run -d -p 80:80 nginxto run the default nginx docker image. - To log in to your container use
docker exec -it <container-id-or-name> sh. If you get the errorthe input device is not a TTY. If you are using mintty, try prefixing the command with 'winpty'then use:alias docker="winpty docker"to resolve. - You may run
apt update -yto ensure your container has access to the internet. (Note: This container has nothing installed other than Nginx. You have to install sudo withapt install sudoand nano withsudo apt install nanoin order to edit theindex.htmlfile found by navigating using this command:cd /usr/share/nginx/html, then to edit use:sudo nano index.html.) You can useexitto log out of your container. - You can visit this localhost page to check if Nginx is running and working as it should from your conatiner. It should display the default Nginx page if you have not made changes to your default Nginx
index.htmlfile. - If you already have an nginx container running and wish to copy over a new
index.htmlfile to display your static page use the following command:docker cp <file-path-on-local-machine> <container-name-or-id>:<destination-path-on-container>eg.docker cp ./index.html e3708997c1dc:/usr/share/nginx/html/. - You can refresh the localhost page to check that the changes have been made.
- Tag your updated image
docker tag <image_id> <dockerhub-username/repo-name>:<optional-version>eg.docker tag ec9ddc341919 eslabbert/profile:latest, thendocker login. - Push your image to dockerhub using
docker push <dockerhub-username/repo-name>eg.docker push eslabbert/profile. - To run this image from dockerhub on any device stop/remove your current container using port 80, then use
docker run -d -p 80:80 <dockerhub-username/repo-name>:<tag>eg.docker run -d -p 80:80 eslabbert/profile:latest.
Each Dockerfile command (each line in a Dockerfile) is an image layer. Each image is built from these layers. (To see image layer use docker history <image-name>.) Each layer is cached by Docker on your local system, which makes building the image much faster. If a layer changes then all the following layers are re-created as well. Best Practice is to order your commands from least changed to most changed commands in your Dockerfile to take advantage of caching.
Also make use of a .dockerignore file to exclude unnecessary files from copying over (works similarly to .gitignore file).
Make use of multi-stage builds (e.g. build stage, run stage) to structure to use temporary images to get to your final image, which will be kept as an artifact.
- Create a
Dockerfilein the same directory as yourindex.htmlfile containing the static page you want to display. (In terminal:cd <path-to-where-you-want-the-Dockerfile>, thennano Dockerfileto create and write to it.) - Write the following to the
Dockerfile, then save and exit:
# Use the official Nginx base image
FROM nginx

# label it with name - optional
# Add label metadata
LABEL MAINTAINER=Your name/company

# Copy your personalized HTML file to the appropriate directory
# COPY path/to/index.html /usr/share/nginx/html/
COPY index.html /usr/share/nginx/html/

# Expose port 80 to allow incoming traffic
EXPOSE 80

# launch app/server
CMD ["nginx", "-g", "daemon off;"]- Build your docker image using:
docker build -t <image-name>:<optional-tag> <path_to_dockerfile>eg.docker build -t eslabbert/nginx-image .(Note:.indicates your current directory and the image name should also have reference to your dockerhub profile and repo as when you push this it will create a repo or update the repo specified). This should return the following/similar:
[+] Building 0.1s (7/7) FINISHED
 => [internal] load build definition from Dockerfile                         0.0s
 => => transferring dockerfile: 492B                                         0.0s
 => [internal] load .dockerignore                                            0.0s
 => => transferring context: 2B                                              0.0s
 => [internal] load metadata for docker.io/library/nginx:latest              0.0s
 => [internal] load build context                                            0.0s
 => => transferring context: 5.21kB                                          0.0s
 => CACHED [1/2] FROM docker.io/library/nginx                                0.0s
 => [2/2] COPY index.html /usr/share/nginx/html/                             0.0s
 => exporting to image                                                       0.0s
 => => exporting layers                                                      0.0s
 => => writing image sha256:bec86b0974c1680cb2cbe93947d450a8893b01f0f4585b7  0.0s
 => => naming to docker.io/eslabbert/tech230-nginx                           0.0s
- To run the image on a container use
docker run -d --name <optional-container-name> -p 80:80 <image-name>eg.docker run -d --name nginx-container -p 80:80 nginx-image. To find the image name or ID you can usedocker imagesordocker images -a. - Check Docker container ID with:
docker psordocker ps -ato ensure it is running and available. - Go to localhost page to see the static web page you set it up to host. Alternatively, log in to the container use
docker exec -it <container-id> sh.cd /usr/share/nginx/htmlto navigate to the correct directory, thensudo nano index.htmlto check if the file is the correct one with your profile information. - To stop and remove the container:
docker rm <container-id> -f. To stop the container without removing it:docker stop <container-id>. To start a stopped container use:docker start <container-id>.
DockerHub - Node Official, Nodejs Web server deployed in docker guide.
- Create a
Dockerfilein the same directory as yourappfolder containing the Sparta Provisioning Test App. (In terminal:cd <path-to-where-you-want-the-Dockerfile>, thennano Dockerfileto create and write to it.) - Write the following to the Dockerfile:
# get node
FROM node

# owner label
LABEL MAINTAINER=Esther@Sparta

# app working directory
WORKDIR /app

# Copy the entire app folder to the container
COPY app .

# uses port 3000
EXPOSE 3000

# Install app dependencies
RUN npm install

# run app with execute commands
CMD ["npm", "start", "daemon off;"]
- Create docker image using
docker build -t <dockerhubusername/repo-name:optional-tag> <path/to/folder/containing/Dockerfile>eg.docker build -t eslabbert/sparta-app:v1 ..
- Run container using
docker run -d -p 3000:3000 <dockerhubusername/repo-name:optional-tag>eg.docker run -d -p 3000:3000 eslabbert/sparta-app:v1. - Check Sparta Provisioning App page and Sparta Provisioning App fibonacci page in your web browser to ensure it is working.
- Push the image to DockerHub using
docker push <dockerhubusername/repo-name:optional-tag>eg.docker push eslabbert/sparta-app:v1.
- To stop and remove container:
docker psand copy the container ID thendocker rm <container-id> -feg.docker rm 8a79975b70d8 -f.
- Write this to your
Dockerfile:
# Use the official MongoDB image as the base image
FROM mongo:4.4

# Replace the bind IP in the configuration file
RUN sed -i 's/bindIp: 127.0.0.1/bindIp: 0.0.0.0/' /etc/mongod.conf.orig

# Expose the default MongoDB port
EXPOSE 27017

# Start MongoDB with the modified configuration
CMD ["mongod"]
- Build image:
docker build -t eslabbert/mongodb . - Run image:
docker run -d -p 27017:27017 eslabbert/mongodb:latest - Push image:
docker push eslabbert/mongodb
Jfrog: 3 steps to secure docker containers
Use official images and specific versions, with the smallest size necessary (like alpine light-weight distribution) to reduce security vulnerabilities that come from using larger images.
Specify the least privileged user to run the container.
Scan images on DockerHub.
Docker Volumes: Storage of docker images for sharing between others. Docker Images are immutable.
docker volume COMMAND
Commands:
  create      Create a volume
  inspect     Display detailed information on one or more volumes
  ls          List volumes
  prune       Remove all unused local volumes
  rm          Remove one or more volumes
Usage:  docker [OPTIONS] COMMAND

A self-sufficient runtime for containers

Common Commands:
  run         Create and run a new container from an image
  exec        Execute a command in a running container
  ps          List containers
  build       Build an image from a Dockerfile
  pull        Download an image from a registry
  push        Upload an image to a registry
  images      List images
  login       Log in to a registry
  logout      Log out from a registry
  search      Search Docker Hub for images
  version     Show the Docker version information
  info        Display system-wide information

Management Commands:
  builder     Manage builds
  buildx*     Docker Buildx (Docker Inc., v0.10.5)
  compose*    Docker Compose (Docker Inc., v2.18.1)
  container   Manage containers
  context     Manage contexts
  dev*        Docker Dev Environments (Docker Inc., v0.1.0)
  extension*  Manages Docker extensions (Docker Inc., v0.2.19)
  image       Manage images
  init*       Creates Docker-related starter files for your project (Docker Inc., v0.1.0-beta.4)
  manifest    Manage Docker image manifests and manifest lists
  network     Manage networks
  plugin      Manage plugins
  sbom*       View the packaged-based Software Bill Of Materials (SBOM) for an image (Anchore Inc., 0.6.0)
  scan*       Docker Scan (Docker Inc., v0.26.0)
  scout*      Command line tool for Docker Scout (Docker Inc., v0.12.0)
  system      Manage Docker
  trust       Manage trust on Docker images
  volume      Manage volumes

Swarm Commands:
  swarm       Manage Swarm

Commands:
  attach      Attach local standard input, output, and error streams to a running container
  commit      Create a new image from a container's changes
  cp          Copy files/folders between a container and the local filesystem
  create      Create a new container
  diff        Inspect changes to files or directories on a container's filesystem
  events      Get real time events from the server
  export      Export a container's filesystem as a tar archive
  history     Show the history of an image
  import      Import the contents from a tarball to create a filesystem image
  inspect     Return low-level information on Docker objects
  kill        Kill one or more running containers
  load        Load an image from a tar archive or STDIN
  logs        Fetch the logs of a container
  pause       Pause all processes within one or more containers
  port        List port mappings or a specific mapping for the container
  rename      Rename a container
  restart     Restart one or more containers
  rm          Remove one or more containers
  rmi         Remove one or more images
  save        Save one or more images to a tar archive (streamed to STDOUT by default)
  start       Start one or more stopped containers
  stats       Display a live stream of container(s) resource usage statistics
  stop        Stop one or more running containers
  tag         Create a tag TARGET_IMAGE that refers to SOURCE_IMAGE
  top         Display the running processes of a container
  unpause     Unpause all processes within one or more containers
  update      Update configuration of one or more containers
  wait        Block until one or more containers stop, then print their exit codes

Global Options:
      --config string      Location of client config files (default
                           "C:\\Users\\super\\.docker")
  -c, --context string     Name of the context to use to connect to the
                           daemon (overrides DOCKER_HOST env var and
                           default context set with "docker context use")
  -D, --debug              Enable debug mode
  -H, --host list          Daemon socket to connect to
  -l, --log-level string   Set the logging level ("debug", "info",
                           "warn", "error", "fatal") (default "info")
      --tls                Use TLS; implied by --tlsverify
      --tlscacert string   Trust certs signed only by this CA (default
                           "C:\\Users\\super\\.docker\\ca.pem")
      --tlscert string     Path to TLS certificate file (default
                           "C:\\Users\\super\\.docker\\cert.pem")
      --tlskey string      Path to TLS key file (default
                           "C:\\Users\\super\\.docker\\key.pem")
      --tlsverify          Use TLS and verify the remote
  -v, --version            Print version information and quit

Run 'docker COMMAND --help' for more information on a command.

For more help on how to use Docker, head to https://docs.docker.com/go/guides/
Tags:
-p: ports
-d: detached
-it: interactive mode
sh: shell
-f: force (eg. if running will force it to close and end in order to remove)
Most used commands:
docker rmi <image-id-or-name> -f: remove image
docker rm <container-id-or-name> -f: remove container
docker exec -it <container-id> sh: allows you to log in/interact inside container with shell
alias docker="winpty docker": Resolves TTY issue when trying to log in/interact with container
docker build -t <image-name>:<optional-tag> <path/to/Dockerfile>: builds an image from a Dockerfile
docker run -d -p <host-port-number>:<container-port-number> <image-name-or-id>: runs container from docker image
docker push <image-name>: pushes image to docker repo
Docker Compose is a tool that allows you to define and manage multi-container Docker applications. It simplifies the process of defining, configuring, and running multiple Docker containers as a cohesive application. It uses a file called docker-compose.yml file to do this.

Commands:
docker compose up -d: starts and manages containers in detached mode (without logs).docker compose up: starts and manages containers with logs.docker compose down: stops and removes containers associated.docker compose down -v: stops and removes containers and volumes associated.
docker-compose.yml: YAML script to deploy app & db containers and connect them so that you can see the app, fibonacci & /posts pages on port 3000.
- Create a
docker-compose.ymlfile containing the following:
# version of docker compose file syntax
version: '3.1'
# specifies the services/components block
services:
  # mongodb service (database server)
  mongodb:
    # uses this image to launch a container
    image: eslabbert/mongodb-image:latest
    # container will always be restarted if it exits for any reason to ensure that the service remains running
    restart: always
    # ensures mongodb default port accessible
    ports:
      - 27017:27017

  # sparta-app service (app server)
  sparta-app:
    # uses this image to launch a container
    image: eslabbert/sparta-app:v1
    # container will always be restarted if it exits for any reason to ensure that the service remains running
    restart: always
    # ensures Sparta Provisioning App port 3000 is accessible
    ports:
      - 3000:3000
    # specifies dependency on MongoDB database service
    depends_on:
      - mongodb
    # uses this environment variable to connect app to database and make the /posts page available
    environment:
      - DB_HOST=mongodb:27017/posts
    # installs app dependencies and starts the app with the database connected using shell commands
    command:
sh -c "npm install && npm start"- Run with
docker compose up -din the directory containing yourdocker-compose.ymlfile. - Check pages in web browser.
- Remove with
docker compose down.
Kubernetes, also known as K8s, is an open-source container orchestration tool/framework, in other words, a system for automating deployment, scaling, and management of containerized applications. Developed by Google. It is very powerful and complex.
It groups containers that make up an application into logical units for easy management and discovery. Helping you to manage containerized applications in different environments (i.e. physical, virtual, cloud, or hybrid environments). It supports auto-scaling and has built-in monitoring, you can also configure load-balancing manually. You use CLI tool called kubectl to interact with K8s.
As number of microservices increase in an application it becomes more difficult and complex or even impossible to manage these containers across multiple environments using scripts or self-made tools. This is what brought about container orchestration technologies like K8.
Using K8s/other orchestration tools provides:
- High Availability (i.e. no downtime, always user-accessible)
- Scalability (i.e. high performance, loads fast and users have high response rate from application) - using labels and selectors
- Disaster Recovery (i.e. backup and restore for if an infrastructure has problems like data is lost or the servers explode or something bad happens with the service center the infrastructure has some kind of mechanism to backup and restore the data to the lastest state so the application doesn't lose any data and the containerized app can run from the latest state after recovery)
Components of Kubernetes Architecture (K8s cluster):
- Master Node(s): connects to, runs and manages worker nodes (much more important than worker nodes, must have a back up in production as if you lose a master node you lose the access to the cluster).
- Worker Nodes: have containers or microservices or applications running on them and Kubelet process (which is the primary "node agent"). (bigger, most load, more resources).
- Virtual Network: creates one unified, powerful machine from sum of all the resources of the nodes in the cluster. (It assigns each Pod its own IP address, so each pod is its own self-containing server with its own IP address and they communicate using those internal IP addresses).

Master Node Processes:
- API server, which is the entry point to the K8s cluster for UI, API and CLI. (Kubernetes Configuration, in declarative form (meaning K8 will try to meet the requirements by comparing desired and actual state), goes through this. Requests must be in YAML or JSON format).
- Controller manager, which keeps track of what is happening in cluster (if repairs are needed or container dies and needs to be restarted etc.).
- Scheduler, an intelligent process that decides which node the next container should be scheduled on, based on the internal resources on the worker nodes and the load that container needs, i.e. schedules containers on different nodes based on the work load and available server resources on each node/ensures Pods placement.
- etcd, key-value storage that holds, at any time, the current state (i.e. a snapshot) of the Kubernetes cluster (has the config data and status data of each node and container). Using this snapshot you can recover the whole state of the cluster.
Basic Concepts:

- Pod = ephemeral component of Kubernetes that is a wrapper for a container(s) that manages the container(s) running inside itself without our intervention. (e.g. if a container dies it will restart it automatically)
Each worker node can have multiple pods. Each pod could have multiple containers, good practice is to have one application (like database, app, server, message broker) per pod (an app with helper containers if necessary). We do not create or configure containers inside Kubernetes cluster, we only deal with the pods which is an abstraction layer over containers.
Ephemeral = can die frequently.
Each time a pod dies it is restarted, creating a new pod, assigned a new IP address. So these pods have dynamic IP addresses, which is inconvenient if these pods need to communicate with other pods.
- Service = permanent IP address, which is an alternative or substitute to the pod's dynamic IP addresses, which sit in front of each pod and remains constant (as the lifecycle is not tied to the pod's) to allow communication between pods. Also works as a load balancer.
A ReplicaSet then fulfills its purpose by creating and deleting Pods as needed to reach the desired number.
Check version of Kubernetes kubectl version --client (Note: Will show this WARNING: This version information is deprecated and will be replaced with the output from kubectl version --short..You can ignore this warning. You are only checking the version of kubectl that you have installed.)
kubectl get svc: get service info.
kubectl get deployment <name-deployment> or kubectl get deploy: deployment info, which can be for a specific deployment or all deployments.
kubectl create -f <.yml>: runs .yml file to create K8s cluster (-f = file).
kubectl get pods: get pods info.
kubectl get rs: get replica set info.
kubectl delete pod <pod-name>: deletes pod, but as it is self-healing it spins up a new pod immediately.
kubectl edit deploy <name-deployment>: opens deployment file in notepad to make changes, save and exit, without taking server down.
kubectl describe deploy <name-deployment>: human-readable logs on deployment.
kubectl describe svc <name-svc>: human-readble logs on service.
kubectl delete deployment <deployment-name>: delete deployment.
kubectl delete service <service-name>: delete service.
kubectl logs -p <pod-name>: get a specific pod's logs.

- Ensure a cluster is running with
kubectl get service. - Create
app-deployment.ymlfile andapp-service.ymlfile.app-deployment.yml:
# api used for deployment
apiVersion: apps/v1
# pod - service what kind of serivce/object
kind: Deployment
# case insensitive metadata
metadata:
  # name of deployment
  name: sparta-app-deployment
  labels:
    app: sparta-app
# specifications for deployment
spec:
  # creates 3 replicas (pods) of this set with pods/instances
  replicas: 3
  # connection with labels
  selector:
    matchLabels:
      # looks for label & match with k8 services
      app: sparta-app
  # template to use its label for k8 service to launch
  template:
    metadata:
    # label
      labels:
        # label connects to service or any other k8 components
        app: sparta-app
    # define container specifications
    spec:
      containers:
      - name: sparta-app
        # image of app from DockerHub
        image: eslabbert/sparta-app:v1
        ports:
        # exposes this port
        - containerPort: 3000
# Only add the following if also launching database:
        # adds the environment variable to connect with mongodb
        env:
        - name: DB_HOST
          # references the internal mongo service IP
          value: mongo-service:27017/posts
        command: ["sh", "-c"]
        args:
          - |
            cd /app
            npm stop --if-present
            node seeds/seed.js
npm restart app.js --update-envapp-service.yml:
# select type of API version
apiVersion: v1
# type of service/object
kind: Service
# metadata for name
metadata:
  # name of service
  name: sparta-app-svc
  # sre - keep private for each team, but as not in production use default
  namespace: default
# specification to include ports selector to connect to the
spec:
  # create NodePort type of deployment for external access
  # load balancer for local cluster
  type: NodePort
  # define selector and label to connect nginx deployment
  selector:
    # label connect to nginx deployment
    app: sparta-app
  # port mapping
  ports:
  - protocol: TCP
    # range 30000-32767 to be accessed externally
    nodePort: 30001
    # internal communicating ports
    port: 3000
targetPort: 3000- Run deployment with
kubectl create -f app-deployment.yml, then run service withkubectl create -f app-service.yml. - Check web browser for http://localhost:\<specified-port-between-30000-32767-in-service.yml>.
- Ensure a cluster is running with
kubectl get service. - Create
mongo-deployment-and-service.ymlfile.mongo-deployment-and-service.yml:
apiVersion: apps/v1
kind: Deployment
metadata:
  name: mongo-deployment
  labels:
    # label selector
    db: mongo
spec:
  replicas: 1
  selector:
    matchLabels:
      db: mongo
  template:
    metadata:
      labels:
        db: mongo
    spec:
      containers:
      - name: mongodb
        image: eslabbert/mongodb-image:latest
        ports:
        - containerPort: 27017
        env:
        - name: DB_HOST
          value: mongo-service:27017/posts
---
apiVersion: v1
kind: Service
metadata:
  name: mongo-service
  namespace: default
spec:
  selector:
    # label connects service to pods with same label (send requests to pods)
    db: mongo
  ports:
    - protocol: TCP
      # Service port, accessible at this port
      port: 27017
      # same as containerPort of deployment/stateful set
targetPort: 27017- Run deployment and service
kubectl create -f mongo-deployment-and-service.ymlthen run the app's deployment and service files. - Check web browser for Sparta Provisioning Test App/posts page.
Note: To delete all these services and deployments: kubectl delete deploy sparta-app-deployment mongo-deployment | kubectl delete svc sparta-app-svc mongo-service.