
This is a step by step guide to set zsh to be your default shell in windows using WSL.
First of all, you would need to install WSL in your system if you don't have it already, in order to do so, you could follow one of these two tutorials:
- Install WSL through Microsoft Store
- Install WSL without Microsoft Store (If you are going to install it manually, just make sure you install ubuntu 18.04)
Once your WSL is installed, you have to update all of your ubuntu packages running the following command in your ubuntu bash:
sudo apt update && sudo apt upgrade
Once you have followed the previous instructions, you are all ready to go to the next step
- Now you need to install zsh with the following command:
sudo apt-get install zsh - It will ask you if you want to set zsh as default, select yes
- Once it is installed, you have to open your bash_profile:
vim ~/.bashrc- You have to set your zsh as default, so at the top of the file, write
bash -c zsh, leaving the top of the~/.bashrcfile like this:
bash -c zsh
# ~/.bashrc: executed by bash(1) for non-login shells.
# see /usr/share/doc/bash/examples/startup-files (in the package bash-doc)
# for examples

# If not running interactively, don't do anything
case $- in
 \*i\*) ;;
 \*) return;;
esac

...
- You have to set your zsh as default, so at the top of the file, write
You can check all the available plugins for zsh here but I'm going to provide you a few plugins that I use that are really useful, the names of the plugins are self descriptive so there's no need to tell you what each plugin does. Installing plugins it's pretty easy, all you have to do is edit the plugins=() line inside the ~/.zshrc file. The plugins that I use are the following ones.
plugins=(git colored-man-pages colorize cp node npm compleat copyfile django docker pip python vscode zsh-autosuggestions zsh-syntax-highlighting)The last two plugins zsh-autosuggestions zsh-syntax-highlighting need an extra step to install, but belive me, they are extra worth it. In order to install those plugins, run the next commands:
Download zsh-autosuggestions by
git clone https://github.com/zsh-users/zsh-autosuggestions.git $ZSH_CUSTOM/plugins/zsh-autosuggestionsDownload zsh-highlighting by
git clone https://github.com/zsh-users/zsh-syntax-highlighting.git $ZSH_CUSTOM/plugins/zsh-syntax-highlightingReopen your terminal, and now you can use all of the plugins you installed.
In order to install Oh My ZSH you have to run this command.
sh -c "$(curl -fsSL https://raw.githubusercontent.com/robbyrussell/oh-my-zsh/master/tools/install.sh)"Now that oh my zsh is installed, we now have to configure it in order to make it look nice, so we are going to install a theme called PowerLevel9k, so run this command:
git clone https://github.com/bhilburn/powerlevel9k.git ~/.oh-my-zsh/custom/themes/powerlevel9kThen, you have to set this as your theme in your ~/.zshrc file by adding this line
ZSH_THEME="powerlevel9k/powerlevel9k"Now in order to see your changes that you have made, you have to run this command.
source ~/.zshrcBefore you install fluent terminal, I recommend you that you first install the powerlie fonts in windows, those are fonts that will allow you to make your terminal look even better using some really nice icons, so follow the next instructions in order to install the powerline fonts.
- Go to the Powerline Fonts Github page.
- Click on the green “Clone or download” button.
- Click “Download ZIP”
- Save the file
fonts-master.zipto your Downloads folder or wherever you want to put it. - Extract fonts-master.zip.
- Go into the
fonts-masterfolder and the otherfonts-masterfolder inside that. Rather than opening each folder and trying to install each font file ending with.ttfor.otfwith the Windows Font Viewer, we will use a PowerShell batch script (.ps1) calledinstall.ps1.But a few things need to be done to make it work. - You need to open PowerShell as an Administrator (
Window Key + Xthen select “Windows PowerShell (Admin)”. Click “Yes” when the User Access Control (UAC) prompt shows up. Because PowerShell started with the Administrator user rather than the regular user (you), PowerShell starts up inC:\WINDOWS\system32instead ofC:\Users\${env:UserName}, you will need to navigate to thefonts-masterfolder in the Downloads folder. You can do this by typingcd ${HOME}\Downloads\fonts-master\fonts-master. - Next we need to tell the Execution Policy to stand down. If you don’t do this, the script won’t be allowed to run. This isn’t the same as what Linux does where the script is given execution privileges. Rather it is the inverse. The Execution Policy is a blanket approach to preventing scripts from executing. We will need to set to Execution Policy to
Bypass, so that we may run this script. If you entered something else, you can reset the execution policy toRestrictedlater. So typeSet-ExecutionPolicy Bypass. You will likely be warned you are changing the Execution Policy, typeyfor Yes then enter. - Now we can run the install.ps1 file! Type
.\install.ps1If you are Installing a newer version, you will likely be prompted for every font that is replaced. (I should look into that.) Otherwise new fonts will be installed. - Just to be sure, reset the Execution Policy back to the Default setting.
Set-ExecutionPolicy Defaultthen typeyfor Yes like before.
Now that you have installed the fonts, you can install Fluent Terminal, you can follow two simple steps that are described here in the Fluent Terminal repository.
- Install Chocolatey
- From an elevated/admin shell, execute
choco install fluent-terminal
Now, you have to set WSL zsh as the default terminal in fluent terminal, you can do that in the fluent terminal's settings

If you have followed all the steps in this guide, you will now have a very nice looking terminal that's actually fully functional, you can follow the next steps if you are interested in things like how to install python, nodejs and docker.
If you want to install nodejs in your WSL, I highly recommend you to use nvm which is used to install and manage different nodejs versions in your environment, so you can follow the next steps to install nodejs. First of all, we need to install some basic build tool for node-gyp - node binaries build tool.
sudo apt-get install build-essentialMost of the times that I tried to install nvm I had a lot of problems until I found out that I had to export an environment variable before installing nvm, so run the following command.
export PATH=/usr/local/sbin:/usr/local/bin:/usr/sbin:/usr/bin:/sbin:/binInstall nvm running this command.
# This command install version 0.35.1, check the NVM reference it there are newer versions.
curl -o- https://raw.githubusercontent.com/nvm-sh/nvm/v0.35.1/install.sh | bash
Restart your terminal after the installation to make sure nvm command works correctly.
Now you can install the latest nodejs version using the following command:
nvm install --ltsPython is actually really easy to install, you just have to run this command and you are all set.
sudo apt install python3 python3-pip ipython3Docker is actually just a bit complicated, but you can get over it quickly if you copy and paste the following commands
- Install packages to allow apt to use a repository over HTTPS
sudo apt-get install apt-transport-https ca-certificates curl software-properties-common- Add Docker’s official GPG key:
curl -fsSL https://download.docker.com/linux/ubuntu/gpg | sudo apt-key add -- Use the following command to set up the stable repository
sudo add-apt-repository "deb [arch=amd64] https://download.docker.com/linux/ubuntu $(lsb_release -cs) stable"- Update the apt package index again
sudo apt-get update- And install Docker Community Edition
sudo apt-get install docker-ce- Now you need to tell Docker client where the Docker host is (the docker installed in your windows), and you can do that by setting an environment variable called
DOCKER_HOST.
echo "export DOCKER_HOST=localhost:2375" >> ~/.zshrc- Now we need to make sure that you expose the daemon on Windows, otherwise it won't work.
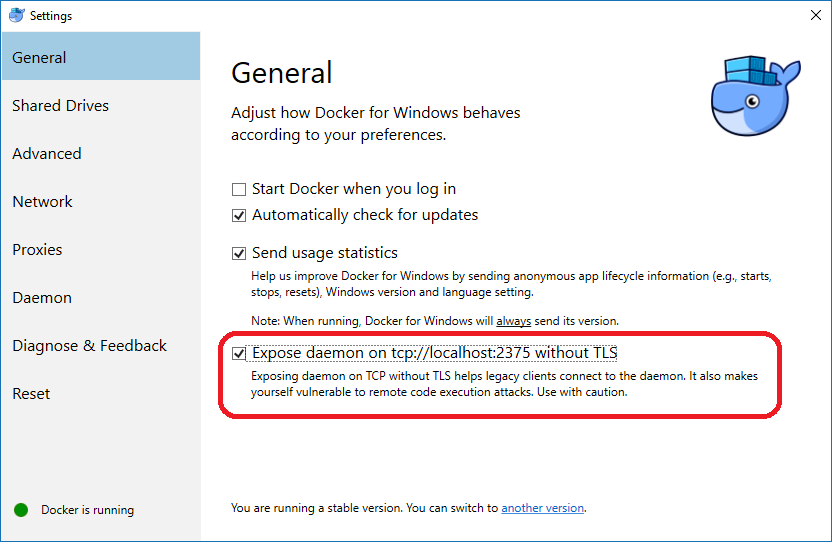
You can now reopen your terminal and docker will be available in your WSL.
I'm sure you will need to use docker-compose so I'm gonna tell you how to install it.
- Download the latest version of Docker Compose, use the command.
sudo curl -L "https://github.com/docker/compose/releases/download/1.24.0/docker-compose-$(uname -s)-$(uname -m)" -o /usr/local/bin/docker-compose- Next, change the file permissions to allow the new software to be executed on Ubuntu.
sudo chmod +x /usr/local/bin/docker-composeAnd that's all, reopen your terminal and now you will also have docker-compose command available in your WSL.
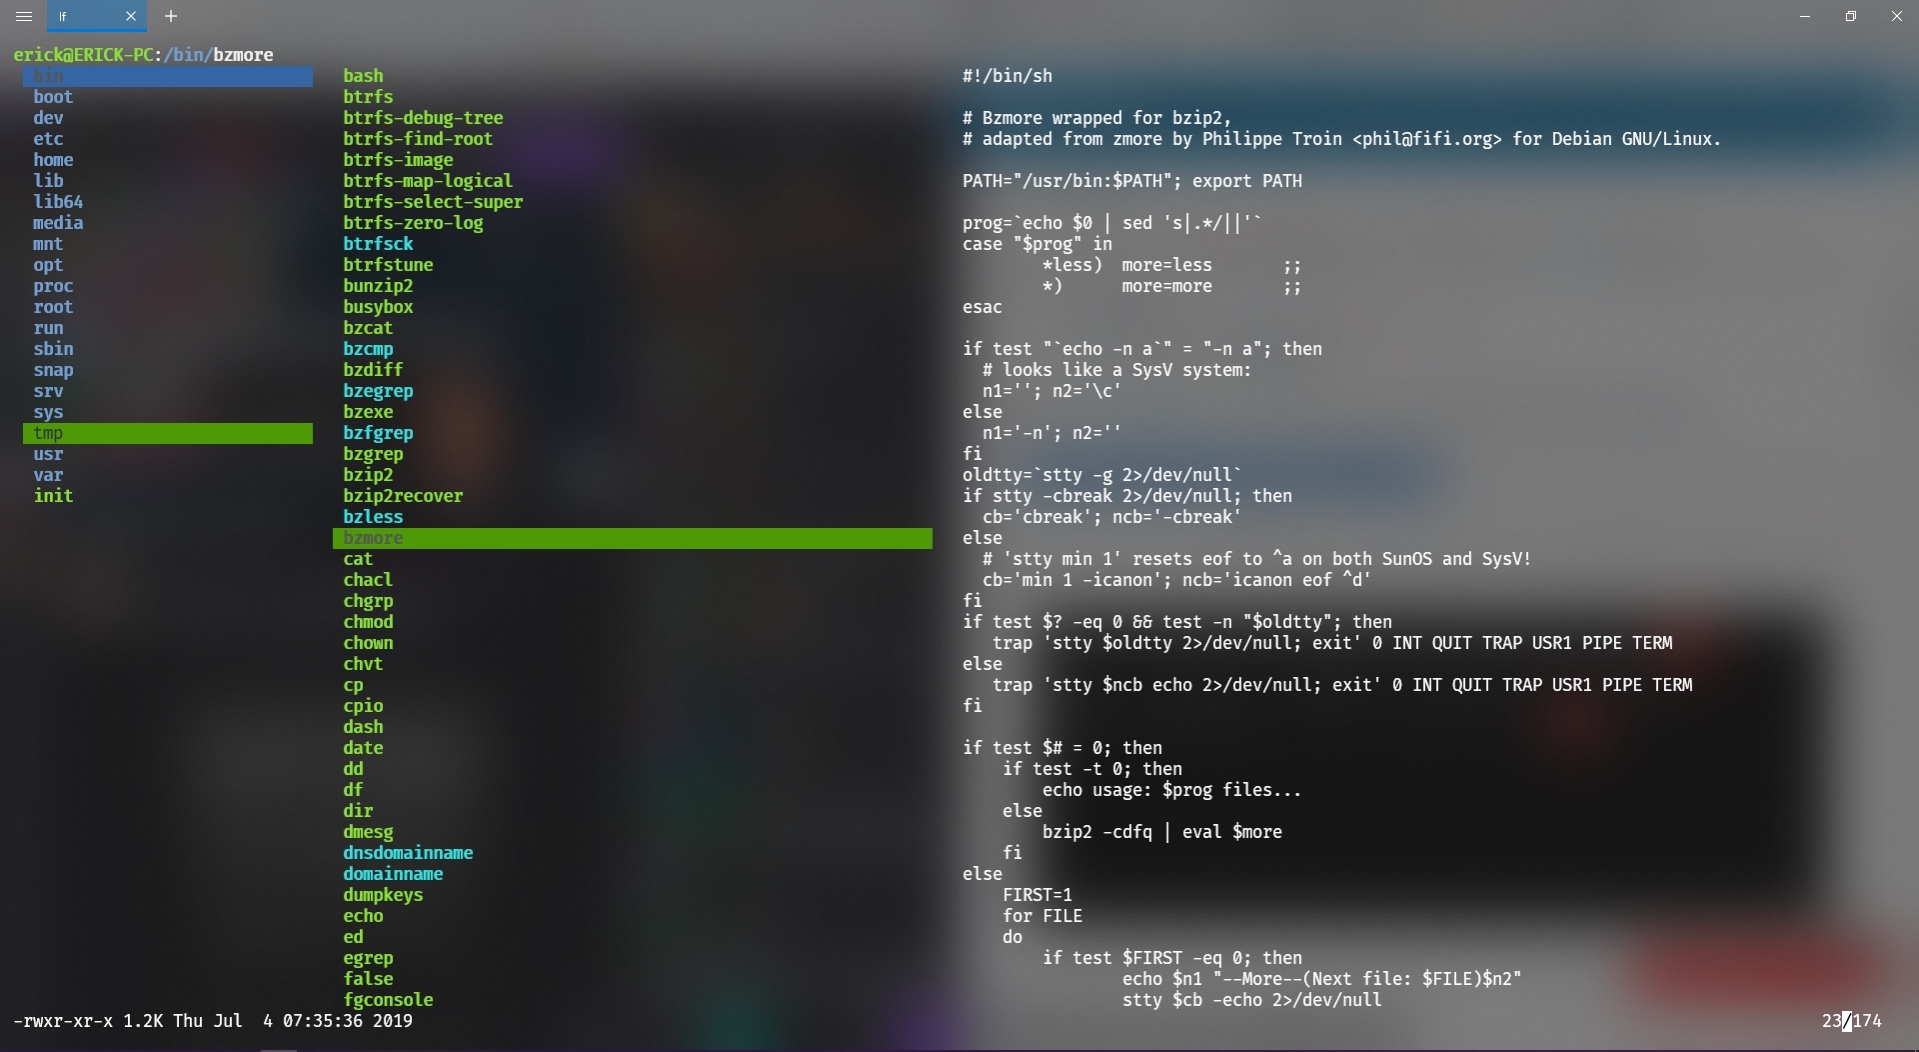
Finally, I'd like to share lf library that's used to navigate through files and folders in an easy way.
Download the version relevant to your operating system, I'll put Linux x64-bit version.
wget https://github.com/gokcehan/lf/releases/download/r6/lf-linux-amd64.tar.gz \
-O lf-linux-amd64.tar.gz
After downloading the package, extract it using tar
tar xvf lf-linux-amd64.tar.gzMake the file executable
chmod +x lfCopy the file to /usr/local/bin directory.
sudo mv lf /usr/local/binReopen your terminal, and now you can use the lf command running lf in your terminal.
I've used the following resources in order to write this guide, you should definetly go and check'em out.