


I always wished to have a pokedex and today my dream comes true!
- Node.js ^16.6.1
- Serveless Framework
- AWS Account
npm install
Or simple:
yarn
Was installed and configured the
eslintandprettierto keep the code clean and patterned.
First review the variables.json file and change it if necesary.
| key | description |
|---|---|
| ProjectName | Project's name that will be created during the deploy. |
| ProjectVersionName | Project version's name that will be created by the setup script. |
| Bucket | Bucket's name used for store pokemons' images,training results and pictures sent to be recognized. |
Then, deploy the API:
$ sls deploy
Now you need to run the setup script (scripts/setup.js):
$ node scripts/setup.js
The script will:
- Upload pokemons images into a S3 Bucket.
- Create datasets for the project created during the deploy.
- Add the images uploaded to S3 Bucket into the datasets.
- Start a model training and configure the project version ARN in the secret created during the deploy.
This script is configured to load only the first 151st pokemons.
After the training finishes, start your model.
Pay attention to the limits of the free tier, remember to always stop your model!
To completly remove the resources follow these steps:
- Run the teardown script:
$ node scripts/teardown.js
- Then remove the stack:
$ sls remove
That is all.
First of all start up the server:
npm run dev:server
Or:
yarn dev:server
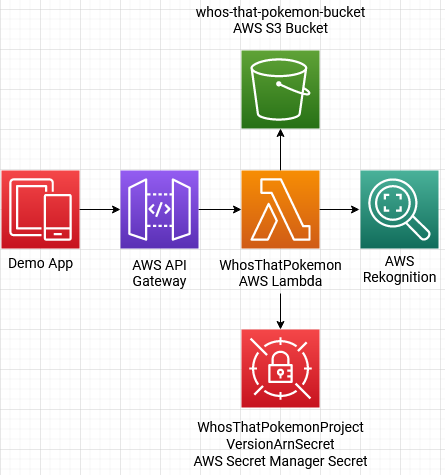
The server has just one endpoint that is responsible to upload the provided image to S3 bucket, send the image to Rekognition's model, delete the image from bucket and finally send the request response with a pokemon name if one was identified or an error message.
After server started up you will be able to see the endpoint's url and HTTP method:
POST | http://localhost:3000/dev/recognize
In the body of the request you must send just one field:
| field | description | example |
|---|---|---|
| data | Image in base64 (You can use some online service to convert images to base64). | data:image/png;base64,iVBORw0KGgoAAAANSUhEUgAAAA8AAAAPCAYAAAA71pVKAAAAAXNSR0IArs4c6QAAAARnQU1BAACxjwv8YQUAAAAJcEhZcwAADsMAAA7DAcdvqGQAAAMNSURBVDhPbZLdb9tUGMafc2I7juN8NlnSpG3I0tCtW9qJwDoWQGKVqAQ3m0CI/4DLSfw5SEjcToOh3YAYH9qQGAg6DYRKgdGvpEndfNhJHTu24w8cc4XEe3F0dPT+nvc8zzkEfuWqRSZbYRbEDGnwcZrr/Db9RPrdGbmep47lE3fW838VwIXVYrz+Lv9hOEZuCCkqMhykqQlD67uStOs8ged93Nlxdg+3W/8RCs2WxSup5NxzzO3sMlOZKC4bnQul2DDJRtOknCjQ67aJTX9/X94XzpY3XmrMFZdov3U0YmawkKA1IUUuUl/K8bVdG1A7FYTZOmz7ANl88Xm2lH2YyPSweGmlPOpI9493/7pFq9eXouI58oGYofy/QgT60AVxqyiu1FFafQeltQYhUbG83ZfK1tQCHxMvFlYqGZqv0WvxPG0w4cA+2AiFNnDAsvO+VcAYj6GcdNE9OcUra+sI+WfUsBaqL643aIh1r1EG8YAMisLWzyOaSsOVR7j6VIL4RxuV5fPIppN4tP0EF7qmIJ4M36bWxHVNzfZMzYGmEvz4OIlp6AXE/EZON3GBS2DtcQthjkMslcDm66+BHnYhiGKdDlv4xnXdbvMXC38/rWJfWUAqPw+W5zFhQ/ii/QytQhQhSsGwLOIxEa3NVQzmIk5g9PLW+hvrW2/eKdU2korU8+EsHNuB2pdhGUYAMWHWfwUHU8NC96C529tvvk9nsJirLR/K01j7oAljpELXNMzS0pQhLH0CU9f9EEc468kglCAcieztfPv9DwGcns+9Kp+pIYZjYVgmPv38AVRZASEEQjIOToiAFXjEMimkCjlorl0rXbm0FMAsoZObb23hXCEP4k+MRnjwggBT0zE5G2MsD83B0fFPak/WFP82bXkQL9fXFgO4f9z5urd3NBk1O95U1YwbG1dBCbUtTZeIYcnTTv+jX798+N5YGX4V84N8+XKNCrbHBX9bTGf3OEV7Rofj73qHrc8ijifSwWhnvH98O246d6K2d+/BvbtthhV+5lyc0lPlrvTn3qN/AFGAVGhg7mYvAAAAAElFTkSuQmCC |
The base64 initial part (
data:image/png;base64) is crucial to identify the image type, be sure to always send it too!
The project comes with a demo, at the project root there is a demo folder. Read the next sections to know how to configure and use.
In the demo/web folder there is a web page (index.html) where a random pokemon is selected and shown to you to guess who is that pokemon. Just open it and start to guess:

The demo/app folder contains a expo mobile app that you can run in a emulator or in your device through USB.
Before emulate or build the app you need to configure the url of the recognition endpoint to the app too. Make the same process in the env section previously, but this time inside the demo/app. Rename the .env.example to .env and chage the values. I strongly recommend to use your machine IP as the host of the url:
RECOGNITION_URL="http://184.148.178.90:3000/dev/recognize"
Sometimes the firewall can block Expo or the requests comming from the app to the server, pay attention to it!
As you can imagine the app will just send the photo in base64 to the server recognize the pokemon to you!
After install and configure the app, open it and take a picture of the greyed out pokemon in the web page, press the button at right to send the photo to analysis, then after some seconds the app will tell you what pokemon is that! (if one was identified)

Jest was the choice to test the app, to run:
$ yarn test
Or:
$ npm run test
Run the command in the root folder
You can see the coverage report inside tests/coverage. They are automatically created after the tests run.